Are you planning a renovation? We recommend starting the repair by insulating the balcony yourself. We will tell you what is needed in order to carry out repair work on the balcony, namely, do-it-yourself screed.
Preparation for pouring
Many people ask the same question, how to do the work regarding the floor screed on the balcony. Based on the large number of questions, we decided to answer all questions in this article.
So that at the end of the work process the work does not completely disappoint, you should carefully choose a high-quality material for floor screed. Construction stores can offer a wide range of different good quality materials, so installing screeds and insulating a balcony with your own hands will not be difficult.
In order to begin construction work, it is worth remembering that there are several solutions regarding floor screed. But, first of all, you should prepare the work surface so that the floor screed is at a high level. It's about cleaning.
Cement strainer
It is necessary to carefully remove all irregularities and remove all debris. Prime the surface thoroughly. This is necessary so that the cement mortar adheres well.
The next stage of screeding the floor with your own hands is the installation of special beacons. These beacons are different in size. Having purchased them, you need to take into account the size of your balcony. After which they should be installed using self-tapping screws or cement.
First you need to go through the building level and determine where the highest or lowest level is. After measurements have been taken, beacons should be installed. While installing, you need to monitor the level. This is to keep everything smooth.
To screed the floor you will need a cement solution. This solution must be diluted strictly according to the instructions indicated on the cement packaging. After this, pour the cement solution between the beacons and, using a special tool, smooth it out with careful movements.
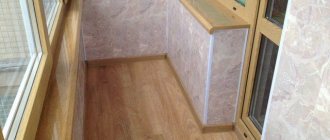
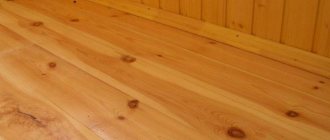
What will happen in the end, look at the photo. This should not be done hastily; the work should be done carefully and slowly. Give it time for everything to set. You will end up with a smooth surface. If cracks appear, then somewhere you made a mistake. The video shows how to do everything correctly.
Preparation of the grounds
The base for the screed must be strong, clean, free from oil and dust.
If there are old coatings, we remove all layers to the base, remove construction debris and inspect the surface of the reinforced concrete slab.
Figure 2. Dismantling balcony coverings
If there are cracks, we carefully repair them and clean them of destroyed concrete.
We clean the damaged areas of the concrete slab to form durable layers. If there is exposed fittings, we clean it of rust and dust. Rust can be removed with phosphoric or hydrochloric acid, or with a stiff wire brush.
We clean the cleaned areas from dust, treat them with a primer and seal them with ready-made repair compounds for concrete or cement mortar.
Figure 3. Repair of a concrete slab.
We coat the repaired concrete slab twice with a deep penetration primer. After the first layer has dried, apply a second layer of impregnation. It is better to choose primer compositions with antiseptic additives to prevent the formation and development of mold, mildew and other microorganisms.
Dry pouring of the floor
There is also dry pouring of floors. This is the fastest and most effective way to level floors compared to cement mortar. The surface itself will also be smooth when compared with cement pouring. Dry pouring is perfect for all surfaces (tiles, boards, linoleum). It turns out that dry pouring is considered an inexpensive option for insulating floors.
Now let's take a closer look at all existing types of floor insulation.
We insulate the floor with expanded clay
In order to insulate the floor, you can use expanded clay. An excellent material that is suitable for insulation and thermal insulation for all rooms and apartments in particular. According to its characteristics, the material is light and durable, holds heat well.
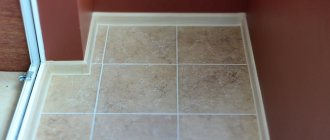
In order to install this material, it is necessary to purchase metal profiles. First, we install the profiles exactly. The profiles must be attached to the floor with self-tapping screws, after which expanded clay is poured. A cement solution is applied on top of the expanded clay. This is how the screed is made. You can see the result in the photo. After completion of the work, a completely new floor appears, where you can lay out tiles, linoleum, etc.
Insulation with mineral wool
The floor can also be insulated with mineral wool. This material is also considered one of the best in thermal insulation work. In order to make insulation with your own hands, you don’t need a lot of work.
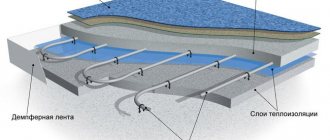
To begin with, a waterproofing material is installed on the concrete floor, which prevents moisture and dampness. Then you need to install logs from wooden boards along the floor. Install so that there is a small distance between them. This is necessary so that the material does not create gaps between each other and the cold does not pass through.
The main task afterwards is to stretch and secure the vapor barrier. This will protect the mineral wool from moisture. At the last stage, plywood is stuffed onto the joists.
Balcony waterproofing
Unprotected concrete can absorb moisture, resulting in reduced strength. When water gets into the pores of concrete, it increases in volume and destroys the structure of concrete. High humidity promotes the formation of mold and the development of microorganisms.
Waterproofing preserves concrete from destruction, protects the reinforcement in the concrete body from corrosion and increases the service life of the structure.
There are several ways to insulate concrete:
- Coating. Hot bitumen mastic or special polymer emulsions are applied to the dry primed surface of the slab.
- The lining is made using roll materials: roofing felt, waterproofing material, glass insulating material and other materials based on cardboard or fiberglass impregnated with bitumen.
- Polyethylene insulation is the simplest and cheapest insulation made from polyethylene film, at least 100 microns thick.
We begin insulating the balcony after the primer layer has dried, but not earlier than 8 hours after its application.
If the balcony is not glazed, it is better to use high-quality glazed waterproofing. We apply bitumen mastic as the first layer on the reinforced concrete coating. Then we apply the weld-on roll material.
We place the bitumen primer and roofing felt on the wall, as if creating a trough.
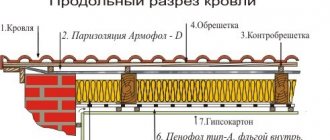
Figure 4. Construction of fused insulation.
Insulation with plastic film is a simpler and more cost-effective method. It is better to lay the film as a whole sheet. Individual strips need to be glued together with tape.
Figure 5. Insulation with polyethylene film.
Important . Place all waterproofing materials on the walls 5-10 centimeters higher than the thickness of the future screed.
After completing the waterproofing work, we lay a strip of foamed polyethylene or a special damper tape around the perimeter of the wall to compensate for deformations of the screed and isolate it from the wall.
Figure 6. Damper tape design.
Insulation of floors using polystyrene foam
This method has several options. The first option is similar to insulation using mineral wool. The installation of logs is also carried out, but in this case it is necessary to install bars.
If cracks form, it's not too scary. You can remove them using polyurethane foam. If you insulate the floor, then it is worth applying several layers of polystyrene foam. It is best to install polystyrene foam in a checkerboard pattern, and peculiar gaps are best disposed of using liquid nails.
As for the second option, here you don’t have to use wooden elements. You just need to level the floor with a screed, after which the insulating layer is laid out in stages.
Roofing felt is laid out, you can lay out polystyrene foam in a checkerboard pattern in several layers, then lay out plastic film. The final stage of this process is to lay down another layer of cement mortar.
Assembling the sheathing
First, we fasten the beam under the window sill, leaving a gap of 1-1.5 cm at the top. We cut the beam 1.5-2 cm shorter than the length of the parapet, place the beam against the wall and drill holes with a diameter of 8 mm with a hammer drill for dowel nails in increments of 50-70 cm.
We fasten the lower beam in the same way, retreating from the floor by 1-2 cm.
After we have secured the upper and lower beams, we proceed to fastening the cross beams using the same method. The distance between the transverse bars should be 60 cm. If the balcony is often exposed to wind loads, reduce the step of fastening the transverse bars to 40 cm.
Every 2.5 meters, two beams are attached in a row (see the picture below!) This is done so that we can then attach a sheet of drywall to them!
After all the cross bars are secured, we move on to the side walls of the balcony. How to understand which walls to insulate and which not? Everything is very simple, if the wall is load-bearing, it does not need to be insulated. But to achieve an ideal result, you will have to insulate both side walls, the ceiling and the floor. The wall adjacent to the room is usually not insulated. That's what we'll do!
We insulate with penoplex
You can insulate the floor with your own hands using penoplex. This material appeared on the market not so long ago and has gained credibility among buyers.
Laying should be done on a previously clean floor. Next, self-tapping screws, which consist of polymer, are attached. When laying this material there are no gaps or cracks. The cracks are removed with polyurethane foam. You can see this in the photo.
Types of screeds
The final floor covering is laid on the poured screed. There are three filling methods:
- Wet
The solution is prepared from cement with sand or crushed stone, and then poured onto the prepared surface of the balcony slab. The drying process lasts about a month. To crystallize the solution, the surface is regularly moistened with water.
- Dry
The balcony slab is covered with a layer of expanded clay or other bulk material. Special materials are laid on top. This screed is quickly installed, but has the disadvantage of low resistance to moisture. This limits its use for unglazed balconies.
- Self-leveling
There are special mixtures diluted with water. Leveling the surface of the slab occurs due to the spreading of the liquid composition of the mixture. Such a mass has a limited action time, so installation is carried out at an accelerated pace. The mixture cannot be laid on a frozen balcony slab. After a week, you can apply the topcoat.
Self-leveling compounds are available in several types:
- cement mixtures with the addition of plasticizers. The composition is intended for rough finishing when there is a large difference in heights or there are large defects on the slab;
- mixtures with gypsum create the base before finishing installation. They are characterized by low resistance to moisture, so they are not recommended for use on unglazed balconies.
- finishing mixtures. A transparent or colored floor covering is created. These are epoxy and polyurethane compounds. Self-leveling 3D coatings are especially attractive.
The balcony slab does not withstand every screed. Due to its weight, wet, dry and self-leveling screed is suitable for the first floor balcony. Dry and self-leveling screeds do not have significant weight, so they are suitable for balconies on any floor.