More and more apartment owners are trying to turn even a small balcony into an additional useful space. Various materials are used for insulation, but many people have a question: is it possible to insulate the floor on a balcony with penoplex?
It is clear that achieving the plan, so that the functionality of the balcony minimally depends on the time of year and established weather, so that the room becomes “all-season”, is possible only with full insulation. Let's say right away that it is completely pointless to insulate only the balcony floor - in order to realize your plans, you will have to carry out a whole range of work.
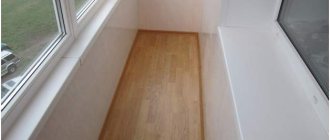
Insulation of the floor on the balcony with penoplex
Proper insulation of the balcony. Step-by-step instruction
In reality, everything looks much more complicated. One of the main tasks is proper insulation of the balcony. Without this, it is impossible to expand the living space by getting a full-fledged recreation area, a small dining room or a sports corner.
A little theory
According to the laws of physics, any insulation must be installed on the street side. The moisture generated inside the balcony, freely penetrating through the walls of the balcony, collides with a cold front coming from the outside of the balcony, creating condensation on the outside of the wall.
When installing insulation inside the balcony, moisture meets cold air already on the inside of the balcony wall. A wall built from porous brick is not a barrier to the cold. The dew point is formed in the area where the insulation adheres to the balcony wall. The resulting condensation leads to wetting of the finishing material and the appearance of mold and mildew.
In practice, it is almost impossible to install insulation from the outside. Everyone installs it from the inside, using proven technologies that have stood the test of time with positive results.
Video description
Watch this video to see how to mix the solution yourself:
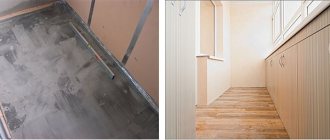
It is also important to remember about the beacons - without them you cannot start the pouring process. Otherwise the surface will be uneven. The filling technique itself involves working from the far corner (here we will work with a level). After leveling the previous layer and before pouring the next one, a reinforcing mesh is placed.
It is important! Before carrying out work, you should consider the further use of the room, since the thickness of the screed depends on this. Thin slabs are suitable for an ordinary living room. For heavy structures, it is better to give preference to dense sheets.
To prevent cracks from appearing in the frozen surface, you need to water it with water for three days. Drying takes several days. Only after all these procedures is the facial finishing performed.
Self-leveling mixtures
To understand what thickness of penoplex to choose for insulating a floor with a screed made from a self-leveling mixture, it is necessary to take into account the type of room. The greater the load on the floor, the thicker the slab should be.
In this case, it is important to take into account the thickness of the layer of the mixture itself under the screed - in this case it is no more than 2 cm Source remstroidomufa.ru
3 advantages of self-leveling mixture:
- does not require manual alignment;
- distributed with a needle roller;
- dries faster than cement.
On a note! The leveling of such a surface is carried out under the influence of gravity. The kneading process itself is described on the packaging of the material. This base polymerizes in just a few hours.
The importance of leveling the underlying base should be kept in mind. If any defects remain, there will be a difference in height, and, as a result, an uneven screed.
Attention ! Waterproofing must be installed as close to the finished floor as possible. Some people put it under penoplex - this is a mistake. If water penetrates into the floor, it will not be possible to dry it. The surface will remain wet for a long time, since the slabs have a water-repellent effect.
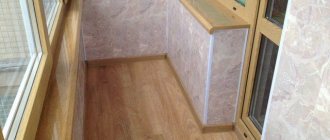
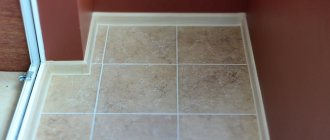
The finishing itself can be anything - from ceramic tiles to wooden parquet. If the technology has been followed, the result will be excellent.
Which penoplex to choose
Penoplex slabs are produced in different thicknesses, densities and thermal conductivities. Each type of material has its own marking and is used for its intended purpose. The softest type of penoplex brand 31C. It is designed to insulate surfaces that will not be subject to strong mechanical stress. It is recommended to be used for installation on ceilings and walls.
It is better to put penoplex grade 35 on the floor, since it is endowed with increased density and does not deform under the weight of furniture; you can walk on it freely without leaving dents. You can pour a cement screed on it or install a “warm floor” system.
The thickness of the slabs varies from 20 to 100 mm. The 20 mm thick material has smooth edges, while thicker sheets are available with protrusions on the edges. Through these protrusions, the sheets are tightly connected to each other, so that cold bridges do not form. This connection system eliminates the need for additional sealing of seams and does not require gluing of joints.
Penoplex sheets 50 mm thick are suitable for insulating walls and ceilings. It makes no sense to buy thicker material, since it will “steal” the useful area of the balcony, while the efficiency of insulation will not increase much. On the floor, the thickness of the sheets is selected based on how many centimeters it can be raised. In any case, it is necessary to carry out calculations so that, taking into account the screed and flooring, the floor height does not rise above the threshold.
Sequence of insulating a loggia using PENOPLEX COMFORT®
- Window units are being installed. The optimal means of sealing seams is PENOPLEX®FASTFIX® polyurethane foam.
- PENOPLEX COMFORT® boards are attached with polyurethane adhesive PENOPLEX®FASTFIX®, which is also used to process joints between structures./p>
- The vapor barrier is attached - foil-coated polyethylene film - using double-sided tape. The vapor barrier is installed end-to-end, and the joint between the panels and the structures is glued with metal tape. /p>
- We install the balcony floor./p>
In the photo - insulation of the loggia with PENOPLEX ® in the apartment of actress Marina Dyuzheva
How to insulate a balcony floor with penoplex
Methods of insulation largely depend on what finishing coating is chosen. The procedure is carried out using two technologies: the slabs are laid along the joists and under the screed. However, it is precisely because of the chosen finishing coating that each technology has its own nuances.
Insulation of the floor with penoplex on the loggia along the logs
The method is considered the most difficult and costly. It is most often used if the floor needs to be raised high. The logs allow you to do this with a minimum load on the balcony slab. If you lift with a thick concrete screed, the structure may not withstand heavy weight.
With the help of logs you can raise the floor high without creating a large load on the balcony slab
The process consists of the following steps:
- The concrete slab is covered with waterproofing. The choice of material is at the discretion of the owner. A film, roofing felt, a special membrane or bitumen mastic will be suitable. The edges of the waterproofing should extend onto the walls.
- Using a laser and water level, markings are made. The level of laying the logs is calculated so that the finishing floor covering of the balcony does not protrude above the threshold and floor of the adjacent room.
- For the logs, dry, even pine beams with a side size of 50x50 mm are used. The elements are laid in increments of 30-40 cm. The outermost logs are laid from the walls with a distance of 10 cm. A gap of 3 cm is left between the ends of each beam and the walls. Each log is anchored to the balcony slab.
- Penoplex slabs are cut to the required size and inserted inside the cells between the joists so that they fit tightly. The gaps are filled with foam.
- After laying all the slabs, they are covered with a vapor barrier film or foil insulation made of foamed polyethylene.
The insulation process is complete. All that remains is to lay a subfloor made of boards or particle boards on the joists and lay the finishing coating. You can simply paint the boards.
Insulation of the floor on the balcony with penoplex without logs
The simplest way to thermally insulate a balcony floor is to glue penoplex to a concrete slab without using joists. Surface preparation requires thorough cleaning of dust. The base is treated with deep penetration soil. A membrane or mastic is used as waterproofing.
When laying without joists, the thermal insulation is glued to the balcony slab
The slabs are cut to the required size. In a bucket, glue is mixed with a drill with an attachment. Any will do, for example, Ceresit CT-83. The finished glue is applied with a notched trowel to the concrete base and a thin layer on the slab itself. Penoplex is pressed tightly to the floor, pressed down with a heavy load.
When all the elements are glued, the joints are covered with foam. The weights are removed after the glue has completely hardened. A floor made of plywood, particle boards is laid directly on top of the thermal insulation, or a concrete screed is poured.
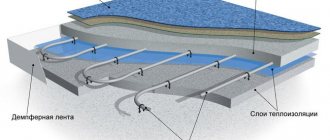
Insulation of the floor on the balcony with penoplex under the screed
Filling the screed over the thermal insulation is most often carried out when installing a “warm floor” system on the balcony. Initially, the technology requires the implementation of similar actions taken for the method without lag. When the penoplex is glued, the joints are foamed, begin laying the heating circuit.
For strength, the screed must be reinforced with mesh.
First, the entire floor area is covered with a vapor barrier. Place the foil heat reflector with the mirror surface facing up. The contour of the “warm floor” system is distributed over the floor. The first layer of screed 2-5 cm thick is poured with concrete mortar. After the mortar has set, a reinforcing mesh is laid and beacons are placed. The final layer of floor screed on the balcony is poured onto polystyrene foam with a thickness of 4 cm. It is ideally leveled along the beacons, since the finishing coating will already be laid on this surface.
Important! If it is not planned to lay the heating circuit of the “warm floor” system on the balcony, the total thickness of the screed is reduced, but not less than 4 cm
Insulation of the floor on the balcony with penoplex under the laminate
A special feature of laminate flooring is the need to lay it on a hard surface. Despite the elasticity of penoplex, it still remains a soft material. Laminate flooring cannot be laid directly over thermal insulation. A point squeeze effect will occur. That is, dents will remain at the load points.
A rigid base is installed on top of the penoplex under the laminate.
To organize a rigid condition, insulation is done using the technologies discussed above: under screed or joists. You can simply glue penoplex without lag. Plywood or particle boards are laid on top. Such a rigid base is sufficient for laying laminate flooring.
Characteristics and properties of the material
To make penoplex, polystyrene foam is used, which is subjected to heat and passed under pressure through an extrusion plant. As a result, a completely light, but quite dense insulation is formed.
A special feature of extruded polystyrene foam is its porous structure. The material consists of many closed and air-filled cells no larger than 0.2 millimeters in size. This characteristic provides penoplex with sufficiently high strength and high thermal insulation qualities.
Due to its high technical performance, extruded polystyrene foam is very popular for insulating walls, floors, ceilings, as well as for protecting the foundation. Cellular material has a number of positive properties:
- Low thermal conductivity coefficient - from 0.028 to 0.03 Watt/mC°. Such a low indicator indicates the high thermal insulation qualities of the material.
- Minimum level of water permeability. Penoplex is capable of absorbing only 0.4 percent of moisture by volume in 30 days. In this case, water enters only into open pores, and closed cells remain completely dry. This ability allows it to be used for insulating rooms with high humidity.
- Quite high strength. The material is resistant to compression. During installation, it does not crumble, and under the influence of heavy loads it retains its original dimensions.
- Environmental Safety. High-quality extruded insulation does not contain toxic substances and is completely safe for the environment.
Penoplex has high wear resistance. Its service life is at least 50 years. The material is easy to process, and you can do it yourself without much effort. Moreover, such insulation can be used both outside and inside the building. It does not change its characteristics at all when the temperature changes from -50 to 75 degrees.
What does penoplex look like?
When using penoplex for thermal insulation, one should take into account its instability to direct sunlight. Therefore, it is recommended not to leave the material without lining.
Preparation for insulation with penoplex
A balcony can play the role of an additional room, but this is impossible without good insulation. Insulation work can be entrusted to specialists, or you can do it yourself.
If you take on the task yourself, you need to try to avoid common mistakes.
It is not enough to simply install double-glazed windows, seal them with foam and turn on the heater.
Before you begin, prepare a certain set of tools:
- hammer drill with drill;
- drill with attachment;
- hammer;
- electric jigsaw;
- building level;
- pencil and tape measure;
- special foam gun;
- step ladder;
- construction knife;
- drill with attachment.
Before starting work, you must clear the entire balcony of foreign objects. There are several successive stages of insulation:
- Installation of double-glazed windows;
- Treatment of cracks.
- Selection of insulation.
- Balcony insulation.
- Finishing and decoration.
- Installation of an additional heat source.
Before installation, you need to remove the glass unit from the frame.
When treating cracks, foam must be applied evenly to all cracks.
Penoplex is suitable for insulating all surfaces.
Insulation of the balcony wall. To install windows that are suitable for a future balcony, you need to understand what the parapet structure is. If it is strong enough, then you can begin installing double-glazed windows immediately. In cases where there is doubt about the strength of the parapet, it is necessary to strengthen it. For this, an additional parapet is used.
Read about how to strengthen the parapet here.
Once the window frames are installed, the heat problem will not go away. It will escape through numerous gaps and cracks. To seal them, it is necessary to use polyurethane-based sealants and mastics.
Penoplex is one of the most optimal insulation materials. It meets all the criteria that are important for optimizing the microclimate on the balcony - low heat conductivity, lightness, small thickness, complete safety for health, and the ability to use only a knife for cutting.
Characteristics of penoplex thickness:
The insulation process includes several stages of work on the walls of the balcony, its floor and ceiling. The details of each stage are described below.
After the insulation process is completely completed, you can begin cosmetic finishing. The choice of materials depends on the tastes of the apartment owner. Radiator radiators or air conditioning can be used as an additional heat source.
Video:
Return to content
Correct installation of insulation in stages
1. The room should be cleared of unnecessary items before starting the insulation process.
2. The enclosing surfaces are leveled - they should be free of screws and cracks.
3. Using fasteners (dowels), the slabs are fixed (the sheets are cut with a knife if necessary).
A disc-shaped dowel used for mounting sheets on walls (“umbrella” or “mushroom”).
The sheets can also be secured using a special mounting adhesive if the surface is pre-leveled.
The adhesive composition should be applied to the surface in dots (5-7 pieces per 1 sq. m) or in a zigzag. The walls should be coated with a primer for better adhesion.
Avoid using the winter version of foam sealant containing toluene.
5. In order to smooth the joints, you can use tape. The result will be a smooth surface;
6. The high moisture resistance of the material allows for the absence of special vapor barrier. However, if you decide to organize an additional layer, it can be made of polyethylene film covered with foil (penofol). Thus, the balcony room will be protected to the maximum from moisture. The foam layer should be oriented with the foil facing outward.
Polyethylene foam with metal tape operates on the principle of a thermos, additionally insulating the room;
Metallic tape for joining polyethylene foam film.
7. Another way to provide vapor barrier is to cover the surface with special plaster and plasterboard;
After covering the balcony with penoplex, it is necessary to complete the insulation of the floor.
There are three finishing options:
1. Light flooring option. A base is created from timber in two tiers, the elements of the two layers are fixed perpendicular to each other. Insulation is placed in the structure, then the cells are sewn up with sheets of plywood or boards. The resulting coating can serve as the basis for the final layer.
2. Screed made of concrete or sand-cement (thickness 40 mm). The leveled floor is tiled. A prerequisite for installation: creating a 10 mm gap with polyurethane foam around the perimeter of the floor (between the walls and the screed). The weight of the structure is significant; preliminary load calculations are necessary.
3. Installation of heated floors. Installation instructions are included with the specific system.
Installation of heated floors on top of insulation.
Balcony insulation with polystyrene foam.
Floor insulation.
Preparing for floor insulation
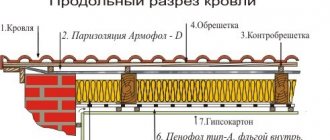
A fundamentally standard floor insulation scheme on a balcony can be depicted as follows:
Scheme of standard balcony insulation
1 – reinforced concrete base.
2 – waterproofing, preventing capillary spread of moisture into the insulation layer.
3 – lags. Often the floor on the balcony is raised to the level of the threshold of the door leading into the room, so the height of the logs can be different. A two-tier arrangement is often used when the upper logs are perpendicular to the lower supporting ones.
4 – a layer of insulating material laid between the joists.
5 – waterproofing layer that does not prevent the free release of moisture from the insulation. Can be used when used as a thermal insulation layer.
6 – sheet material (plywood, OSB) for laying the finishing coating.
If you plan to turn your balcony into a comfortable room, you can additionally use an electric floor heating system. In these conditions, it is most convenient to use infrared film heaters.
In order for the insulation to be of high quality and reliable, you need to do some preparatory work.
Carrying out minor repairs before insulation
Thermal insulation of the floor is carried out simultaneously with the insulation of all surfaces of the balcony, otherwise the work simply loses its meaning.
It’s good if the floor is in excellent condition - the surface is smooth, intact and without defects. If the floor is tiled and it fits well, then it is quite possible to leave it without resorting to dismantling.
However, if the concrete base has cracks, potholes, chips, and there are gaps between the floor and walls, then all defects must be eliminated before starting work.
Preparing the concrete base is necessary to prevent the accumulation of moisture and the occurrence of mold and mildew.
- If there are small protrusions on the surface, they can be carefully chipped off to a general level.
- Cracks need to be cut to a depth of up to 10 mm and widened to fill the repair compound deeper and more densely. This can be done manually or using a grinder with a stone wheel.
- Places to be repaired are thoroughly cleaned of dirt and dust.
- After this, it is necessary to prime the damaged areas with a deep penetration compound.
- After the primer has dried, all cracks and potholes are tightly filled with cement-sand mortar. Wide gaps between the slab and the walls can be filled with sealant or foam.
- After drying, the surface is cleaned to the general floor level.
Waterproofing the floor surface
If the base of the floor is in good condition, and there is a neighbor’s insulated balcony below, then you can do without waterproofing, it will be enough to just carry out priming.
It’s a different matter when the concrete canopy of the balcony below is open to “all winds.” The possibility of moisture penetration through a reinforced concrete structure cannot be ruled out in any way. Well, the dangers of excessive humidity have already been mentioned above, and in addition, some insulation materials (mineral wool, for example) can lose their thermal insulation qualities from saturation with water.
To protect the insulating layer from waterlogging, you need to waterproof it. Simply covering the surface with plastic wrap is not an option. Yes, the insulation will remain dry, but moisture will begin to accumulate in the thin gap between the film and the concrete slab, and sooner or later it will make itself felt. A better approach is needed.
There are several ways to do this:
- Cover the surface with a layer of penetrating waterproofing composition such as Penetron or Hydrotex. These compounds, entering the pores, close microcracks in concrete, blocking the spread of moisture.
- Apply coating waterproofing. The range of such compositions based on bitumen or polymer is quite wide. They are used in accordance with the instructions supplied with them, cold or heated.
- Cover the entire surface with rolled waterproofing, also on a bitumen or polymer base. In this case, it is necessary to achieve a tight fit of the material to the base.
After waterproofing, you can proceed to floor insulation work.
Basic data about penoplex
What is penoplex?
It is necessary to immediately clarify that all the advantages can only be attributed to insulation produced in strict accordance with the requirements of the technology. Unfortunately, there are vapor barrier materials of this type (EPS) on the market that do not meet the characteristics expected of them. Therefore, it is recommended to purchase slabs only from trusted manufacturers - for example, the same Penoplex.
pros
- Almost complete absence of hygroscopicity - the material does not absorb water, and, therefore, its thermal insulation qualities do not decrease with an increase in general humidity or from direct contact with water.
- High strength with low weight.
- Easy to install plates . The material is quite easy to cut, does not crumble or break when laying it on floors or installing it on walls.
- Long service life , which according to the manufacturer is 50 years. And at the same time, one can even believe that with proper installation, Penoplex will last much longer.
- High resistance to heat transfer (low coefficient of thermal conductivity) - according to these parameters, penoplex occupies one of the leading positions in the general list of insulation materials.
Minuses
- Extruded polystyrene foam, just like polystyrene foam, is unstable to some aggressive substances that can destroy its structure. Such compositions include gasoline, acetone and other organic solvents.
- Penoplex should be protected from direct exposure to sunlight, since their ultraviolet component has a destructive effect on it.
- You should not expect miracles from penoplex in terms of obtaining reliable noise protection. A layer of such insulation will certainly provide a certain reduction in external noise background. However, you can also get the opposite effect. Thus, rigid, low-plasticity panels themselves can become a “relay membrane” that transmits sound vibrations further. Even the effect of resonance with increased noise effect cannot be excluded.
- The flammability of the material is an important characteristic that is of interest to the majority of users who decide to use it on their property. Therefore, it makes sense to talk about it in more detail.
Materials are classified according to the degree of flammability into five groups - from “NG” - non-flammable (which is typical for many insulation materials based on mineral wool) to “G4” - flammable and spreading flame (these include the usual white foam).
There are several brands of penoplex for different areas of insulation. Accordingly, the flammability class may differ slightly. So, about some brands it is stated that they are close to “G1” - difficult to ignite, self-extinguishing, and does not spread flame.
However, builders who have been working with this material for a long time argue that in reality it is better to count on “G3” - it will be closer to reality. Such materials ignite much harder, but will burn quite steadily, although still showing a tendency to self-extinguish.
But the main danger is this: when burned, any polystyrene foam emits extremely toxic smoke that can cause irreparable damage to health. Often just a few breaths can lead to death.
Conducting an experiment to test the flammability of insulation (penoplex in both fragments of the photograph - in the center).
To achieve a reduction in the flammability of penoplex, the manufacturer adds special fire retardants to the raw material to promote rapid self-extinguishing. Insulation materials equipped with these additives belong to the flammability class G1 ÷G3.
Expert opinion
Afanasyev E.V.
Chief editor of the pol-exp.com project Engineer.
When using polystyrene foam as insulation within an apartment, it is recommended to take maximum safety measures. In order to prevent open fire from affecting the insulation, it is advisable to securely enclose it with non-combustible materials. Unfortunately, this is not always possible.
The main types of Penoplex boards
Several versions of Penoplex are supplied to construction stores (here we mean branded products, and not a unifying conventional name). Despite the general similarity of the slabs, there is still a division into areas of application.
- “Penoplex Roofing” (the old name is “Penplex-31”) - has the lowest density and strength, but also the lowest thermal conductivity. Flammability group G3, since the roof in fire safety terms is one of the most vulnerable areas of the building.
- “Penoplex Wall (31C)” has similar characteristics, but the flammability group is lower, G4, since it is assumed that the insulation layer will be covered with some kind of mortar or facade panels.
- “Penoplex Comfort (35)” is a universal insulation material designed for insulating walls, floors, and ceilings in a private house or apartment. Flammability group – G3.
penoplex comfort
- "Penoplex Foundation (45C)" - used for external insulation of plinths and foundations. It has high mechanical strength due to its increased density. Fire-fighting qualities are not so important (it is covered with soil), so the flammability group is G4.
- "Penoplex Geo (45)" - may, of course, be suitable for thermal insulation of the foundation of a private house or cottage, but in general it is intended for industrial and road construction. So purchasing such slabs for an apartment is completely unjustified. Moreover, the flammability group is only G4.
Dimensional parameters of "Penoplex"
The sizes of the slabs are standardized. Slabs with a width of 600 mm usually have a length of 1200 mm, and only “45” and “45C” are produced with a length of 2400 mm. But we are not interested in them at the moment.
But the thickness should be of particular interest - it is this parameter that, together with the thermal conductivity coefficient, will determine the effectiveness of thermal insulation. It can vary in the range from 20 to 150 mm (different models may have their own range of thicknesses). Most slabs are equipped with interlocking lamellas (oppositely directed protrusions along the edges), which makes it possible to create an almost monolithic insulating layer when installing the structure.
Penoplex sheets with clearly visible locking lamellas.
What thickness should I use?
To insulate a loggia or balcony, in practice, slabs with a thickness of 20 to 50 mm are most often used, but if the house is located in a region with harsh winters, then you can choose a more significant material thickness. True, we also have to take into account the fact that the area of an already cramped balcony or loggia will noticeably decrease (if we are talking about thermal insulation of walls), or the ceiling will become lower (if we are talking about insulating the floor and/or ceiling).
The diagram shows what thickness of other materials “Penoplex” with a thickness of 20 mm corresponds to in terms of thermal conductivity
When choosing the thickness, it is important to take into account the exact effect of insulating the balcony that is planned to be obtained:
- Insulation is created for the most comfortable access to an unheated balcony, for the purpose of, say, hanging laundry or for other household needs. For this, as a rule, a small thickness of thermal insulation is selected, about 20÷30 mm.
- The balcony or loggia should become a full-fledged room with heating (for example, with a floor heating system), and will be used along with other rooms. In this case, you should purchase penoplex with a thickness of at least 50 mm.
The thickness of the material also depends on what is located “on that side” of the insulated structure. There may, so to speak, be nothing there, that is, just a street or an open balcony (loggia), which, in principle, is equivalent. Another option is a closed but unheated room. And the optimal case is that there is a heated room (loggia, balcony) behind the wall or ceiling.
So what thickness is considered optimal? Refer this question to the online calculator below. If you have any questions, below it will be given several explanations on how to use the program.
Calculator for calculating the thickness of insulation on a balcony or loggia
Go to calculations
Explanations for using the calculator
First of all, let’s say that the calculator is universal, that is, it allows you to calculate the thickness of insulation not only of the floor, but also of other surfaces of the balcony, using not only penoplex, but also other thermal insulation materials. There are no restrictions on the region of residence in Russia. And various options for “neighborhood” are presented - as discussed above. There are other interesting nuances. Let's talk about everything in order.
- First of all, you need to indicate the selected insulation material - penoplex is also presented in this list. Thermal conductivity coefficients of insulation are already included in the calculation program.
- Secondly, it is selected for which of the balcony structures the calculation is carried out. Possible options:
a) walls or parapet;
b) floor or ceiling.
- Next, you will need to find your region of residence on the proposed schematic map in order to find the values of the normalized heat transfer resistance (m²×℃/W).
Diagram map for determining the value of the normalized thermal resistance of building structures for your region.
Important: these values are shown in different colors for different building structures. But already in the calculator request field itself there is a “color hint”: the values indicated in purple numbers are FOR WALLS, and in blue numbers FOR FLOORS.
The found value is indicated by a slider in this field.
- The next paragraph suggests choosing one of the options for the proximity of the insulated balcony structure - depending on this, the necessary adjustments to the calculation results will be made.
- It is necessary to indicate the material of manufacture of the insulated structure (walls, ceilings) and its thickness. For example, for the floor, the thickness of the reinforced concrete balcony floor slab is most often indicated. For walls there are many more options. And for parapets, there may be no thickness at all, say, if the balcony fencing is still just a welded steel lattice. With this option, the thickness is shown equal to zero.
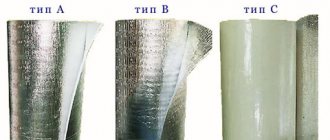
- The insulation of a balcony is often enhanced by installing an additional layer of thermal insulation. For this, thin-layer (up to 10 mm) rolled material made of foamed polyethylene with a foil surface is used. For example, "Penofol".
penofol
This measure gives a very noticeable effect, especially since the effect of heat reflection toward the room is “turned on,” which reduces heat loss. Consolidated, this makes it possible to quite significantly reduce the thickness of the main insulation, which, as we remember, is especially important for saving precious space in an already traditionally cramped balcony room.
So if the item “- using penofol” is selected, an additional field will appear in which you must indicate the thickness of this additional insulation - from 3 to 10 mm.
- In principle, the basic data is indicated. But the most pedantic user is given the opportunity to calculate also taking into account other technological or finishing layers of the structure. Of course, you can’t expect too much of a difference in the final result - but still...
If this option is selected, four more fields will open - for two additional layers (thickness and material of manufacture for each). If there is no layer, then its zero thickness is indicated.
- Pressing the calculation button will immediately display the finished result. It is indicated in millimeters. And it remains to be brought to the nearest (increasingly) standard thickness of the selected insulation.
By the way, to gain the required thickness, two-layer insulation is often used. For example, the calculator showed that a layer of foam foam of 72 mm is required. You can use foam boards 80 mm thick. But it’s even better to lay out the first layer at 50 mm, the second at 30 mm, and the second is laid perpendicular to the first, so that the seams do not coincide. That is, this approach to installation effectively covers the remaining “cold bridges”.
All that remains is to purchase the required amount of material (penoplex) of the required thickness - and you can proceed to insulation work.
Option #2 - installation of film heated floors
To get around the problem of laying concrete screed, you need to choose an alternative installation option. Such an alternative is provided by infrared film floor systems, which do not accumulate heat, but only warm up the laid floor covering. In this case, laminate or linoleum is used as the finishing floor. When choosing a laminate, do not forget about laying the substrate. Installation of an infrared floor heating system requires high-quality hydro- and vapor barrier.
The floor is lined with penoplex, on top of which there is a special thermal film that emits infrared heat. Under its influence, both the floor covering and pieces of furniture heat up. Therefore, this system is not installed under furniture. Installation of a film system is much easier and faster than a cable system.
Film heated floor on the loggia under the finishing coating
Advantages of these heating systems:
- implementation of widespread heating of the floor surface;
- the invisibility of heating devices improves the overall appearance of the interior of the room;
- low cost of installation work;
- heating large areas at low energy costs;
- balcony windows do not freeze;
- the room is protected from dampness and the negative consequences it can cause.
The classic composition of an infrared heated floor kit: thermal film; contact terminals; connecting wires; insulation kit
The instructions included in the package make it easier to carry out proper installation. When choosing a suitable set of film heated floors, the total area of the heated floor is taken into account. It is also necessary to calculate the system power at the rate of 200 W per square meter of area.
In addition to the kit, a thermostat is purchased separately, the power of which should exceed the power of the future heated floor system by 15-20%. Heat-reflecting material, which has a lavsan or polypropylene film, is also purchased for the entire area of the balcony. To enhance waterproofing, you can purchase regular polyethylene film.
Infrared heating film is used not only for heating floors. You can install thermal film on ceilings and walls. This allows for additional comfort in any weather. Even severe frosts will not disturb the ideal microclimate.
You see, anyone can make a warm floor on a loggia or balcony. There are plenty of materials on the market for installation of the selected system. There is a choice between manufacturers' offers, and, of course, you should not skimp on quality. Preference should be given to well-known brands. If you feel that you cannot cope with the installation, then involve specialists who install heated floors at a professional level.
Preparation and planning
At the first stage of work, it is necessary to prepare in advance the necessary materials and tools:
- perforator;
- long and short drills;
- welding machine;
- electrodes;
- a corner with a length equal to the perimeter of the balcony;
- cement (2 kg).
You should start by inspecting the balcony that is to be insulated. It is necessary to remove all things and objects stored there and clean it down to the ground in order to assess the extent of the damage it has. However, in some situations, the consequences of prolonged use of the loggia are such that there is a need to repair the slab. This is where many owners make mistakes. They try to carry out repairs with little effort and approach the task of repairing the stove lightly. As a result, the repair is of poor quality. They understand this when the insulation work is completed. Everything has to be redone, and this leads to additional costs of time and money. Regardless of the scale of the repair, it is impossible to do without securing the loggia structures. And for this you will need a high-strength corner. A hammer drill or welding machine is also required. A hammer drill is used to drill holes in the prepared corner, as well as in the wall for reinforcement. Subsequently, the corner is welded to it. When a new structure is created, the loggia acquires high strength and is able to withstand significant loads.
When deciding to insulate a balcony, you need to take into account the time of year and choose the appropriate season. In the warm months, it is best to carry out repair and insulation work on the loggia. However, this is not always possible. At the moment, many companies offer consumers material that can be used for work on the balcony in winter.
Assembling the sheathing
First, we fasten the beam under the window sill, leaving a gap of 1-1.5 cm at the top. We cut the beam 1.5-2 cm shorter than the length of the parapet, place the beam against the wall and drill holes with a diameter of 8 mm with a hammer drill for dowel nails in increments of 50-70 cm.
We fasten the lower beam in the same way, retreating from the floor by 1-2 cm.
After we have secured the upper and lower beams, we proceed to fastening the cross beams using the same method. The distance between the transverse bars should be 60 cm. If the balcony is often exposed to wind loads, reduce the step of fastening the transverse bars to 40 cm.
Every 2.5 meters, two beams are attached in a row (see the picture below!) This is done so that we can then attach a sheet of drywall to them!
After all the cross bars are secured, we move on to the side walls of the balcony. How to understand which walls to insulate and which not? Everything is very simple, if the wall is load-bearing, it does not need to be insulated. But to achieve an ideal result, you will have to insulate both side walls, the ceiling and the floor. The wall adjacent to the room is usually not insulated. That's what we'll do!
How much to buy penoplex
Standard dimensions of penoplex: width 60 cm, length 120 cm. To find out the area of one sheet, you need to multiply these values (0.6 m X 1.2 m = 0.72 m2). Therefore, the area of one sheet of penoplex is 0.72 m2.
Now the area of the walls that will be covered with insulation is measured, and the result is divided by 0.72. The resulting number is the number of sheets that need to be purchased. If, when dividing, the number turns out to have a remainder (and this always happens), you need to buy material with a reserve.
An example of insulation calculation. Wall area 12.5 m2. We divide this figure by the square footage of one sheet and find out how much penoplex to buy: 12.5: 0.72 = 17.36. This means that you should buy not 17, but 18 sheets of insulation. The principle of calculating the amount of material is the same for insulation on the outside and inside of the balcony.
If the insulation is installed in two layers, it is natural that you need to buy twice as much material.
Preparatory work
The first thing you need to do before insulating the floor on a loggia or balcony is to check whether the ceiling is well reinforced. For example, if the balcony is not reinforced with a lower support, then this deficiency will have to be compensated for, for which support brackets are used. Unfortunately, it is not always possible to install them, since this requires the consent of the neighbors below.
You can strengthen the balcony using a metal frame, which is mounted on top of a concrete slab and attached to the wall of the building. Installing such a frame allows you to reduce the load on the floor. However, in most cases, the balcony slab is initially laid on concrete supports, and problems do not arise with such a design.
The next important point is the material from which the outer wall of the balcony is made. Often, a metal lattice covered with sheets of thin material is used to make the outer wall.
If the floor slab rests on a reliable support, then the outer wall will need to be laid with foam concrete. True, such work will require coordination with architectural services so that problems do not arise in the future. The situation will be much better if the outer balcony wall is made of concrete - such a structure will not have to be changed or remodeled.
Next, the balcony needs to be glazed with high quality. The meaning of this stage is clear: in the absence of high-quality window frames or their poor-quality installation, all the heat will escape from the balcony to the street. The choice of suitable frames is completely individual: most often apartment owners choose reliable double-glazed windows with low thermal conductivity, but sometimes good wooden frames are chosen for balconies, which, if properly processed, can also retain heat well.
This is important: any leaky joint can cause dampness, which will significantly worsen the performance of the insulation. After some time, mold will appear and all building materials will begin to deteriorate, and sealing the cracks is needed precisely to prevent such effects. Wide gaps in the slabs are best eliminated using special rollers, for the manufacture of which foamed polyethylene is used
By placing such rollers in the gaps and sealing them with sealant, you can achieve good tightness.
Wide gaps in slabs are best eliminated using special rollers made from polyethylene foam. By placing such rollers in the gaps and sealing them with sealant, you can achieve good tightness.
Often, insulation rollers are used instead of polyurethane foam to save money. This is done like this: first, a little foam is applied to the required place, and a roller is placed on top of it. When the foam expands, it will fill all the free space and provide a good connection to the seal. Small gaps can be eliminated using conventional sealant.
Having dealt with the problems at the joints and walls of the balcony, you need to start eliminating similar flaws in the floor. All cracks are cleaned of dust and various debris, after which the floor surface must be treated with a primer. After this, each crack is filled with a sealant or cement-based adhesive mixture.
Having noticed deep and narrow cracks, you need to widen them with a drill or grinder, and then fill them with sealant: in this case, the composition will penetrate well into the surface and fill the entire space.
Do-it-yourself ceiling insulation
You should start insulating a loggia or balcony from the ceiling.
Stages of work:
- The first foam board is placed in the corner of the balcony, then the next sheet of insulation is inserted tightly into its groove.
- If decorative panels or drywall will be installed on top of the insulation, then the foam sheets should be secured using dowels in the form of mushrooms.
- To attach panels using dowels, a hole is drilled into them and only then a nail is driven in. Five dowels are taken per sheet.
- If putty will be applied to the installed penoplex, it should be mounted first with glue and then with dowels. To do this, the sheet is treated with an adhesive composition, pressed tightly against the ceiling and screwed with dowels.
If the slabs need to be cut, then it should be done with a construction knife, cutting them along the entire length and breaking them with your hands.
What are thermal insulation boards attached to?
The choice of method for attaching EPS mats depends on the coating itself on which installation is taking place, as well as the operating conditions of the balcony. For fixing to concrete, stone and brick walls use:
- Mastics. For gluing to a bitumen-polymer composition, a special gun is required. The mastic is applied to the edges and center of the slab, then pressed to the surface. Within an hour, the penoplex can still be moved.
- Cement mixtures. The dry powder is diluted with water according to the instructions on the package and infused for 2 hours. After this, apply the mixture onto the panel with a notched trowel and press it against the base for several minutes.
- Glue. Special adhesive compositions may contain cement in their formula. The adhesive is applied to the EPS board in spots, stripes or in a continuous layer. After this, the penoplex is pressed to the surface. The adhesive method requires additional fixation with dowels.
- Adhesive foam. A special polyurethane foam binder ensures good adhesion of the balcony wall to the penoplex. The foam is distributed along the edge and center of the slab. Press the product onto the base for 20 minutes.
- Liquid Nails. This fixative is used in small areas, since over a large area the cost of glue increases significantly. The product is applied pointwise: along the perimeter and in the middle. Penoplex is pressed to the surface for one minute.
- Disc dowels. Mechanical fasteners are used simultaneously with glue. The hole for the dowel creates a passage for cold air, so the cap should not rise above the surface of the slab.
- Self-tapping screws. This type of fixation is used if there is a wooden base. Before tightening the screw, place a washer under the head.
Advice from professionals
A few simple tips from experienced builders will help you avoid mistakes when thermally insulating a loggia. They are worth learning before starting work.
Do not use a lot of foam when blowing joints
In the video, insulation of the floor with penoplex on the balcony and other useful information:
Excess foam at the joints will not do any good. As it dries, it expands greatly. If there is a lot of foam, the slab will begin to deform. It is enough to apply a thin layer to the edges, and reliable adhesion will be ensured.
The film will help prevent the accumulation of moisture under the thermal insulation. It is spread on the base before laying the slabs. This action is especially important if you plan to install joists and wooden floors.
Insulation inside or outside, which is better?
Two insulation technologies are used for balconies: inside and outside. Internal insulation is less effective, since the outer walls of the balcony freeze in severe frosts, and condensation forms between the insulation and the wall surface. The only advantage of this method is that you can do it yourself and save on paying hired workers.
When insulating from the outside, the wall is protected from freezing by insulating material, which contributes to better heat retention. Although external insulation technology is more effective, it cannot always be applied. You can carry out work on the 1st and 2nd floors from the ground or using a stepladder, but if the balcony is located above the second floor, it is very difficult to do the work yourself. Also, after gluing the penoplex, it is necessary to finish the surface, so another issue is being resolved - the decorative design of the balcony from the street.
What is better to insulate with polystyrene foam?
Comparing the technological indicators of mineral wool and polystyrene foam, it becomes obvious that under certain conditions the properties of both materials are identical. For example, the looser structure and lower density of polystyrene foam practically duplicates the properties of mineral wool produced in rolls.
And, nevertheless, when insulating a house with polystyrene foam, you need to pay attention to its features. For example, the inability to convect air and low vapor permeability can lead to the fact that heat will not flow to the insulated surface
Thus, the dew point will be shifted inside the insulated structure, thereby cooling the room faster
For example, the inability to convect air and low vapor permeability can lead to the fact that heat will not flow to the insulated surface. Thus, the dew point will be shifted inside the insulated structure, thereby cooling the room faster.
And, based on this, it is undesirable to insulate the internal surfaces of the room with foam plastic.
But polystyrene foam as an insulation material shows a high degree of efficiency in insulating a building from the outside.
- It is absolutely suitable for insulating external walls
- It is also beneficial to use it when insulating attic spaces and roofing structures
- The excellent effectiveness of polystyrene foam is manifested when it insulates the surface of the foundation base. Foam plastic is especially often used for insulating strip foundations.
- Polystyrene foam is practically indispensable for insulating balconies and loggias
- This insulation is used for insulating industrial premises and agricultural buildings
- There is practically no alternative to polystyrene foam when insulating cooling units
And this material is also very convenient for insulating structures of small architectural forms - shopping stalls, park gazebos, bathhouses.
The reasonable cost of Izover insulation, whose technical characteristics are very high, and time-tested quality, has made this material very popular in Russia. Great for the coldest areas of our country.
If you have uneven walls and there is no suitable space for lathing. Then polyurethane foam insulation will be an excellent solution; read and see more about the features of its installation here. Modern devices allow you to use it yourself, saving money on construction crews.
What is better to insulate with mineral wool?
Insulation with mineral wool is effective in cases where it is not advisable to use polystyrene foam.
- For example, when insulating wooden surfaces, due to the inability of foam plastic to pass air and moisture, the structure may experience damage. Therefore, it is definitely necessary to use mineral wool as the most suitable insulation for the walls of a wooden house.
- Mineral wool is also effective in places where high temperatures can be felt - it can withstand up to 800 degrees
- The use of mineral wool is justified when sound insulation is necessary - this parameter is higher than that of polystyrene foam
- Mineral wool is convenient for insulating pipeline communications
Insulation with polyurethane foam
Insulation with polyurethane foam
Sprayed insulation cannot be applied independently, as special installation is required. But all the preparatory work can be done with your own hands. Polyurethane foam has many positive qualities:
- impermeable to sounds, water and air;
- very light;
- adheres perfectly to any surface;
- durable;
- not affected by mold.
The insulation is flammable, but the problem can be solved by painting it with fire-resistant paint. After it dries, be sure to isolate the material from the sun. A bare wood floor will do just fine. If you decide to insulate all surfaces of the balcony with polyurethane foam, do not forget to organize mandatory ventilation (micro-ventilation), otherwise you will feel like you are in a thermos (the insulation does not breathe!).
Floor insulation
Screed is almost never laid on the balcony floor, unless the apartment is located on the first floor and does not have a reinforced extension. Such a floor creates pressure on the slab, so it is better not to use this technique, which is especially true for old buildings where the slabs have not been in perfect condition for a long time.
Insulation of the floor on the balcony with penoplex is carried out on the basis of a system of logs. This procedure is as follows: the slab is cleaned of dust, dirt and finishing materials, and checked for integrity, especially in connection areas with the wall. If you notice chips and cracks, they should be filled with plaster.
After the solution has dried, the surface must be primed several times. Then the lags are laid, which are wooden supports. The insulation will be located between them. The height of the logs should be greater than the thickness of the thermal insulation. When insulating the floor on a balcony with your own hands using penoplex, the distance between the logs should not seem too small, because in this case the thermal insulation will have to be cut into a large number of parts. The optimal minimum is 50 cm.
Ground mounting
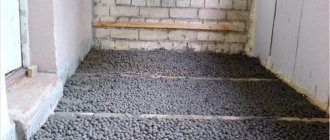
Penoplex is widely used to insulate earthen floors. Floors on the ground are installed as follows:
- Carefully level the installation site.
- Cover it with expanded clay and sand to a height of 40 cm. The layers should be positioned strictly horizontally.
- Insulation boards with a thickness of 5 cm or more are laid. The sheets are carefully joined together, leaving no gaps. The joints are sealed with tape.
Penoplex can be used to effectively insulate an earthen floor
- The entire base along the edges is covered with roofing felt or polyethylene. They are also mounted on penoplex.
- Cement is poured on top, on which a metal mesh is laid to strengthen it. Its layer must have a thickness of at least 5 cm.
- The screed must be strictly leveled horizontally, otherwise difficulties will arise when laying the floors.
Installing a floor in a bathhouse has its own characteristics. Here the screed is installed at an angle to ensure water drainage. To cover the floor, it is better to use sanded boards mounted on joists.
Advantages and disadvantages of penoplex
It should be noted the positive characteristics of the material:
- The moisture absorption of the insulation is 3%, therefore, the material prevents the penetration of steam and moisture without auxiliary vapor barrier and waterproofing, does not settle and retains its properties.
- Easy to use boards during work: easy to cut and glue.
- It is light in weight , this is due to the fact that penoplex consists of 98% air.
- Resistant to high temperatures (withstands short-term contact with materials whose temperature is over 100 degrees, but changes in shape and shrinkage occur from constant exposure to temperatures from +80 degrees).
- It prevents cold air flows from entering the room during the cold season, and in the summer it prevents hot air from entering, thus providing a kind of climate control throughout the year.
- Affordable pricing policy.
- High-strength - can withstand loads of up to 400 kilograms, which makes it possible to insulate the floor base without installing supporting structures.
- Safe for human health - it is an environmentally friendly material.
- Resistant to flammability - this property makes it possible to lay insulation in both brick and wooden buildings.
- It interacts ideally with the “warm floor” system , therefore it is used to heat the floor covering.
- It has a low degree of thermal conductivity , which is due to the cellular structure of penoplex.
- Resistant to the growth of bacteria , fungi and mold.
- It has a long service life and does not lose its thermal insulation qualities over time.
Despite a lot of advantages, penoplex also has disadvantages:
- Susceptible to destruction by rodents.
- It is not resistant to constant high temperatures, the material changes shape and loses its properties.
- Despite the fact that penoplex has a low degree of flammability , high temperatures can cause it to melt and burn.
- It has a fairly low level of sound insulation.
Insulation materials
People are often concerned with the question of how to insulate the floor on the balcony? For this process they can use:
The first option is very common due to its low cost. It is produced in sheets, the thickness of which ranges from 2 to 10 centimeters. Since the balcony is a cold room, from below which there is often only cold air, it is better to use sheets with a thickness of 10 cm.
Styrofoam
Many people insulate their balcony floors with penoplex. This material is also called foamed polystyrene. In addition to the fact that it is endowed with excellent thermal insulation ability, it also allows very little steam to pass through, and is lightweight and easy to use. For insulation, you can use 2-3-5 cm thick penoplex.
Penoplex
Mineral wool is also a commonly used material. It is produced in the form of mats or in roll form. In both cases, the thickness is 50-100 millimeters. It does not burn, but can absorb moisture. Moisture does not destroy it, but deteriorates its thermal insulation properties. Therefore, waterproofing is mandatory. During installation, it cannot be compacted, since the air placed between the fibers will escape and thermal conductivity will increase. It will be colder.
Mineral wool
Penofol is a material that allows you to insulate a loggia with your own hands very well. It is a combination of polyethylene foam and aluminum foil. This composition also allows it to retain moisture and sounds. The foil can be on one or both sides.
Penofol
The thickness of this insulation is 3-10 millimeters. It is produced in rolls. To connect the two strips you need to use aluminum tape. According to technology, this material must be used together with penoplex.
Use penofol together with penoplex
Expanded clay is not the best option. Its ability to retain heat is worse than that of polystyrene foam. In addition, for it to become a reliable heat insulator, you need to pour a sufficiently thick layer. Which is not very undesirable.
Expanded clay