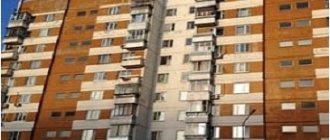
A huge amount of heat from the living space is lost through the balcony. Depending on the design features of the premises, heat loss ranges from 15 to 20%. To prevent this, it is necessary to insulate the floor of the balcony or loggia under the tiles.
Before you start choosing the type and method of insulation, you need to find out several nuances:
- Do you have a loggia or balcony? Depending on this, the degree of weight load on the structure is selected. You should choose lighter options for the balcony; overloading it with thick concrete screed or heavy tiles is strictly prohibited. When insulating a loggia, the situation is the other way around - when insulating it, you can use metal structures. But, regardless of the chosen method of insulation, the first and most important indicator is its weight - it should be as light as possible.
- Clearly define the purpose of the insulated room? Is it rational to do major insulation if you use the balcony only for hanging laundry or storing rubbish that does not fit in the apartment?
- Insulating an unglazed balcony is a waste of money. In winter, your balcony is provided with piled-up mountains of snow even on relatively windless days, which automatically nullifies the effect of your efforts. Important points are the type of glazing (cold or warm) and insulation of the balcony walls. It depends on this whether this room will be listed in the plan as a heated area, or as a regular place with thermal insulation.
Selection of thermal insulation materials
The modern building materials market provides a choice of insulation materials of different price categories. The assortment is filled with both items that have been tested over decades of construction experience, as well as the latest inventions. The most in demand will be those materials that have maximum ergonomics - the ratio of weight, fire safety and thermal insulation efficiency. There is a huge selection of all kinds of tools that will allow you to insulate the floor with your own hands, without the help of specialists.
Below we will consider the types and methods of insulation, starting with the simplest and least labor-intensive, and ending with the most capital and complex.
Advantages of heated floors
Heated floors are an excellent alternative to the “radiator” heating method, as they contribute to a comfortable and rational distribution of heat in the room. And for such “additional” rooms as a balcony, this is generally the only possible option, because moving the battery here is problematic, and the constant use of heaters or fan heaters is not always effective.
Among the main advantages of heated floors are:
- the highest level of thermal comfort, incomparable to any heating system;
- low heater temperature;
- absence of bulky and unaesthetic radiators requiring decoration and maintenance;
- the widest functionality of temperature regulation due to the installation of sensors and automation;
- long service life (for a water floor - several decades);
- the ability to install without special equipment and skills, the ability to carry out local repairs if necessary (for electrical structures).
Often before final finishing it is necessary to raise the floor level on the balcony.
Read our guide and you will find out how you can do this. And this article has all the information on how to choose a plastic window profile and what you need to pay attention to.
Types of insulation
Next, we will consider how and with what materials you can insulate the floors in the house.
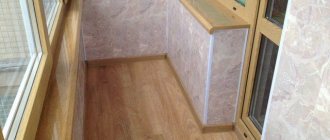
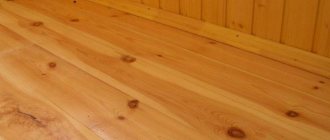
Wooden floors
Provided that your balcony or loggia is protected from moisture coming from outside, the easiest and cheapest way to improve the floor is to insulate it with wood. Wood as a material has a very low thermal conductivity, so it is recommended for use on concrete floors. There are two main designs of wooden floors:
- If your concrete floor is level enough, the boards can be laid directly on it. A significant disadvantage of this method is that most often concrete floors are not dry enough so that they do not harm the wood.
- The second method is to install floors on joists. This will provide additional ventilation and increase the distance between the boards and the concrete, ensuring less cold transfer from below. Such floors will last much longer compared to the previous option.
Important!
It is necessary to provide the wooden floor with a sufficient slope so that accidentally spilled liquid flows off the flooring neatly.
The ideal material when working with wood would be coniferous species. They are relatively cheap, and due to impregnation with natural resin they have the greatest moisture resistance. It is not recommended to use plywood or chipboard - these materials are not durable.
Expanded clay
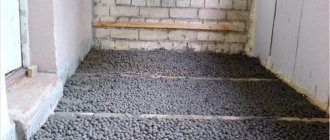
As an addition to a wooden floor, you can use insulation in the form of expanded clay. It is worth immediately noting that this option is unacceptable for weak structures that cannot withstand heavy weight - after all, of all the known insulation materials, high-quality expanded clay is the heaviest. It is used in a layer of ten to fifteen centimeters, spilling between the joists.
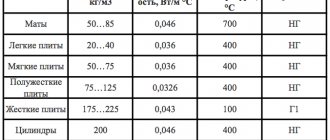
Mineral wool
There are three main types of mineral wool, which differ in chemical composition - glass wool, slag wool and stone wool. Their structures are strong and resilient, they have high ignition temperatures, the operating temperature range ranges from -60°C to 450°C, which makes them fireproof enough for installation in residential premises.
However, there are a number of significant disadvantages that make you think about choosing this particular method of insulation:
- Despite the high fire safety indicators, evaporation of substances impregnating the wool occurs already at 250°C. To seal the structure of the material, phenol-formaldehyde resins are used, the fumes of which are carcinogenic.
- Installation of glass and slag wool is very dangerous to health. Glass wool contains microscopic glass particles that can injure your hands even if handled with care. If it enters the respiratory tract, it causes acute irritation of the mucous membrane. Slag wool absorbs moisture very well, while releasing caustic and very dangerous acids.
Important!
Floor installation using these materials must be carried out in special clothing that covers the maximum area of the body, thick gloves, goggles and a good respirator. After finishing installing the wool, the overalls must be destroyed.
Based on the listed disadvantages, if you still decide to use this material, it is recommended to use it under a thin concrete screed. Cotton wool is allowed for installation if it was in a sealed, undamaged film before unpacking. You should carefully calculate the total weight of the structure when used on balconies or loggias with non-permanent ceilings.
Styrofoam
This option is the second cheapest and simplest after expanded clay. The main advantage of polystyrene foam is its light weight. It practically does not absorb moisture and is relatively resistant to chemical attack.
For a wooden floor, foam plastic is laid between the joists in a layer of the required thickness. In the absence of solid plates of this material, you can use foam chips, which are used in the same way. If you plan to cover the floor in the loggia with ceramic tiles or trim it with natural stone, then special preparations must be made before installing the foam.
Below are step-by-step instructions:
- To prevent the formation of uneven surfaces on a new floor, it is first necessary to level the existing floor. To do this, mix a liquid solution of cement, sand and water. A thin concrete screed is used to fill uneven areas on the old surface. Please note that the thickness of the layer in its thinnest part must be at least 7 mm, otherwise it will immediately crack after drying. For additional hardness, it is recommended to sprinkle the still wet layer with dry cement.
- After the new layer has dried, a layer of roofing material up to five millimeters thick is laid. It is a layer of rubber impregnated with bitumen resins, which gives it a high level of waterproofing. Waterproof glue is used for fixation - it is necessary for trouble-free work with the next layer.
- Foam plastic is then laid out as a thermal insulation material. In this case, the thickness of the layer is selected depending on the height that remains to bring the balcony floor to the level with the room. Typically, a thickness of 2-3 cm is used. The foam is also fixed to the roofing felt with waterproof glue to avoid free movement of the blocks during further work.
- After the foam plastic, a layer of solid polymer film is unrolled. It serves as the final waterproofing layer. It is important that the film is solid, without tears or damage - this will significantly increase heat retention.
- Another thin concrete screed is poured on top of this structure, which is carefully leveled. It is allowed to sit and dry, and then tiles or natural stone are laid on it, using a special glue as a fixative.
Important!
It is recommended to seal all joints at all levels of insulation (joints of roofing felt strips, gaps between foam blocks) with construction tape or adhesive aluminum tape. When laying polystyrene foam, you can also coat the sides of the blocks with waterproof glue for their end connection with each other and with the walls. By taking these steps you will ensure the best possible insulation.
The amount of material is calculated as follows:
- The volume of cement, sand and water is calculated locally, depending on the number and size of irregularities, taking into account the above recommendations for pouring the screed.
- The required area of roofing material is equal to the area of the room, taking into account its placement on the side walls by 4-5 cm. This will help prevent moisture from penetrating through unevenness in the walls. The launch must be thoroughly coated with waterproof glue and attached to the walls.
- The square footage of the foam is equal to the area of the balcony floor of the balcony or loggia. It is necessary to very accurately calculate its quantity so that it fits flush against each other and the side walls.
- The size of the polymer film is calculated in the same way as roofing felt, not forgetting about a small application on the walls (1-2 cm) with gluing.
- The length of the construction adhesive tape is equal to the length of all the joints that you want to tape. It is relatively inexpensive, but effective, so do not regret it as a material for additional insulation.
Expanded polystyrene
This material is very similar in chemical composition to polystyrene foam. However, if the foam is made from gas-filled plastics (polyurethane or polyvinyl chloride), where the pores are open, which does not give the proper density of the structure, then polystyrene foam is made as a solid, monolithic mass. Due to its more advanced and ergonomic structure, expanded polystyrene is superior to polystyrene foam in physical properties, because its density is five times higher than the previous one. The absence of voids in the structure reduces the water permeability of the material by 10 times, which ensures a much longer service life. Moreover, the bending strength exceeds the strength of foam plastic by 5-6 times.
The technology of insulation with polystyrene foam in the case of covering the floor with tiles or natural stone is similar to insulation with polystyrene foam. The difference is that instead of polystyrene foam, polystyrene foam is laid on the roofing material as a thermal insulation layer, which is attached to the rubber layer with waterproof glue. It also needs to be laid flush using waterproof adhesive for trimming. The use of this material will make the thermal insulation layer thinner while maintaining efficiency (this is suitable for installing floors on balconies, the level of which is not very different from the level of the floors of the adjacent room).
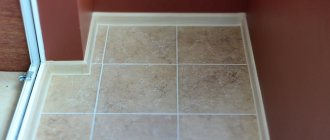
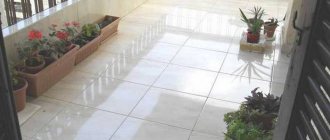
Floor insulation with tiles
Ceramic tiles or natural stone have very high thermal conductivity, so their independent use as heat-protective materials is impractical. Simply put, if you lay them directly on a concrete floor without any lining, then you will get absolutely nothing other than a beautiful floor. Insulation with the above materials has only two significant disadvantages - firstly, it is the most expensive and time-consuming method. And secondly, due to their colossal weight, these structures are strictly contraindicated for balconies, even with a major ceiling.
To create a thermal protective gasket between the original layer of concrete and the tile, you can use all of the above materials - expanded clay, polystyrene foam or polystyrene foam. An alternative is a new technology - “warm floor”. There are three main types of underfloor heating - electric, water and infrared. Installation of water structures involves connection to a central heating system, so their use on balconies is prohibited. Electrical elements are most often used due to their lower cost compared to infrared ones. They do not require special preparation and can be laid directly into a layer of tile fixing adhesive. The big advantage is the small thickness of the layer, which allows you to maintain the original distance between the floor and ceiling as much as possible.
Design Features
The tiles have proven themselves very well as a finishing coating. However, it has one feature: to lay the material you must have a flat and durable surface. Therefore, you will have to choose suitable insulation materials and assemble a solid base for laying tiles or porcelain stoneware. As a rule, this is a lightweight frame filled with porous insulation or penoplex.
When using cotton fillers for insulation, it is necessary to ensure their protection from possible influences unfavorable to the materials. This means that you will need to waterproof the base and cover the material on top with a special membrane film that does not allow moisture to pass through. Even though the tiles laid on the floor will be a kind of barrier to water, the insulation of the balcony must be carried out in compliance with the technology.
Some craftsmen claim that to obtain a high-quality base for these types of coatings, it is necessary to pour a concrete screed. However, in the case of balconies, this should not be done. The load that the cement mass will create will be very large and the floor slab may not be able to withstand it. This option is well suited for loggias, and it is better to insulate balconies without screeds.
conclusions
There is no universal method of insulation - materials and installation method are selected based on the following indicators:
- Loggia or balcony;
- Are they glazed;
- Passive or active insulation is required (expanded clay lining or “warm floor”).
The low cost of materials, their variety on the modern market and a large selection of tools will allow you not to resort to qualified help, but to do everything yourself.
What types of systems are there?
Warm floors are equipped in two ways:
- water;
- electric.
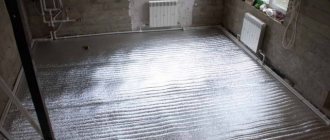
The water method of installing heated floors is presented in the form of a structure made of metal-plastic pipes, which are laid on the floor and filled with mortar.
Tiles are laid on top of the solution, and metal-plastic tubes are filled with coolant. This option is convenient because additional energy costs are eliminated. Flaws :
- complexity of installation;
- high costs for construction equipment.
This option of a heated floor pays for the costs of its construction, but do not forget that heat on the balcony can appear when the heating season is announced, and this is at least in mid-October. Often you have to freeze for 1-1.5 months.
Electric floors, although they have a serious drawback - high energy consumption costs, are still more popular and in demand. Apart from this drawback, electric heated floors no longer have any negative aspects.
How to fill a screed
If everything works well? Then it is necessary to hide the mats using cement and sand mortar. The filler is crushed stone; an increase in elasticity is achieved by adding a plasticizer.
- Increasing the plasticity of the solution is possible thanks to slaked lime, PVA glue, shampoo, egg white, liquid soap, and washing powder.
- The solution is applied to the mats in a layer of no more than 3 cm. It is important to take this into account so that an artificial obstacle to the spread of heat is not created.
It is necessary to ensure a perfectly flat surface to simplify the process of installing tiles without cracks or distortions.
How to secure heating equipment
Installation of mats is extremely simplified. To do this, they have adhesive tape on the inside. It allows you to create a reliable fixation on the substrate without the possibility of displacement. If necessary, the material is carefully cut so that the cable is not damaged.
Heating elements are mounted based on the diagram. The system is connected to the electrical network, connected to a sensor and thermostat. The functionality is checked so that the malfunction can be easily corrected.
Thermal insulation wiring
If decent thermal insulation of a balcony or loggia has not yet been provided, then it is worth doing it. Particular attention is paid to the floor.
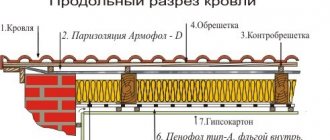
- It is important to protect the room from cold penetration in order to increase the efficiency of the heating system. To do this, it is advantageous to use penofol based on laying the foil part up.
- You should rely on penofol to cover the maximum area of the balcony or loggia. Attention is paid to corners that overlap the walls and to ensure that the joints fit tightly. The edges are protected with damper tape.
A metal mounting mesh is mounted above the heat-insulating layer. It is used as a basis for laying mats.
Checking Electrical Wiring
In order for the heating system to work properly, it is necessary to ensure reliable wiring. It is important that it can withstand the load and ensure stable, safe operation of the heating system.
That is why the entire electrical network should be checked, because sometimes it does not meet the requirements and does not guarantee performance.
The main thing in the calculations is the thickness of the cable section. The maximum available load depends on this. Very thin, may burn out quickly and there is a risk of short circuit.
Important: If after checking it is revealed that the wiring capabilities do not match. Then it is completely replaced.
It is more profitable to use cables based on a copper core, since, unlike aluminum, they have increased thermal conductivity and last many times longer.
How to properly install sensors and thermostat
With a thermostat, everything is simply mounted in an open area to access the controls. The best place is considered to be near an outlet.
- The temperature sensor is mounted inside the system. Its function is to control the floor temperature.
- Therefore, a connection to the thermostat is required, thanks to a cable that fits into a pre-created groove.
- It is worth creating a frame for the device based on corrugated pipe, as it provides excellent protection.
The sensor should be located in the central part of the cable. The end of the corrugation must be sealed with sealant.
Installation instructions
To begin with, I propose to decide which balcony/loggia we are talking about. If this is an open-type balcony, where you will go out in the cold season just to drink coffee and enjoy the surrounding landscapes, there is no need to bother too much with installation.
In this case, our procedure will be as follows:
- preparation of the base. We need to seal cracks and potholes, if any, and clear the surface of debris. If mold has formed on the base, you should get rid of these “arrogant” parasites. Be sure to treat the surface with a penetrating primer, which has antiseptic properties, and let it absorb and dry,
- laying foil polyethylene (of course, with the foil facing out). Its thickness can be approximately 5 mm,
- laying film heated floors,
- laying flooring. In our case, this is tiles or garden parquet.
That's basically all there is to do in the open space. However, if the loggia/balcony has glazing, the situation is somewhat different. Here you will have to describe the process in more detail:
- preparation of the base,
- laying insulation. For this we will use extruded polystyrene foam (from 30 mm). In this case, we are considering a design without pouring a screed. We assume that the old coating is in satisfactory condition. If this is not the case, the old screed must be removed, and then a new one must be poured. It is impossible to pour a new screed directly onto the old one, as this will make the suspended structure heavier, and we have absolutely no need for collapse,
- laying a layer of foil foamed polyethylene (penofol). It will act as both insulation and heat reflector. In this case, the foil works on the principle of a mirror,
- installation and connection of the heating system. As we remember, we place a rod “heater” under the tiles,
- preliminary check: turn on the heating system. If everything works properly, turn it off and wait until it cools down,
- laying tiles. The tiles can be installed with regular glue, but it is advisable that its thickness be at least 10 mm,
Tile laying process
The final coating starts 72 hours after applying the cement layer. Before this, marking is done to reduce the amount of tile cutting. The whole is used on an open floor area.
Laying begins from the center of the room with a guide to two perpendicular lines in the middle of the floor.
Stages of work:
- The floor and the back side of the tile are covered with glue;
- The mixture is carefully distributed over the entire surface. After attaching the tiles, light blows with a mallet are performed for leveling;
- To form even seams, construction crosses are installed;
- All tiles are laid using this method.
How to insulate a balcony floor under tiles or other material
Initial stages of floor insulation:
- We remove the old coating (boards, tiles, etc.);
- We clean the surface of any debris;
- We cover all cracks with cement or putty;
- Levels the joints of the wall and the floor with putty or cement;
- When the floor is dry, lay a layer of waterproofing. It is desirable that this material extends 10 centimeters onto the walls. After this, seal the joints of the waterproofing material with tape;
- Next, you need to install logs (wooden beams with a cross-section of at least 40 by 40 millimeters). The logs must be laid parallel to the length of the balcony at a distance from each other equal to the size of the insulation;
In order for the structure to be strong, the logs must be fastened with self-tapping screws, and the outermost ones must be attached to the balcony using dowels.
After this, we proceed to install the insulation:
- We install our material between the lags so that it is slightly compressed;
- We install a vapor barrier layer on the insulation. Using a stapler or small nails, we attach it to the joists, and seal the edges with tape;
- After this, it is necessary to install a counter-lattice made of small beams to ensure good ventilation.
Advice from professionals
A few simple tips from experienced builders will help you avoid mistakes when thermally insulating a loggia. They are worth learning before starting work.
Do not use a lot of foam when blowing joints
In the video, insulation of the floor with penoplex on the balcony and other useful information:
Excess foam at the joints will not do any good. As it dries, it expands greatly. If there is a lot of foam, the slab will begin to deform. It is enough to apply a thin layer to the edges, and reliable adhesion will be ensured.
The film will help prevent the accumulation of moisture under the thermal insulation. It is spread on the base before laying the slabs. This action is especially important if you plan to install joists and wooden floors.