I have one friend. Builder by profession. Engaged in renovation of apartments, cottages, offices. And recently a client came to us who wanted to raise the floor a few centimeters before insulating the loggia.
I recommended my friend, gave him his phone number and said goodbye to the client until he raised the floor on his loggia. Only a couple of days passed and he returned again, thanking him for the recommendations and the prepared floor.
Well, I called my friend after that and asked about all the intricacies and technologies for raising the floor on the loggia and balcony. I wrote everything down in a notebook and prepared this article. I hope it will be useful.
Why do you need to raise the floor?
It often happens that having decided to attach a balcony or loggia to a room, many apartment owners are faced with the problem of different floor levels, since in many houses the floor level on the balcony is much lower than the room level. And here a lot of difficulties arise for families with small children and people with disabilities.
In addition, different floor heights are an inconvenient phenomenon even for a full-fledged adult, since it requires maximum concentration of attention, and the process of moving around the apartment does not provide the opportunity to relax and is more reminiscent of a quest.
It happens that there are unevenness on the balcony, angles of inclination that interfere with everyday life, and also when the floor needs insulation and the need to raise it from 15 cm to 30 cm. Such special cases also lead to the need to raise it.
One way or another, if you are faced with the problem of different floor heights on the balcony, as well as unevenness, then you will not be able to limit yourself to a thick carpet or stand, because any temporary measures require further major changes, and at this moment a logical question arises: how to do it yourself raise the floor on the balcony?
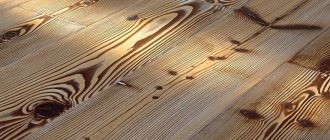
What is the advantage of a wooden floor
Wood has long been used in the construction of residential and non-residential buildings due to its high heat-saving properties. Compliance with the technology of laying plank flooring on the balcony will please you with a smooth surface, and a wide selection of covering materials will give you the opportunity to implement your own design.
What are the advantages of wooden floorboards:
- the reality of obtaining a flat surface even with dilapidated concrete slabs of the balcony base;
- ease of processing and fastening of wooden slabs for high-quality insulation of a balcony room;
- strength without special stress for the concrete slab and long service life of an aesthetically attractive coating.
Advice. The choice in favor of plank flooring is especially relevant if there is a significant difference in height between the floor of the balcony and the apartment. By laying a wooden base along the joists, it is possible to raise the balcony floor to the apartment level. Even with existing unevenness of the concrete slab, the surface of the flooring will be smooth.
Despite the many advantages of using wooden structures, we should not forget about some disadvantages that can upset you after glazing a balcony:
- wood has a high flammability;
- natural material is subject to rotting processes and can be damaged by insects;
- the tree is defenseless against moisture, which will lead to deformation of the coating.
The few disadvantages of a wooden floor can be easily minimized if, before laying the floor structures, the material is treated with a high-quality antiseptic against rotting and impregnated with fire retardants that prevent fire. Protection from moisture absorption will be provided by varnishing or painting the floor, which will also extend the service life of the boardwalk.
How to change the floor level on the balcony?
It is necessary to begin work by preparing the premises.
To do this, you need to clear the balcony of unnecessary things. The unusable screed is removed with a hammer and chisel. Floors, regardless of the method of work, are treated with a primer and an anti-fungus and mold remover.
An equally important point in how to raise the floor is its insulation. It is best to do this with expanded clay or polystyrene foam.
So, the height can be changed in several ways:
1. Dry screed. This method is similar to the process of insulating a balcony floor with expanded clay. A dry screed is usually called a structure made of bulk material, on top of which a layer of waterproofing is laid, covered with floor boards. Let us remind you that expanded clay is an excellent insulation material, which is very important if the balcony has not been insulated.
Before you begin compacting the material, it is necessary to make a limiting formwork to avoid deformation of the dry screed. As a compensating material, a layer of thermal insulation is laid along the perimeter along the walls.
The strength of the base of the balcony floor will depend on the quality and density of compaction.
2. Cement screed. Cement or cement-sand screed - the ability to raise the floor on the balcony by no more than 8 cm. Formwork is made from boards, and a layer of waterproofing is laid on top of the dry and cleaned balcony slab.
Both roofing felt, glassine or high-density film are perfect as a waterproofing material. A sand-cement mortar with the addition of expanded clay is poured on top. The proportions of sand and cement are 3:1. The second layer, to level the floor surface, is filled with the same solution, only without expanded clay.
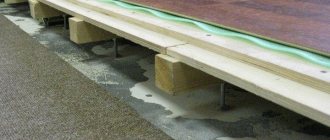
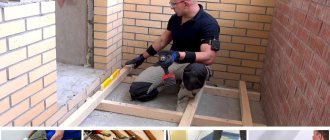
3. Raising using logs. If you decide to lay wooden balcony floors, you will need to make and install logs. Lags are usually called frames made of beams, on top of which any wooden covering is laid.
They are made from wooden beams of rectangular cross-section. The width of the lag should be one and a half to two times less than its length. Metal corners are used to attach the logs. The wood may not be of the highest quality, but it is important to ensure that it is sufficiently dried.
https://www.youtube.com/watch?v=rC4qBlvfhho
To prevent damage from insects, fungi and bacteria, the wood is thoroughly treated twice with an antiseptic solution before laying.
The width of the lags should not be too large, otherwise the final covering will “play” under your feet. The most optimal distance between the bars is from 20 cm to 40 cm.
The sequence of laying the floor is as follows:
- A layer of waterproofing is laid on the balcony slab;
- Insulation (mineral wool, penoplex, foam plastic) is placed on top of the waterproofing;
- A lag structure is installed;
- The finishing flooring is made of wood.
If you have chosen a wooden covering, you can familiarize yourself with the photo and video materials of its installation technology.
More on the topic: 9 secrets for finishing a balcony with plasterboard
Installation of insulation
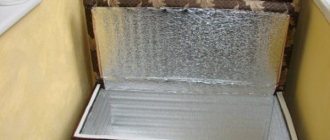
Mineral wool or polystyrene foam is used as insulation. Fiber insulation does not burn and adheres tightly to structures. However, it loses its beneficial properties when wet and requires special means to protect the builder’s skin and lungs. Mineral wool is used only for reliable steam and waterproofing of the floor on the balcony.
Extruded polystyrene foam is cheap and easy to install. It does not absorb moisture and is frost-resistant. However, expanded polystyrene is flammable. It is destroyed by sunlight and some complex hydrocarbons - polyvinyl chloride, paint solvents. To install this type of insulation, you need adhesive for polystyrene foam, for example, Ceresit Express CT 84 or Penoplex Fastflix.
Read more in the article “How to insulate the floor on a balcony with penoplex.”
Next, we’ll look at how to install insulation under a wooden floor on a balcony with your own hands. Instructions and installation will depend on the selected material:
- Mineral wool is cut and placed between the joists. No glue is used to attach it to the floor. The edges of the insulation should fit snugly against the wooden blocks. It is permissible to partially lay wool on the brackets before installing the frame.
- Expanded polystyrene is cut with a construction knife. The layers of insulation are placed so that the joints between the plates do not coincide. In some cases, the joints are treated with polyurethane glue. A gap of up to 10 mm is left between the polystyrene foam and the wooden blocks, which is filled with polyurethane foam.
The next step is to install a special film on the insulation.
How to raise the floor on a balcony using a metal frame
You need to start with a drawing of the frame with measurements of the width and length of the base of the balcony slab.
The frame is based on a metal rectangle welded from metal corners. If you want to strengthen the structure, you can weld intermediate rods with a diameter greater than 10 mm in increments of 50 cm.
Leg mounts corresponding to the desired floor height are welded to the frame. The frame is coated with an anti-corrosion primer and then painted. The frame is attached to the floor and wall using anchors.
Before starting installation, lay a layer of waterproofing on the balcony floor, cover it with liquid mastic, and install a metal frame on top. Place a layer of insulation inside the frame.
If there are gaps between the frame and the insulation sheets, they can be filled with polyurethane foam. Boards are attached on top of the frame.
Finishing process
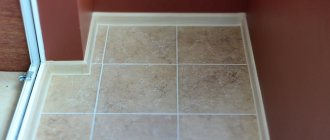
After raising the floor level on the balcony, the question remains: how to finish it? Many craftsmen consider ceramic tiles the most popular and practical method of finishing balcony floors.
In addition, you have used the cement screed method and are planning to tile it, you can install a floor heating system. This is especially true if you want to use the balcony space as a living room.
In addition to tiles, you can use all kinds of coverings on the balcony: parquet, laminate, linoleum, or you can simply paint the wooden boards or concrete floor in your favorite color.
Knowing how to raise the floor on a balcony, you will make the transition between rooms smooth, and you will also be able to insulate the room and make the flooring from the material most suitable for you. And you will no longer need to overcome all sorts of steps and thresholds when moving from the room to the balcony.
Source: masterok-remonta.ru/balkon-i-lodzhii/kak-podnyat-pol-na-balkone.html
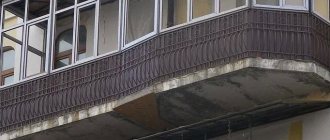
Features of an open balcony
The balcony slab is clamped into the wall at a right angle, but its profile differs from rectangular - the upper plane relative to the bottom has a slope of at least 3% (GOST 25697-2018). But even if the front plane of the slab does not have a slope (which is allowed by agreement with the customer), then at the construction site on the balcony they screed the balcony floor with a slope towards the street.
1 – balcony slab; 2 – building wall; 3 – screed layer; 4 – slope angle of the screed to the outside of the balcony – 10–15 cm
This ensures that precipitation is drained outside, but due to the slope, the difference in floor level between the threshold and the fence can reach several centimeters.
Another feature is that the floor of the living space is several centimeters higher than the floor of the open balcony. And together with the threshold of the balcony block itself, the resulting height difference is quite large.
The regulations do not clearly indicate what the height of the balcony threshold should be from the outside; there is only a stipulation that any thresholds must be safe for the movement of residents. Usually, in this case, they are guided by the prescribed height of the stair steps - no more than 20 cm. But in practice, this condition is often not met, and the height of the threshold outside relative to the slab can be more than 25 cm.
Even in an open balcony, too high a threshold is inconvenient, and when glazing and landscaping to the level of a closed room, a slope is not needed. That is why the floor on the balcony is raised, leveled and a covering appropriate for the operating conditions is laid.
Four ways to raise the floor on a balcony with your own hands
How to raise the floor on the balcony and avoid mistakes? How to do this work correctly and with your own hands?
We will try to answer these questions and describe in detail the common methods of raising the floor.
In this article you will definitely find useful information to raise the floor on your balcony with your own hands.
You can quickly raise the floor on the balcony and you can do all the work yourself, because as a rule, the area is very small.
Therefore, it is quite possible to cope with such work in a few days. And if you choose the first method and work hard, then in a day.
4 ways to raise the floor on the balcony
Let’s say right away that in fact there may be more of them, but you should only use proven and repeatedly used methods.
Because a balcony, in most cases, is a protruding element of a building. Its strength is lower than that of the interfloor ceiling.
By making a mistake in the calculations and exceeding the permissible load per square meter, you can destroy the balcony. The consequences will be very sad.
The methods recommended below will allow you to do the work of raising the floor level with your own hands, without fear.
First way
Make a wooden floor.
This is the easiest, fastest and most reliable way to raise the height of the floor on the balcony. The wooden structure does not have much weight. A floor made of wood is strong and durable, provided the waterproofing rules are properly followed. It can be raised by at least 10 cm, at least 15 cm, at least 20, at least 30.
For its construction you will need lumber. Its exact quantity, type (timber, block, plank) and size depend on the task at hand and the area of the balcony.
Therefore, only general recommendations are presented below. From them it will be clear how to act.
The balcony needs to be cleared of everything that is there. Eliminate all cracks, holes and openings by covering them with mortar or polymer mastic. Sweep and wash, if necessary, the surface.
Measure its length and width. Determine the height to which it needs to be raised. Check the slope of the base with a level and find its highest point, if there is one.
Having all the required dimensions, the required amount of lumber is calculated. It is better to always take with a reserve, so as not to run around later looking for a small piece of a block or other material.
Let's say we need to raise the level by 17 cm. This means we can take a 5X5 block, a 5X10 board and moisture-resistant plywood 1.5 cm thick.
The sequence of work will be as follows: cut the board into equal sections that will fit freely along the width of the balcony.
We make the distance between them equal to 50 - 70 cm - 15, 20 or 30 cm will not be enough. But before this we lay waterproofing with an overlap on the walls - roofing material or penoizol.
Some other similar material is also possible. The main thing is that it does not allow moisture to pass through.
We cut the block into sections equal to this distance (between the previously installed boards) and insert them between them. Two in each section, placed on opposite edges, are enough.
We sew them together with nails or self-tapping screws, using a metal corner.
Using a level, we level the plane of the resulting structure. Somewhere we cut it, somewhere, on the contrary, we pad it. And so on until we level it out. After this, we drill holes in the base of the balcony.
We attach the corners above them and fix the structure with anchors. Remember that all work done by yourself must be carried out in compliance with safety precautions.
Next, we lay the logs along the entire length of the balcony, leaving centimeter gaps at the edges, and nail a 5X5 beam. We end up with something like a sheathing.
The distance between the bars is taken arbitrarily, depending on the width of the balcony. Thus, the floor level has already risen by 15 cm (10+5=15), and by laying plywood on it, we get 16.5 cm.
Having fixed the plywood with screws, we cut off the protruding waterproofing flush with the surface. The remaining 5 mm will be removed by linoleum or carpet.
If it is necessary to insulate such a floor, you need to use mineral wool or polystyrene foam. The insulation is cut and inserted between the joists. It should lie there tightly, without gaps.
If cracks appear, they must be filled with foam.
Second way
Application of metal structures.
Using this method, you can easily raise the floor to a level of 20-30 cm. To install such a floor you will need a profile pipe or angle, a welding machine and a welder, where would you be without it.
The preparatory work proceeds as in the example above. Using welding, a metal frame is made in the shape of the base of the balcony.
It rises on improvised legs to the level of the height we need for the floor.
After welding, the structure is fixed with anchors or construction dowel-nails to the base of the balcony.
Next, the rough floor covering is laid on it. It can be plywood, OSB, tongue and groove board, etc.
It would be nice to consider placing a wooden sheathing on top of the metal structure. It will improve the process of attaching the subfloor.
As a finishing layer, on such a floor you can use not only linoleum or carpet, but also parquet, laminate and tiles.
More on the topic: Lining the inside of the balcony with wooden clapboard
Third way
Application of dry screed. This is one of the most promising methods, which for some reason is rarely used. You can make a dry screed and raise the floor by about 15 - 20 cm with your own hands.
This process is simple, not messy, unlike wet screed, and takes little time.
To carry out work on raising the floor, you will need expanded clay, profile guides, and gypsum floor panels. The panels have a quarter-shaped groove on all sides.
Only on two perpendicular sides is it located at the top, and on the other two at the bottom. This is how they form a lock when laid.
The preparation of the base is standard: seal the cracks, sweep the surface and roll out the waterproofing.
You can use roofing felt, penoizol or ordinary plastic film. Waterproofing is laid with a margin and fixed on the walls.
They install profile guides, also known as beacons. Having set the desired level and fixed the profile, they begin to fill in expanded clay chips from the far edge.
They pour in generously - heapingly. Then they begin to level and compact with the rule.
Expanded clay chips with good compaction almost do not shrink. Therefore, having leveled a sufficient area for laying gypsum panels, they are laid immediately.
If the panels are too large, they are cut and adjusted to size.
Having placed the panel, fix it with self-tapping screws and continue working further. Having fixed the last panel, you get a finished floor. You can walk on it right away.
It does not require additional insulation, since expanded clay is an excellent heat insulator.
Fourth method
It involves using a cement-sand screed to raise the floor. All work can be done with your own hands, but the method cannot always be applied.
The use of cement-sand screed is acceptable if the height of the floor on the balcony needs to be raised by 8-10 cm. If you want to raise the floor by 20 cm, then it is better to use another method.
Before starting work, it is necessary to remove all excess from the base. Seal all cracks.
Find the highest and lowest point. Using the highest place as a level reference point, markings are applied to the walls.
The level must be calculated so that at the lowest point the screed layer does not exceed 8 cm.
A damper tape is attached around the perimeter of the floor; penoizol can be used for this purpose.
To facilitate the construction, you can use expanded clay or polystyrene chips as fillers.
Once the solution has hardened, you can lay any type of flooring. If the balcony was insulated and was part of the apartment, then the floor can be made warm.
Whether you install an electric heated floor yourself or turn to specialists is up to you.
However, remember that when installing such a floor, it is necessary to lay a layer of foil foam foam on the concrete base, and then pour the screed onto it.
By the way, as an option, you can use extruded polystyrene slabs - also known as penoplex - to raise the floor. Penoplex slabs are solid and have grooves.
They are produced in different thicknesses: 3, 5, 10, but up to 20 cm. You can choose the one you need.
We lay them out to the required height to raise the floor and reinforce them. And fill it with cement-sand screed on top.
The mortar layer, with such a floor design, should not be less than 5-7 cm and no more than 10 cm.
Using basalt fiber or fiberglass reinforcing mesh, you can increase the strength of the cement-sand screed several times. As you can see, the above methods are quite simple. Most of the work can be done with your own hands.
Knowing them, you don’t have to think about how to raise the floor on the balcony, but immediately begin to complete the task.
Source: stoydiz.ru/napolnye-pokrytiya/kak-podnyat-pol-na-balkone.html
Second way
Application of metal structures. Using this method you can easily raise the floor to a level of 20-30 cm.
To install such a floor you will need a profile pipe or angle, a welding machine and a welder, where would you be without it.
The preparatory work proceeds as in the example above. Using welding, a metal frame is made in the shape of the base of the balcony.
It rises on improvised legs to the level of the height we need for the floor.
After welding, the structure is fixed with anchors or construction dowel-nails to the base of the balcony.
Next, the rough floor covering is laid on it. It can be plywood, OSB, tongue and groove board, etc.
It would be nice to consider placing a wooden sheathing on top of the metal structure. It will improve the process of attaching the subfloor.
As a finishing layer, on such a floor you can use not only linoleum or carpet, but also parquet, laminate and tiles.
How to raise the floor on a balcony with your own hands - instructions from a professional
The balcony should be practical and comfortable.
It can be used for storing things or turned into an extension of the room, equipping another seating area for the whole family, but for this, in addition to the concept of flooring, it will also need to be insulated. An uneven floor on a balcony can cause a lot of inconvenience both in terms of installing furniture there and simply when cleaning the room.
In addition, by raising the floor on the balcony, you can get rid of the inconvenient threshold between the loggia and the room. There are situations when the difference in levels is very noticeable, thereby greatly spoiling the appearance of the room.
If you have decided to tackle the floor yourself, but do not know how to raise the floor on the balcony with your own hands, then the article below will help you with this.
More on the topic: We insulate the floor on the balcony and loggia with your own hands
Basic Supplies and Tools
Of course, before you start work, you need to make sure that everything you need is available. And we need the following:
- plywood. It can be chipboard or OSB, fairly large sheets, at least 20 mm;
- wooden beam. Section 30x40 or 40x40 mm;
- dowel, 80 mm, more is possible;
- black wood screws, 65 mm, you may need more;
- insulation (you can use penofol or polystyrene foam);
- roulette;
- bubble level, pencil;
- drill or screwdriver;
- jigsaw;
- circular saw (you can also use a grinder with a suitable blade);
- hacksaw.
Depending on how you plan to raise the floor, this set may differ slightly for each specific case.
Preparatory work
Preparing the balcony for the start of raising the floor with your own hands is quite simple and usually does not take too much time.
The first thing to do is to completely remove everything stored there from the balcony. Nothing should interfere with further work.
Secondly, if there is an old screed on the balcony, it is imperative to dismantle it to the very base of the slab. This work can be done using a hammer and chisel.
Next, you need to remove the resulting construction debris from the balcony, collecting and discarding all remaining pieces of the old screed.
After this, the floor is treated with a primer specially designed for concrete (of course, only if you actually have a concrete floor).
To prevent the occurrence of mold and the development of bacteria, the timber should be treated with an antiseptic. After complete drying, you can proceed directly to work.
Materials and tools
Considering the large number of ways to raise the floor on a balcony, we provide a list of necessary materials and tools for each method separately. This approach will not confuse site visitors.
Cement-sand screed. To fill a wet screed you will need:
- river sand or quarry sand, sifted;
- cement grade M300 (more durable grades can be used);
- fiberglass;
- plasticizers;
- damper tape;
- metal profile for beacons;
- self-tapping screws for fixing beacons, but it is better to install them on cement-sand piles;
- a container for stirring the solution (due to the small volume of work, a concrete mixer may not be used);
- hammer drill or electric drill with mixer;
- rule;
- level;
- hydraulic level;
- roulette;
- fishing line or construction cord;
- trowel;
- construction pencil;
- sanding machine or self-leveling mixture.
Dry screed. Carrying out work on installing a dry screed requires the purchase of materials and tools (the latter can be borrowed from friends, acquaintances, neighbors or rented):
- expanded clay;
- sheets of flat slate (plywood, gypsum fiber board, OSB or chipboard);
- polyethylene film;
- metal, U-shaped profile for beacons;
- self-tapping screws;
- damper tape;
- aluminum rule 1 m long;
- hammer drill;
- level;
- hydraulic level;
- roulette;
- fishing line;
- screwdriver or Phillips screwdriver;
- knife;
- roulette;
- jigsaw;
- pencil;
- buckets.
Wet screed on expanded clay. To raise the floor using expanded clay and wet screed, you need the same materials and tools as for cement-sand screed. Additionally, you only need to buy expanded clay and plastic film.
Extruded polystyrene. Raising the floor using extruded polystyrene sheets is easy. All you need to have on hand is:
- extruded polystyrene sheets;
- plywood, chipboard, OSB or GVL;
- construction knife;
- roulette;
- marker (construction pencil).
Metal carcass. Installation of a metal frame is possible if you have:
- metal corner or profile pipe 50x50 mm;
- plates under the heel of the rack;
- anchor bolts;
- Chipboard, plywood or OSB for flooring;
- self-tapping dowel for attaching anchors to the balcony slab;
- welding machine;
- electric drill or hammer drill;
- roulette;
- marker or pencil.
Lags. To install the joists you will need:
- block - dimensions depend on the installation method and the height of the floor;
- Chipboard, plywood or OSB for flooring;
- studs or U-shaped supports;
- self-tapping dowels for attaching racks to the balcony slab;
- wood screws;
- antiseptic;
- electric drill or hammer drill;
- screwdriver;
- jigsaw or wood saw;
- roulette;
- marker or pencil.
Raising the floor using cement screed
Be prepared for the job to be labor-intensive and messy.
First of all, you will need to thoroughly clean all potholes and existing cracks. If they are deep enough, it is better to seal them with a solution of sand and cement.
For a floor installed on an open balcony, it is worth considering a slight slope from the wall of the house.
Next, let's start constructing the formwork. To do this, boards approximately 2.5 mm thick are installed around the perimeter of the balcony. You can also use thick moisture-resistant plywood. Using metal corners we secure the corner nodes.
Now you need to lay waterproofing material in the floor formwork. You can use a special membrane, roofing felt, glassine or high-density cling film as it. The sheets are laid with an overlap of 15-20 cm. The edges of the waterproofing must be brought to the height of the formwork.
Now you can start laying the reinforcing material.
Pouring concrete is best done in 2 stages. First make a batch of fine gravel or expanded clay, and then make a second, more liquid layer. This will become the leveling layer.
Dry screed device
To begin installing a dry screed on the balcony and insulating the floor, it is important to seal all existing cracks on it.
This applies not only to the floor itself, but also to the wall that adjoins it. The perimeter of the balcony must be protected with a protective barrier, which can be constructed from thick, moisture-resistant plywood or boards. Between the wall and the sheathing you need to leave a gap of 8-10 mm for laying the heat insulator there.
As for the height of the protective barrier, it should be equal to the height to which the floor needs to be raised minus the height to which the thickness of the floor covering will be equal.
The sheathing must be installed in such a way that when the boards are laid on it, the latter is positioned strictly horizontally.
Now you can lay the waterproofing material. Both special membranes and glassine, roofing felt or even high-density cling film are suitable. It is important to overlap the waterproofing sheets by 15-20 centimeters, and bring its edges to the height of the formwork itself.
Now let's start filling in the dry bulk material. The main requirement is that its composition be homogeneous. Fine-grained slag, perlite, silica or quartz sand or expanded clay are well suited for these purposes. The backfill is laid flush with the sheathing and compacted properly.
Leaning on the sheathing, we lay 10-12 mm plywood on the screed or lay floorboards.
Dry screed
Dry screed
The use of dry screed involves the use of light bulk fillers to create a lifting layer. Thanks to this feature of the material, you can significantly raise the floor without overloading the base. Typically, expanded clay, quartz sand, perlite, and fine-grained slag act as backfill.
Video - Dry screed on the balcony
Stages of work execution
- The floor is covered with waterproofing and damper tape is applied. The perimeter of the balcony, if necessary, is limited by formwork so that the screed does not lose its shape.
- The backfill is laid out and compacted on the prepared base, which is additionally covered with a layer of film on top.
Dry screed on the balcony
- Sheets of rough covering are laid on top, most often it is moisture-resistant plywood, but there may be other options. The good thing about plywood is that it is a natural, environmentally friendly material that has no unpleasant odors, is easy to work with and is affordable. The sheets are laid in two layers for greater strength and fastened with self-tapping screws. It is important to remember that all wooden parts must be treated with an antiseptic so that they do not subsequently become moldy and become a haven for various insects.
Raising the floor using joists
We carry out the standard procedure for cleaning the floor surface and eliminate all potholes, carefully filling them.
Now let's start installing the logs. We need to get a structure that is a wooden frame located around the entire perimeter of the balcony. A board should be laid along it, as well as in the middle.
To do this, take boards 2.5 cm thick and install them on the edge. This will be the height to which our floor will be raised. You can fasten them together using metal corners.
When the structure is ready, we will begin laying waterproofing material, which can be roofing felt, glassine or dense polyethylene. The laying is done with an overlap, and the edges are brought out onto the sheathing.
Next, we lay the insulation. When using polystyrene foam, be sure to fill the gaps formed between it and the sheathing using polyurethane foam.
But when using mineral wool, you will also have to lay waterproofing on top of it, since this material is hygroscopic and, when wet, loses its thermal insulation properties.
Floor boards are laid on top of the sheathing. Also suitable for this are 10-12 mm plywood or two layers of gypsum plasterboard.
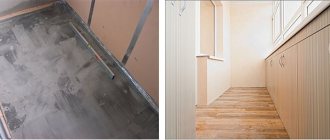
All that remains is to install the finishing coating (linoleum, laminate, ceramic tiles) and the work of raising the floor can be considered complete.
So, we talked about the main possibilities of how you can raise the floor on the balcony yourself. The above recommendations will help you not only raise the floor, but also level it, and also insulate it, if necessary, creating a comfortable, convenient and cozy additional room.
Source: svoirem.ru/balkon-i-lodzhiya/kak-podnyat-pol-na-balkone-svoimi-rukami-instrukciya-ot-professionala.html
Types of subfloor
There are three types of ways to level a subfloor before finishing: joist floors, adjustable floors, and screeds. In turn, each type has several device options:
- each of them is “cold” and “warm”;
- floors on joists are made in one or two rows;
- adjustable floors come in “adjustable joists” or “adjustable plywood”;
- The screed can be classic (wet), semi-dry or dry.
Raise the floor level
The need to raise the floor in a house most often arises when carrying out initial installation and finishing work in a new room, but it happens that the need to raise the floor level also occurs during the redevelopment of housing and its major repairs.
This technological operation is labor-intensive, but can be done independently with your own hands, for which we advise you to study the main stages and technologies before starting the work process, with a description of several options and materials that can be used.
Raise the floor level a few centimeters
If it is necessary to raise the floor just a few centimeters, the task is simplified, since you can do without special bedding and the use of polystyrene foam, and it is enough to simply pour a cement screed at the required level; dry building mixtures for floors are quite suitable for this; it is advisable to use a high-quality mixture of sand concrete M300.
It is important here that the general floor level in the entire room is at the same marks, for which you first need to check it; a laser level is best suited for such matters (it is not expensive, but simplifies the task many times over), and it will also be useful in other areas in the future finishing works.
Working with it is just as simple, install it in a room so that the beam covers as many rooms as possible (if there are many of them). Turn on the laser and make marks along the red beam, in the corners, in the middle of the walls, in doorways, and then away from them The required distance down is marked where the floor level should be - this will be the mark of the future floor.
From the resulting line we subtract the thickness that the floor covering will occupy (for example, floor tiles, this is 1.2-1.5 cm, taking into account tile adhesive) on the first floor and in the basement we carry out waterproofing (you can use roofing felt or a special coating waterproofing like Glims waterstop) and you can make a screed.
If the thickness of the screed is minimal, and in the future it is planned to use parquet as a floor covering, which requires ideal evenness of the base, then it is necessary to pour a self-leveling floor (self-leveling leveling solution).
If it is necessary to fill a screed of more than 3 cm, you must use a cement-sand mortar when pre-installing guide beacons and level the floor strictly according to the specified beacons.
Screed with expanded clay
Screed with expanded clay
This method is good for those who, for various reasons, prefer a cement screed, but are afraid to do it, since the floor level needs to be raised quite significantly. All that is required is to pour expanded clay into the cement-sand mixture, which will significantly lighten the weight of the leveling fill layer. Then everything is done as described earlier: waterproofing, installing beacons and laying out the mixture. Only its level should be 2-3 cm lower than the specified level, since a layer of ordinary mortar is laid on top of the lightweight screed, now along the beacons.
There is another option to lighten the screed using expanded clay, but it will require leaving the formwork in place. With this method of raising, the floor is covered with waterproofing, beacons are installed on it, and dry expanded clay is poured between them so that the surface of the bedding layer does not reach 2-3 cm to the level of the beacons. Then the solution is applied and leveled on top. Expanded clay is needed in two fractions: medium and fine, this will allow it to be compacted better.
Self-leveling, self-leveling floors
Before pouring the floor with a self-leveling agent, the surface is covered with a layer of deep impregnation primer, after which the screed composition is mixed to the thickness recommended by the manufacturer and poured into the far corner of the room.
For the initial leveling of the mixture, a wide metal spatula or an aluminum plaster rule is used, and a needle roller, which is used to roll the poured but not yet set mortar, will help to avoid visible joints between self-leveling batches.
Do not lose marks on the walls during the process of pouring the self-leveling solution and try to work as quickly as possible in one room, since the self-leveling material sets quickly, and it will be impossible to get rid of the joints of the mixture during slow work even when using a needle roller.
Cement-sand mortar, screed
If the thickness of the thin-layer liquid screed is planned to be from 2 to 5 cm, then first beacons are installed along the length of the room in accordance with the required thickness of concreting (ordinary plaster ones can be used), the top line of which should extend to the marks left by the water level.
It is best to attach the guide beacons to a fast-setting solution, for example, gypsum plaster, which, after pouring and hardening of the concrete, can be cut out along with the beacons. The interval between beacons should not exceed 1.5 meters in a normal room, but they should not be installed closer than 120 cm from each other.
Next, a cement-sand mortar is thrown or poured between the guides, the excess of which is removed with a long, even lath or rule, and large cavities on the surface of the screed are eliminated by smoothing them with a wide (from 50 cm) metal spatula.
Preparatory work
Before raising the floor, the balcony needs to be prepared. Although it is part of the apartment, it still does not have its microclimate. The concrete base of the floor is cold and absorbs moisture well, so the first thing you should take care of when making repairs is waterproofing.
It is recommended to use several methods, for example, treatment with bitumen-based mastic and covering with roll material/film. Penetrating mixtures that provide reliable protection of concrete from moisture have proven themselves very well. Before applying the composition, the surface must be thoroughly cleaned, the existing cracks must be rubbed, and then treated with waterproofing in accordance with the instructions.
Waterproofing
When protection from moisture is ensured, you can begin construction and repair creativity. Having decided on the height to which you want to raise the floor and your wishes for the future covering, you should choose a method.