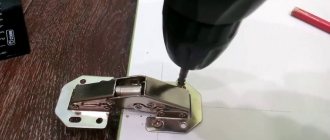
When installing any door in the entrance opening, you need to prepare a place for the hinges and, if necessary, install locks. Home craftsmen use a chisel and a hammer for this. Professionals have already switched to a milling cutter for cutting locks. Let's consider how a manual milling machine can be used for operations not related to decorative surface finishing.
Preparing a door for a lock mortise Source moysignal.ru
Types of manual milling installations
Inserting a lock into an interior door with a router is much more practical than using a drill, much less a chisel. The latter tool generally requires certain skills. Otherwise, there is a risk of damage to the decorative coating of the door. In addition, this process takes quite a long time.
A hand router can complete the task in a very short time. And the quality of work is a bonus. The mechanism will make all the necessary grooves and recesses with extreme precision and without damaging the surface of the door. And the need for fine-tuning arises only in some cases. Usually, after the operation is completed, constipation can be installed immediately.
But the device does not insert hinges with a router until the very end. At the final stage, you still have to do a little work with a hammer and chisel. To select angles. But, after passing the cutter, this operation becomes simple and takes little time.
All manual milling cutters can be divided into 4 categories:
- vertical;
- edge;
- combined;
- special purpose.
A simple plunge router Source ytimg.com
A vertical router is also called a plunge router. It is used for cutting grooves. Moreover, the width and depth of the passage can be set in advance. This tool is often used as a router for cutting locks and hinges.
Edge routers process the edges of wooden products. They are used where decorative finishing is needed. Therefore, they also have another name - edging.
The combination tool is usually used by professional woodworkers. It combines the capabilities of both vertical and edge options. And it can also be considered as a device for inserting loops with a router.
Special-purpose power tools come in different varieties. It performs certain technological tasks. And the most common among craftsmen are dowel and lamella milling cutters. They are also called figireans. But all of them are used for curly processing of wood surfaces.
Installation
Having screwed one part of the hinge to the door leaf with self-tapping screws, proceed to inserting the other part into the hinge beam. Different masters carry out this stage in different ways.
- First way . Mark the location of the hinge on the box until it is inserted into the opening. To do this, place it on the floor, place the door leaf inside and, taking into account the upper gap of 3 mm, mark the location of the hinges.
- Second way . When the box is inserted into the opening, the door is placed against it, placing stops underneath. Align to the desired height, taking into account the upper gap, and mark the loops in this position.
- Third way. Although experienced craftsmen do not shift the loops from the originally made marks during the insertion process, they still measure the location of the cards embedded in the canvas just in case.
- The measurement is taken from the top edge of the fabric to the beginning of both loops. For example, the top edge of the top hinge is located 20 cm from the top edge of the door, and the top edge of the bottom hinge is 170 cm from the top edge of the door.
- Then marks are made on the loop beam for the upper edges of the second parts of the loops. In this case, 3 mm is added to the obtained values for the upper gap. In this case, marks are placed at a distance of 20.3 cm and 170.3 cm, respectively.
- Draw arrows indicating in which direction from the mark to embed the loop. Both arrows will point down, as the top edges of the loops are marked.
- Then the second parts of the loops are cut in according to the same pattern.
- This method is convenient when the master works alone and there is no one to help him hold the canvas for method number 2.
Tool selection criteria
Let's figure out how to choose a tool with a cutter for installing locks on doors. And also for preparation for hanging loops. And since the above operations are only part of the capabilities of the router, the recommendations boil down to the following.
Master at work Source psoriazugat.psopt.ru
See also: Catalog of companies that specialize in doors, windows and related work
You don't need too powerful a tool for housework. Most of its features are simply not useful. In addition, there is a small minus. A tool designed for more complex tasks than cutting a simple groove will not be able to provide the required high speeds. In addition, professional milling cutters weigh a lot.
Secondly, it is necessary to pay attention to the actual overhang of the working tool. In the technical documentation it is somewhat overstated. And therefore, later, during work, you have to drill out the grooves to install the lock with another tool.
An important parameter is ease of use. The device should not be heavy and have a sufficiently long cord. And also with a convenient location of control buttons. Its functionality must be thought out in advance. So that when working, you don’t have to urgently look for a replacement if the tool is not able to perform the required operation.
Convenient template for inserting loops Source avito.st
The equipment also plays an important role. The backlight option is very useful for a high-quality overview of the work area. And in addition to cutters for cutting in hinges and locks, the device must have various holders and additional attachments. It’s good if the kit already includes a special device that makes it easier to insert locks and hinges. It will be very useful especially for beginners.
Fitting
- The next step will be trying on the lock. It should not dangle in the groove.
- Now trace with a pencil the front lining of the lock inserted into the finished recess.
- Use a chisel to cut away any excess wood from the inside of this outline. This item is considered completed provided that the lock escutcheon exactly coincides with the plane of the door end.
- After this, you can finally insert the lock and secure it with screws through the holes made.
Adjusting the strike plate
- Insert the cylinder, screw it with the bolt from the kit and make sure that the product functions well. The key should turn without effort. If so, you can secure the handle.
- Next you need to apply something to the latches that leaves marks. After closing the door, turn the key so that marks remain.
- Drill holes along these marks and level them with a chisel.
- You have finished cutting the lock into the wooden door. The last thing you need to do is prepare the hole for the strike plate, align it and tighten it with self-tapping screws.
There is nothing impossible; it is easy to embed a lock with your own hands, provided that you strictly follow the instructions. The only difficulty is that the grooves are perfect, however, if you use a router, it will be easier for you.
Setting up the router
Inserting loops with a router begins with setting up the tool. The device itself will perform the entire operation if you set the necessary parameters on it in advance. In particular, it is necessary to set the required engine speed. And also set the desired processing depth.
To do this, you will need to bring the tool to a neutral position:
- Place the router on a hard and level surface.
- Loosen the feed pin lock.
- Lower the cutter to the level of the supporting surface.
- Set “0” on the processing depth scale.
- Secure the pin.
Professional router Source routerforums.com
Using a template
The procedure in question is also carried out with a special template. You can get it yourself as follows:
- First, the offset of the cutter is measured.
- You can determine the dimensions of the template for insertion using conventional measuring tools.
- 2-3 passes are performed.
- This step produces a finished hole.
After receiving the special element in question, you can embed the hinges using other various tools.
In conclusion, we note that the process of cutting hinges with a router is carried out to obtain a high-quality niche. The features of the tool can significantly speed up the process and reduce the likelihood of serious defects. By using special attachments, you can significantly expand the capabilities of the device.
Preparing doors and working with a router
Let's take a closer look at how to cut grooves for a lock and hinges on a door using a router. Let's look at an example of hanging loops. The lock is cut in identically, using a similar algorithm. In order not to apply markings manually, it is better to purchase special templates. Their cost is low, and the store has a wide assortment for any model of locks and awnings.
Installing a cutter into a tool Source amazon.com
Step-by-step instructions for working with a router:
- The door is securely fixed to the floor with the side end surface facing up. It is better to use special clamps.
- The places where the loops will be located are marked.
- A template is placed on the marking and secured.
- The router is adjusted to the desired depth and placed on top of the template.
- Wood is removed from the inside of the template using a milling cutter.
- At the end of the operation, the router along with the device is removed to the side.
- The groove is refined with a chisel (the corners are selected).
- Hinges are installed on the treated areas and secured with fasteners.
Choosing good cutters
All cutters are divided into types according to geometry:
- End;
- Worm-shaped;
- Cylindrical;
- Conical.
They are also divided according to the material being processed:
- Aluminum;
- Ceramics;
- Steel;
- Plastic;
- Soft metals;
- Tree.
The significant difference is the size of the shank. Most often, cutters with 6 mm and 8 mm are used, less often with 12 mm shanks. There are their analogues, similar, but not identical. They are measured in 1/2 and 1/4 inches. In terms of millimeters, these are 6.35 and 12.7, but it is prohibited to use them in a collet chuck designed for shanks with sizes of 6 and 12 mm.
A collet chuck differs from a jaw chuck in that it does not tolerate errors. In this regard, the fixation is unreliable, and during operation the cutter can fly out and cause injury to the operator. To avoid such situations, you should use cutters for a router, which a sales consultant in the store will help you choose.
When buying cutters, you should choose only high-quality products. They will last for more than one day, and will not break during operation, as happens with cheap, non-certified products. It is better if the coating of the product is made of high-carbon stainless steel.
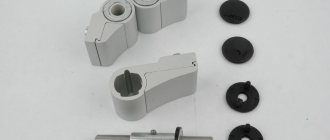
Furniture hinge insertion
To select a large-diameter blind hole with a hand router, you need to make a template yourself. It has a stop bar, thanks to which the tool can be easily positioned on the furniture door. It is done very simply.
Milling for a furniture hinge Source amazon.com
A rectangle with sides 280×140 mm is cut out of plywood 4-5 mm thick. Divide the width in half and draw a line. We retreat 70 mm from the corners along one of the sides along the length and also connect these points with a line. At the intersection we drill a hole with a diameter of 51 mm.
We select a wooden plank for support. Its length is 140 mm, and its cross-section is 5×30 mm. We place the stop at the very edge of the hole, stepping back from the edge of the rectangle by 15 mm. We attach the plank with glue and small nails. The template is ready.
The depth is set on the router to 11.5 mm. The template is applied to the furniture board, and the strip rests against its end. And in several passes the groove is selected. In this way, a blind hole is made for a standard furniture hinge with a 35 mm cup.
Marking
The location of the upper and lower hinges is marked on the door leaf.
To do this, use a tape measure or ruler to measure 20 cm from the top and bottom edges. To avoid mistakes, craftsmen draw an arrow indicating where the loop will be directed from the mark. The arrows are directed towards the center of the door end. Place the loop map against the mark and trace its outline with a sharpened pencil. The hinge part must not touch the door leaf.
It is not recommended to simply measure the length and width of the card and draw a rectangle with this data on the end, since the card may not have a strictly rectangular shape - it may be beveled or trapezoidal.
The loop will fit perfectly into the groove made along the contour. In order not to confuse the loops during installation, they are signed with a marker B (top) and H (bottom).
Briefly about the main thing
To cut a lock with a router or hang hinges on a door, you need to choose the right tool. It is best to use a simple submersible model, since the combined model is heavy. This will create certain inconveniences, especially if there is no experience in such wood processing.
Using a router to cut in fittings is easy. But the process is greatly simplified if there are special templates. Having placed the device in the desired place, all that remains is to set the required processing depth on the tool and install it on top.
When working, you need to carefully monitor the process in order to notice overload in time. It can occur if the wood structure is too hard. Then you just need to reduce the speed of the tool using a special switch on the body.
What types of locks are there for MD?
Taking into account the insertion, use and other parameters, locks are:
Flat. They have a rectangular frame and tongue that are separate from the locking latch. They also have a push handle (halve). Such designs are very reliable.
Flat lock
- Round. In such mechanisms, the cylindrical body, latch and tongue are connected. The shape of the handle can be arbitrary. In such devices, the stopper and the cylinder are embedded in the spindle.
- Small flat with a rotary handle. No latch provided;
- round with a knob handle.
Round castle
To install a lock, you need to know the thickness and structural features of the door. Modern MDs are:
- with MDF 3.5 or 4.5 cm wide;
- New type wooden MD with a width of 5 cm;
- Wooden fiberboard door with an old design (with a plank frame).
Installation of the device in the MD can be done without outside help, but to do this you need to know the design features and operation of the lock.
Flat
These locks are the most expensive. They are more difficult to install, but they have good burglary protection. They load the door leaf (DP), so it is better to install them in an existing door.
Only a small flat lock can be installed in MDF panels with a thickness of 35 cm. Also suitable for them are locks with a wide tongue of about 1.5 cm. The width of the end is a maximum of 2.4 cm. This limitation is explained by the fact that only a wooden frame can withstand the load created by the lock.
MDF door
Common mistakes
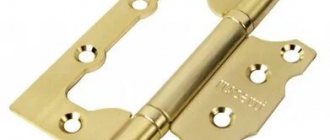
- Incorrect determination of the door opening/closing direction. This is an important initial stage that needs to be treated with great care.
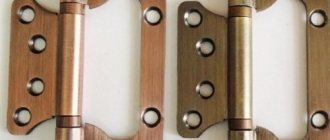
- If you mix up the parts of the detachable hinge, the part with the rod will be at the bottom and the door will not be able to hold on.
- Marking on the hinge beam without taking into account the upper gap. If you do not provide a gap of 3 mm and measure 20 cm from the top of the counter, then the door will rub against the top bar and close with difficulty.
- A too tight fit of the hinge cylinder to the door leaf leads to poor closing of the door.
- Screwing in self-tapping screws without first drilling a hole for them. In this case, the canvas may crack and split.
- Installing the loop and fixing it with self-tapping screws at the location of the knot. You cannot screw screws into a knot, because the wood in this place may crack. If a knot is found on the canvas, then the loop is slightly moved to a safe place.
If you follow the recommendations and pay attention to possible mistakes, even a novice master can install a mortise hinge.
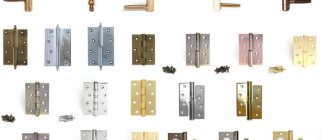
Instructions for installing hinges in interior doors with your own hands
Author of the article: Alexandra Ivanova March 18, 2021
Door hinges are an important element of an interior door, on which its functional purpose and correct opening/closing depend. The most popular are mortise hinges. By following the instructions and recommendations of experienced craftsmen, you can install them yourself.