During the operation of the door, various problems arise with its operation. For example, the panel begins to creak or does not close tightly. This is caused by distortions, lack of lubrication in the canopies, swelling of the panel or box and other problems. Fortunately, most of them can be fixed with your own hands. But you need to understand how interior doors are adjusted. You also need to be able to work with certain tools. Following the instructions and recommendations of specialists, you will be able to set up the door yourself, saving money.
Tools
To adjust the design of an interior door block, a standard set of tools and devices is required.
- Screwdriver.
- Hammer.
- Plumb.
- Chisel.
- Grease (a pencil lead will do instead).
- Plane.
Where is it used?
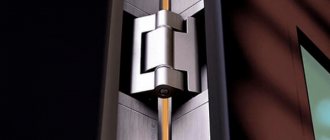
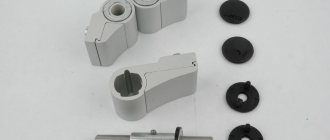
Screw-in hinges are also called pin hinges; they are installed on doors with a hinged part (with a quarter). Instead of regular slats, they have small rods that are screwed into the block and the canvas.
The dimensions and weight of the door determine the choice of screw-in hinge model. For lightweight folding sashes and swing doors, you need to choose awnings with 2-3 rods. For large and heavy doors, hinges with four rods are used - such models are made of special steel and can withstand heavy loads.
The advantage of such fittings is easy adjustment using a hexagon. It can be adjusted in height or horizontally, as well as in the clamping area.
Positive traits:
- different colors;
- complete with decorative caps;
- made of non-ferrous metal, mainly aluminum (plastic pin hinges are used for lightweight doors or windows);
- high wear resistance;
- beautiful appearance and compactness.
Among the disadvantages is the appearance of noise during operation, but models with a special plastic insert can solve this problem.
Screw-in mechanisms are universal - there is no need to choose for the left or right side. The canvas on such hinges cannot be removed, which can be attributed to both disadvantages and advantages.
The caps cover the rods and act as a decorative element. They are available in a variety of colors and can be chosen to suit any interior.
Operating procedure
- Determine the location of the problem. These can be hinges, a box, a canvas or a lock (latch). If the problem is related to the opening of the sash, then it is better to check the verticality of the elements with a plumb line. The tightness of the interior fabric is easily determined using a sheet of paper, which must be placed between the sash and the frame at the moment of closing.
- Prepare the faulty area for repair. In some cases, this requires opening access to the hinges by removing the canvas. Often the box is skewed relative to the wall. In this situation, it is necessary to dismantle it and then reinstall it.
- Eliminate the problem using the necessary tools and equipment.
Interior door device
House owners often try to install the entrance group themselves. But to do this as successfully as possible, you need to have an idea of its structure. Let's consider the design of an ordinary walk-through structure.
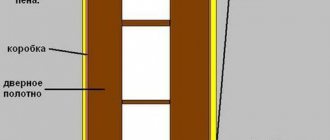
Essential elements:
- canvas (sash);
- box;
- platbands, which are needed to hide the seam when installing the structure.
These parts are the minimum that you will need to install the entrance group. If you decide to install a double-leaf structure in a room or a sliding door, then you will need a threshold, extensions, closers or hinges, a connecting key, and a door strip.
As a decorative element, you can use a crossbar, transom, or additional strip. For decoration you will need handles, latches, latches, and locks.
Adjustment in planes
The way to adjust the opening and closing of an interior door is to adjust the leaf in two planes. In most cases, this is enough to tighten the screws in the door hardware elements.
If you are yet to choose an interior door unit, it is important to take into account the nuances that will allow you to avoid such a breakdown.
- A lightweight door leaf does not sag due to the low load on the opening axis.
- Hidden hinges ensure long-term operation of the interior door structure without the need for horizontal adjustment.
- Plastic interior doors require horizontal adjustment much less frequently.
Vertical
If the interior panel opens or closes on its own, then its plane is not vertical. The misalignment may be due to the misalignment of the hinges or the non-vertical position of the hinge beam. An extended building level will help you check what is causing the spontaneous opening of the interior door.
If the problem lies in the alignment of the hinges, then it can be solved by reinstalling them. If the verticality of the hinge beam is broken, it needs to be adjusted.
Sometimes the problem of opening an interior door on your own is much easier to solve. A key and lock must be inserted into such a door if it is expected to be closed most of the time.
Horizontal
Horizontal sagging of the canvas is the most common problem requiring adjustment. Its reason is the constant pressure of the weight of the canvas on its axis of rotation. If the hinges are open and the elements of the interior door block are made of low-density material, then the door will sag.
To determine whether horizontal adjustment is required, checking the verticality of its elements using a tape measure, pencil and plumb line will help. Horizontal sagging is easily recognized by the non-parallel lines of the edges of the sash and frame beams.
Standard instructions for horizontal adjustment of an interior door include dismantling the hinges and their subsequent reinstallation. The top loop is moved above its previous location, and the bottom loop is moved below.
If the hinges are unsuitable for further use, they must be replaced by choosing a larger size. If the interior panel has a large mass, it is necessary to install an additional, third loop to reduce the load on the other two.
It happens that some time after installation at the top of the door the leaf clings to the frame. To eliminate this defect, a small layer of solid wood is removed from the upper end of the sash using a plane. After this, you need to restore the paint layer of the panel.
Correctly adjusting the interior door during installation
When the installation is almost complete, the frame is in the opening with the sash fixed, you can proceed to adjusting the interior doors with your own hands. It is not difficult. It is necessary to adjust before filling the gap between the structure and the wall with foam. We check the operation of the product, measure the distance from the sash to the frame. We take into account the unevenness of the gap due to the uneven connection of the lintel with the hinged beam. To eliminate this, you should remove the box to adjust the joint of the beams.
Setting up locks and handles
Adjustment of locks and handles is required in two cases.
- The lock is not seated tightly in the socket.
- The lock escutcheon touches the narthex.
The first problem can be eliminated by tightening the screws or installing a gasket in the space between the lock and the socket.
The second problem can be easily solved by deepening the groove under the latch or lock.
Butterflies
“Butterfly” is one of the varieties of overhead one-piece loops.
It is suitable for doors with low weight. This model got its name due to the similarity of its shape to the wings of a butterfly. Professionals call such a loop a card loop. The butterfly can be adjusted in different planes:
- Horizontally. The work is done using the adjusting screw. You should loosen it a little and level the door. It is recommended to alternately loosen and tighten the screw, checking the result each time.
- Back and forth. You need to slightly loosen the fixing screw on the overhead hinge. Then, by tightening and loosening it, you should align the door.
- Vertically. Adjustment is made using the upper and lower screws on the installation pad.
To perform the work efficiently and achieve the desired result, actions must be precise and accurate.
Adjusting the hinges
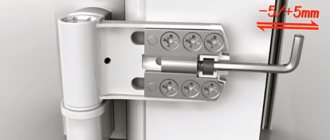
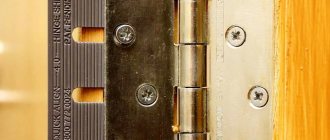
Often the problem of opening and closing an interior door occurs when the hinges are not seated correctly in the thickness of the elements of the door block. It is easy to check the correct location of the hinges: the surface of the box (canvas) and the metal surface of the hinge must coincide. If this is not the case, the door hinges need to be adjusted according to the following diagrams.
- If the surface of the hinge is recessed into the thickness of the wood material, then the interior door does not close tightly. In this case, a cardboard backing of the required thickness is placed under the loop.
- If the surface of the hinges protrudes above the solid structure, then physical force is required to close the sash. To eliminate this problem, you need to deepen the groove for the hinge in the thickness of the corresponding elements of the door block.
- Sometimes the sash gets stuck on the frame. The reason is incorrectly installed hinges; they are visible from the front side when the interior door is closed. In this situation, it is necessary to rearrange the loops so that they are not visible.
Possible causes of malfunctions
There are several main factors that cause problems or the need for adjustment of walk-through structures:
- installation of new sashes;
- violation of the geometry of individual elements;
- box deformation;
- poor fit of loops.
When a problem occurs, a characteristic symptom appears.
Which interior doors to choose for an apartment: types, description of advantages and reviews
Prevention of door defects
Early identification of signs of door malfunctions will help minimize their consequences in the future and reduce repair efforts. The condition of the structure, its components and mating surfaces should be periodically checked. Also, when eliminating one problem, it would be useful to correct other, perhaps less significant problems. For example, how to adjust the door hinges of interior doors so that the geometry of the frames in the opening is also restored? To do this, carefully measure the bars and record their position - especially for the loop part. A comprehensive examination of the parameters of the door along with the frame will also make it possible to identify currently unnoticeable problems or possible future threats to the fittings.
Where is it used?
Screw-in hinges are also called pin hinges; they are installed on doors with a hinged part (with a quarter). Instead of regular slats, they have small rods that are screwed into the block and the canvas.
The dimensions and weight of the door determine the choice of screw-in hinge model. For lightweight folding sashes and swing doors, you need to choose awnings with 2-3 rods. For large and heavy doors, hinges with four rods are used - such models are made of special steel and can withstand heavy loads.
The advantage of such fittings is easy adjustment using a hexagon. It can be adjusted in height or horizontally, as well as in the clamping area.
Where to install
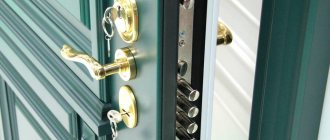
Pin hinges are suitable for all types of wooden doors and quarter-hinged windows. Such fittings can be installed on glass doors of steam rooms and office premises. Fixation on the glass is carried out using clamping loops or fastenings in the glass hole.
Hinges for glass doors differ from ordinary ones in that they have two welded screws and a part for fastening to the glass. There can be from two to four turning elements, depending on the massiveness of the doors.
Where to install
Pin hinges are suitable for all types of wooden doors and quarter-hinged windows. Such fittings can be installed on glass doors of steam rooms and office premises. Fixation on the glass is carried out using clamping loops or fastenings in the glass hole.
Hinges for glass doors differ from ordinary ones in that they have two welded screws and a part for fastening to the glass. There can be from two to four turning elements, depending on the massiveness of the doors.
Rubbing the canvas
If during operation the sash rubs against the frame, metal is visible from under the decorative coating, it needs to be adjusted.
In this case, the input adjustment is carried out as follows:
- Use a socket wrench to loosen the fastening of the middle canopies. You should also loosen the loop at which friction is observed.
- The canvas is moved to the side towards or away from the box. This depends on the direction in which the misalignment is detected. The end nut is then tightened.
- The sash is “rocked” a little until the hinges return to their original place.
- After this, tighten the fastening.
- Then you need to open and close the sash several times to check the effectiveness of the work done.
If the friction has decreased but remains, the procedure must be repeated. If the hinges are worn out significantly, adjustment will not help them. You need to buy new fittings.
How to measure gaps?
In factories and professional workshops, special rulers are used to easily measure the gaps between panels. It is not difficult to make such a ruler yourself. It can quickly compare different gaps without even remembering the values.
The coincidence of adjacent panels along the plane can be checked by applying a ruler with its edge simultaneously to two edges of different panels. A gap of 2 mm is allowed between the ruler and the body.
Manufacturer's recommendations for body panel gap sizes vary among different body panels. There may be different options for the front fender and hood compared to the front fender and front door. Typically, the size of the gaps between panels varies from 3 to 8 mm. In some cases the gaps may be larger.
DIY replacement
A competent operation to replace the seal will require scissors and silicone glue.
Repair stages:
- Purchase a seal with the required parameters. This needs to be taken care of in advance. If necessary, visit a hardware store with a sample of the old gasket, where, with the help of a consultant, select an analogue.
- Removing the old seal from the groove using available tools. The operation must be performed carefully so as not to damage the canvas.
- Thorough cleaning of the grooves. Dirt will not allow the new insulation layer to be laid properly.
- Applying silicone glue to the corners. This will prevent the elastic from moving.
- Laying the insulation into the groove, starting from the attachment point of the old gasket. An even distribution is required, without sagging, folding or tension.
- Fastening the joint tightly. Sometimes the seal is cut at a 45 degree angle to ensure a tight fit at the end.
- Quality checking. Cold air should not penetrate into the room.
Eliminating door squeaks
All kinds of noise effects can characterize not only aesthetic imperfections of the door structure, but also structural ones. Creaking indicates either excessive friction of parts and surfaces, or wear of mechanical elements in critical parts of the connection. Most often, unpleasant sounds are eliminated by lubricating the hinges. Moreover, the lubricant composition itself must also have a useful technical function. For example, when answering questions about how to adjust butterfly hinges on an interior door, experts often mention the need to use graphite-based lubricant. After changing the position of the parts of such a loop, its working surfaces are processed. A traditional method of such care is also recommended, which involves using a piece of pencil lead instead of a special lubricant.