Spring reflections
Having seriously thought about how to adapt the house for living in the “off-season,” the owners drew up a rough work plan, which included additional insulation of the walls, floor and roof.
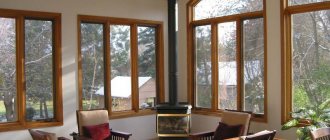
However, it was obvious that the problem with the windows had to be solved first. The wooden frames had long since dried out, the sashes sagged, the glazing beads barely held on, and through gaps were discovered under the platband: obviously, the builders did not have the appropriate material to seal the assembly seam, or no one set such a task for them. It is not surprising that at night an unbearable cold blew from the windows, and in stormy weather the wind whistled into the rooms. There was one more problem: as soon as the electric heater was turned on, the glass completely fogged up and streams of condensation began to flow along the window sill. Attempts to plug the cracks with foam rubber and tow or seal them with sealant yielded virtually no results. One day, after a particularly cold night, the desperate owners even covered the outside of the windows with thick plastic film, attaching it to the frames with a stapler. This made the house look uninhabited and the rooms became noticeably darker. But no warmer.
And then it was finally decided to install modern window structures instead of the ancient “carpentry”. The owners began making their choice, first formulating their requirements for new windows, the main ones of which were:
- complete tightness and good thermal insulation;
- high level of light transmission (due to the wide frames and frequent sash of old windows, there was clearly not enough light in the rooms);
- protection not only from cold, but also from heat (the owners remembered that the southern room can be very hot in the summer);
- convenient opening with the possibility of not only burst, but also adjustable ventilation;
- weather resistance and easy maintenance.
Required materials and tools
The process of replacing glass in wooden windows does not require special knowledge or professional skills. Local conditions will be decisive when choosing equipment. The components also depend on the design features.
Basic tools and materials:
- glass, selected depending on the expected temperature and mechanical effects;
- when making it yourself - a tool for cutting glass (glass cutter), a limiter (table) where the glass profile will be cut;
- chisel (remove glazing bead);
- when repairing a supporting structure - hinges;
- hammer, screwdriver, hacksaw, pliers;
- In the work, a ruler (tape measure), cutters (cleaning the groove from old materials), markers (pencils, pens) for marking, a rebate and a zenzubel to eliminate the distortion of the frame quarters will not be superfluous.
Suitable option
Having studied the market offers, our heroes chose windows made of PVC profiles, which had all the necessary qualities and were at the same time significantly cheaper than their wooden competitors.
User reviews helped to conclude that saving on components and workmanship does not justify itself under any circumstances. Therefore, the owners of the dacha turned to a trusted company that cooperates with the leading manufacturer of PVC profiles, the German company REHAU.
BLITZ profile
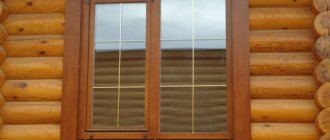
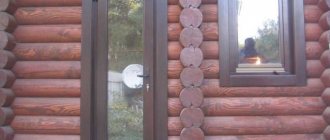
The company used the entire range of profile systems and double-glazed windows and could produce windows for any building. The 3-chamber BLITZ system with an installation depth of 60 mm was quite suitable for a country house. These profiles have quite sufficient heat transfer resistance of 0.70 m² °C/W, two sealing contours made of innovative RAUCELL EPDM foam material and a service life of up to 60 years. At the same time, the visible width of the profiles (frame + sash) is only 105 mm, thanks to which the windows let in more light. The manufacturer's assortment included a wide range of products laminated to look like wood, but the owners of the house opted for classic white frames, which went well with the facade of the house and were also cheaper.
The windows use an innovative Raucell EPDM seal
So that the seal can be distinguished from a fake, it is marked with the REHAU logo along its entire length in increments of 50-100 cm
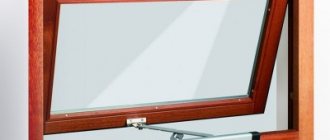
Tilt Safe element
It was decided to equip the windows with high-quality ROTO NX fittings with a built-in micro-slit ventilation function and Tilt Safe elements for increased burglary resistance in the tilted position of the sash. At the same time, they did not forget to equip two gable windows in the attic, where there was a granddaughter’s bedroom and a small playroom, with child safety locks, which do not interfere with opening the sash for ventilation, but do not allow it to be opened without a key.
The hardest part was deciding on double-glazed windows. What to prefer - the simplest single-chamber product or a two-chamber one? With regular glass or energy-saving? After much deliberation, it was decided to install the most modern double-glazed windows with innovative multifunctional Energy Light glass from the world leader Japanese company AGC. At a very affordable price, it has important advantages over conventional glass: due to the reflection of infrared radiation in both directions, it reduces heat loss in the cold and protects rooms from overheating in the summer heat.
In addition, such glass has a slight specularity, from which two more benefits follow: firstly, the window itself, without any curtains, protects from prying eyes, and secondly, the window openings do not look like dark gaps on the facade and the house looks more attractive.
The main delivery package has already been agreed upon with the manufacturer. But during the visit of the surveyor, the owner got the idea to replace the small window in the kitchen-dining room with a panoramic one. It will be so nice in May, sitting at the dining table, admiring the blooming apple trees in the yard! The supplier willingly met halfway, but recommended using 5-chamber DELIGHT-Design profiles for the possible installation of more powerful double-glazed windows, and in addition, equipping the structure with internal safety glass AGC Stratobel, which is much stronger than usual, and also does not crumble into sharp fragments, but only cracks because it is reinforced with a polymer film. Having learned about the properties of AGC Stratobel, the owner immediately asked to install such glass in the attic where there was a children's room.
Checking the package before installation
Professional builders consider this point to be the most important, because if you don’t pay enough attention to it, then all further work will be inappropriate.
First of all, you should check the dimensions of the opening for the window and the arrived glass unit. If the size of the opening is 184 cm, then the size of the frame itself should be 180 cm. The difference between the values is needed for the gap between the side posts and the wall itself.
If the height of the opening is 120 cm, then the normal height of the frame is about 116 cm, so that the plastic support profile - the clover - is completely inserted at the bottom. It must be included in the initial package of the double-glazed window, and it is mandatory to install it. The clover is used to correctly install the window sill indoors and screw the ebb from the outside.
For windows with mosquito nets, make sure that the fasteners are suitable. There are situations when pens or small parts are lost.
Important! In most cases, you will need to select the dowels yourself. The length of the elements must correspond to two dimensions of the casing board + the size of the gap.
It is recommended to check the entire structure for minor damage and cracks. Recalculate the number of arrived linings and drainage holes.
The window sill will often need to be ordered separately. Also, for proper installation, you need to order glass linings.
Window selection steps
1. Choosing a window profile brand.
It is important that the profile manufacturer is well known and has been working on the Russian market for a long time. Since such companies carefully monitor compliance with the technology and formulation of their products, which guarantees the durability of the window frame structure.
2. Selecting a profile system.
For a country house in the middle zone, three- or four-chamber profiles with an installation depth of 60 mm (BLITZ, TERMO-Design) are suitable. In a cottage where people live permanently, it is better to install windows made of five-chamber profiles (depth 70 mm) - GRAZIO or DELIGHT-Design. And maximum heat saving will be provided by profiles with six or more chambers with a depth of 80 mm, for example, INTELIO 80.
3. Selection of double-glazed windows.
Maximum comfort and savings on heating/air conditioning are achieved when installing products with multifunctional glass. And such double-glazed windows cost the same as regular double-glazed windows.
4. Selecting the brand and type of fittings.
Here, as in the case of profiles, European origin and the long successful history of the brand are the key to reliability and resistance to stress and corrosion. Even when glazing a country house, it is better not to save money and order windows with a tilting function, which will allow you to ventilate the room without a strong draft. Stepped inclined opening will provide a long-lasting flow of fresh air with adjustable intensity - this option is useful in all living rooms. Also at the dacha it makes sense to provide anti-burglary fittings and locks with a key, which will increase the security of the home. The most advanced fitting systems, such as Roto NX, provide a burglary resistance class of up to RC2 even when the sash is tilted for ventilation.
5. Selecting a supplier of finished windows.
This must be an official dealer of the profile manufacturer.
What to fasten with?
This type of work does not require complex expensive tools.
Note. If you do not have the necessary power tools, it is more profitable to rent them for a short period, since the entire work will not take more than one or two working days.
Basic tools, equipment and auxiliary materials that will be required to install Euro-windows in wooden frames:
- mechanism for gripping double-glazed windows;
- jigsaw;
- electric drill with drills for metal and wood;
- regular and rubber hammer;
- screwdriver with replaceable heads;
- set of hex keys;
- handle with hexagonal tip for removing pins;
- universal adjusting key;
- wedges and gaskets for installation;
- measuring tools: level, square, ruler and tape measure;
- a clamp with a wide grip for securing materials during cutting;
- fasteners;
- casing board;
- flax batting for thermal and noise protection of side seams in the casing;
- insulation and waterproofing tape for thermal protection of large seams;
- galvanized self-tapping screws for fastening the casing;
- linings;
- sealant.
Important! In the case where only one person will install a PVC window in wooden openings, a set of mounting slings will be required to lift and fix heavy frames in the window opening.
From measuring to finishing
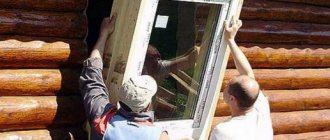
In order not to make mistakes when measuring window openings, it was necessary to dismantle the internal trim, slope panels and window sills. The geometry of the walls was not entirely correct, and this also had to be taken into account. However, modern installation technology allows you to vary the width of the gaps along the perimeter of the frames within the range of 15-60 mm, so no additional construction work to adjust the openings was required.
The house is frame-panel, and the windows were installed between the frame posts. To begin with, the craftsmen installed a so-called casing box in each opening, which serves to compensate for the resulting deformations of the building. Next, they fixed the window frames with anchor plates to the casing boxes (so that the fasteners were invisible), hung the sashes and tested the operation of the fittings. After this, we checked the position of the windows again according to the level and filled the installation seams with polyurethane foam. The excess foam was not cut off, but waited until a crust had formed and was gently crushed, making the seam more durable and resistant to moisture.
The craftsmen warned that before finishing the openings from the outside, the seam must be protected from moisture with a polymer membrane or mastic, and sealed with vapor barrier tape on the side of the room. These works were carried out immediately before the installation of new trim and window sills, which the owner of the house made himself from pine boards.
Estimated replacement cost
The final price consists of several factors:
- installation season;
- type of house;
- model;
- manufacturer;
- quality of execution;
- size and equipment.
As a rule, companies offering services for installing plastic windows dismantle old frames for free, and install new double-glazed windows on a turnkey basis, that is, the price includes the price of the double-glazed window itself, work on its installation, window sills, olives, stand profile, seam insulation, slopes .
The cost of installing new windows in a brick house will be approximately 1200 - 1400 rubles per 1 sq. m. meter, and panel - from 900 to 1100 per 1 sq. meter.
A balcony block consisting of one door and two windows, a width of 2100, a balcony door height of 2100 and a window height of 1450 cm, will cost approximately 20,000 - 25,000 rubles.
A three-leaf window 1750 cm by 1400 cm will cost approximately 15,000 - 18,000 rubles with all work, a double-leaf window measuring 1300 by 1400 - 12,000 - 14,000 rubles.
Statistics show that plastic windows are becoming more and more popular; they tolerate temperature changes, high humidity, and are resistant to rot. Renovating an apartment, house or office, as a rule, begins with replacing old windows with plastic ones. They can be installed at any time of the year and can be done on your own if you follow clear instructions and advice from professionals.
What to pay attention to when installing windows
1. The window must be securely fastened.
To fix the frames, special dowels or mounting plates are used. The fastening spacing is regulated by GOST (usually it should be 500-600 mm). When installing into walls made of cellular blocks and other materials with a risk of chipping, it is important to make a distance from the surface of at least 50 mm.
2. It is necessary to take into account the shrinkage of the building and fluctuations in the size of house elements and windows due to changes in humidity and temperature.
Therefore, the seam should not be too narrow (less than 15 mm). In wooden houses (log houses or frame-panel houses) subject to significant shrinkage, casing boxes must first be installed in the openings.
3. The installation seam must be well insulated.
Before filling with foam, it must be cleaned of dust and slightly moistened (if the outside temperature is above zero) for proper polymerization of the foam. In winter, a special frost-resistant composition should be used.
4. Insulation (foam) must be protected from the sun, atmospheric moisture and water vapor penetrating from the rooms.
For this purpose, polymer and bitumen-polymer sealants and special self-adhesive tapes are used.
5. Don’t forget to make sure that the fittings of the installed window work easily and without jamming, and that the sashes do not touch the frames when closing.
It is important to notice the defect in time: the installers will correct it immediately and you will not have to call the service department.
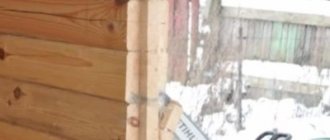
Installation of windows in a log house
Installation in a log house begins with casing.
There are three options for this process:
- Monolithic type spike.
- The pigtail is embedded with a block.
- Through the deck.
The second option is the most popular, but casing with an embedded block is considered to be the most reliable.
Algorithm of actions for bookmarking:
- In the opening for the window, right in the middle of the beam, you will need to select two vertical grooves. The optimal size is 5x5 cm. It is recommended to perform the process with a chainsaw or a circular saw.
- Drive a beam of the same size - 5x5 cm - into the resulting grooves. It is recommended to wrap the beam on all sides with linen. It is important to wrap it so that the sealing mixture is located between the wall and the beam and extends onto the walls in the opening.
- Install an edged board into the upper part of the block and secure it flush with a self-tapping screw. Two screws at the bottom and two at the top. It is recommended to drill small holes in advance, the diameter of which is slightly larger than the screw head.
- Vertical elements should not touch the top of the opening with a recommended margin of 8 cm. This is necessary so that the 5 cm thick top has a minimum distance of 3 cm from the wall beam. This distance of 3 cm is called the shrinkage gap.
- The tip should be inserted into the hole with little force. Under no circumstances should it move freely along the grooves. It is recommended to screw the screws in at an angle of 15-20 degrees.
- Next, the insulation needs to be installed in the gap and covered on the inside with insulation, and on the outside with a protective membrane from the wind.
Important! You cannot place a vapor-proof film on all sides of the insulation - this will cause the formation of condensation, which will contribute to the development and accumulation of mold.
When choosing a tenon-monolithic casing type, you will need to cut out a T-shaped element in advance, which is inserted into the grooves and secured with self-tapping screws.