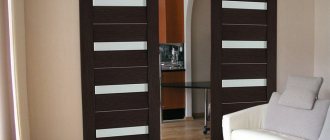
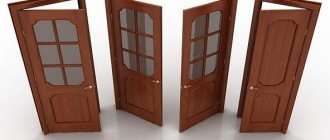
At the moment, interior double doors are very popular. They will wonderfully transform any room in the house.
Choosing such a door is very easy, since their choice is very simple, and there will be no problems with installation if you know all the stages of work and have the least specific abilities. In this article we will look in detail at all the pros and cons of double-leaf doors, their types and all stages of installation, after which you will make sure that there is nothing complicated about it.
Double-leaf interior doors (advantages and disadvantages)
pros
- The convenience of such doors is one of the serious advantages. The pendulum system makes it easy to open doors in both directions without much effort.
- The abundance of design so that the type of doors is not limited.
- Their appearance will give your home sophistication, hospitality and comfort.
- Selecting double-leaf doors for unusual door openings is much easier than selecting single-leaf doors.
Minuses
This design does not have any significant shortcomings, except that for small amounts of living space it may simply not be suitable, and if installed in such conditions, beauty may come at the expense of inconvenience. To solve this problem, many people choose sliding doors. This small-sized option for small areas is the best, and their mechanism for opening and closing the door is also quiet and smooth.
Types of double doors
Before purchasing double doors, you should be aware that they are and what types are not unique.
- The design has 2 rules of operation - swing and sliding.
- Type of construction: paneled glazed, paneled blind and powerful.
- Made from aluminum, glass, wood, plastic, and MDF.
Having decided on the size of the door and design, and having purchased it, you may forget about it for a while, since at home there is still a huge amount of work to do to dismantle the old door and its frame. Do not forget about preparing the place for installing the newest one. As for the door frame, you can either make it yourself or purchase it. The width of the box must correspond to the width of the wall, without maintaining any limits; if at a time when the box turns out to be narrower, then extensions can be used. Likewise, everything concerns the height of the box, which is equal to the height of the doorway. When taking the loops, scroll in your head in which direction the opening will occur, so that difficulties do not arise at the final step.
Preparatory work
The next stage of installation is taking measurements. First you need to think about what kind of structure will be installed: sliding or hinged. After all, each of them has a number of opening features.
Sliding doors are well suited and fit into rooms with a small area. After all, they save a lot of space. To install them, you will need to purchase a special design necessary for the operation of swing doors.
Note: you can build a plasterboard box into which the doors will subsequently “go” after opening. However, it will significantly reduce the space in the room that could be used for furniture.
The swing method of opening door leaves is very popular.
After all, it increases the level of sound insulation, unlike a sliding door. However, swing doors take up more space in the room and require more room to maneuver. This type of door is most often installed in large rooms. Once the design of future doors has been chosen, you can proceed to measuring the existing opening. To subsequently decide whether it requires changes (decrease or increase). It is worth remembering here that the width of the box should be 110 mm less than the opening.
For this type of door, the opening should already be wider than both leaves and plus 100mm.
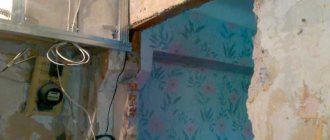
Removing the old door and preparing the doorway
First, you need to remove the old door from its hinges, and only later begin to remove the frame. Carefully unfasten the box using a pry bar or crowbar, and after that, clean the gap from the remaining cement. If the cement is hard and cannot be easily removed, and at the same time its surface will not interfere with the installation of a new box, then you can get by with removing the previous foam. The place has been prepared, and at the moment we are focusing on the door frame, which we don’t necessarily need to take, but maybe make it ourselves.
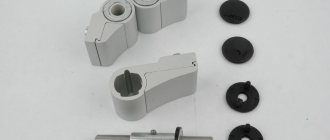
Required Tools
To cut the door frame bars you will need the following tool:
- Or an electric miter saw, which allows you to get a better cut and speed up the work process.
Miter saw
- Or a hand saw with a fine tooth and a miter box.
Hacksaw and miter box
- Also, a miter box and a hacksaw can be a single tool, almost a miter saw, but with a manual drive.
Miter box with hacksaw
What other tools and materials will be needed to assemble a double door frame:
- hammer;
- screwdriver;
- chisels, 2 pieces - wide, about 20 mm and smaller, about 10 mm;
- wood drill 3 mm;
- self-tapping screws 3.5*50-60 mm;
I recommend: Where should the door to the pantry open?
Assembly and types of door frame
The door frame is a frame made of beams, which comes in two types - U-shaped and rectangular. A rectangular frame is usually used for interior doors, in the bathroom and toilet, and all other options are ideal for doors without a threshold.
Door frame assembly steps:
1. First, before assembling the box beam, we need to adjust its dimensions to the double-leaf door.
The end result will be like this:
- ШВК= 2*(ШД+3)+4, where
- ШВК – width of the box from the inside;
- ШД – the width of the door itself.
2. Having made all the measurements and markings, we cut the box block at an angle of 40 5 degrees, which is done with a simple hacksaw with a small tooth.
3. The upcoming action will be to embed the hinge into the vertical part of both the frame and the door.
Using a hammer and chisel or a router, we carefully make cuts into which the loop will later fit. But by using expensive hinges, you can do without cutting in.
4. At the end of assembling the box, all that remains is to assemble all the parts into a pile.
Having attached the parts to each other, we twist them with 3 screws, but before that it is necessary to drill a hole with the smallest diameter compared to the diameter of the screwed-in connector, which will avoid cracking while screwing in the fastener element.
Installation of the loop and its quality level is also a crucial moment of all your work. The reliability of the door and the process of opening and closing itself depend on its correct choice and installation, since a hinge, of any kind, is a critical element standing between the frame and the door, but not just standing, but uniting them.
The double-leaf version of interior doors is usually used in two cases - a large doorway and a small room. Compared to a single canvas, they take up much less space when open. There is another reason for this choice - double-leaf interior doors look very elegant, especially modern product models. Their canvases can be hinged or sliding. There are also swinging models, but they are used extremely rarely. How to install a double-leaf interior door? Installation of double-leaf products is not difficult, but it requires a certain consistency and knowledge.
Content
- Preparing the opening video
- Doorway calculation
- Door frame assembly
- assembly of the finished box
- DIY box installation video
- Installing loops video
- Installing a frame in a doorway
- Installation of sliding interior doors
- video guide installation
- hanging the canvas video
Preparing the opening
Before proceeding with the installation of the door, an opening for it is prepared. If there is a need to dismantle the old door frame, this is done using a nail puller, a hammer and a screwdriver. Then the opening is cleaned of any remaining plaster and foam. Depending on the material of the wall, a grinder, chainsaw or hammer drill is used to expand it. You can reduce the space to the required size using lumber or plaster.
The walls must be ready for finishing and leveled as much as possible - the door frame should not be adjusted to their curvature or be knocked out of plane.
Doorway calculation
There are double-leaf interior doors whose dimensions do not fit the existing opening. The calculation of its width is carried out according to a simple scheme - plus the width of one panel, the gap between it and the beam and the thickness of the box. The resulting amount is multiplied by 2 and 4-5 mm is added to it for mortgages. For example, let's take the most common door width of 600 mm and frame thickness of 25 mm. (600+3+25)x2+4=1260 mm. Its height is calculated in the same way. But here you should take into account the gap between the door and the floor - 10-20 mm. 2000+10+25+15 (gap between frame and door)=2050 mm. When constructing a threshold, the height of the door, the double thickness of the frame and the gap between it and the leaf, multiplied by two, are summed up.
Door frame assembly
Assembling the finished box
Modern door models are produced complete with fasteners and frame parts, ready for assembly. In this case, the work will not require much effort. It is necessary to decide on the opening side of the canvas, measure the length of the racks, taking into account the unevenness of the floor and the prepared opening. In accordance with its height, saw off the bottom of the racks. Then install the dowels into the holes located in the end cuts on the side posts of the box. Pull the parts together until they fit completely and secure them with corner brackets. For this purpose, there are special grooves on the back of the box.
Door blocks can be sold fully prepared for installation, with seating grooves for hinges, or they can be without them. In this case, you will need to perform a series of actions to cut them out - this process will be discussed below.
DIY box installation
When assembling a door frame with your own hands, first of all you need to adjust the timber to the dimensions of the door leaf. Its dimensions are double the width of the canvas plus 6 mm for gaps. When calculating the height of the box, 10 mm is added to the door dimensions for clearance at the bottom and 3 mm at the top. The top beam and the ends of the posts adjacent to it are cut at an angle of 45º.
Next, the door frame is assembled - its corners are fastened with three self-tapping screws, the length of which should reach the center of the second beam. Two of them are screwed at an angle from the side post upwards, the third is located between them, but is screwed in from above.
Installing hinges
The location of fastening and rotating devices is marked on the doors. To do this, measure 20 cm at the end of the canvas and attach a loop. Its outline is outlined with a pencil or a sharp knife and a groove is selected at this point to the required depth. It can be done using a chisel, but in order for the recess to be neat, it is better to use a router - it will allow you to carry out the work more accurately and quickly.
Through the hinge plate attached to the grooves with an awl, places for self-tapping screws are marked and guide holes for them are drilled. Their diameter should be 1-1.5 mm less than the corresponding screw sizes. In the same way, a recess for the crossbar is made on one of the sashes.
Then the doors are placed on the frame, a place for the hinges is marked on the side bars, and a groove for them is made in the same way as on the canvases. There are modern fastening and rotating devices that do not require such work. But butterfly hinges are not particularly popular among door craftsmen - there are too many complaints and they prefer time-tested mechanisms.
Hinges are installed on both door leaves and pillars, and a crossbar is installed on one of the leaves.
Installing a frame in a doorway
When installing the assembled door frame into the opening, using a level and plumb line, the accuracy of its horizontal and vertical position is checked.
The structure is attached to the wall with long screws (8-10 cm). First of all, the side pillars are fixed. Wooden spacers can be installed between them and the wall.
The resulting space around the perimeter of the box is filled with polyurethane foam. The degree of its expansion should be taken into account - one to five. The door block parts must be protected from foam. After it dries, the excess is carefully removed with a knife and the gap is closed with a platband. The door leaf is hung in place and a hole is drilled at a slight angle for the bolt locking plate.
Installation of sliding interior doors
Installation of guides
Interior sliding double-leaf doors, photos of which can be found on the Internet, are a good alternative to swing models. They free up space, which is very important when the apartment area is small.
If you plan to install double-leaf interior doors with your own hands, you should pay special attention to the material they are made of. If one guide is enough for a wooden door, then a heavy glass product will require the installation of two structures. Moreover, it is better to plan the lower one in advance so that it is possible to deepen it into the floor. In any case, it is attached before the floor is finished, to its concrete base. The horizontality of the guide is checked with a level.
In order to determine the location of the upper guide, which is attached first, the door is leaned against the opening and a horizontal line is drawn along its upper edge. It should be taken into account that there should be a gap of 10-15 mm between the floor and the canvas. You can immediately place a gasket of the required thickness under the door.
The wooden block on which the guide will be attached must be positioned strictly horizontally, otherwise the doors either will not open or will spontaneously move to the side. It is fastened with dowels or self-tapping screws, depending on the wall material. In addition, there are models with a guide that is attached to special brackets or to the ceiling.
Having retreated 2-3 mm from the wall, a guide is installed on the lower edge of the beam using screws. It is set strictly according to level.
The next step consists of attaching the roller mechanisms to the door. At the upper end of the canvas, 20-50 mm are measured on both sides, and the brackets are screwed in with screws. If a lower guide is installed, then a groove 18 mm deep is made in the lower part of the doors. Its width should be 2 mm greater than that of the bottom rail, made in the form of a flag or knife. Since it is not easy to carry out this process at home, it is better to choose a lower guide consisting of a U-shaped profile or two slats.
Hanging the canvas
Rollers with supporting screws are inserted into the upper guide. Limiters are installed at its ends. The canvas is installed on the flag of the bottom rail and hung with brackets on the screws. The fixing nuts are slightly tightened. By turning the screws on the brackets, the door is adjusted vertically, taking into account the gap above the floor. The second door is hung in the same way. Then, using a wrench, the nut is finally tightened and the blades are locked on the rollers.
The final stage of installation of sliding doors is the installation of fittings and a decorative strip that masks the guide rail.
Author: Sergey and Svetlana Khudentsov
10
Installing hinges on interior doors
A huge number of us are sure that two hinges are more than enough for the reliability of an interior door, but as practice shows, this is not always the case. Everything depends on the weight of the door and its dimensions, so it is recommended to install another additional hinge in the center.
- Marking the locations should be started from the top of the door, moving 25 cm, and another 50 cm from this mark, and in the same way measure 20 5 cm from the bottom of the leaf.
- At the end of this, use a pencil to emphasize the edges of the loop of the upper and lower edges.
- Having turned the door over on its edge, we apply the open hinge so that the groove protrudes beyond the edge of the canvas.
- Having aligned the canopy with the previously drawn lines, we outline the outline of the sash.
- Against the grain of the wood, we cut off the part we don’t need to the mark.
- To ensure that the loop fits perfectly, we carefully smooth out and clear the marked area, not forgetting that the wood can crack under heavy loads.
- Having adjusted all the parts, we screw the awnings to the door with self-tapping screws, the short length of which is 3.5 cm.
With the installation box, everything happens except for this:
- We mark the placement of the loop in a vertical position.
- Later we insert the door into the frame, leaving a gap of up to four mm between the door leaf and the top beam.
- Having pulled out the door, we cut out the grooves with a chisel and then, inserting the door back, we cut the hinge into the standing door frame.
- After checking their functionality a couple of times, make sure that the door fits into the frame without any snags.
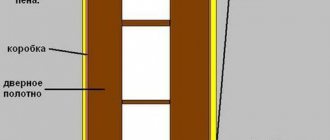
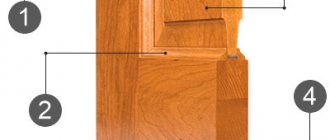
What is a swing door made of?
So, when dismantling the door, we found out what it consists of, let's repeat and analyze it popularly:
- The door leaf is the door itself.
- Door frame - bars (mostly made of MDF or wood, if the door is more expensive) of a special shape, which are attached to the doorway; the door closes into the frame.
- Door trim covers the mounting joints between the frame and the edges of the wall.
- Door hinges are what the door hangs from in the door frame.
- An additional strip is not always a required attribute; it is used to block a wide doorway (the photo below shows where it is).
- Locks, latches, handles...
What does an interior door consist of?
Now we will find out how to dismantle the old double door, if there is one.
Installing a frame in a doorway
The installation of the box can be carried out in conjunction with a hung door or without it. Before installation, to avoid future problems with cleaning construction foam, it is better to protect the surface with paper, tape or other suitable material. The frame of an interior double door is installed strictly vertically using a level or plumb line.
1. First, a stand with hinges and an upper crossbar are installed.
2. By means of manipulation we align them completely evenly.
3. The next step is to expand the parts of the box using wedges.
4. After which we again control the placement of the rack with a level; it is considered set if it takes a strictly vertical position.
5. Then the second rack is installed in a similar way. If necessary, if the walls of the room are not level, the door frame must be adjusted using special small pads.
6. We drill both side posts of the box through for holes for dowels, and fix the block itself in the wall with long, strong screws.
But there is another way to secure the box in the gap - using a special glue “watery nails”. First, glue should be applied to the wood, then install the frame and place the spacers. It is better to slip a cloth under the spacers to avoid scratching the door. The advantage of this method is that there is no need to make holes.
Double door installation
Before you begin fixing the interior double-leaf door on its fixed leaf, you need to mount a crossbar - a metal pin that protrudes from the ends when locked.
Bolt installation steps:
- First, markings are applied at the intended location of the crossbar.
- After which a hole is drilled, the depth of which should correspond to the thickness of the pin, and the diameter should be 3-4 mm less than its width. To ensure that the door can be locked without free movement, the holes should be made at a slight angle.
- Using a cutting carpentry tool, the groove is adjusted to the required width and depth. Then the crossbar is inserted and secured with self-tapping screws.
At this point, we are starting to install the double-leaf door itself - hanging the panels and painstakingly fitting them to each other, using supports and racks.
Double door installation steps:
1. We install the first door and immediately control how it locks. If the trim rubs against the jamb, you need to deepen the grooves. If the door “walks”, then we place small cardboards under the hinge doors.
2. Then we install the second door in the same way.
After completing the full adjustment of the double-leaf door, the hinges must be secured with the remaining screws. In order not to affect the placement of the structure during fixation, it is recommended to install wooden spacers between the elements of the box and the base of the opening.
It is worth remembering that after installing the doors, it is not recommended to carry out work that will lead to an increase in humidity in the room, for example, plastering, priming, painting walls, etc.
Features of installing a sliding structure
For double doors, the “compartment” option is often used. Sliding structures allow you to save space in the room and look beautiful. The doors move apart in different directions - they look more interesting than the usual swing doors.
The assembly and installation of sliding doors is completely different from the previous version. First of all, you need to buy canvases and an opening mechanism.
Installation steps:
- First, a false frame is installed on the doorway.
- It is necessary to secure the guide rails along which the blades will move.
- Rollers are attached to the upper ends of the doors, with the help of which movement will occur.
- Before hanging the canvases on the guide rails, you need to install the fittings on them. This could be a lock or handles for convenience.
- After installing the fittings, you can fix the rollers into the grooves located on the guide rails.
- The travel stops need to be secured. They are installed at the two ends that guide the rail and prevent the blade from falling out of the grooves. To prevent the doors from swaying when moving, you need to secure a flag roller to the floor.
It takes two people to install the sliding system. It will be difficult and inconvenient for one person to fix the blades on the guide rails.
When installing sashes and guides, it is necessary to leave 1.5 cm of free space between the doors and the floor.
Adjustment
After assembling the sliding doors, adjustments are required. The sliding mechanism has fixing bolts and brackets with screws for changing the position of the canvas. When you tighten the staples, you can raise it higher, and when you loosen it, you can lower it. This way you can adjust both sides of the door. If problems arise with closing the sashes, you need to check the guide elements. Perhaps the fasteners are preventing the rollers from moving freely.
You can order sliding doors with a false wall from door masters. Thus, when openings are opened, they will be hidden inside the wall, which looks even more interesting and completely saves space.
Installing interior swing doors is not as difficult as it might seem at first glance. To carry out the installation yourself, you need to properly prepare the passage, take measurements and follow the proposed procedure. Installation of the sliding structure occurs in the same sequence, only the mechanism is installed differently.
Foaming
Before this step of installing interior double doors, you should carefully prepare the surface in order to avoid future problems associated with removing the foam. To do this, the doors should be carefully closed with cellophane, and the door frame should be covered with masking tape. When finished, the space between the box and the wall is foamed. After that, within 2-3 hours the mounting foam should dry completely.
It is important that the foam has a low expansion coefficient, otherwise the box may warp.
Lock installation
Inserting a lock is one of the most difficult manipulations in installing an interior double door. The thing is that this step requires surgical precision, since a small discrepancy between the locking and mating parts can lead to jamming, which will later lead to the need to reinstall the lock, and this will spoil the appearance of the door. In addition, another difficulty lies in the fact that you need to create a lock mortise on the canopy. Based on this, this step should be taken with particular seriousness.
1. First, the lock body is applied to the end of the door at the planned height, after which it is outlined with an awl.
2. Then you need to make a groove, the depth of which is equal to the length of the lock.
3.The next step is to place the lock body. If the hole for the lock is made correctly, its bar will be flush with the plane of the end.
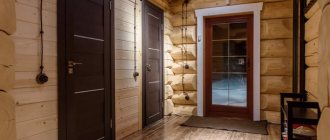
Interior sliding double-leaf doors - photos of pleasant examples:
?
Cost of double-leaf interior doors
The non-specialized cost of double-leaf doors depends, first, on the material from which the doors are made. The most expensive structures are those made from solid wood. Materials such as chipboard and MDF are significantly lower in price. Determines the cost of double-leaf doors, not counting the presence and type of mortise lock.
Economy class double-leaf interior doors, of course, attract with their affordability. But you must know how this low price is achieved.
Firstly, such doors imply voids in. The manufacturer saves significantly on material, which leads to a reduction in the price of the finished product.
Secondly, the coating is most likely made unnatural. For example, let's take veneer - a narrow layer of wood that serves to cover products; if it is unnatural, then it is simply an unnatural laminated coating.
Step by step process
It is performed in almost the same way as a single-leaf one; there are few differences, but they exist. First, you should level the stand, checking with a level, on which the canvas with the handles and lock already attached will be hung. A second stand must be attached at the top point in advance. Hang a product that contains a latch bolt that secures it.
Subsequent racks must be positioned so that the canvases are in the same plane, and only then can they be finally secured. The crossbar must be secured with a screw. The location of fixation should be carefully selected so that the crossbars can subsequently be closed with a striker plate.
Today, many apartment residents, before installing, decide which one is better to use - a double-leaf or single-leaf model. What properties should it have to make it a great purchase? It is very important that it is functional, matches the interior, and also has a beautiful appearance.
Beautiful bivalve
Mechanical properties also play an important role. For each room you need to select the best option.
What you need to have for installation and how to do it can be seen in this video:
Voted over 167 times, average rating 5
Comments
Unfortunately, there are no comments or reviews yet, but you can leave your...
Add a comment Cancel reply
We recommend reading
Door installation Recommendations on how to make and install interior doors with your own hands Installing and making your own is a way to save money during...
Door installation Installation of interior doors in a wooden house, the subtleties of the process Repair work in wooden houses has its own characteristics, according to ...
Door installation Technology for installing non-standard interior doors step by step Installation of interior doors is not very complicated, but responsible...
Door installation How SNiP and GOST affect the installation of fire doors, requirements and installation Installation of fire doors has several ...