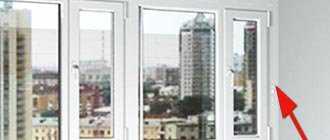
Stand profile -
This is a load-bearing element in the form of a plastic pipe of rectangular cross-section, the purpose of which is to secure the window sill and ebb.
Experts are divided on the importance of this element for the installation of PVC windows. Some believe
that installing windows without a support profile is necessary for the operation of windows, although its presence is not so important.
Others believe
that this element is not needed at all, and that installation without it, subject to certain installation rules, will not lead to a deterioration in the performance of PVC windows. Moreover, experts believe that in fact, during installation this element often creates certain problems:
- At the point where it connects with the window, a single air chamber is formed, which is not enough.
- The foam performs protective functions against the penetration of cold more effectively than the stand profile.
Preparing the installation site
The opening must be prepared in a certain way for the installation of a window sill, and for each individual installation method, the preparation will have some differences. Let's start with what is the same in all options: we apply a square to the vertical posts, aligning the edge along the lower edge of the frame profile, and draw two horizontal lines on the slopes that limit the hem. Along the lines, you need to make cuts using an angle grinder and a diamond disc to a depth of about 10–15 mm; if there is a plaster corner at the corner of the slope, it should be cut completely. Next, use a chisel or an old chisel to select pockets with a depth of about 30–50 mm in the slopes. More is possible, but it should not be less than 30 mm, otherwise the connection of the side plugs with the angle of repose will be incorrect. If the slopes will be covered with panels, the protrusion of the window sill beyond the slope should correspond to the width of the closing corner profile.
If a heavy tabletop is installed instead of a light plastic profile, you need to prepare the lower plane of the window opening. First, a plaster beacon is installed under the side of the frame, close to the stand profile, on the tubercles of cement mortar. The distance between the edge of the lighthouse and the window frame must exactly correspond to the thickness of the window sill-tabletop. Using cement mortar, a smooth horizontal edge of the opening is drawn along the lighthouse, on which the window sill will rest; it is advisable to strengthen the inner corner with a plaster corner.
Don’t be surprised, but it also happens that a window is installed without a support profile. If in this case a window sill with a thickness of 18 mm or more is installed without a trailing edge, it is necessary to increase the thickness of the bottom foam seam to at least half the thickness of the window sill profile used. Also, in the lower part of the slope, a series of vertical notches are made in the wall, 30 mm wide, 20 mm deep and about 120–150 mm high. Notches must be made in increments not exceeding 80 cm and at least two pieces per window sill.
Industry encyclopedia. Windows, doors, furniture
Before installing the window sill, you must complete step 14. Installing a vapor barrier sealing tape.
When installing a window sill, you must perform the following steps:
1. Check the window sill for consistency in size, color and absence of scratches or other damage, having first removed the protective film. In the case when it is necessary to trim the window sill depending on the size of the opening, marking is done first, and then the window sill is trimmed. The marking is made with a construction pencil relative to the center of the structure. Trimming is done with a jigsaw or a plastic hacksaw included in the installation kit. 2. Check that the connection between the window sill and the frame of the window unit is tight, airtight and resistant to deformation. 3. The gap between the end of the window sill and the load-bearing walls on the sides should not exceed 3-4 mm.4. The ends of the window sill boards must be inserted into the wall or behind the finishing of the internal slope to a depth of at least 15-20 mm.5. Cut the window sill in such a way that the “ears” protruding beyond the side surface of the internal slopes fit tightly to the inner surface of the wall without a gap and have a length of 30 to 50 mm.6. Cut out the window sill. If you have a window sill with extra width, then the excess part can be cut off from the back side - this means the edge where the window sill joins the window. It is advisable to mark the cutting line so that it passes a little (5-10 mm) behind one of the vertical stiffeners located inside the window sill (green dotted line is the correct cutting line, red dotted line is incorrect). This is necessary so that the edge of the window sill does not wrinkle during installation and is firmly docked from below to the window frame. It's all about the way the window sill is joined to the window: with its rear edge it goes under the window (about 10 mm) and is rigidly supported from below with wooden or plastic wedges, as well as a layer of foam. If the edge of the window sill is without a stiffener, its upper side will not be able to maintain an even, flat shape at the joint (it will bend inward). Glue pre-cut end caps onto the window sill with glue designed specifically for PVC. Install the window sill horizontally or with a transverse slope of 1-2 degrees towards the "beak". The window sill on the “beak” side must rest on supporting load-bearing blocks, which are installed in increments of no more than 500 mm and must not protrude beyond the surface of the wall. The outer support blocks are installed at a distance from the side slopes of no more than 100 mm.
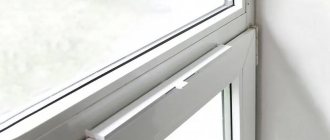
Additionally, it is recommended to install a spring bracket for a tighter connection of the window sill to the frame profile. The bracket is attached to the stand profile using a self-tapping screw. The brackets are installed by attaching them to the stand profile at a distance of 20-25 cm from each other, after which the window sill is simply snapped into the brackets and does not require additional installation.
The recommended overhang of the window sill beyond the inner surface of the wall should be ½ the width of the heating radiator, but not more than 100 mm (without brackets). If the overhang exceeds the specified value, it is necessary to use standard brackets, the distance between which should not be more than 500 mm, the distances from the edge of the window sill should be no more than 250 mm. Check the accuracy of the installation of the window sill using a level in the longitudinal and transverse directions. Be sure to foam the support pads for fixation. Along the entire length of the window sill, where there will be contact with the frame, it is recommended to apply a strip of white silicone or PVC glue. Installation of the threshold under the box of the balcony block carried out in the same way as installing a window sill. The projection of the threshold beyond the inner plane of the wall is from 30 to 40 mm.
!!! NO GAP IS ALLOWED BETWEEN THE BOX AND THE WINDOW SILL.
In order to avoid scratches on the surface and chips at the cutting site, you must be careful and cut without putting too much pressure on the window sill.
Based on thermal expansion, the maximum length of the installed PVC window sill is limited to 3000 mm.
When installing a window sill from the inside and outside under the window of a balcony block, the window sill must extend beyond the frame of the balcony door and at the same time overlap the corner of the lower quarter (wall panel) and protrude no more than 15 mm, unless otherwise agreed with the Customer.
The window sill must extend under the bottom surface of the frame by at least 5 mm and be pressed tightly against it along the entire length of the junction.
If the distance from the stand profile to the edge of the wall under the window sill is more than 150 mm, it is necessary to provide measures to prevent the window sill from deflecting under load in the area adjacent to the frame and along the plane of the window sill (threshold). For these purposes, additional support blocks and fragmentary foaming are used.
If the opening under the window sill is small, then it foams. Structurally, a new window sill is always about 2-4 cm higher than the old one, so it is usually impossible to preserve wallpaper under the window sill. The sealing under the window sill is done with a building mixture for further wallpapering or subsequent painting.
Chipboard or wooden window sills are installed in the same way.
Installation using holding brackets is also possible: using fasteners (two holding brackets are screwed in one after the other with cylindrical screws measuring 3.9*16 or screws with a half head 4.5*16) in a layer of mortar, 2 pieces each. at a distance of 60 cm – for window sills with a maximum length of up to 2 m.
Smirnova Dana
www.wikipro.ru
Window preparation
The plastic window must be disassembled before installation:
- remove the sash,
- remove the glass unit from the blind part.
Next, we will consider the most common type of window, in which the frame is divided by a vertical impost into two sections: blind (does not open) and open (with a sash). This is the popular “kopeck piece” shown in the figure.
A standard size window (approximately 1300 x 1400 mm) can have other configurations: with two sashes (without capercaillie), with two capcaillie (without sashes), with one sash for the entire window, or with one capercaillie for the entire window window. There is no point in considering each option separately, because there are no fundamental differences in installation between them, and individual nuances will be mentioned additionally.
Removing the sash
So, first of all, we remove the sash. To open and remove the sash, you must first install the handle. In addition to the handle itself, the window handle also has a base that is attached to the sash. Holding the base with one hand, try to twist the handle with the other - you will feel that you need to apply some force to do this, since there is a mechanism in the base that locks the handle every 45°. Turn the handle so that it is parallel to the base. Remove the protective film from the sash in the place where three holes are made for the handle (two for the mounting screws, and one between them for the tetrahedron of the handle) and firmly insert the handle into the sash with the handle facing down (see picture). Pull the edges lightly with your fingers and rotate the cap 90° on the base of the handle. Insert and tighten the mounting screw into the top hole, just do not tighten too much so as not to break the base of the handle. Turn the handle to the horizontal position (the sash will open) and screw the second screw into the bottom hole of the base. Close the lid. That's it - the handle is installed, the sash is open.
Now you need to disconnect the sash from the frame at the top hinge assembly. To do this, pull down the top hinge pin (shown in the photo). To do this without difficulty, the sash must be closed, but not locked (the handle is horizontal). The pin should first be pressed from above with something, such as a screwdriver, to move it away from the internal spring latch. After this, you can carefully pick it up with pliers at the lower end and pull it down, but not necessarily completely - just so that the upper hinge mechanism is disconnected (make sure that the pin is not lost during work!). Now the sash can be easily removed from the window: tilt it towards you to disengage it from the upper hinge, and lift it slightly - the sash will be removed from the lower hinge. There is no need to do anything else with the sash and it is better to put it away from the installation site, covering it with something on top so as not to cover the fitting mechanism with debris and dust.
If the pin is completely disconnected from the loop, then:
- remember where it is top and bottom, so that you can orient it correctly during installation;
- Please note that the cross-section of the pin is not perfectly round. MACO fittings it has one flat edge, so when installing the pin back into the hinge, this face must be aligned with a similar face in the loop hole to prevent the pin from jamming;
- the pin can only be inserted into the loop in the direction from bottom to top;
- the pin must be inserted into the loop until it clicks, i.e. until it is secured with a spring latch inside the loop.
types and instructions for their installation, tips for working
It all starts with assessing the readiness of the installation site. GOST 30971 regulates what the internal seam should be, and surface cleaning is mandatory in accordance with the instructions for the use of adhesive and cementing compounds. Therefore, before starting work, you need to make sure that the insulation is covered with a vapor barrier film. It would be better if it was self-adhesive. As for the space for installing the window sill, you can go through it with a construction vacuum cleaner, a brush, or a rag. In general, you need to get a clean, dry, as smooth as possible surface. Sometimes a chisel coupled with a hammer will help with this. If only everything lays evenly.
Types of window sills and their installation
GOST 30971 prescribes installation of the window sill directly on the foam insulation. For support, several blocks of wood of the required thickness are used, and the edge is inserted directly under the frame until it touches the stand profile. Outside, plastering work is carried out under the window sill to hide the layer of foam insulation.
Convenient window sill
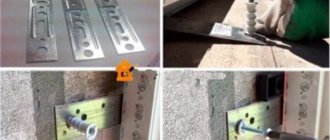
Let's see what happens. Our frame is often mounted on anchor plates in accordance with the same appendix B GOST 30971. Come on, if they were fat, everyone can watch Zemskov’s demonstration in his video on YouTube. Metal literally bends with your hands. It begs to be called foil.
In fact, galvanized steel should be used, otherwise the aluminum frames will slowly be eaten away by corrosion, but this is not the question now. Imagine that such foil holds our window together with a layer of the same foam insulation on which the window sill sits. Now we place the edge under the frame, and... you can imagine the rest. If the Möller window sill itself can withstand 200 kg of lateral load, then the window will simply squeeze out from such a weight. The installation seams will crack, and the installer will say that unacceptable operating conditions were applied and will not do anything.
The question is, do we need this? Yes, polyurethane foam sticks well, but who guarantees that it will not crack over time? It is absolutely known that she is afraid of transitions through the zero temperature mark in the wet state. That is why on both sides (outdoor and indoor) the seam around the perimeter of the frame is covered with a vapor barrier membrane. We are no longer talking about other unforeseen cases. But that's not all. Let's say we have a good Werzalit window sill that can withstand a hammer blow, everything is fine and does not sag. But for the majority this is not the case. There is an ordinary PVC profile with cheap polystyrene plugs, which shakes, all you have to do is stand on it.
Plastic window sill
What happens? Before installation, you need to evaluate the flexibility and strength of the profile. Try bending it lengthwise from the end adjacent to the window. If it doesn’t work out, then most likely the profile is good. Werzalit holds 200 kg over a length of one meter with a deflection of 8.8 mm (so it says in promotional materials). A simple profile will bend easily. What to do in this case?
Experienced users say that the bars are a laughing stock. We need to create some kind of consoles. If the window sill is already standing, then corners made of durable steel are installed for this purpose. And we will add that there is one more point that cannot be hidden from a careful look. In the same video about a series of tests of Möller window sills there is an impact resistance test. Many cheap profiles break due to this. We believe that if the consoles are narrow, and even with sharp edges like steel corners, then the method is not suitable from start to finish. It would be more correct to do this:
- We mount consoles (narrow ledges above the battery) from the corners.
- We attach the board to them strictly horizontally, level with the bottom plane of the window sill.
- Now we just rest the window sill on the resulting surface.
Without looking, we can say that the board is not suitable for 25. You need to take 35, or you need to buy timber of thickness. For example, with a side of 40 mm. You might think that it won't look very good, but in fact, a window sill broken (or squashed) by a foot looks much worse. We believe that the ledge can be completely assembled from steel if such problems exist. You can buy stripes. And so that the corners do not interfere, even before installing the window sill, mount a good steel console from a single strip and fasten it with dowels to the window opening, and not to the wall.
In this case, only straight segments are used. No corners are required. We place the heels of the steel strips across the window sill, resting it on the opening; you can even place it under the frame. We nail each one with dowels, and it’s done. A long wide strip of steel is mounted across them in place. Is it possible to replace galvanized reinforcement with a board? Yes, you can. Let us remind you that now we are talking about installing a cheap window sill that needs reinforcement, so any material will do, and it is advisable to have it on hand. So that it would be cheap.
If the window sill was already lying in the closet, and no one knows where it came from, then a lot can be said by the profile. For example, Möller has free-standing crossbars, thicker than usual, separated by equal intervals. Look online, it’s hard not to recognize this type of window sill. After this, it is enough to carry out tests on a small sample, for example, for fire resistance, and you can begin installation according to the instructions for this type of product. As for Werzalit, it is usually a slightly porous but solid material. In general, you can tell a lot by appearance. If the ends are covered with caps, simply remove them!
The best manufacturers
Window profile systems from large manufacturers are usually equipped with a stand profile.
Their separate purchase may be required if:
- The complete profile is not suitable or the customer is not satisfied with its characteristics (lack of thermal insulation filler, number of chambers).
- In case of loss (happens quite often with domestic installers) or breakdown;
The most common manufacturers on the modern market:
- Rehau. Popular models: energy-saving five-chamber profile - 561910 and two-chamber with reinforcing filler - 561790;
- KBE. A three-chamber version (article 342) 46 mm wide, 3 cm high and its analogue with a pressure wing (article 343) are often used.
- Veka. The products of this company are represented by models of the Softline line - a two-chamber profile with a pressure wing and Euroline - a three-chamber version without filler.
Also, high-quality products are manufactured by Wintech, Enwin, and domestic Novotex and Brusbox. The products of the latter two are more affordable, but the quality is not always comparable to foreign analogues.
Fastening the structure in place
After fitting, when the correct position is achieved, proceed to the fastening stage. This action is carried out by polyurethane foam, which evenly fills the space. But before installing the window sill, the cylinder needs to be heated a little. Temperature allows the foam to become more effective, which better fills empty spaces.
Window sill installation diagram
The best way to heat the balloon is to place it in warm water. But you can also use the heating system if the installation of a plastic window sill takes place from autumn to spring. The heated container is shaken well, mixing its contents. Next, the space under the slab begins to be filled. There should be no voids left.
The space under the window sill is carefully filled with foam
The work doesn't end there. The fact is that polyurethane foam has enormous expansion. This circumstance has a negative impact on the position of the board between the slopes. In order not to spoil the work, it is necessary to strengthen the element. Many people use ordinary bricks for this purpose, which are installed on the surface of the slab.
There is no need to worry about the product, since there are stiffening ribs inside the product. They can withstand heavy loads, allowing an adult man to stand freely on the window opening.
Skillful hands - two ways to make it yourself ↑
It’s quite possible to save on buying a plastic panel! To do this, you can go the following ways:
- Install a concrete window sill. To do this, make permanent formwork and pour the first layer of concrete. Next, install the top removable formwork. Lay a 1.5–2.0 mm wire mesh with a mesh size of 50x50 mm. This will help strengthen the structure. Then pour the concrete and sand it after drying. You can lay tiles or mosaics on top.
- The second way to make a window sill yourself is to glue it together from a floorboard. To strengthen the structure you will need dowels. The board must first be sanded and primed, and then varnished in several layers. It is better to install such a window sill using liquid nails.
Advice! To grow flowers on a wooden structure, it is better to use special overlays. They can be glued to wood.
Decorating a window with your own hands is both simple and difficult. On the one hand, this does not require serious skills or special tools. On the other hand, it will be quite difficult to correct the mistakes made. Therefore, it is still better to entrust the installation of window sill boards to professionals!
Installing a window sill on a balcony
Nowadays, it has become popular to install not only windows, but also balcony structures from plastic. This material retains heat well in the apartment and saves usable space. However, you should understand that the installation procedure itself is quite expensive. Therefore, many residents of multi-storey buildings perform the procedure themselves.
Before you start replacing the plastic window sill, you need to prepare metal brackets. They are necessary if it is not possible to place the canvas under the window frame. The brackets are fixed to the parapet using anchors, which increase the load on the PVC board and strengthen the entire structure.
Install the brackets at a distance from each other that does not exceed one meter. After installing the panel, you need to check the angle of inclination with a building level. Before fixing the fabric holders, you need to tighten the thread well. This operation makes it possible to level the PVC board horizontally.
After the brackets are installed, we proceed to the installation of the window sill itself. It is fixed with self-tapping screws at the bottom of the structure. It is recommended to do this with a screwdriver.
After installing a plastic window sill on the balcony, the entire surface of the PVC board should be treated with a special sealant. This manipulation is necessary to eliminate gaps and other irregularities.
Note! Unlike installing a window sill in a house, there is no need to use polyurethane foam on the balcony, since all components of the structure are quickly and reliably attached.
Installation methods
To correctly install the support strip, it is important to take into account the characteristics of the walls, building material, ebb, opening, and the part itself. The base element is mounted in two ways. The choice of installation method depends on the characteristics of the room.
Option one
It is distinguished by an increased level of complexity, so it is rarely used for self-assembly at home. The method consists of step-by-step fastening of the stand and box.
Let's look at this method step by step:
- Marking the stand strip in accordance with the frame parameters.
- Cutting the stand to the required length.
- Aligning the prepared part at the bottom of the opening according to the level.
- Measuring the distance from the top of the opening to the plank.
- Preliminary block fitting.
- Adjusting the size of the gaps between the glass and the frame.
- Sealing gaps with foam.
Option two
Suitable for beginners and experienced installers.
It involves mounting the opening according to the following algorithm:
- Removing the sweet clover attached to the box.
- Inserting an additional warm layer into the stand chamber.
- Filling the junctions of the lower element with foam or adhesive tape for sealing.
- Attaching the base stand to the bottom of the frame.
- Installation of the block using a level.
- Using foam to seal gaps.
- Cut off excess foam.
- Preparing a place for a window sill and installing it.
Caring for the window sill
Plastic window sills should only be used indoors. They should not be subjected to shock or sharp objects. Do not place heating or heating devices, water containers, or flower pots without stands on the surface.
It is recommended to wash the product with non-aggressive means. It is not advisable to use abrasive powders or chlorine-containing bleaches. Prolonged exposure to direct sunlight is not allowed.
Now he is an active foreman at a large construction company engaged in the development of cottage communities and the construction of private houses. Previously, for 14 years, as a contractor, he was engaged in the construction of houses and renovation of residential premises.
Why is it more profitable to install windows with a stand profile?
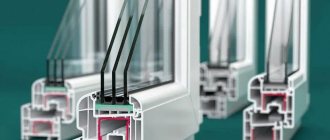
A window sill profile is a profiled strip designed for fastening internal and external window sills. It is manufactured by extrusion, and is given a specific shape and cross-section. This support profile is an important structural element in the process of “warm” window installation. It is installed under the frame of the window structure, or rather directly under the window sill. Thanks to the specially formed surface of the window sill profile, it becomes possible to strengthen the window sill more reliably.
This type of stand profile can support the window along the entire length of the lower edge of the window frame. The window sill profile is designed to install the internal window sill in such a way that it provides effective support along the entire length of the plastic window and fits tightly to the insulating layer, namely: polyurethane foam, vapor barrier tape on the inside and vapor-permeable tape on the outside.
The modern market offers several options for additional profiles of this type, so the system can be successfully used with all types of window sills. To install external window sills made of steel or aluminum, it is better to use a profile version with a special “cap”. This solution facilitates the installation process and also protects against water flowing in at low tide. This model is especially suitable when using bottom drainage.
Do-it-yourself installation of plastic windows
Before installing plastic windows, it is necessary to make a competent and most accurate measurement of the window opening. Here you need to take into account such features as the type of house, what the walls are made of, as well as external and internal finishing materials. Measuring a window also requires a careful study of the window opening from the outside and from the inside of the room, assessing the unevenness of the thickness of the walls and their unevenness. This procedure is also required when ordering a plastic window for a standard home. After all, various defects and violations of standard dimensions are a fairly common occurrence in mass-built panel houses. Proper measurement of plastic windows is also necessary for old buildings; in such apartments the depth of the window opening is much greater than in standard panel houses, and window openings can be different even in the same room.
In order to measure a plastic window correctly and without “jambs,” it is better to take the advice of a professional with good experience in installing these structures. If you are confident in your abilities and have decided to save money and install plastic windows yourself, then we hope this article will help you cope with the task.
Measuring a window opening in a house and a quarter
In houses with such an architecture of openings, the window should extend 20-30 mm beyond the side external slopes and the upper slope (Fig. 1, “A”).
Rice. 1. How to measure the width of a window in a quarter opening.
The width of the window “D” is calculated as follows: 40-60 mm is added to the distance between the external slopes “A” for the plastic window to fit into a quarter on both sides (if the walls are very curved, then a little less). After you have measured the width between the external slopes “A” and calculated the width of the window “D”, you need to check that the width of the window is not greater than the distance between the contact points of the internal slopes to the window frame “B”. In addition, the width of the window should definitely not be larger than the internal opening “C”.
Fig.2. How to measure the height of a window in a quarter opening.
The height of the window (Fig. 2, “H”) is the distance from the outer upper slope to the base of the window opening “F” minus 10-20 mm (the gap for the foam) and plus 20-30 mm for the window to enter the upper quarter. If you plan to install a window sill and ebb, then a prerequisite is the presence of a stand profile. In this case, the height of the plastic window “H” should be reduced by 30 mm (by the height of the stand profile).
Now we check the correctness of the measurement by checking the following dimensions: without using a stand profile, the height of the plastic window should be less than the distance from the upper internal slope to the window sill “E”, and with a stand profile, the height of the window should not be greater than the distance from the bottom surface of the window sill to the top slope "E" + "G".
How to choose a plastic window sill
1. Window sill covered with PVC film
The cheapest option. It tolerates temperature changes very poorly and quickly loses its appearance, as it quickly absorbs dirt and dust. The only advantage is its low cost.
2. CPL coated laminate
Such window sills are obtained by pressing paper sheets impregnated with melamine resins. Very resistant to temperatures and chemical influences.
3. Plastic with EPL coating
Window sills with EPL coating are premium class. Excellent technical characteristics, special antistatic coating, a huge range of design solutions, etc. and so on.
Necessary tool
- The window sill itself is the required width
- Plastic plugs for it
- Plastic wedges or bars, in the absence of such
- Metal saw or jigsaw
- Polyurethane foam
- Building level
- Roulette
- Well, preferably a primer
Preparing for installation
We have decided which window sill to choose for plastic windows and we can proceed directly to preparation. If, after dismantling the old window sill, there are side grooves left, then this is good, but if there are none, then you will have to cut them out. We use a hammer drill or chisel for this. The depth of the groove should be about 6 cm on each side.
The next stage is garbage collection. Using a brush, clean the work surface as much as possible.
Then we prime. Primer is necessary to increase the adhesion of the polyurethane foam, and we will also exclude fine dust from the work.
Friends, if you stain a window while priming, you should immediately remove the remaining primer, because traces may remain in the future.
The final stage of preparation is to control the gap between the window sill canvas and the base. The distance should not exceed 4 cm, as this is the optimal thickness for polymerization of polyurethane foam. Exceeding the permissible limits will lead to the appearance of “sinks” and voids in the frozen foam, which is not good: (If your distance is greater, then you need to build up the base using plaster or other methods - it all depends on the thickness:)
Installation
There are 2 ways to install a window sill profile.
Method No. 1
With this option, the window sill strip is installed first, and then the frame.
- A piece of the required size is cut.
- It is placed in the opening and leveled using a building level.
- A preliminary fitting of the window frame is done. If there is a gap between it and the top of the opening, it can be eliminated by raising the support bar. To do this, you can place pieces of timber under it.
- The space between the bar and the opening is filled with polyurethane foam.
Mr. Build recommends that to prevent the “bare” bottom profile from becoming a weak point of the entire structure in terms of freezing, it must be additionally insulated. To do this, extruded polystyrene foam, cross-linked polyethylene or other insulation in the form of a bar is inserted into one of its chambers.
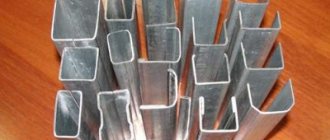
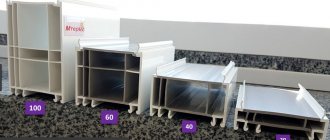
Types and parameters
The basic bottom profile differs in size, cross-section, quantity, chamber filling, length, height, thickness of outer walls, and intersection partitions. There are differences in compatibility with production systems.
Based on this, the planks are:
- single-chamber - a simple basic element for fastening a PVC structure with low weight, thickness of outer walls, low cost;
- two-chamber - a durable element with two chambers, designed for glazing balconies, verandas, loggias, for cold glazing;
- five-chamber - endowed with high thermal insulation, energy-saving properties, rarely used for domestic purposes;
- prefabricated modifications - a part of an unusual design, from 10 cm or more, equipped with vertical and horizontal sections at the same time, and have compartments for collecting sealant.
All types are intended for indoor installation and are not noticeable after finishing work. Planks of a sophisticated design completely replace windows. The cost of such models is higher, and skill is also required to mount them correctly.