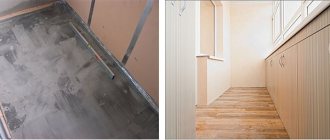
Active advertising and many positive reviews on various construction forums have led to the fact that self-leveling floors are actively penetrating from industrial facilities into residential construction. Most often they can be found on balconies/loggias, not only as a base for laminate, linoleum, tiles, porcelain tiles, etc., but also as a finishing floor covering.
It comes to the point that many experts consider a self-leveling floor on an open-type balcony to be an indispensable option for leveling a balcony slab. Let's try to figure out whether it is worth using such material when carrying out repair work on the balcony.
What is self-leveling floor
A self-leveling floor is a coating made of fluid mixtures based on cement or gypsum with polyurethane or epoxy resin, which have the property of self-leveling under the influence of gravity. It can be used as a base for finishing flooring or as an independent decorative floor. Filled with a thickness of no more than 5 mm.
Contains self-leveling floors:
- binders: cement, gypsum or polymers;
- fillers: fine sand or ground lime;
- modifiers and plasticizers - substances that give the solution fluidity, plasticity and good adhesive properties (adhesion);
- dyes - added to decorative floors.
Tile screed
The ideal option for making screed under tiles would be a semi-dry version. The installation of such a screed is much simpler than a wet one, but at the same time the surface will be ideal for subsequent tiling. It does not even require additional processing; you can lay the tiles on standard adhesive-cement immediately after complete drying.
Kinds
Self-leveling floors can be divided into several types:
According to the binder component:
- cement;
- gypsum;
- cement-gypsum;
- epoxy.
Method of application:
- machine;
- manual;
- mixed.
Place of use:
- for interior work - can only be used at positive temperatures;
- external work - in winter they can withstand freezing any number of times;
- universal - used under any conditions.
Purpose:
- coarse mixtures - intended for flooring made of laminate, carpet, linoleum, etc.;
- finishing mixtures - used as an independent decorative coating;
- high-strength floors - used to level a wooden base.
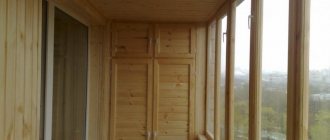
Performing a dry screed
A dry screed on the balcony will help you out if you need to not only level, but also insulate the floor. At the same time, there is no desire to interrupt the technological process while the cement mortar hardens. A dry screed is ready for further finishing immediately after its creation. Another advantage is the speed of installation. On the balcony, dry screeding will only take a few hours.
To install a dry screed, you will need to purchase: bulk thermal insulation material - expanded clay (or coarse sand, slag), subfloor elements (GSP, GVL, DSP, OSB), polyethylene film (waterproofing), self-tapping screws, edge tape (made of polyethylene foam), tape or masking tape, U-shaped profiles as beacons, a grater and a rule.
Technology for creating dry screed:
- Prepare the floor. Clean it from debris and dust. Cracks are sealed with cement mortar. The gaps between the slab and the walls are filled with polyurethane foam.
- An edge (damper) tape is laid along the perimeter of the walls, acting as a soundproofing material. If you skip this installation step, the floor slabs will make quite noisy sounds when they come into contact with the walls.
- Start waterproofing. To do this, place a plastic film on a concrete slab, placing it over the walls 6-10 cm above the level of the future floor. The edges of the film are fixed with tape.
- Beacons are installed - thick-walled U-shaped profiles that will help more accurately level the expanded clay layer. They are laid on the floor along long walls without fastening, with the wide (supporting) side down, checking the horizontality as a rule. The level of the upper edges of the profiles must coincide with the planned level of the expanded clay layer.
- Expanded clay is poured between the profiles in a layer of 3-7 cm. By stretching the rule along the beacons, the resulting surface is leveled. The remaining irregularities are smoothed out with a grater. To move along the expanded clay layer, “pedestrian paths” made of square sheets of plywood or gypsum fiber board laid out in the form of paths are used.
- Covering slabs are laid. To be able to connect them together (they will not be attached to the floor!), use plates with grooves. They are laid, pressing them as tightly as possible against the wall. Then the structure will be able to withstand any load no worse than a concrete screed. The joints in the grooves are glued with construction adhesive and fastened with self-tapping screws in increments of 5-10 cm.
- The parts of the edge tape and polyethylene film that rise above the floor are cut to the level of the coating slabs.
This technology is reproduced step by step in the video:
Is it possible to use self-leveling floors on the balcony?
Home craftsmen sometimes have doubts whether it is possible to use a self-leveling floor on the balcony. In principle, there are no contraindications for using self-leveling floors on the balcony. You just need to consider their type.
Open. A frost-resistant floor is required. But there is a problem: you need a slope for the water to drain, so as not to walk through puddles. On the Internet, all authors take this point into account and advise creating a slope of 3-5o. But not a single author explains how to do this in practice.
And they won’t be able to explain, because... self-leveling solution and water spread according to the same physical laws. Show me the magician who will make the water calm down at an incline. Therefore, self-leveling flooring on an open balcony can only be used to strengthen the surface of the slab with subsequent laying of flooring or terrace boards.
For dilapidated balcony slabs, a lightweight solution is needed, where expanded clay crumbs are used instead of sand.
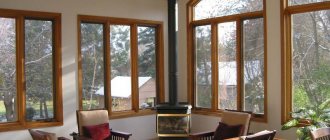
Glazed unheated balcony. Here the operating conditions are similar to an open balcony. Therefore, the requirements for a self-leveling floor are the same as for an open balcony.
Indoor heated balcony. If the balcony/loggia is insulated and heated, you can use any type and type of self-leveling coating without restrictions.
Conditional boundaries and their application
Once all the necessary surfaces are completely cleaned, you need to draw conventional marks on the walls that will show the boundaries of the concrete pouring. Therefore, you need to think in advance about what the height of the floor on the balcony will be. To do this, you will need to take into account the overall height of the balcony, how busy it is, whether there will be furniture in the room, and everything else. Taking into account all such points, you can already begin to apply marks. They are installed on all walls of the room, in several places.
In most cases, the floor on the balcony consists of reinforced concrete slabs, which themselves are flat, so no additional leveling of the surface is needed (read: “We are leveling the floor on the balcony: screed options”). However, to get an ideal result, it is worth purchasing a level and carefully measuring everything to be sure of the result. Using this device, you connect all the marks that are made on the walls and determine whether they are located at the same height from the floor.
Pros and cons of this option
Self-leveling flooring has recently gained many supporters. The sharp increase in their number is due to the presence of many advantages :
- durability - service life from 15 to 30 years;
- Suitable for all types of flooring. It can also be a finishing floor covering;
- not exposed to aggressive chemicals;
- due to its small thickness, it does not create critical loads on the balcony slab;
- if the technological conditions are met, it turns into a monolithic stone together with the concrete of the slab;
- has a smooth surface without seams, which simplifies cleaning;
- can be used as a base for the finishing floor covering or as a decor;
- has high strength (withstands a load of 15 MPa), which allows you to install furniture of any weight with any legs without the risk of damaging the surface;
- environmentally friendly - does not emit substances harmful to health;
- fireproof - assigned flammability class NG, non-flammable;
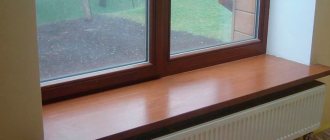
- can be used as an independent floor covering. Looks unusual in 3D design.
This is what the self-leveling floor looks like after processing the photo using Photoshop. In reality, everything is more gray and mundane.
Self-leveling flooring on a loggia/balcony has not only supporters, but also opponents who provide strong evidence as arguments. Among the disadvantages :
- strict requirements for the surface base. It must be smooth, without cracks and microcracks, dry (filling is allowed only if condensation has not formed under the plastic film glued to the concrete within 24 hours) and clean: without dust and various types of stains (paint, coffee, tea, grease, etc.) etc.);
- problematic dismantling. The strength of a self-leveling floor does not guarantee its durability. The slightest mistakes during the pouring process lead to the appearance of defects: swelling, peeling. It is not recommended to remove the self-leveling floor using a hammer drill - the reinforcement of the balcony slab may be damaged, which is extremely unpleasant (due to the strong adhesion to concrete, the self-leveling floor is knocked off along with pieces of the base). Using special products to remove self-leveling mixture is expensive and labor-intensive. It will not be possible to use the alternative option: repairing damaged areas. Not easy and, again, expensive;
- complex filling. The seemingly simple technology for installing self-leveling floors requires certain skills from the master. Due to the fact that the mixture “lives” for a short time (about 30 minutes), the self-leveling floor must be quickly mixed, poured and leveled. With regard to balconies, where the pouring area is small, this drawback is not significant;
- low hardness - wears out quickly with intensive use, especially if sand remains on the shoes: it becomes dull, micro-scratches appear;
This is what a self-leveling floor looks like after 6 years of use.
Important: do not confuse high-strength self-leveling floors (used in underground parking lots, in industrial workshops) with mixtures for civil construction.
- takes a long time, about 3 weeks, to dry;
- high price. The cost of filling 1 m2 ranges from 1,500 to 5,000 rubles, while in the range of 3.0-5.0 thousand rubles. There are self-leveling floors with a 3D pattern.
It is worth mentioning the high level of thermal conductivity. If the floor is “warm”, then this is a big plus. If the balcony is not heated, a cold one is a minus.
Professional Characteristics of Technology
This technology, despite all its progressiveness, is not absolutely ideal - it is not a “golden pill” for all pressing problems with floors.
Advantages of self-leveling floors
- can be operated with a bang in the temperature range from minus forty to plus sixty-five degrees Celsius;
- within a short period of time they are able to repel “attacks” of higher temperatures - up to one hundred and fifty degrees (this is a very useful “option” of self-leveling floors in case of fire);
- environmental friendliness and chemical inertness. After complete polymerization, the coating does not emit toxic substances that are extremely harmful to human health. Yes, yes, despite the overwhelming amount of chemical reagents in the composition.
- resistance to mechanical stress and vibration;
- self-leveling floor is a good dielectric;
- high hygiene - due to the fact that the surface is seamless;
- ease of care;
- self-leveling floors allow you to create a plane, the quality of which is impossible to find fault with - even in rooms with an impressive area;
- users are happy to note that such floors are waterproof, resistant to fungus, mold, and various atmospheric vagaries.
Disadvantages of self-leveling floors
- Extraordinarily careful preparation of the base is required - everything should be primed, where it needs to be puttied, plus there should not be any debris or dust left on even a single square centimeter. So three strokes of a broom are not enough here;
- freshly prepared leveling mixture is not only toxic, but also flammable; Getting it on your hands is extremely undesirable, let alone your face and eyes;
- whatever one may say, working with such technology requires the person performing it to have certain narrowly focused knowledge and skills - thoughtless experiments are fraught!;
- self-leveling flooring is not a cheap pleasure. Depending on the degree of complexity of the manipulations at the preparatory stage and the type of materials used, a square meter of space will cost you 30-100 dollars.
Required materials and tools
Before starting work, you need to buy materials and prepare tools and accessories. You will need:
- dry self-leveling mixture. Sold in bags of 25 kg. Self-leveling floors are in demand for finishing coating: “Knauf”, “LeviCoat”, “Berggauf”. For decoration, buy transparent mixtures “Ceresit” and “Volma”. For dilapidated balconies, lightweight compositions “Vetonit L” and “Osnovit Innoline T-43” are needed;
- deep penetration primer;
- paint shoes are special shoes with spikes. You don’t have to buy one for a balcony—you can make it yourself: take a piece of plywood and hammer in nails. About 15-20 pieces. After this, the plywood is attached with tape to the work shoes;
Paintshoes.
- a hammer drill or electric drill with a mixing attachment - the solution dries quickly, so you need high-quality and quick stirring;
- container for stirring the mixture. By volume it should take 1 bag of dry mortar;
- primer cuvette;
- brush for applying primer in hard-to-reach places;
- primer roller;
- a level 1.5-2.0 m long to check the quality of work;
- a spatula, preferably a serrated one - use it to distribute the solution evenly over the entire balcony. The length of the teeth must be no less than the thickness of the layer;
- toothed roller with a telescopic handle - for leveling the solution while simultaneously removing air bubbles;
Needle roller.
- overalls - some types of mixture can leave chemical burns on the body.
Individual protection means.
Calculation of the required amount of mixture
Dry mixture of self-leveling floors is an expensive type of building materials. Therefore, it is important to accurately determine the number of bags of self-leveling flooring so as not to overpay. This indicator is calculated by the formula: K = S x (Hn / 2 + Hm) x G x L , where:
- K—number of bags;
- S—balcony area in m2;
- Hn is the distance between the highest point on the floor base and the lowest. Determined using a laser level or hydraulic level, through a system of lines: horizon and screed, in mm;
- Hm is the minimum thickness of the screed. For self-leveling floors in residential construction it is 3 mm;
- G - mixture consumption per 1 m2 with a thickness of 1 mm. You can always find it on the packaging. Depending on the manufacturer, it can vary between 1.4-1.8 kg/m2;
- L is the weight of the bag in kg (usually 25 kg).
Manufacturing of decorative flooring
During the filling process you will need:
- drill with a nozzle for mixing components;
- bucket;
- wide spatula;
- needle roller;
- decorative materials;
- polymer clay;
- polyethylene film;
- filling components.
Step 1: Apply base foundation
The polymer for the base layer is mixed with the hardener mechanically. The mixture should be homogeneous, not too thick, but not liquid either. The ratio of components is necessarily indicated on the packaging of the dry mixture, so preparing the correct solution will not be difficult. The finished mass is poured into the center of the primed area and leveled over the entire area with a spatula. It is better to spread the mixture along the edges with a narrow spatula so as not to stain the surface of the tile, and at the same time fill all the corners well. Finally, the polymer is carefully rolled out with a needle roller, removing air bubbles.
Applying a layer - base
| Name | Description | Price |
| Ceresit CN 175 | Self-leveling universal mixture. Base material: concrete, cement-sand, anhydrite and gypsum horizontal bases. | 340 rub. / 20 kg |
| Bergauf Boden Gross | Self-leveling floor. Base material: monolithic concrete, reinforced concrete floor slab, rough screed, self-leveling floor, gypsum fiber board, chipboard, expanded clay. | 293 rub. / 25 kg |
| Hercules. Siberian master | The floor is self-leveling. Base material: Concrete, stone and other bases with a strength of at least 20 MPa. | 344 rub. / 25 kg |
| Profit Horizon | The floor is self-leveling. Base material: cement-sand and concrete screeds. | 334 rub. / 25 kg |
| Knauf Tribon | The universal self-leveling floor Tribon produced by the Knauf brand is based on a mixture of cement and gypsum with the addition of quartz sand. Base material: mineral base, pouring onto a wooden base using a separating layer system is acceptable. | 288 rub. / 20 kg |
| Axton | Axton self-leveling flooring is used for leveling concrete floors, monolithic concrete, rough screed, during repairs and construction of utility, commercial and residential premises. It is also used to create even, smooth and horizontal surfaces, both independently and for further installation of linoleum, parquet, laminate, ceramic tiles, ceramic granite tiles, and is used as a basis for “warm” floors. | 278 rub. / 20 kg |
Step 2. Decoration
When the base has dried well, you can begin laying the decor. It should match the overall interior, so pebbles, colored sand and shells are more suitable for the bathroom; decor made from buttons or coins looks beautiful in the living room; in the hallway you can lay out a mosaic made of glass, pieces of ceramics or wood. It all depends on your imagination and the availability of materials. You can combine photo printing with natural materials: for example, lay down a film depicting thick grass, and attach polymer ladybugs, pieces of wood, and flowers on top. Or put beautiful shells on an image of a sandy beach.
Coins can serve as decoration
To secure small objects, the base layer is primed with a liquid polymer mixture, and then the decor is laid out as planned.
The most important thing is that the thickness of each element should not exceed the calculated one, otherwise at the highest points the finishing layer will be too thin and will crack over time. If the materials are laid in a dense pattern, all voids between them are rubbed with polymer clay
Shells, sand, starfish are a great option for decoration
Step 3: Applying a clear coat
Transparent two-component epoxy composition. Used as a finishing layer in floors with images (3D floors)
Self-leveling floor with coins embedded in a transparent layer
The final colorless composition is mixed in the same way as the base one. Pour the decor on top and distribute it evenly over the entire area, making sure that the product does not get on the tiles. Rolling with a roller is also necessary here, since air remains in the mixture. Half an hour after leveling, the surface is completely polymerized, which means that it can be coated with a protective varnish. The varnish layer must be flush with the surface of the tile to avoid the formation of a depression.
The decor is filled with a transparent layer and varnished
Preparatory work
You can only pour the balcony floor using self-leveling mixtures onto a flat, dry surface without microcracks. Therefore, special attention should be paid to preparing the balcony slab for the self-leveling floor. The step-by-step process for leveling and repairing subfloors includes:
- clearing the premises of all unnecessary things: building materials, tools, furniture;
- removal of old screed or floor from tiles (carried out when cracking and peeling from concrete);
- foundation repair, during which microcracks, chips, and sinkholes are repaired. The technological process is described in detail here;
- installation of fences on the open balcony;
- pouring a small layer of screed from cement-sand mortar with large differences in height (2-3 cm) to reduce the consumption of expensive mixtures. Some experts advise sealing uneven areas with plaster mortar instead of screed. Their proposal has a rational grain, since the plaster composition is more durable;
- on closed balconies, damper tape must be glued around the perimeter of the walls - despite the thin layer, the self-leveling floor can damage the walls when expanding or crack. After the floor has set, the tape is cut and the seam is hidden under the baseboard;
- using a laser level, a screed line is applied to the damper tape along the perimeter of the walls - you can use it to control the filling level;
- the base is primed twice with a deep penetration primer - this operation is mandatory if the owners want to forget for a long time about the existence of the floor on the balcony.
Requirements for balcony screed and its types
There are many types of self-leveling floors (tinted, transparent, highly filled, with a 3D effect), but it is worth choosing exactly the type that will correspond to the climate zone, operating conditions, your aesthetic needs and other factors.
Basic technical requirements for a poured self-leveling floor:
- Climatic (resistance to cold, moisture, mold);
- Constructive;
- Operational (level of expected loads);
- Let's consider these points in more detail.
Before pouring the floor on a loggia or balcony, you need to buy the “correct” mixture, otherwise in cold weather or after a rainy autumn you may be in for an unpleasant surprise in the form of a cracked or moldy coating.
Moreover, such consequences arise regardless of who poured the floor - a beginner or a team of professionals. You only have yourself to blame for the wrong choice of raw materials before pouring the floor on the balcony.
So the floor in the open air, and even on a glazed but unheated balcony, must be filled with exclusively frost-resistant and moisture-resistant screed (look at the label in the column “type of floor”, and not the temperature of use). A universal material is also suitable for interior and exterior work. You can also use it in glazed mini-rooms, or buy a liquid floor specifically for indoor work.
Another very important point is the type of construction of your balcony. If we are talking about a loggia that rests on the main wall of the house, then there is no problem.
Just buy a standard screed. If the weight of the floor is limited, you need to buy lightweight mixtures, otherwise the balcony may simply collapse. We recommend filling the balcony floor with a lightweight cement mixture with expanded clay, the price of which in Russia is approximately 250 rubles. for 30 kg (Osnovit Innoline T-43) and above – 340 for 20 kg (Vetonit L).
Note! Light self-leveling compounds have nuances:
- used only indoors, in extreme cases - under a canopy;
- operation without finishing coating is prohibited;
- not suitable for heavy loads, especially dynamic ones.
The operational requirements for the floor are simple - the stronger the load on it, the stronger the coating should be.
So if you plan to keep heavy objects on the balcony, walk frequently or move furniture, buy cement or cement-gypsum liquid flooring.
Types of balcony floors
There are rough and finishing mixtures. There are 3 types of drafts:
- cement with sand and crushed stone, poured using a wet method (suitable only for the 1st floor, as it weighs a lot);
- dry expanded clay screeds, which are used to cover the prepared surface on closed balconies;
- self-leveling floors, discussed in detail above.
The use of a liquid self-leveling floor is possible both for decorative external finishing with your own hands, and for a self-leveling base under the finishing floor on a loggia or balcony. There are also 3 types of such floors:
- cement with plasticizers for filling holes (rough);
- self-smoothing with plaster (as a base for finishing);
- finishing (epoxy, polyurethane, 3D).
Preparation of the solution
An important stage of the preparatory work is mixing the solution. After all, the durability of the self-leveling floor depends on its quality. There are some peculiarities here:
- you must strictly adhere to the instructions for preparing the liquid mixture. Thus, a violation of the proportions leads either to a solution that is too thick, and it will not spread well, or too liquid, whose technical and operational characteristics change: the filling of the floor on the balcony cracks already at the drying stage;
Mixing the solution.
- The order of mixing the components is different, compared to conventional cement-sand mortars - water is first poured into the container, and then the mixture is poured. If you do it according to the standard scheme, then due to the lumps you will not get a homogeneous consistency;
- you need to stir quickly - the solution only lasts about half an hour (retains fluidity);
- For many mixtures, re-stirring is provided after 3-5 minutes, as indicated in the instructions on the package.
Installation of guide beacons
According to the markings, guide beacons should be installed for pouring the screed, which are perforated metal (or wooden) profiles mounted on small piles of cement mortar. The distance between the guides is assumed to be equal to the length of the rule (slats for leveling the screed). The profiles are leveled horizontally using a building level and a rubber hammer. When the cement under the beacons has set, you can begin mixing the mortar and pouring it.
Instructions for pouring the floor
It’s easy to make a self-leveling floor on a balcony with your own hands, despite the fact that one of the disadvantages is that you need work experience. The reason is that the balcony area is small and you can fill it without haste or experience in 30 minutes, during which the mixture remains fluid.
According to the technology, the required amount of mixture is poured onto the floor. You can pour it in one place and then spread it over the floor with a spatula, or you can pour it in a thin stream over the largest possible area of the slab, and apply it with a spatula only near the walls. After the mixture has covered the entire slab without gaps, the self-leveling floor is rolled with a needle roller. The point of the operation is that, firstly, you can help the mixture spread into a more even layer, and secondly, remove air bubbles.
Air bubbles are removed from the solution.
Upon completion of work on the glazed balcony, you need to tightly close the windows and door to the apartment - drafts are the worst enemy of the self-leveling floor during the drying process. Further work can be carried out after 2-3 weeks (drying time is indicated on the packaging).
In conclusion, despite the high cost of self-leveling flooring, if everything is done correctly, the owners receive a durable and durable coating.
Installation of heated floors
Modern floor heating systems in the retail chain are presented in a wide range. The system is a bending electrical cord attached to a dielectric base. For more information about the technology, watch this video:
A layer of thermal insulation is laid on the base of the loggia floor. Without this, heat will escape outside. Then a rough screed is made, on which the heating system is laid. The heating is covered with self-leveling floors. The floor covering is laid on the finished frozen surface. Using the control panel, you can set a comfortable indoor temperature. An enclosed balcony and loggia with a floor heating system become a full-fledged living space.
Leveling with cement screed
This is one of the most reliable ways to obtain a smooth and durable surface. It is used if the height of the required leveling is 3-5 cm. A screed less than 3 cm is fragile and is likely to quickly crack. At the same time, a screed thicker than 5 cm will unnecessarily overload the balcony floor.
Materials and tools required for work:
- waterproofing primer for concrete;
- cement, sand or ready-made mixtures (cement mortar or sand concrete);
- beacons, boards for formwork - as necessary;
- building level;
- metal rule;
- trowel (for laying out or mixing the solution);
- mixer;
- brush or roller (for priming).
The technology of work is as follows. Remove debris, clean the surface from dust, oil stains, and broken parts of concrete. All cracks are sealed with cement or gypsum mortar. Then a primer is applied to the surface, which will strengthen the adhesion of the screed to the concrete slab and additionally act as a waterproofing agent.
If the balcony is open, with a lattice fencing, then, to prevent the screed from spreading, temporary formwork is installed along the edge of the slab. Most often, its role is played by thin boards or plywood. A balcony with a monolithic fence does not need formwork.
Then they install beacons. They are long metal guides with a reinforced profile. They are cut into pieces equal to the length of the balcony and installed every 50-60 cm. The top of the beacons should coincide with the top level of the planned screed. For standard narrow balconies, it is enough to use 2 beacons.
Beacons are fixed on cement or gypsum mortar, carefully checking their horizontalness with a level. After 2-3 hours, after the solution has hardened, the beacons will be ready to be filled with screed.
When screeding on a small balcony, the role of guides can be played by formwork boards, the top of which is hewn to the required level.
Then mix the cement mortar for the screed. The optimal ratio of cement and sand is 1:3. Enough water is needed so that the solution becomes like thick sour cream; on average, 10 kg of dry mixture requires 2 liters of water. Mixing the components occurs either manually (using a trowel) or with a mixer. The ready-made mixture is, of course, more convenient to use - there is no need to check the components, just add water to the mixture and mix.
Now pour the solution onto the floor. Using a metal rule, level the solution, pulling it along the beacons. In hot and dry weather, cover the wet screed with film or burlap. This will prevent the solution from drying out quickly and cracks from appearing.
After 1-2 days, the formwork is removed. If necessary, remove the beacons (you can leave them in the screed). The paths from the lighthouses and the gaps left from the formwork along the edges of the screed are sealed with thick cement mortar. The surface is leveled with a grater (foam or wood). After 1-3 weeks, the finishing coating is laid on the finished screed: linoleum, laminate, tiles, decking, etc.
General principles for using waterproofing agents
Waterproofing on the balcony is carried out taking into account the requirements of the raw materials selected for the work.
Features of using mastics
Coatings for waterproofing open and closed balconies are made based on basic components of any category.
- Armoring cement coatings are intended for application to concrete and “related” building materials. Penetrating options are used only when covering fresh surfaces. If there is a need to protect used structures with them, they are first well moistened with water. The one-component material allows you to reliably close cracks with a transverse size of up to 1 mm; products with an elasticizer are used to treat cracks with an opening of up to 2 mm.
Cement mixtures help to properly seal small cracks and prevent corrosion of the base Source glims.ru
- Bitumen mastics are applied hot and cold. They are suitable for treating surfaces made of any building materials. This variety is also good for sealing seams between strips of rolled products, filling structural and deformation cracks.
- One- and two-component mastics based on polymer compositions are intended for cold use. Compositions with the addition of silicone are characterized by particularly high covering power. They are effective for sealing microcracks and depressions up to 1 cm wide.
Polymer-based coatings have the highest waterproofing properties. This makes them a complete replacement for rolled and sheet building materials.
Polymer mastics are highly valued for their excellent waterproofing properties. Source storage.googleapis.com
Rules for using emulsions
Liquid bitumen-type materials for sealing balconies and loggias are used primarily as primers. They make the adhesive bonds between the surface of the building structure and the finishing composition much stronger.
Water repellents are designed to form a layer that is unable to pass moisture by displacing air from the pores of the base and filling its cells. They are applied in the usual manner for paint and varnish compositions, by spraying.
Water repellents ensure high safety of balconies and facades Source fasadec.ru
How to use roll products
A well-known representative of the category is roofing felt. It is applied in strips in one or several layers, and adjacent sheets should lie on top of each other with an overlap along the edge. The seams formed during the work are closed using polymer-bitumen and other mastics.