Heat-resistant glass is more stable, and with significant heating, the crack, as a rule, does not expand. Sealing cracks in Pyrex and some molybdenum glass products is relatively simple. The crack is heated over a narrow and sharp flame from one end to the other. Typically, softened glass expands and melts the crack. However, it may happen that when heated, the sides of the crack move apart and a gap forms between them. This often occurs on thick-walled products or when the crack is on a spherical surface. In this case, the edges of the split crack can be pulled together with a glass rod and then soldered on a sharp burner flame.
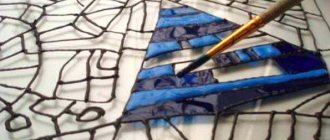
You can do it differently. Gradually heat the place where the crack is located on a burner flame. At the same time, heat the end of a glass rod made of glass of the same brand until completely softened. Take a heated glass rod in your right hand and carefully solder the softened end to one end of the crack. A relatively thin tendril is pulled back. Then, while heating, apply the softened tendril to the gap in the crack, moving the stick from one end of the crack to the other (Fig. 92). A weld seam is formed, reminiscent of an autogenous welding seam. The seam is then melted, finished and annealed.
It is much more difficult to seal cracks on products made from ordinary laboratory glasses. When heated, cracks in products made from these glasses quickly lengthen and can render the product completely unusable. A non-hot flame of a gas burner is directed onto the product where there is a crack, which is first kept at a considerable distance from the crack. Then it is slowly moved towards the product, thereby ensuring slow and uniform heating of the glass. With careful and slow heating, the crack will not widen. You can do it differently: the product and the place where there is a crack are carefully heated over a smoky burner flame (a layer of soot prevents sudden heating). Gradually increase the flame temperature by adding air (or oxygen) and gas. When the crack has stabilized (the glass will not crack), a narrow burner flame is directed onto the product along the crack and the glass is heated until it softens. At the same time, the soot burns out, after which the product is turned with the crack down and heated over a wider flame. The glass, expanding, is soldered. If a gap forms when a crack is heated, it can be sealed using a glass rod, as indicated above. The operation to seal cracks should be done fairly quickly. If the sealing is slow, the glass may collapse and the joint surface will become dull.
Sealing of cracks at the bottom of a flask, glass or vessel with a flat bottom is carried out as follows (Fig. 93). The bottom is slowly and gradually warmed up. Then the burner flame is made sharp and narrow and heated until the crack softens with the so-called counter fire from one end to the other (from bottom to top). The flask is placed to the flame at an angle of 130-140°. To blow air into the neck of the flask or glass, insert a stopper with a glass tube or an open-end holder, around the wide part of which corded or sheet asbestos is wound. If the edges of the crack diverge, then the gap is sealed with a glass rod and melted well. This creates a convex seam at the bottom of the flask or glass. To restore the flat bottom, it is heated over a wide burner flame, placed on a burnt wooden board, and lightly pressed against it, while simultaneously blowing and rotating the flask or glass. This operation is repeated on the graphite plate until the bottom is completely leveled. Then the product is annealed first on a burner flame and then in a muffle furnace.
How to repair a crack in window glass
It is quite possible to remove a crack in a window glass, although you will have to work hard.
Preparatory stage
Before you get started, you need to prepare the surface for the procedure. To do this, you will need to wash the glass on both sides. You must wear rubber gloves to carry out the procedure; you can use any product intended for cleaning windows.
After all dirt and accumulated dust have been removed from the surface of the glass, it is necessary to wipe it dry with a lint-free cloth. The glass must be completely dry, otherwise the result after sealing the crack will quickly disappear.
Degreasing
After you are sure that the glass is clean and dry, it must be thoroughly degreased. Professionals recommend using available materials, such as acetone or gasoline.
It is important to pay attention to ensure that after the degreasing stage there is no lint left from the napkins on the glass.
Repairing a crack
You can seal a crack in the window glass using silicone glue purchased in a store, or you can prepare a repair composition yourself.
Repairing a crack with silicone glue
This product is indispensable when working with glass. On sale you can find tubes with a wide or narrow neck. If you purchased the first option, then it is more convenient to work with the material by taking a sufficient amount of glue into an ordinary medical syringe; If you bought glue of the second option, then you won’t have to do any additional manipulations.
- By lightly pressing the tube or syringe plunger you need to fill the crack with glue. It is important that there are no voids left.
- If the crack is wide enough, then you need to cover it on both sides with tape. Once the glue has dried, the tape can be easily removed.
- Wait for the right time. Exactly how much is indicated in the instructions on the package. The glue can dry from 12 to 24 hours.
- After the glue has dried, you need to clean the surfaces of excess material.
- Finally, you need to use regular nail polish, it is important that it is transparent.
After such work, the glass can be subjected to water procedures.
Let's make our own glue
If you don’t have silicone glue at home, you can prepare the adhesive base yourself. To do this you need:
- Mix turpentine and acetone in equal quantities.
- Gradually add crushed foam to these components. It should dissolve in the prepared solution. In order for the foam to dissolve quickly, you need to grind it as finely as possible.
- As a result of cooking, a transparent, viscous mixture should form, with a consistency reminiscent of honey.
Then proceed in the same way as when using silicone glue. The result will please even a professional!
other methods
If you have a barely noticeable crack on the window, then it would be wise to do without lengthy procedures to repair the chip. You can use regular transparent nail polish; in some cases, classic stationery glue will do.
If you doubt your skill, using tape will do. You need to seal the crack with transparent tape on both sides. But you need to be prepared for the fact that the tape on the window will be noticeable, and such repairs will not last too long. Therefore, the tape will need to be changed from time to time. The fact is that condensation will form, so the tape will simply peel off.
DIY kits
Automotive stores offer a large number of adhesives and ready-made kits for windshield restoration.
GlassProfi
The set includes a blade, an adhesive disk, polymer glue, a fixing suction cup, and a syringe. Using a disk and a suction cup, the syringe is securely attached to the crack area, after which the glue is squeezed out of it. After 3–4 hours, the defect will become invisible and the composition will completely harden. Using this product, cracks up to 3 cm in length can be easily removed.
Contents of GlassProfi windshield repair kit
Windshield Repair Kit
This set includes the same accessories as the previous one, but is additionally equipped with a protective film. It helps eliminate defects on regular and tinted glass. When introduced, the adhesive composition completely displaces air from the crack, so the hole will be reliably sealed. This kit is recommended for emergency repairs, as the glue hardens within 20 minutes.
Windshield Repair Kit
Done Deal DD6584
The polymer composition included in this repair kit is characterized by very high strength, almost several times higher than that of cheap analogues. The product contains acrylic acid, so you need to work with it in the air and only with gloves. Glass restoration should be carried out in the shade in summer, and in winter - after preheating the damaged area.
Windshield Repair Kit Done Deal DD6584
Permatex
The product included in the kit is recommended for removing deep chips and can also be used for quick repairs in road conditions. This glue is not suitable for filling long cracks. The composition can damage the paint on the car body, so the hood must be carefully closed before repairs.
Transparent adhesive sealant for glass Permatex
WIEDERKRAFT WDK 65182
The kit includes a set of repair plates, a scraper for cleaning the crack and removing excess glue, an injector, suction cups and glue. It is better to work with glue indoors - this way it will harden an order of magnitude faster. In the summer, after applying the composition, you can expose the car to the sun's rays to speed up polymerization.
WIEDERKRAFT WDK 65182 chip repair kit
How to seal a crack in glass in doors and furniture
If the doors or pieces of furniture in your home have glass inserts, then you have probably encountered cracks in these glasses.
In this situation, you can do the following:
- If the crack is of an impressive size and is visible, then you can order a replacement element on the manufacturer’s website or from a company representative.
- If the first option is not suitable for you, then you can try to hide the crack: paint it over with varnish, then decorate the problem with professional paint or ornament.
- You can also use the methods described above to eliminate cracks in window glass.
Let your doors and furniture always fill your interior with aesthetics!
Types of damage
The cause of cracks can be either a stone hit or a minor accident. All defects can be divided into five types according to their shape and features:
- Ray-shaped. Formed by a strong blow. They are usually long and extend to the edge of the windshield. Removal is possible if the size of the crack does not exceed 10–12 cm.
- Rounded. The cause of the appearance is a sharp blow from a hard object. Such defects must be removed as quickly as possible with preliminary drilling, otherwise they will spread over large areas of glass.
- Branching. Formed when hit by a heavy object or due to temperature changes. They are a whole scattering of branching rays, which is why they are difficult to repair.
- Double sided. They look like a beam that appears from the interior part of the triplex. Most often, the car owner has to replace the glass, since such defects are almost impossible to repair.
- Mixed (combined). Includes elements of different types of cracks. Their sealing is not always possible.
Branching crack on the windshield
How to stop the spread of a crack directly depends on its type. Usually, simple defects, chips and small dents are successfully repaired at home.
How to repair a crack in glassware
To seal a crack in glassware, you can use any of the above methods or use your grandmother’s method:
- You will need to use a burner to slowly warm up the problem area.
- Additionally, you need to heat the glass stick.
- Use a softened stick to seal the crack, starting from one of the ends.
- You need to do this until an even seam is formed, which will eliminate your problem.
- Finally, you need to melt and anneal the seam.
Cracks in glass are no longer a problem for you!
When is the best time to contact the service?
It is difficult to repair a crack on your own. If you do not have experience in repairing car glass, special tools and consumables, we recommend contacting a specialized service:
- Experts repair auto glass every day.
- Car service centers have sets of special tools. Glass repair is a delicate job. The use of special drills minimizes glass damage. The services include lamps with suction cups, high-speed drills, and marking tools.
- To seal cracks, fillers of different viscosities are used to work with auto glass.
Self-repair is rather a measure for the case when it is not possible to come to the experts and you have experience in solving such problems on your own. In other situations, we recommend that glass be repaired by specialized services.
Operating a car with a cracked windshield
Is it possible to drive a car if a stone has broken the windshield? The Code of Administrative Offenses does not provide for punishment for operating a car with a cracked dashboard. However, the inspector can fine the driver 500 rubles for driving a faulty vehicle, but this is a fairly rare case, since there is no official fine for a crack.
If the windshield is severely cracked, problems may arise during maintenance. The inspection staff will issue a form refusing to issue a technical inspection until the malfunction that interferes with the review is eliminated.
A clean and transparent shield provides good visibility on the road and does not distract the driver’s attention, and also reduces the age of the car and has a positive effect on the appearance.
Gluing glass to glass - instructions
To implement the process, you can use a sequence that looks like this:
- The seam or surface is thoroughly cleaned of splinters.
- The mixture is distributed from a tube with a dispenser or brush.
- After which the workpieces are pressed tightly against each other.
- Wait until the specialized solution has completely set.
When performing manipulations, it is important to pay attention to detail so as not to cut yourself, as well as to correctly position the fragments, creating the original shape that was destroyed.
After purchasing the appropriate type of glue, it is worth reading the instructions again or placing them on your desktop to ensure that you follow the model manufacturer's instructions exactly.
How to glue glass to metal
A reliable connection can only be achieved by using a special mixture and a device that emits UV rays. Applying the gel-like solution is quite easy, it does not spread over a smooth surface, and is also perfectly distributed on parts.
Both sides must be degreased and then dried; it is not recommended to move the product until the mixture has completely hardened.