Engraving on glass, how to do it?
The easiest way is to use a special etching paste. It contains acid, which leaves matte marks when it comes into contact with the treated areas. This will allow you to create unique designs on any glass surface. Let's try to consider the option with dishes.
For work you will need the following materials and tools:
- glass etching paste;
- sponge brush;
- self-adhesive film;
- stationery knife;
- computer drawing;
- self-adhesive tape;
- scissors;
- glass with a smooth smooth surface.
The first thing to do is to stick a film that will protect the surface of the product from damage. Its edges should protrude a few centimeters beyond the drawing. Make sure that no bubbles form when gluing, because the design is applied on top of it. All unnecessary residues are removed along the contour of the selected stencil. Now it's time to apply the paste. To do this, take a brush, with which you carefully distribute the substance over the surface. The acid should not get into unprotected areas of the product; it will be impossible to correct the situation. You can remove the paste after 20 minutes, after which you need to rinse the product under running water. Then the stencil is removed and the residue is washed off.
As you understand, engraving on glass at home is not such a complicated process, which means that all you have to do is purchase the necessary tools and get to work.
Glass engraving - methods and subtleties of art: Review + Video
Engraving is the ancient art of applying patterns, ornaments and inscriptions to various materials.
Currently, it is a very common way of designing and decorating various products, giving them specialness, sophistication and uniqueness. Engraving can be applied to different materials, the most popular of which are metal, wood, plastic, stone and glass. Initially, engraving was considered a part of jewelry; now it is a separate decorative process.
It is used to decorate various products - from small souvenirs to large interior items.
Tips for Beginner Engravers
But engraving on glass using special tools is a very complex process that takes a lot of time and consists of various technological stages, however, if you want to try, here are some practical tips:
- Workplace lighting. It should be your main assistant, because only with the help of light can you constantly monitor the treated surface and ensure that the pattern is reproduced correctly. When engraving on glass, dust will constantly fly from under the bur, which settles on the product and interferes, so a simple lamp will not be very appropriate, because you will need to interrupt to clean its surface. The most successful option would be an LED strip that meets all the requirements.
- Engraver. Even if you are not planning to become a professional engraver, don’t overpay twice: it’s better to immediately buy a good tool and start creating with it. Among people who are engaged in this kind of work, engravers from German manufacturers are in great demand. They are considered the most suitable for quality work.
- Bors. To avoid wasting time and money, buy diamond options with a ball-shaped head of various diameters. They can be used to create any design.
- Workplace. Mechanical engraving is a noisy and dusty process. Remember this and try to protect others from unpleasant sounds and debris. Additionally, take care of the sound insulation of the table; place foam rubber between it and the object being processed, which will not allow the product to slide and reduce the sound.
There are two ways to engrave glass at home
- - chemical - a type of engraving in which the surface of the material is exposed to various reagents that destroy silicon compounds. It involves frosting the glass, or applying a matte image to the glass surface.
- - mechanical - performed using a drill with a diamond attachment. Depending on the strength and quality of the material being engraved, a dry or wet method is used, the difference being the presence of water in the process.
What is it for? When operating the device on a thin or fragile surface, there is a risk of glass breaking due to overheating. To avoid this, water is supplied dropwise to the engraved surface through a tube, which cools the material being processed.
The dry method is considered more common, but very dirty, as it leads to the formation of a large amount of glass dust, so it is especially important to protect your eyes and respiratory organs when working, using a transparent mask and a respirator.
DIY glass engraving
Mastering how to work with an engraver can be compared to learning to write at school. The first thing you need to do is learn to write words, then texts, and only after that start reproducing drawings. First, you need to get used to the device, understand how it works and what it can do. To begin with, it is better to exercise for up to 2 hours every day for a month. During this time, you should achieve certain skills and draw smooth lines with ease. You can gradually change the thickness of the strokes (to do this, go over it several times).
Master class on glass engraving at home with step-by-step photos and training videos
A master class on engraving yourself quickly and easily on glass is quite a useful thing. Because, having mastered this subtle and elegant art, you can discover a whole world of airy and elegant inscriptions and drawings. Again, new opportunities open up - from the fact that you can delight your family and friends with original and interesting gifts, and ending with opening your own business. You can decorate wedding glasses with your own hands, make a memorable inscription on a vase, and much more.
Let's move on to practice: how to decorate glasses?
Engraving on the glass of glasses is carried out using the following materials:
- engraver;
- champagne glasses;
- paper;
- pencil;
- adhesive tape;
- Swarovski crystals or beads for decoration.
Draw the desired pattern on paper or print a ready-made one. Secure with adhesive tape and use an engraver to mark the outline of the image. Using the side surface of the nozzle, paint over the outline and gradually get rid of the resulting dust. If you like a picture in a frame, you can make it using an oval stencil. Now you can stick on crystals or other beads of your choice. The gift is ready, you can present it.
Engraving techniques are constantly improving
Modern technologies make it possible to simplify and speed up the process of applying an image to glass.
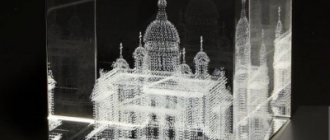
3D engraving is a new type of laser engraving in which a three-dimensional image is created inside the glass space, formed using many volumetric dots obtained by the intersection of two lasers. 3D engraving is actively used in the manufacture of souvenirs. Engraving a photo inside a glass figure has become especially popular.
Among glass souvenirs, bottles, glasses, cups and anything with a glass surface are common. When making an engraving, you can engrave both the entire product and part of it on glass. Glass souvenirs with engraving are interesting products that can become an original and creative gift for any celebration, helping to emphasize the attitude towards the recipient, or simply can be a beautiful thing in the interior of a home or office , giving the room a special style.
Engraved glass products do not require special care. When they become dirty, they should be wiped with a damp cloth using glass and mirror cleaners. No need to use abrasives!
Glass engraving can also be done at home, but it should be noted that high quality images in this case are extremely difficult to obtain, especially for beginners. Where should I start? First you need to choose the design for engraving, the item to be decorated and the method of work.
Laser engraving
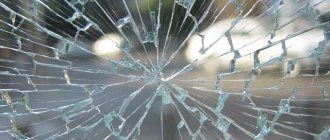
As you know, glass is a fairly fragile material. It is not difficult to break it, the slightest effort - and a crack appears. In this regard, laser engraving on glass is the most suitable option for processing it. The laser beam will allow you to delicately apply the desired image to the surface and will not damage the product itself, and the process itself will not take much time. This type of engraving will most accurately convey the plot with a large number of small details. The process is fully automated, so any errors in the work itself are excluded. What is he? Essentially, this is spraying the outer surface layer of a product using special equipment. It is thanks to the laser system that you can capture the smallest and subtlest details of a sketch, which is inaccessible to other methods.
It is noteworthy that laser engraving can be done both on the outer layer and on the inner one. These methods are significantly different. When engraving internally, two beams are used at once, which heat the glass, forming bubbles, which create the pattern. The program allows you to adjust the direction of the rays, which gives free rein to your imagination. If you watch the creation of such a drawing, you might think that you are in a fairy tale. This engraving does not fade or wear off over time, which means it will please you for a long time.
We decorate the decanter and glasses using glass engraving technique
1. Diamond tip engraver No. 9929-DREMEL ENGRAVER.
2. Drill (engraver) - I have this FIRSTPOWER.
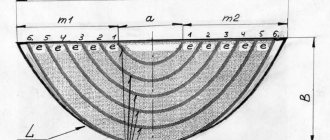
3. 6 kinds of engraving diamond bits for drill.
a) cylindrical 1mm diameter fine fraction;
b) ball 1mm diameter fine fraction;
c) oval with a narrowed end 2.5 mm, tip 1 mm fine fraction;
d) ball 3.5 mm average fraction;
e) ball 2.5 mm average fraction;
e) ball 3 mm coarse fraction.
4. A sheet of paper, tracing paper, pencil, glass marker.
5. Alcohol, can be diluted 50%.
6. Cotton pads, napkins.
7. Glass decanter, cup (you can use any homogeneous glass object).
8. For safety while working, you need to use a dust mask and goggles.
We select a design that we want to engrave on the decanter (we come up with it ourselves or find a suitable one), create a sketch on paper (in this case, I simply traced the decanter with a pencil on A4 paper, then applied the design I liked and added something of my own).
We transfer the drawing to tracing paper and cut out the image of the decanter along the contour.
Then use tape to attach the tracing paper to the surface of the decanter. It is important that the tape does not touch the contours of the drawing!
Using DREMEL ENGRAVER we transfer the design to the surface of the decanter. We pass the engraver along all the contours of the drawing, without missing details. It is important to start tracing with the details that are inside the image of any object in the sketch, since after tracing this detail may fall out of the picture (it will be cut off with a cutter).
We remove the tracing paper from the bottle.
This is what happened - we have a clear outline of our drawing.
In order to clearly see the outline on the glass, take a dark soft cloth and cover the working surface of the table with it. Now it will be easier to continue working.
At the first stage we will need attachments for the drill:
d) ball 3.5 mm average fraction for large parts;
e) ball 2.5 mm average fraction for smaller parts.
Using a drill, we process the surface in the drawing in places where we think the image should be the lightest.
LiveInternetLiveInternet
—Categories
- Textiles. Various ideas for working with materials (868)
- Rag rug or what can be made from old things (275)
- Sewing (175)
- Teddy bears (120)
- Leather (97)
- Clothing designers, fashion (57)
- Fabric flowers (48)
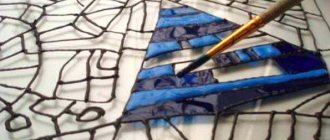
- Batik (33)
- Indian patchwork (11)
- Soutache (7)
- Knitting (854)
- Spokes (502)
- Hook (244)
- On the fork (9)
- On fingers (7)
- Furniture and everything related to wood (518)
- Wood carving. (96)
- DIY furniture (65)
- Wood painting (38)
- Birch bark (31)
- Sawing (30)
- Burnout (13)
- Leaf products (12)
- Furniture of the 21st century. (12)
- Screen (12)
- Products made from matches (7)
- Art Nouveau. Furniture and craftsmen (5)
- Art Deco. Furniture and craftsmen (1)
- Home renovation and design (517)
- Interior detail (148)
- Interior (123)
- Mosaic (93)
- Interior painting or frescoes (42)
- Stained glass (39)
- Cleaning and means for it. (36)
- Everything from garbage (16)
- Cooking (450)
- Baking (173)
- All meat (91)
- Blanks (41)
- Drinks (18)
- Korean dishes (13)
- Soups (12)
- Salads (10)
- Milk and dairy products (10)
- Fish (5)
- Sauces (5)
- Embroidery (434)
- Beads (80)
- ribbon embroidery (41)
- Cross stitch (24)
- Satin embroidery (10)
- All made of paper (291)
- Papier mache (60)
- Cardboard (36)
- Corrugated cardboard (7)
- Arte Francese (4)
- Paper mosaic (4)
- Weaving (227)
- Macrame (36)
- Wire (24)
- Wicker furniture (8)
- Notebook (217)
- Painting (186)
- Modeling (177)
- Plaster (78)
- Cold porcelain (20)
- Salt dough (7)
- Art history. Cultural studies (168)
- Philosophy Stars (3)
- Art (157)
- Watercolor (32)
- Health. (150)
- Felt (140)
- Cottage.Garden.Vegetable garden (100)
- Stories from life. Life in France (46)
- Plastic and everything made from it (43)
- Introduction to Drawing (42)
- Eggshell carving and embroidery (30)
- Sculpture (30)
- Metal. Working with it (18)
- Candles (16)
- Glass.Working with it (13)
- Bone (8)
-I'm a photographer
Areas of application
Thanks to the enormous technological capabilities in creating various decorative patterns, engraving can be seen both on decorative and household items, as well as on advertising structures. Most often, engraved patterns can be seen on the following items:
- automobile glass;
- lamps;
- interior items;
- glass parts of doors;
- glass cutlery;
- photo frames and glass paintings;
- decorative souvenir products;
- prize products, cups and medals.
Recently, more and more orders have been received by specialists for the decoration of signs, nameplates and advertising items, the effect of which can be enhanced by installing additional lighting. Rays of light striking the engraved lines are refracted at different angles, creating a spectacular luminous glow.
Engraving technology
Images on plexiglass will look different on artificial glass, it all depends on the technology used to produce the glass. If plastic glass is made using casting, then the surface of the engraving will be soft, similar to velvet, but on the surface of extruded acrylic the image will be rough and grainy in structure. By using the depth of engraving and adjusting the angle of the beam, you can achieve quite different and delightful effects in the decoration. For example, inscriptions with shadows appear in images or images with a mirror image are obtained. All this is successfully used when creating signs with three-dimensional letters or backlit signs.
Nuances of the procedure with the addition of lighting
Engraving on plexiglass tiles with the installation of backlighting is a more complex job that is best left to professionals.
However, if your preparation allows, you can do this work yourself. To do this you need to do the following:
- prepare the material with the required parameters, process the edges of the tiles;
- prepare an adhesive film, apply a sketch on it and glue it to the surface of the plexiglass;
- carefully cut out the contours of the future engraving;
- use an engraving machine to apply a design to the glass;
- attach a lamp or LED backlight to the end side, then secure the entire structure in the prepared housing.
Engraving on plexiglass is a multifunctional solution that is used in various fields of activity. You can apply the engraving yourself, following clear instructions. You can also create a unique design by making backlit engraving.