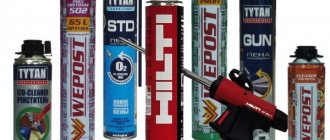
In one of our previous articles, we talked about how to correctly calculate the amount of polyurethane foam you need. This text is most useful to those who already know that they will need a lot of sealant. However, it happens that one cylinder is too much for the job. Then we leave the still partially filled balloon until better times (do not throw it away). When better times come, we are often surprised to find that the gun no longer foams. What to do? First, let's check the cylinder itself and its components (regardless of whether our tank with sealant was attached to the gun).
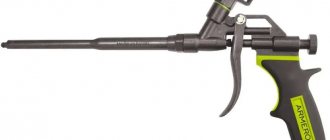
Design and principle of operation of a spray foam gun
To begin with, I’ll tell you about the use, design and principle of operation of a spray foam gun.
Experienced readers who are not interested in this can immediately proceed to the description of my modification.
Foam gun application
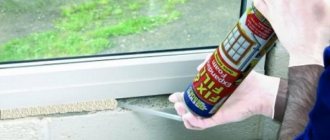
As the name suggests, the tool is designed for applying liquid polyurethane foam. It seals cracks, joints between building materials, gaps in door and window openings after installing frames and frames. The sealant is blown from a container where it is under pressure and expands to fill the void. Under the influence of air humidity, the composition hardens. The higher the temperature and the higher the humidity, the faster the sealant hardens. I have already written about the relationship between temperature and relative humidity here.
The gun for polyurethane foam is designed so that it can be “released” from the container in a dosed manner. It is much more convenient for them to apply the composition to the application site than with a conventional tubular applicator. If you handle the tool correctly, it allows interruptions in work even up to 6 months. In this case, the sealant inside will not dry out.
How a spray foam gun works - diagram
The simplest device consists of the following parts:
- gun body for polyurethane foam;
- applicator barrel with working valve;
- trigger lever;
- flange for connecting to the cylinder;
- check valve;
- limit screw.
The housing connects all parts into one design and makes the device convenient to use.
In the channel of the applicator barrel there is a long rod, which actuates the working valve. When it is opened, the sealant rushes out. The gun rod for polyurethane foam is made of steel with a coating that reduces the adhesive properties of the composition.
The check valve serves to ensure that when replacing the cylinder, the sealant located in the barrel is not squeezed out. The valve consists of a ball and a not very elastic spring. If the spring is stiff, the pressure in the cylinder may not be enough to compress it.
The limit screw is designed to regulate the output of sealant from the gun and to lock the valve when the tool is not in use.
Operating principle of a foam gun
When installing the cylinder and connecting it to the tool, the built-in reservoir valve is pressed and remains in this position as long as the cylinder is installed. When this valve is pressed, the sealant comes out, rushes into the gun barrel and remains there until the operating valve opens.
The operating valve is controlled by a release lever, which in turn is actuated by a squeezing movement of the hand. The release rate of the sealant depends on how far the operating valve opens. Sometimes it is convenient to limit the degree of opening, for example, when filling narrow sinuses and crevices. To do this, set the adjusting screw to the desired position, and it does not allow the valve stem to move more than necessary.
When replacing the cylinder, it is unscrewed from the threaded flange. The foam, which is under pressure in the barrel, locks the ball valve and does not come out.
If foam has dried in the outlet valve
If the situation with the valve is worse than described above, and the foam has dried, as they say, tightly, then the procedure is as follows. We put the knitting needles and wire aside - a more serious approach is needed here. We take a self-tapping screw with a length of 30–35 mm and a diameter of 4 mm. The thread must be large - this is important. We screw our screw into the valve 2-3 turns. We do this very carefully, as there is a possibility of perforating the valve right through, which is not good. Next, use pliers to pull out the self-tapping screw along with the remaining foam. Now the foam is at your disposal again. If in your case the cylinder was attached to the gun, and the foam froze in this prefabricated system, then continue reading the article.
Malfunctions of the spray foam gun
Everything would be fine, but unfortunately, frequent breakdowns of polyurethane foam guns occur. In general, they all boil down to two situations - the polyurethane foam does not come out of the gun, or vice versa - the device allows foam to pass through.
Foam does not flow into the mounting gun
If the polyurethane foam does not flow through the gun, most likely it has dried inside. Much less often there is another reason - the instrument itself is clogged. Well, it very rarely happens that you get a defective cylinder.
If the composition has dried inside the barrel, then in most cases it is possible to clean it. But more often the sealant hardens in the check valve. It is very difficult to remove. You will most likely have to say goodbye to the tool. The tool can become clogged if dust or sand gets into it when replacing the cylinder.
The gun leaks foam
Sometimes, due to the poor quality of the parts, the device may leak foam at the junction of the cylinder and the flange. It happens that over time it quickly dries out and does not come out anymore. However, it is too early to calm down. Air trapped inside the gun will promote hardening.
And in some cases, the hardened sealant can block the plastic valve of the cylinder. Then it will be very difficult to change it safely. When unscrewed, the composition may continue to exit the cylinder.
It is difficult to correct such a situation; it is better to prevent it. How? I'll tell you below.
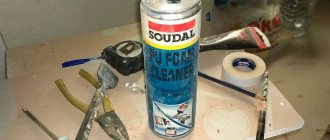
And of course, for reliable operation, maintenance of the spray foam gun is necessary. This is necessary both when replacing the cylinder and during storage. How to care for a spray foam gun and how to clean it from foam if it is to be stored for a long time is most clearly explained in the video.
How to revive a foam gun
If the foam has dried in the mounting gun so that it cannot be washed off with a cleaner, you will have to disassemble the tool and remove the hardened compound mechanically. As a result of disassembly, you can gain access to all parts. You can clean the gun barrel from dried foam using a thin, long screwdriver. The most difficult thing to clean is the flange, since the compound can completely block the ball valve, and mechanical cleaning can damage it.
Instead of special washing, you can use dimexide in its pure form. It has a unique dissolving ability and can remove dried foam. It is not recommended to use solvents intended for paints and varnishes.
Dimexide is used in medicine for compresses in the treatment of inflammatory diseases of the musculoskeletal system. This substance is included in many ointments and gels: “Capsicam”, “Ketorol”, “Dolobene”, etc.
You can see how to restore a foam gun in the video I found on YouTube.
I myself have not done any cleaning for a long time, since there was no need. After modifications, my instrument has never dried out.
If foam has frozen in the supply tube
If in your case the cylinder was not attached to the gun, and the foam froze in the supply tube, then first you need to try to remove this tube. To do this, unscrew it along the thread of the fitting and slightly pull it towards you. In most cases, the tube separates without problems. If your situation is one in a hundred, then you shouldn’t apply much force: you’ll rip off the valve and splash sealant all around. It is safer to immediately get rid of such a cylinder. If the tube is removed, then take a piece of wire or a bicycle needle (or a knitting needle - mom will forgive you) and clean the tube with it. Afterwards you need to inspect the exhaust valve - if its nozzle is clogged with thickened (but not tightly) foam, then clean it with a match or a cloth. Then rinse with acetone. Ballon is resurrected and “eager to serve.”
How to turn the simplest tool into a reliable spray foam gun
Well, I’ve come to the most important thing - how to make a reliable gun for polyurethane foam. It turns out it's not difficult.
What's superfluous here?
If you carefully examine the design, you will notice that the most vulnerable point of the tool is the ball valve. This is where the foam begins to dry first. The fault is with the spring, which, when the mobility of the foam decreases, becomes “fettered” and the valve opens with difficulty. Well, then - more. Soon the valve jams completely.
In fact, the tool will work just fine without this valve. Minor difficulties can arise only when changing the cylinder - the composition remaining in the barrel will begin to come out of the flange. But if the cylinder is completely used up, then its quantity will be minimal, since the pressure in the barrel is already low. After washing off the foam with cleaning liquid, you can safely screw on a new cylinder.
How to remove the ball?
All modification comes down to removing the ball valve from the structure before the tool breaks.
To do this, you need to unscrew the flange with a suitable wrench.
From the inside of the flange it is necessary to remove the locking plate that holds the spring.
This can be done with a thin screwdriver or a narrow knife blade.
Having removed the spring and ball, you need to carefully blow out the flange bushing from any remaining metal.
Before installing the flange on the body, I advise you to wrap a little FUM tape on the threads, which is used to seal the threaded connections of pipelines. This will prevent the sealant from subsequently “crawling” out.
A reliable spray foam gun is ready for use!
Of course, such a small upgrade will require better care. In order for the tool to work without failures, when storing it separately from the cylinder, it is necessary to close the flange hole so that foreign objects do not get inside the body.
If you read this article to the end, you may have found it helpful. Share it with your friends. Join our groups on social networks - it will be interesting!
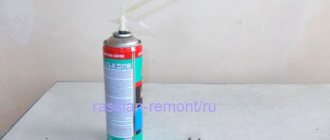
Cleaning the gun after use
At the end of work or in case of planned long-term inactivity (more than a month), the instrument must be washed with a special washing solution. During this process, the gun should be turned with the nozzle away from you and the container with polyurethane foam should be replaced with the same container, but only filled with the specified composition.
Next, you need to press the trigger to fill the barrel with the solution and leave the tool with it for 15 minutes, during which the remaining mixture will dissolve. After the specified time has elapsed, you should press the trigger again to bleed the composition with the remaining polyurethane foam. Next, you need to rinse the barrel again with a clean solution, and then unscrew the cylinder. After bleeding the residue from the barrel of the gun, you can hide it in a convenient place where it will be kept until the next use.