A plastic window is a very durable product, the service life of which is tens of years. However, even the most durable mechanism needs maintenance and adjustment. Read on to learn how to adjust a plastic window yourself.
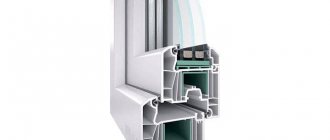
The profile is made of polyvinyl chloride with steel reinforcement. Thanks to this, sashes and frames made from it retain their geometry throughout the service life of the window. Minor sagging of the sash, deformation of the seals and wear of the locking mechanisms can be corrected to some extent by adjustments.
Seasonal Maintenance
The main feature of opening windows is that they do not have vents. For better ventilation of the room, the system provides rotary doors. During the operation of plastic double-glazed windows, you may notice that a draft appears in winter. Don't panic - this is not a manufacturing defect, but simply the seasonal mode is set incorrectly. Switching plastic windows to winter and summer modes is a mandatory maintenance procedure.
The tilt and turn mechanism of the glass unit must be adjusted depending on the season of the year
During long-term use, drafts may also appear. This occurs due to the loosening of the hinge screws of the rotary-locking mechanisms. By independently adjusting the windows for the winter, you can easily save 3-7 thousand rubles on calling specialists.
Leak test
How to prepare plastic windows for winter? With the onset of cold weather, it is necessary to carry out a preventive inspection of the state of normal locking of the sashes in winter mode. Leak tightness can be checked in several ways:
- Tactile. By running your hand along the frame, you can determine the presence of serious drafts.
- Fire with a match or lighter. Deviation of the flame from the vertical indicates the presence of blowing.
- A sheet of paper. They leave him in the closed door and try to pull him out. If the leaf comes out easily, the sash does not close tightly.
If the paper sheet is easy to pull out through the sash, then the window is not airtight
Having identified problem areas, we begin to regulate the system to optimal requirements.
Checking the tightness of a Veka (veka) window (how to check where the wind is blowing from a Veka (veka) window?)
If in summer the problem of blowing through Veka (century) windows worries us little, then in winter we don’t want to freeze at home. So, three ways to detect a Veka (century) window blowing. We check the windows for blowing, look for where the wind is blowing from the Veka (century) window.
The first way to check the tightness of a Veka (century) window : using a sheet of paper, half an A4 is quite enough. We open the window sash slightly and expose half of the sheet to the street, close the sash, and lower the handle all the way down. Important! The sheet of paper should not fall on the locks that are installed on the window frame, otherwise it will simply be bitten and the experiment will be carried out incorrectly. We pull out the sheet. Three options: the sheet flies out with a whistle, the sheet comes out with difficulty, it feels like the sheet is about to tear. Important! Thus, the entire perimeter of the window sash is checked. If in most places of such a check the sheet comes out freely (flies out with a whistle), the seal needs to be replaced. If the sheet comes out with difficulty in most places of inspection, the problem of window tightness can be solved by adjusting and lubricating the window. If the sheet is about to tear in most places of inspection, you do not need to do anything with the Veka (century) window. You won’t be able to blow from this Veka (century) window!
The second way to check the tightness of a Veka window (century) : using a soap solution. Do you remember how you were looking for a hole in a bicycle tube?))) We make a soap solution. Apply Veka (century) around the perimeter of the window. Where the bubbles appear is where it blows.
The third way to check the tightness of a Veka window (century) : using a candle flame. Carefully move a burning candle around the perimeter of the window. Wherever the flame fluctuates, from there it blows from the Veka (century) window.
Switching winter/summer modes
When installing double-glazed windows, installers set the initial neutral parameters for locking the sashes. All positions will be adjusted for optimal functionality. However, then it is necessary to adjust the settings - ideally twice a year.
Why is this necessary?
Seasonal adjustment is often forgotten, leaving the sash pressure in a neutral position. As with any violation of operating rules, consequences arise over time:
- drafts from under the sash even with correct installation adjustments;
- if the summer mode is set, then in winter this will not provide sufficient pressure on the locking mechanism, which will cause heat loss from the room;
- if you leave the winter position, then due to the constant strong pressure of the sash on the seal, the latter will quickly become unusable;
- in the absence of seasonal adjustment, the normal microclimate of the room is disrupted, including an increase in humidity levels (there is a risk of condensation and mold).
Improper operation may lead to the formation of condensation on the glass
To do this, you need to correctly set the winter and summer modes of plastic windows in the sash settings.
Adjustment mechanisms
Before you begin changing the mode, you need to determine the locations where the adjustment devices are located. In most cases, the system provides for the presence of special mechanisms - trunnions, which, depending on their position, determine the degree of pressing of the sash required for the season.
They are located at the ends of a metal-plastic window or door. The number of such mechanisms may vary depending on the size and manufacturer of the glass unit (from two or more).
Possible locations of eccentrics - different manufacturers have them in different places
The trunnions may differ in appearance, but they perform the same adjusting function.
Options for the appearance of eccentrics
At the edge of the eccentric there is a mark, which serves as an indicator of the desired mode. By default, it is set up - this is a neutral position, which needs to be changed in accordance with the season.
Risk indicating the selected mode
How to switch
The process itself is quite simple, you only need one tool - a simple hexagon (usually 4 mm), or less often an asterisk.
You need to set plastic windows to cold season mode before the onset of frost, when the temperature is still plus 5–10°.
Open the glass unit and inspect the ends. Usually there is one eccentric on the side, the second on top.
Mark indicating adjustment mode
Most likely, the regimes will be in a neutral position, and the risks will point upward. Having selected the desired tool, change the position of the marker.
To set a plastic window for the winter, turn the notch on the regulator towards the outside of the room. With the onset of the warm season, the position of the marker should be moved by the mark inside the room. Accordingly, if there are several such regulators, then the modes are transferred by turning all available eccentrics to one position.
You need to constantly switch modes according to the season - this is what will ensure normal functionality, balance of ventilation and sufficient energy saving in your home.
Cleaning dirt and lubricating Veka window fittings
Start insulating your windows for the winter by inspecting the Veka window fittings. Remove dirt, especially from the top of the window sash. All folds must be cleaned of deposits and dirt, especially cement and plaster residues. Direct exposure of the fittings to moisture and contact with cleaning agents should be avoided. Then lubricate the window fittings with Veka. Veka window lubrication points are marked with special markings. How to lubricate a Veka (century) window? The most common ones are WD-40, machine oil, grease. Do not under any circumstances lubricate with sunflower oil or olive oil or anything else! Edible oils dry quickly into a sticky substance that will break the Veka (eyelid) window mechanism. After this, rotate the fittings in different modes several times to distribute the lubricant. Wipe off excess oil from the Veka (eyelid) window.
What other adjustment methods are there?
If, when checking the tightness of the lock, cold air still penetrates from above or below the sash, then most likely the problem is that the sash geometry is incorrectly set.
The figure shows the main points where adjustments to the fittings may be required. The window design provides several adjustment options:
- horizontal and vertical shift;
- setting the position of the lower corner;
- degree of pressing against the frame.
Location of adjustment points
How are optimal modes set?
Setting the vertical position
This is done by adjusting the bottom loop. Remove the protective cover. There are two adjustment points here - horizontal and vertical. To raise or lower the sash, adjust the screw located on top of the hinge. To raise it, turn it clockwise, and vice versa if you need to lower the height.
Vertical position adjustment
Horizontal adjustment
To perform this operation, both loops must be configured.
There is a second screw on the side of the lower canopy, designed to change the horizontal position. When it is turned from left to right, the sash moves towards the hinge, and vice versa when turning it back.
Adjusting the lower canopy
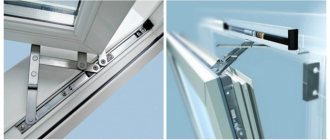
Drafts can also form through the upper corner of the window that cannot be locked. To do this, set the pressure on the upper hinge, the adjustment screw of which is located on the side. We twist it and achieve the desired result - evenness and tight fit.
Setting up the top canopy
When changing the horizontal position, it is necessary to leave a gap of several millimeters between the hinge and the sash. Otherwise, if you tighten it too tightly, the ventilation mode will not work.
Changing the degree of sash pressure
The clamping mechanism is another device in the form of a plate located on the frame. It is designed to prevent burglary by pressing the sash from the street side.
Related article: How to switch plastic windows to winter mode
Pressure plate ensures tighter closure
When turned clockwise, a tongue extends, which will contribute to a tighter closure.
Adjusting the top corner fit
There is another adjustment screw to press the top corner of the window against the frame. To get to it, you need to open the window in two directions at once. To do this, press the lock on the end of the sash, as shown in the picture.
Locking loop and tongue locks allow the top corner to be pressed against the frame
Pull it all the way, turn the handle to ventilate, and then pull the top edge of the sash towards you. Access to the clamping mechanism is open. One of the plates has space for a hexagon. By turning it, you can adjust the tightness of the upper corner of the sash.
These are the main problems that can appear over a long period of operation, when the operation of the system gradually weakens the initially set modes. But immediately after installation, all these settings are regulated by the installers themselves from the supplier company - they are obliged to ensure the correct operation of the system.
Of course, if you have no experience or it is not clear how to make the adjustment yourself, it is best to contact an installer. They will send their specialist who will perform all the necessary procedures, placing the valves in the desired position.
Main components that need adjustment
The sash can be adjusted vertically and horizontally. In the first case, adjustment of the lower loop is required, and in the second - the upper part of the mechanism. To adjust the sash pressure, adjust the fastening in the middle part of the sash on the side of the handles. Also, the sash pressure is adjusted at the bottom of the window. To adjust the lower angle of the sash horizontally, the lower hinges are adjusted.
Without the help of a specialist, you can not only adjust the window structure, but also eliminate some simple malfunctions.
Adjusting plastic windows
Modern plastic windows, thanks to their high quality characteristics and ease of use, have brought a new level of comfort into our lives. This is achieved not only thanks to their high heat and sound insulation characteristics, but also to a carefully thought out, complex technical system of mechanisms, which is responsible for their high-quality functionality. During operation, like any other mechanism, it requires periodic monitoring and maintenance. In addition, sometimes various types of malfunctions arise that make it difficult or impossible to fully operate the windows. However, most frequently occurring faults can be resolved on your own. Modern window fittings are equipped with convenient mechanisms for adjusting windows. Having a minimal set of basic tools at hand, you can bring the window into working order in a matter of minutes, saving time and a lot of money.
PVC windows: Interesting facts and news
16.05.2018
Installation of REHAU plastic windows in the South-East Administrative District Company... Read more
16.05.2018
How to adjust Rehau windows yourself?
REHAU plastic windows are so well assembled that they retain complete tightness and correct geometry even after years... Read more
16.05.2018
Features of glazing loggias and balconies
Any balcony or loggia can be used to greater advantage... Read more
16.05.2018
Conversion of VEKA plastic windows to winter mode
Plastic windows… Read more
16.05.2018
Plastic windows VEKA for a summer residence
If you visit your dacha not only during the spring-summer season, your dacha… Read more
05.04.2017
Veka Alphaline, Euroline, Softline profile: how to choose the right one
When choosing a profile in favor of Veka systems, the buyer must decide which of the existing types is most... Read more
29.03.2017
Aluminum windows in Moscow
Aluminum windows are distinguished from other translucent structures by their increased wear resistance: the performance characteristics of the structures allow them to be used in… Read more
22.03.2017
Aluminum doors
PROFILE SYSTEMS FOR ALUMINUM DOORS. Today, aluminum systems are manufactured using modern innovative technologies. Warm doors… Read more
16.03.2017
Who benefits from buying Veka Softline and which profile to choose, Softline 70 or Softline 82
More details
03.02.2017
Where to buy plastic windows Veka, Rehau in Moscow, on the official website at manufacturer prices
More details
PLASTIC WINDOWS. PVC.
plastic windows and double-glazed windows Veka
German PVC Windows: Reviews 08/12/2020 Customer review Ilnur K. Read more
08/12/2020 Client review Dmitry Karimov Read more
08/12/2020 Customer review Maxim Poletaev Read more
08/12/2020 Customer Review Rinat Tikhonov More details
08/12/2020 Client review Alina B Read more
News: 02/04/2019 VEKA windows in Moscow Read more
01/29/2019 Eurowindows in Moscow Read more
01/12/2019 Which plastic windows are the best and how to choose them? More details
12/24/2018 How will the rise in price of titanium dioxide affect the plastic window market Read more
12/03/2018 Trends in the development of the plastic window industry (continued) Read more
Comparison of plastic windows, New items, Reviews: 06/29/2018 Panoramic glazing Read more
06/20/2018 Aluminum window calculator Read more
06/10/2018 Installation of Rehauer balcony systems Read more
06/10/2018 Glazing of balconies without frames Read more
06/10/2018 Glazing options for Khrushchev balconies Read more
A little about the general principles of adjusting window sashes
Most modern windows have the ability to adjust the sashes in three planes, which allows you to achieve the correct position of the sash in the frame, as well as ensure the optimal degree of pressure on the seals along the entire perimeter of the sash.
Depending on the manufacturer of the fittings, the appearance of individual elements, adjustment methods and the tools used may vary, but in general the general scheme for adjusting the sash is as follows:
What you need for adjustment
Masters adjust metal-plastic windows with a special universal key. But with the same success this can be done with a simple set of tools. Everything you need can be easily found at home or purchased at a hardware or auto store.
Here's what you'll need:
- hex key 4 mm;
- Torx key T15 (asterisk);
- 11 mm open-end wrench or pliers;
- flat screwdriver;
- knife;
- plastic linings;
- All-purpose grease or machine oil.
When closing, the flap touches the frame from below
The sash must be moved towards the top hinge and up. To do this you need:
- Open the sash
- Using a hexagon, turn the adjusting screw located at the end of the sash near the top hinge several turns clockwise. (photo 1)
- Close the sash
- Remove the cap from the bottom hinge
- Insert the hexagon into it and make a few turns clockwise
- Check the free movement of the sash and, if necessary, repeat the adjustment until the fault is eliminated. (photo 2)
When closing, the flap touches the side of the frame
The sash must be moved towards the hinges, for this:
- If the side of the sash touches the frame only from below, then it will be enough to move the sash towards the lower hinge. This can be done using the adjusting screw under the bottom hinge. (photo 3)
- If the side of the sash touches the frame along its entire height, then it will be necessary to move the sash also towards the upper hinge, as described in the previous case. (photo 1)
Insufficient fit of the fold to the frame
At the side end of the sash on the handle side there is a system of eccentrics that regulates the tightness of the sash against the frame. Depending on the manufacturer, their appearance may vary, but the principle of operation is the same for all.
By rotating the eccentrics with a hexagon or pliers, you can achieve the degree of pressing of the sash against the frame that is necessary. It is recommended to set a strong pressure in the winter, and a weak one in the summer.
If it is necessary to adjust the degree of pressing of the sash to the frame from the hinge side, this can be done using the adjusting screw on the lower hinge (photo 4). If it is a tilt-and-turn sash, you can additionally adjust the pressure on the sash using the top hinge. To get to the adjusting bolt, which is located on the scissors in the area of the top hinge (photo 5), you need to open the sash and then turn the handle to the ventilation mode, after first pressing the lock (photo 9, 10). Rotating it clockwise presses the sash against the frame, counterclockwise weakens the pressure.
On some types of fittings, adjustment is made using responders (photo 6) located on the frame on the handle side. Their position can be adjusted using a hexagon. To ensure stronger pressing of the sash to the frame, the sash must be moved closer to the street. On the hinge side of the frame there are also clamping mechanisms (photo 7, 8), adjustable with a hexagon. The further the tongue is pulled out, the stronger the sash will be pressed against the frame.
Troubleshooting window handle problems
The broken handle is replaced. If the handle does not turn all the way when closing the window, this indicates that one or more locking pins are resting on the projections of the locking bars. This problem can be eliminated by adjustment.
When opening the swing-out flap, the mechanism may not work correctly, and then the handle gets stuck in an intermediate position. Let's look at how to deal with these problems.
Replacing a window handle or installing a handle with a lock
The plastic handle may break. Sometimes it becomes necessary to replace ordinary handles with handles with a lock: the doors equipped with them can only be opened with a key, which can be useful in a children's room. To change the handle, you will need a Phillips screwdriver.
The screws that secure the handle to the sash are located under the oval decorative trim. To access them, lift it by the ends and turn it 90 degrees.
Remove the screws with a screwdriver and remove the handle. The new handle is installed in the reverse order.
The handle sticks or does not close completely
The reason may be that the locking pin rests against the strike plate when the sash is locked.
Open the sash slightly and, turning the handle, watch in which direction the trunnions move in order to understand where it is necessary to move the corresponding strips. To move the bar, loosen the fastening screw with a screwdriver, move the bar in the direction of the pin movement by 3-4 mm, tighten the screw and check how the window closes. If the problem persists, move all the other strips one by one, checking the operation of the handle each time.
If the handle is jammed
Most often this happens when the lock, which is responsible for opening the sash in one of two positions - tilting or swinging, does not operate correctly.
The blocker is a lever located at the end of the sash approximately in the middle. It needs to be pressed against the sash - the handle will unlock and it can be returned to its normal position.
Why do you need to adjust windows?
Often, the desire to adjust Veka windows in Moscow and the temperate climate zone of Russia is associated with a variety of external factors that can disrupt the operation of window structures and affect the quality of their functioning as a whole - deform the frame, sash or impost, reduce the waterproofing and heat-insulating characteristics of the glazing.
All this can cause drafts and condensation; the locking mechanisms will jam, making it difficult to open the doors. The soundproofing qualities of the structure will be compromised and in the end the window will not be able to be closed at all. To correct the malfunction, expensive repairs will be necessary with the replacement of fittings and the involvement of professionals.
Important!
If the structures are installed in a completely new house, then you need to be careful with them. After all, the adjustment of Veko windows is carried out by craftsmen according to the parameters of the opening, and over time, buildings shrink and within six months the fittings will need debugging. Usually, the problem is solved by adjusting the hinges and does not arise in the future.
So how can you properly prepare Veka (century) windows for winter yourself?
First, think about what bothered you last winter? How are things going with Veka (century) windows now? Do they open well? Were there any puddles on the windowsill during heavy rain? How does the window handle turn? With or without effort? As expected, does the handle go all the way down? Or not? As they say: cleanliness is the key to health! In our case, regular removal of accumulated dirt and lubrication, plus timely adjustment (adjustment) of windows, significantly increases the service life of Veka window mechanisms. The question arises: how to properly wash a Veka (century) window so that it does not get damaged? You can safely wash the Veka window with ordinary soapy water and a soft sponge. We soap the glass (glazed unit), Veka window profile (century), slopes, window sill, and then wipe it dry with a soft cloth. Check the drainage channels (they are at the bottom of the window frame), maybe they need to be cleaned? It is also important to know how to adjust Veka windows, but more on that below.
Symptoms and prevention of malfunctions
Systematic adjustment of Veka windows, the price of which is significantly lower than a full-fledged repair, will eliminate breakdowns and extend the life cycle of the fittings. Manufacturers recommend carrying out this operation once a year; in addition, it is necessary to change the density of the sash rebate depending on the period of the year.
Adjustment of Veka plastic windows is in demand when:
- During the process of opening/closing, the doors engage fittings or frames. In this case, the fault lies in the sagging of the sash.
- Uneven fit of the sashes to the frame leads to drafts and requires calibration of the pressure.
- In order to extend the service life of rubber seals, Veko windows are adjusted seasonally to the “winter” or “summer” position.
Modern windows allow the sashes to be adjusted in three planes at once - horizontally, vertically and diagonally. This ensures the optimal position of the structural elements.
Sealing the seams of a Veka (veka) window with thermal insulation materials
In case of improper installation, sealing the seams with thermal insulation materials may be the only solution. Sealing installation seams and joints with special heat-insulating materials is one of the most effective ways to insulate Veka windows.
How can I seal the street seams of a Veka (century) window?
- polyurethane foam, which must be plastered or covered with strips
- mineral wool, which must be covered with strips
- polystyrene foam, which must be covered with strips
— liquid rubber (STIZ)
How can I seal the internal joining seams of a Veka window?
- silicone sealant
- acrylic sealant
— cosmofen (liquid plastic)
The described problems with Veka (century) windows can appear due to poor-quality installation of a metal-plastic structure or during a long service life - longer than 10 years. During installation, installers were required to familiarize themselves with the design properties of Veka (veka) windows and teach owners how to use Veka (veka) windows.
The end of summer, the beginning of autumn is the time to prepare Veka (century) windows for winter. If you take care of Veka (century) window insulation in advance, you will definitely not freeze at home in winter!
Adjusting Veka windows for winter
Over the years, the rubber seal loses its volume and a gap forms between the frame and the sash. The problem is especially acute in regions with variable climates, where sharp temperature fluctuations are not uncommon. To compensate for the linear expansion of the material, there is no need to change the seal; it is enough to adjust the position of the valves using the mechanisms provided for this. Adjusting Veka windows will help reduce internal stress in window structures and fittings, and will also preserve the integrity of the insulation.
Checking the frame pressure of your windows is not at all difficult: arm yourself with a sheet of paper and press it with the sash. If the sheet is easily pulled out, then the fittings should be adjusted. If it is set up correctly, it will not be possible to carry the paper through the gap - it tears or gives in very slowly.
How to order preparation of Veka (century) windows for winter in St. Petersburg (St. Petersburg) inexpensively and efficiently
Order preparation of Veka (century) windows for winter in St. Petersburg (St. Petersburg) inexpensively +7(812)904-30-42
By calling, you can order the preparation of Veka (century) windows for winter inexpensively and efficiently in St. Petersburg (St. Petersburg) and the Leningrad Region. A Veka (century) window repair specialist will arrive at the specified address at a time convenient for you. Will quickly and efficiently complete all necessary work. The experience of our technicians allows us to guarantee that, with proper operation, the corrected problems will not reappear for a long time.
We employ only highly qualified professionals who will quickly identify and eliminate the cause of the malfunction. You can once again enjoy the flawless performance of your Veka windows.
Draw your attention to! We DO NOT have “general profile” specialists (from ceiling to floor) or migrant workers!!! Only professional window repairers Veka (century)!!!
Did you find it cheaper to prepare Veka (century) windows for winter in St. Petersburg (St. Petersburg)?
Send an offer from another company of similar quality and we will make it even cheaper. We are confident that our prices are reasonable!
Where do we get such confidence?
We do not have overdressed offices in every district of our beloved city, at every metro station, at every underground passage. There is no overstaffed staff. We do not advertise from every iron. BUT! We have over 16 years of experience, professional craftsmen and excellent cost optimization!
Timely preparation of Veka (century) windows for winter in St. Petersburg (St. Petersburg) will require a significantly smaller amount of money than their repair and will extend their service life.
Our advantages
— We prepare for winter, repair and service Veka (century) windows of any complexity.
— Affordable prices. System of discounts, promotions.
— Urgent departure. Urgent repair of Veka (century) windows at a time convenient for you.
- Only experienced craftsmen.
— High-quality materials and fittings.
— Guarantee for all types of work.
There will always be someone who will do it cheaper...
“Expensive and sweet, cheap and rotten”, “Free cheese comes in a mousetrap” - this works here too. Okay - it doesn't come cheap. The one who works cheaply is the one who steals spare parts from production, the one who pretends to be a master, the one who does not value his work. We work HONESTLY and WELL.
The choice is yours, remember that “The miser pays twice”!
Honest reviews from our clients
When is adjustment useless?
Sometimes it is impossible to solve all problems by adjusting Veka windows and their fittings. There are a number of signs that indicate upcoming window repairs. It is not recommended to neglect these signals.
In particular, you should contact a specialist if:
- The seals around the window are worn or torn. It is not difficult to cope with this problem if you timely replace EPDM rubber seals with new ones.
- The installation regulations were violated; the manufacturer used low-quality materials or components. Insufficient thermal insulation, low-cost materials and incorrect installation are the most common mistakes at this stage.
- The glass unit is destroyed or its tightness is in doubt - a complete replacement of the glazing is performed.
- Window fittings are broken and require replacement.
Have you decided to get rid of your problems and adjust Veka windows in Moscow?
Then you won't find better conditions than ours! Since 1999, we have been able to satisfy the needs of thousands of customers - quality service and professionalism are a priority for the TeploDom specialists. We are ready to help with installation, maintenance and adjustment of windows and provide you with the appropriate level of service. Contact us and consultants will provide comprehensive information about the conditions for adjusting Veka windows in Moscow and the Moscow region!
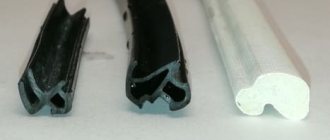
Replacing the seal
A seal that has lost elasticity or is damaged does not provide the window with the necessary tightness. It blows from a window with such a seal and it’s cold in the room. In such cases, adjustment does not solve the problem; the seal must be replaced.
Most profile systems have two or three sealing circuits, which are located on the sash and on the frame. The seals on all circuits are changed at the same time.
The seals are inserted into a special groove on the PVC profile and can additionally be glued. Please note that conventional self-adhesive polyurethane foam seals, which are sold in hardware stores, are not suitable for plastic windows.
Replacing seals is a difficult task, so it is advisable to entrust it to specialists: for example, contact one of the VEKA partners in your city.
We switch windows to winter mode correctly
Switching your windows to winter mode in the fall is an opportunity to save on heating costs. It is possible not to switch the windows to another mode if the good qualities of the seal are preserved. When spring arrives, switch your windows to summer mode.
Due to proper adjustment and reduction of the load on the seal, the windows will last longer.
You can switch the window fittings using the eccentrics (trunnions) designed for this purpose, which are located on the side of the sash.
If the eccentrics have recesses for a hex key, sprockets, screwdrivers, or oval-shaped eccentrics, then this design is capable of transitioning to some kind of window mode.
Eccentrics in their structure can be round or oval with openings for hexagons. To switch the window to cold mode, all eccentrics must be adjusted.
It’s easy to switch plastic windows to winter mode. It is important to remember that incorrect adjustment can have a negative impact on the windows. Schematically the process looks like this.
- First, to switch the mode of plastic windows, you need to take a hexagon to tighten the window sash.
- When you open the window slightly, a rounded pin will be visible from the end of the door. The pattern located on the trunnion is in most cases directed upward. This suggests that an intermediate window mode is set between winter and summer.
- The hexagon must be inserted into the centrally located hole in the trunnion and turned at a right angle in the direction of the seal. Now the adjustment of the notch on the trunnion should face the seal.
- It should be noted that the majority of windows have more than one axle, located along the area of the window sash. To avoid blowing, all trunnions must be switched to winter mode.
- To evaluate the work, insert a piece of paper between the frame and the window sash. Next, see how easy or difficult it is for you to remove the paper from the window. This way you can understand the quality of the pressure and accurately switch the window to winter mode.
Important! When using the fittings, if you notice airflow when the sash is closed, you should make an adjustment - switch the structure to winter mode. But this mode can significantly wear out the rubber seal of plastic windows. Therefore, you should not over-tighten the eccentrics, since such adjustment will cause the trunnions and window frame to fail much faster.
When summer arrives, switch your windows to summer mode. Using an inappropriate mode will soon damage and age the seal.
Plastic windows can be switched from winter mode by inserting a hexagon into the eccentric and turning it clockwise. Remember, the service life of the window depends only on your correct adjustment and prudent use.
Source: pravda.ru/society/15-02-2018/1370194-windows-0/