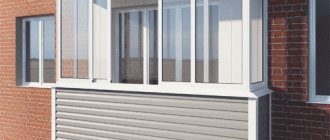
The balcony needs to be sheathed. And the point is not only in aesthetic appeal, but also in the fact that finishing the balcony with siding allows you to additionally insulate and secure it. This raises a number of questions. How to do this at a height, for example, 6 floors? What material should you choose for finishing? How many panels are needed? Let's find out!
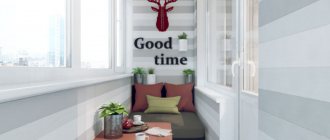
Rice. 1. Balcony covered with vinyl siding.
Why is it worth covering a balcony with siding?
There are several advantages of this cladding:
- Insulation. Under the panels, the balcony can be insulated and made comfortable at any time of the year.
- Easy to install. Covering a balcony with siding is a simple task. You can handle it on your own.
- Practicality. The finish is unpretentious to use. Easy to clean, not afraid of frost, moisture and fungi.
- Price. Siding is one of the most affordable facing materials today.
- Durability. This cladding will last at least 3 decades.
- Individuality of your home. There are a lot of options - different colors, textures, from different materials. You can choose the optimal balcony covering for your home.
Outer corner sockets
We immediately mount the sockets on the lower belt at the outer corners. Each such nest consists of two pieces of platband (window sill) 100-120 mm each, attached “tub up”. The best option is to cut a V-shaped groove at 90 degrees in the middle of a single piece of 200-240 mm from the side of the wide shelf to the narrow shelf, and then, carefully, through a thin fluoroplastic film, heating the narrow shelf with a soldering iron, bend the workpiece at the same 90 degrees. Since you only need two of these nests, it’s better not to be lazy and make solid ones.
Which siding to choose for a balcony?
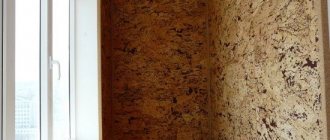
On the market you can find siding that looks like wood, brick or stone. You can choose any texture and color. But the material from which the siding is made needs to be selected more carefully.
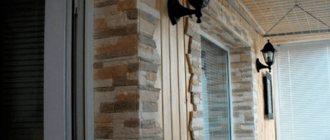
Balcony, decorated with brick panels in the color of the walls of the house. (photo No. 1)
Today, four inexpensive and easy-to-use materials can be distinguished:
- Metal siding. This is a thin steel sheet coated with a protective polymer layer.
- Vinyl panels. Made from PVC. Can be classic or foam siding; "shipboard", "herringbone" or "blockhouse" type.
- Acrylic siding. It is also made from PVC, but with the addition of Acrylnitril-Styrol-Acrylester (ASA) polymer, which changes the properties of the material.
- Facade panels. Made from polypropylene, they look like brick or stonework.
There are also wood and fiber cement siding available. But they are not suitable for a balcony: wood is heavy and impractical - it needs regular protection from moisture and fungi. Fiber cement siding is expensive and very heavy. Balcony ceilings and fences will not withstand such a load.
A comparison of metal, vinyl and acrylic siding and siding panels is given below.
| Metal | Vinyl | Acrylic | Facade panels | |
| Weight | The heaviest type of siding. | Easy | Easy | Lungs |
| Strength | The most durable. | Medium strength. | Medium strength. | Thicker and stronger than siding. |
| Water resistance | Resistant to water thanks to a polymer protective coating. | Water resistant. | Water resistant. | Waterproof |
| Scratch resistance | If the protective layer is damaged in the rain it will rust. | Scratches do not affect the performance characteristics of the panels. | Scratches do not affect the performance characteristics of the panels. | Scratches do not affect the performance characteristics of the panels. |
| Resistance to fungi and mold | Stable. | Stable. | Stable. | Stable. |
| Resistant to fading | Fades moderately in the sun. | Fades moderately in the sun. | Does not fade. | Does not fade. |
| Features of use | Not recommended in coastal regions and areas near industrial facilities, with a high content of salts in the air. | Recommended for regions with temperate and cold climates. | Recommended for regions with hot climates and a lot of sunny days. | Recommended for all climate zones. |
!
Vinyl siding is good for homes in northern regions and on the shady side of the building. Acrylic - for southern regions and balconies facing the sunny side.
Acrylic siding and facade panels will cost a little more than their analogues. But these options win in some respects.
Features of cladding a wooden house
When covering a wooden house with siding, it is necessary to take into account the characteristics of the materials:
- finishing of the facade, as well as interior work, must begin after the house has settled;
- for the lathing, it is advisable to use a wooden beam (seasoned and treated with an antiseptic);
- It is mandatory to treat the surface of the walls with an antiseptic, since after installing the sheathing it is impossible to control the condition of the wood and promptly carry out preventative measures for areas affected by fungus;
- for additional protection, you can lay a waterproofing membrane;
- Even if the walls are smooth and the siding is installed without insulation, the panels cannot be attached to the wall - for proper use of the wood, a gap is required that the sheathing creates.
Cladding a wooden houseSource elka-palka.ru
The ease of installation of siding does not exclude care and accuracy when carrying out work. An error when installing the starting profile, fasteners that are “tightened” or incorrectly installed in the hole, non-compliance with recommendations for the size of the temperature gap - all this can lead to serious consequences for the skin, which will not be so easy to eliminate.
How much siding should I buy?
→ In order not to make a mistake with the quantity, you need to calculate the area of all surfaces that are to be covered. As a rule, these are three walls of the balcony. Or more if the balcony has sloping corners and is of irregular shape. We sum up the data obtained and divide the result by the area of one panel. And if we add 10-15%, we will definitely have waste.
→ Let's look at an example. The balcony is being covered with siding from the outside.
→ Area of the front wall for cladding: 2.4 m x 1.1 m = 2.64 sq. m.
→ Area of one end wall: 0.8 m x 2.7 m = 2.16 sq. m.
→ Total area for cladding: 2.16 + 2.16 + 2.64 = 6.96 sq. m.
→ Add 10% for waste: 6.96 x 1.1 = 7.66 sq. m.
And we divide by the area of one panel (let’s say it will be “Canada Plus Lux” color “Beech”, its area is 0.69 sq. m): 7.66: 0.69 = 11.1 panels.
We always round up. It turns out that for our example we need 12 panels of Canada Plus siding from Alta-Profile.
In addition, a facade fastening system is needed. For metal siding - metal. For vinyl or acrylic, metal, wood and plastic are suitable. The latter is even preferable. It reacts to temperature changes in the same way as the panels themselves, so the system will be more reliable.
And finally, you will need additional strips (starting, finishing, j-profile, outer corner and others - depending on the configuration and size of your balcony). A siding sales manager will help you choose a complete set. Do not neglect additional materials - not only the ease of use, but also the service life of the entire balcony depends on this.
If insulation is planned under the sheathing, you also need to purchase insulation in slabs. For example, mineral wool, polystyrene foam or extruded polystyrene foam.
Painting the bottom
After attaching the sockets at the corners and the starting belt, we paint the remaining part of the lower wooden belt twice. Apply the second coat of paint after the previous one has completely dried. Of course, all wood for sheathing must be pre-treated with fungicides and soaked in drying oil. Over time, the paint underneath will peel off, but the wood will also darken. Since it will be visible no more than 100 mm, it will not be noticeable.
Option: cover the excess wood from below with half a strip of siding on self-tapping screws. But siding that is not secured according to the standard pattern can be torn off by the wind.
Install it yourself or call a professional?
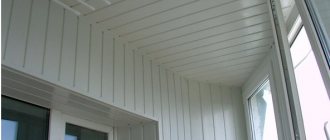
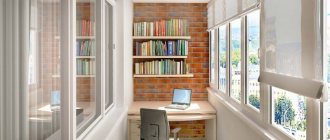
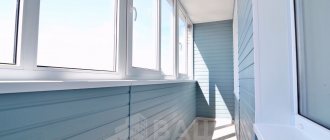
A neat balcony covered with wood siding. (photo No. 2)
In some situations, you can install siding on the balcony yourself, in others you will have to call in specialists.
You can cover your balcony yourself if:
- it is located no higher than the 2nd floor. You can carry out installation directly from the street by installing scaffolding;
- there is no continuous fencing - for example, it is made of metal rods, and you have the opportunity to line it from the inside.
!
You can line a balcony with siding yourself if it is open with a fence made of metal rods or is located on the 1st or 2nd floors.
Accordingly, you will have to resort to the help of professionals with permission to perform high-altitude work if:
- the balcony is located above the second floor;
- The balcony railing is solid and you do not plan to dismantle it.
Let's take a closer look at how to proceed if the balcony fencing is made of metal rods. In this situation, you can do the work yourself, armed with our instructions.
Starting belt
We fasten the starting belt with self-tapping screws flush with the upper edge of the lower belt. In advance, for convenience and safety, we make a safety loop for the drill from braid. Do not tighten the loop too much on the wrist.
Before fastening, we hang a piece of the starting strip on three or four pieces of fishing line using brackets threaded through the mounting holes. It is better to attach these devices (line with brackets) to the inside of the upper belt for the entire duration of work. In the future, you will only need to thread the brackets into the mounting holes of the next belt and pass it over the railing.
Finishing the balcony with siding from the outside: preparatory stage
We will prepare the necessary set of tools. We will need:
- building level
- roulette
- metal scissors or grinder
- drill
- screwdriver
- pencil
- fishing line or cord.
Let's get to work. External cladding of the balcony with siding begins with the preparatory stage:
- We remove furniture and interior items from the balcony - everything that can be taken out.
- We inspect the ceilings and balcony railings. If necessary, we clean off old paint and traces of rust. After this, we apply an anti-corrosion coating or paint to the metal structures.
- If the fences are dilapidated, it is better to dismantle them and install new ones.
- If there are cracks on the balcony slab, they need to be widened and filled with concrete. If there is damage, you need to install wooden formwork and fill it with concrete. Further work will have to be postponed until the concrete gains strength.
Security measures
Since work is carried out at height, it is necessary to follow some safety rules. These include the following provisions:
- Before carrying out installation work, you need to make sure that the metal parapet is reliable.
- When working on balconies located above the second floor, you should use special safety belts. According to existing rules, the belt must be worn on the body, and the safety end must be securely attached to the metal fence.
- If you don’t have a belt, you can use ropes or other equipment, including climbing equipment.
- When carrying out work, the area under the balcony must be fenced off to prevent injury to passers-by if concrete pieces, tools or siding elements accidentally fall.
- It is recommended to use ladders to work on the first and second floors.
- If there is no metal balcony parapet, then it is recommended to use the services of qualified installers, since in order to attach the sheathing to the concrete fence it is necessary to perform some dangerous types of work while being outside the balcony.
- When working with power tools, you must follow electrical safety rules.
In order to fasten the panels efficiently and correctly with your own hands, you must follow the recommendations of specialists. Helpful Tips:
- Before installation, the siding must be left outdoors for some time so that it takes on its operational dimensions.
- Do not force the panels when installing them. They must fit freely into the corresponding grooves of other elements.
- Also, do not tighten the panels when installing them.
- Fasteners must be installed in specially provided holes. Under no circumstances should they be mounted into the body of the panels.
- Installation must begin from the side. This will give you the opportunity to gain some experience before installing the panels from the front.
- The fasteners should not be over-tightened; it is recommended to even leave a small gap.
- All measurements must be taken carefully and panels must be cut with the utmost precision.
- The gap between the end of the siding panel and the fastening element must be at least 5 mm.
- The fastener is installed strictly in the center of the hole provided for it.
Do-it-yourself balcony siding: installation of sheathing
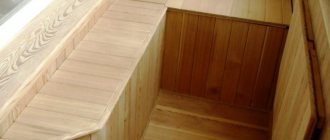
Installation of wooden sheathing under siding. (photo No. 3)
When the preparatory stage is completed, the paint has dried, and the concrete has gained strength, you can move on to the second stage: installing the sheathing.
- We install the lower horizontal belt of the sheathing. You can use a special plank or wooden blocks as it. In the second case, they must be treated with antiseptic agents. The plank or beam is installed strictly horizontally, attached to a steel corner, which is located at the bottom of the parapet, or directly to the balcony slab. We fix the belt to the walls using metal corners.
- We mount the upper horizontal belt. To do this, measure the height at which the panels will be installed. We make markings. We stretch the cord or fishing line, measure the horizontal line so that the outer siding of the balcony is even. We fix the upper belt on the parapet. We carry out the work by analogy with the lower belt.
- We install vertical sheathing profiles. The step is 30-40 cm. In some cases it can be 50 cm. We check that each profile is aligned strictly vertically. We attach them to the wall and horizontal belts using self-tapping screws or corners.
By the way, the sheathing can be assembled on the ground, and only then lifted using strong cables and secured in place.
!
The sheathing pitch is 30-50 cm. It is convenient to assemble the sheathing on the ground, and then lift it with cables and secure it.
Upper belt
If the balcony slab is not skewed and the lower belt is not needed immediately, we now make it from timber onto the sheathing, as described above. Again, the height of the lower belt is at least 80 mm, i.e. it needs to be made from two or three rows of timber.
We measure how many WHOLE strips of siding will fit along the height of the fence, from the top edge of the bottom chord. Siding, unlike lining, cannot be cut lengthwise to size. THE TOP EDGE OF THE TOP SIDING MUST APPLY EXACTLY TO THE TOP EDGE OF THE FENCE. Please note that to install the casing you will need at least 20 mm of board.
Therefore, along the upper connection of the balcony railing, you need to make an upper belt from boards 60-100 mm wide. Its outer edge should protrude outward by the thickness of the sheathing, and the inner edge will support the window sill. The upper chord is fastened through the existing holes (through which the railings were attached) with self-tapping screws 6 mm long, 3/4 of the thickness of the upper beam, or, if the upper chord comes out thin, with bolts with heads flush through. It is better to take bolts with wide thin heads (press washers).
But what to do if the edge of the top strip of siding ends up protruding only 10-15 mm, or “falls short” by the same amount? If you don’t fence 200-250 mm of the upper belt, it’s a monkey’s work, and it will be inconvenient later.
In this case, you need to lay another beam below on top of the one already laid. The small space between the lower edge of the starting belt and the bottom of the wooden belt will then be painted over along with the balcony slab, but it will not be visible from below.
Finishing a balcony with siding: instructions for installing panels
Installation of siding panels. (photo No. 4)
Installation of the panels themselves is carried out in the following sequence:
- We install the starting bar along the lower belt. We fix it with self-tapping screws.
- We install a j-profile along the walls. In the corners there is an outer corner.
- We measure and cut the siding panels to the required size.
- We install the panels from bottom to top. We secure it with self-tapping screws to each vertical plank of the sheathing. In this case, we tighten the screws strictly in the center of the perforation, at right angles to the panel itself. We twist them to the end, and then do half a turn back.
Covering a balcony with siding: the process. (photo No. 5)
- Before installing the last panel, we mount the finishing strip and insert the last panel into it.
- Now you can install waterproofing and insulation.
- Next we move on to the interior decoration. Don't forget to choose the facing material for this in advance. You can also use siding for the interior decoration of the balcony. The work is performed in the same way: first the sheathing is installed, then additional profiles and the panels themselves.
Schematic representation of a balcony insulation cake. (photo No. 6)
If you are doing work from inside the balcony, follow the instructions described above. If you work from the street, then after installing the sheathing, the insulation is installed, then the waterproofing, and only after that the siding panels themselves.
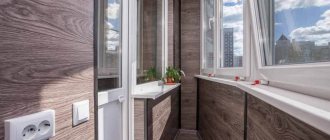
Balcony covered with siding, up to the internal cladding. (photo No. 7)
Selection of materials
We start with the transverse dimensions of the beams for the sheathing. The thickness of the sheathing should be equal to the thickness of the bottom chord, if installed. If not, then the sheathing can be 30-60 mm thick. This size in itself does not matter much, but other sizes will be attached to it. Therefore, decide in advance on the beams for the sheathing, and best of all, stock up on them ahead of time.
Then we determine the required length of siding strips. Siding panels cannot be joined end to end. Therefore, the length of one front strip should be equal to the length of the outer edge of the balcony grille, plus double the thickness of the sheathing, plus 70-100 mm technological allowance. It’s easier with the side strips: they are sawn off to length from the solid ones.
Important nuances when installing vinyl siding
If you are lining your balcony with metal siding, you can skip this point. But finishing the balcony with vinyl siding suggests that the panels will expand in hot weather and contract in cold weather. Therefore it is important:
- Leave a gap of 5-8 mm between the panels and slats in winter, 4-5 mm in summer.
- Do not tighten the screws all the way. You can screw them all the way in and make a half turn back, or insert a coin between the panel and the screw head. It should hold tightly, but be removed without effort. There is no need to tighten the screw any more.
Life hack: use a coin to properly install self-tapping screws. (photo No. 8)
Common Mistakes
If the hand of a master gets down to business, then the result will be perfect. But beginners often make common mistakes, which leads to disastrous results. To prevent this from happening to you, we suggest considering the most common mistakes. Most often, amateurs install fasteners directly into the panel. This cannot be done, since they must be placed in the center of the holes. They are specially made oblong to ensure free movement of the panels. Remember, if this is not done, at high temperatures they will heat up and due to the inability to walk, it may fall off the fastening.
Another common mistake is screwing the panel tightly. Remember that a gap of at least 1 mm must be left between the cap and the surface of the panel so that they can expand. Beginners are not used to leaving a gap between the fastening element and the end of the panel, or they make it very small. Do not forget - in this case the gap size should be 7-10 mm. As you can see, all these mistakes will ultimately lead to changes in the shape of the panels, which will make the appearance of your balcony not the best.
Rice. 15. Mistakes when covering with siding.
Options for style ideas
Let's consider several interesting style solutions for decorating the outside:
External cladding can significantly extend the life of the structure.
This is an opportunity not only to decorate the facade of a building, in any color, but also to improve the technical characteristics of the structure.
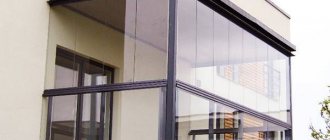
If you glaze it, you can get a small, but full-fledged room.
A wide range of finishing materials will allow you to choose an option for everyone.
Options for finishing the balcony outside with siding and plastic.
If you decide to do the sheathing yourself, follow all safety precautions.
Once you have completed the exterior finishing, you can begin interior cladding.
To fit into the planned renovation budget and bring design ideas to life.
This is interesting: Furniture for the balcony: practical ideas and unusual solutions (23 photos)