The balcony needs to be sheathed. And the point is not only in aesthetic appeal, but also in the fact that finishing the balcony with siding allows you to additionally insulate and secure it. This raises a number of questions. How to do this at a height, for example, 6 floors? What material should you choose for finishing? How many panels are needed? Let's find out!
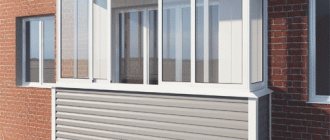
Rice. 1. Balcony covered with vinyl siding.
What to cover the balcony with?
This can be siding, wood or PVC lining. The last two options are good for interior decoration, including loggias and heated balconies. However, the lining is not resistant to frost, moisture, precipitation, and temperature fluctuations. And it is impractical as an exterior decoration.
Siding is more suitable for exterior decoration. It withstands all weather conditions, including frost, rain and exposure to ultraviolet radiation.
But siding is different from siding. There are many types on the market: vinyl, acrylic, metal, fiber cement, wood. However, not everyone is suitable for a balcony.
So, fiber cement siding is too heavy for a balcony. Wooden, like lining, is impractical and requires regular treatment with protective compounds. Metal siding is light and practical, but during rain it can emit a specific hum, which will make it uncomfortable to be on the balcony in such weather.
Rice. 2. Fiber cement siding.
A lightweight, practical and “quiet” option is PVC siding. It is inexpensive, easy to install, and safe for interior decoration of balconies. This will be discussed further.
Methods for attaching panels to the balcony
Most of the panels listed above can be easily attached to any balcony surface with your own hands. There are several ways to start covering walls or ceilings:
- Using lathing;
- On an adhesive base.
In the first case, the lathing is made of either wood or metal, depending on the selected panel material. Of course, a base made of wooden blocks is easier to make, and its cost is lower.
As for gluing the panels, you will have to work hard on choosing a high-quality adhesive composition that will exactly match the original materials (for example, a concrete wall and PVC panel).
Plastic, wood panels, laminate, MDF boards have special grooves along the edges, with the help of which parts of the material fit together easily and tightly. Various fasteners, such as clamps, will help make the sheathing neat and the fastenings invisible.
The clamps remain inside the connection.
Types of PVC siding
PVC siding differs in appearance and composition. The choice between vinyl and acrylic panels depends on what region the house is located in and on which side of the house the balcony is located.
- Vinyl panels are suitable for cold regions and northern exposure. They can withstand temperatures down to -50, and some - up to -64 degrees. However, they can fade in the sun.
- Acrylic panels are the best option for sunny regions and the south side. They are UV resistant and do not fade in the sun. However, with significant frosts they become more fragile.
Externally, siding can be identical to wood, brick or stone:
- Wood siding of the shipboard type. These are long narrow panels (3 - 3.6 m long and about 20-30 cm high). A wide range of colors will allow you to choose the appropriate option for the exterior facade and interior of any home.
Rice. 3. “Shipboard” type siding.
- Herringbone wood panels. Thanks to them, the balcony siding will look exactly like natural wood. Such panels are 5-7 times thicker than the previous ones and, accordingly, stronger.
Rice. 4. Foamed siding “ALTA-BOARD” herringbone type.
- Panels for blockhouse logs. There are single fractures and double fractures. The width and length of the panels will be different, the choice of colors and textures is quite wide.
Rice. 5. Vinyl blockhouse “Alta-Profile”.
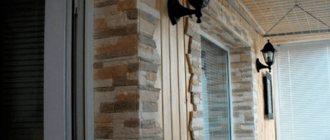
- Facade panels imitating stone or brick imitate the laying of natural materials. The size of the panels may vary for maximum naturalness of the design. But, as a rule, they are shorter and taller than regular siding.
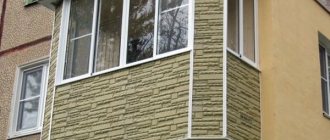
Rice. 6. Balcony covered with stone-like façade panels.
All options are applicable for cladding a balcony. Therefore, the choice depends only on the aesthetic preferences and budget of the owner. Thus, stone and brick façade panels are somewhat more expensive than shiplap siding.
The undeniable advantages of siding
Siding is plates of a certain size, the production process of which uses polyvinyl chloride. The thickness of siding does not exceed 1 mm. Undoubtedly, this material has a number of advantages that make it so popular among builders:
- has high resistance to various types of precipitation (it is not afraid of rain, snow, or scorching sun);
- after the balcony is covered, there is no need for painting or any special care;
- perfectly withstands mechanical shocks;
- non-toxic;
- the material meets all fire safety requirements;
- ease of installation;
- attractive appearance.
Finishing a balcony with siding: instructions
On a balcony or facade of a house, the siding installation algorithm is always the same. Covering a balcony with siding outside, as well as inside, is carried out in 3 stages:
- Preparatory work.
- Installation of sheathing.
- Siding installation.
For installation you will need a traditional set of tools that every home craftsman has: a tape measure, a building level, a screwdriver, an angle grinder, etc.
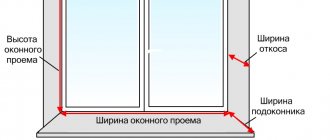
How many panels are needed to cover a balcony? To calculate this, we determine the total area of all surfaces that need to be covered with siding. We divide it by the area of one panel (usually 0.84 m). And add 10-15% for trims.
For example, we decided to sheathe a balcony 2.5 m long and 0.7 m wide with siding. We will not sheathe it completely, but only to a height of 1 m.
So,
You will need to cover the area: 2.5 x 1 + 0.7 x 1 + 0.7 x 1 = 3.9 square meters. m
Area of one panel, for example, “Alta-Siding”: 0.84 sq. m
Required number of panels: 3.9 / 0.84 = 4.6 pcs.
Add 15% for trims: 4.6 x 1.15 = 5.3 pcs.
Round the number of panels up. This means that for the external decoration of the balcony with siding from the Alta Siding collection, you will need 6 panels.
Another option: calculate each surface separately. It is important to take into account that the length of the balcony must be increased by 2 thicknesses of the sheathing (those that will be installed on the side surfaces). If this length is greater than the length of the siding panel, you will have to use a connecting strip (to close the joint of the panels along the length) or overlap the panels (then you need to add 7-10 cm to overlap the panels).
Stage 1. Preparatory work
We remove the previous finishing and check the integrity of the balcony structure. If any problems are found, they must be corrected.
- We clean the concrete slab from contamination. We remove the covering and inspect it. Found any cracks? We seal them with construction mixture.
- If the slab is damaged around the perimeter, install a sheathing on it and fill it with concrete.
Stage 2. Installation of sheathing
To install siding, a special frame is made - sheathing. In other ways, the internal or external cladding of the balcony with siding is not carried out.
You can make the sheathing yourself from wood or use ready-made profiles made of metal or plastic. Wooden slats need to be treated with protective compounds - against moisture, fire, pests and mold. And carefully adjust them to each other in shape and size. Metal and plastic profiles will cost more, but they are much less hassle.
You can make a wooden sheathing yourself, but it needs to be treated with protective compounds. Metal and plastic will cost more, but they are less hassle.
The sheathing is mounted perpendicular to the siding, that is, vertically.
First of all, we install the corner profiles. If the side panels on the balcony are concrete, we attach the profiles to anchor bolts. If they are not there, use brackets.
We install horizontal bars around the perimeter of the balcony from below and above. These are the so-called sheathing belts.
Rice. 7. Lathing for siding. View from inside the balcony.
It must be taken into account that siding panels are not cut to height. Therefore, the height of the balcony railing must be adjusted to the height of the panels. Plus, approximately 2 cm should be left for installation of platbands.
If it turns out that the panel is higher than necessary, you can add another beam to the upper chord and thus raise the window sill.
We mount the sheathing profiles – vertically, at a distance of 30-40 cm from each other.
If you need to insulate a balcony, we use mineral wool, polystyrene foam or penoplex. We install insulation under the sheathing. Cover the top with a waterproofing membrane. It is possible to insulate a balcony from the outside only if it is located no higher than 1-2 floors. In all other cases, insulation is carried out from the inside.
Stage 3. Installation of siding
First of all, we install the corner elements. In the future, they will be used to fix the end parts of the panels.
In the lower part along the perimeter of the balcony we mount a starting strip and secure it with self-tapping screws. We insert the first siding panel into the starting strip and fix it with self-tapping screws - they are screwed into the center of the perforation, perpendicular to the panel. But not all the way, but with a gap of 1-2 mm. Otherwise, the panels will become deformed due to thermal expansion.
Self-tapping screws are screwed into the center of the siding perforation, strictly perpendicular and in such a way that there is a gap of 1-2 mm between the panel and the screw head.
We attach the siding to the sheathing
On average, finishing the inside of a balcony with siding is completed in a couple of hours, since you just need to screw the finished panels to the finished sheathing. You should get a screwdriver for comfortable work, since you will need to twist a lot. Let's look at the installation process step by step.
STEP 1: screw the first lamella. This is the most important step because how smoothly you install it will determine the beauty of the entire wall. It must be set clearly in level and measured several times.
STEP 2: install the first lamella on another wall and create an even angle from the first one. Measure everything with a level in the horizontal plane. To connect, use a special internal corner for siding.
STEP 3: Attach the following siding slats in an overlapping manner. Each lamella has a “lock” on one side, in which holes are made for screwing to wooden joists. It is in them that the screws need to be screwed. Each subsequent lamella will hide the fastening of the previous one.
Advice: do not try to screw the sections tightly, as the PVC material may “lead”. Do not tighten the lamellas during installation, everything should be done with minimal force, only then the wall will be perfectly flat during operation and will not deform at the first load.
The interior finishing of the balcony with siding is completed. If you follow everything according to the instructions, then in just a few hours you can become the happy owner of a beautiful and insulated balcony that will always delight you.
Related article: Insulating a loggia step by step
Finishing a balcony with siding from the outside: features of work
The balcony has to be sheathed at a height. Therefore, you either need to do this work from the inside, from a safe distance, which is not very comfortable, or entrust the installation to professionals who have access to work at heights.
If the fence is metal lattice, installation of the sheathing can be done from the inside, directly through the fence.
Rice. 8. Covering the balcony with siding.
If the fence is solid, the frame frame is assembled entirely on the ground, and then raised by cables to the required height and secured on the balcony.
Where there is a glazed part of the balcony above the sheathing, we install a drip sill above the top panel to drain water from the cladding.
On the open balcony, after the last panel, we install and fix the finishing strip.
Finishing the balcony with siding inside
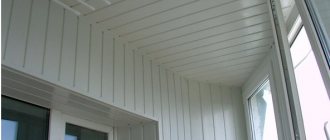
Rice. 9. Internal lining of the balcony with siding.
After the balcony is sheathed on the outside and insulated, we proceed to interior decoration. It is performed using a similar algorithm. The siding for the interior decoration of the balcony is the same as for the exterior. But you need to choose more carefully. Give preference to panels whose safety is confirmed by certificates and sanitary inspection reports. To be sure that the material is non-toxic and safe for humans.
Make sure interior trim panels are safe. Ask the seller for quality certificates and sanitary inspection reports.
If different materials are used for exterior and interior decoration, then different components will be needed. And in all cases, you can’t do without lathing.
The technology will consist of similar stages:
- Installation of sheathing.
- Siding installation.
Detailed insulation work
Additional insulation work
Builders recommend using polystyrene foam or mineral wool as insulation under the siding on the balcony. So:
- If the balcony is used constantly, it is recommended to install a “warm floor”.
Note. At this stage there are some disadvantages: high price and additional load on the slabs.
- When choosing a heat insulator, pay attention to its thickness. Thick material will hide the usable area of the room.
- Be sure to carry out all work on insulating the ceiling. Approximately 15% of the heat escapes through the ceiling surface. All work is carried out using wall insulation technology.
Siding is an ideal option for both external cladding and interior design. The final result is perfect and long lasting. For detailed information, we recommend watching a training video on arranging a balcony with siding.
Do-it-yourself balcony siding: summary
Installing siding on a balcony is more difficult and dangerous than on the facade of a house. Especially if it is not on the first or maximum second floor.
Follow safety precautions. Not only the appearance of the house and the service life of the facade, but also life depends on this. Yours and those of bystanders who may be injured if a tool or finishing element falls from the balcony.
Wear a safety belt during installation. If you are afraid of heights or are not confident in your abilities, it is better not to take risks and entrust the work to professional installers.
Decorative plaster
Finishing using this material is quite common in the repair of balconies.
Surfaces covered with decorative plaster ideally complement the Scandinavian style in the interior.
The walls of the loggia are covered with decorative plaster.
Small living room on the balcony. Plaster was used for cladding.
Advantages of decorative plaster:
- This finish will last a long time (does not rot during use), is resistant to chemicals, mechanical damage, high humidity and sudden changes in ambient temperature;
- The surface is not destroyed;
- Due to its special structure, plaster is used to create various reliefs, patterns on the surface and texture of natural materials;
- The material is absolutely harmless and fire-resistant, has a high degree of vapor permeability.
- Allows you to create a comfortable atmosphere, provides good sound and heat insulation;
- The base for application can be any: brick, concrete, gas and foam blocks, plasterboard;
- The material can be applied in such a way that the surface becomes as smooth as possible or done sloppily, otherwise the plaster will look aged. It all depends on your preferences.
Balcony terrace. The special atmosphere is set by the texture of the plaster and the careless application of the material.