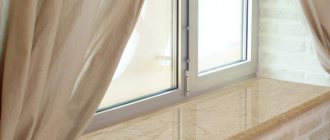
If you can’t look at your PVC window sill without sighing, there is an excellent solution - decorating the window sill with mosaics.
The WINDOWS MEDIA portal offers the fastest and easiest way to make an effective and practical window sill yourself - by gluing a glass mosaic on a grid to its surface. In this case, the composition can be monochromatic or cast in all the colors of a kaleidoscope. It is good to form a pattern from pieces in colors that harmonize with the color of the walls.
Peculiarities
A properly installed window sill will decorate any room. Finishing with universal tiles is a rational solution. This material is not afraid of moisture, resistant to dirt and stress. High-quality cladding increases the strength of the structure. Tile surpasses even plastic in all respects, as it does not fade, is not afraid of contamination, and is easy to clean.
An original option for the kitchen
Tip 7: Close your windows effectively
Now we are not talking about tightly drawn curtains that do not allow light to pass through, which can turn even a large room into a tiny closet. We are talking about translucent options, for example, blinds, decorative carved screens, as well as spectacular shutters. They allow the necessary amount of sunlight into the room, but at the same time they also perform an aesthetic function, since they themselves look very bright and unusual.
DIY repair
You can finish the window sill yourself. Some tips:
- It is necessary to check the integrity of the base: there should be no cracks, large scratches, chips, voids or other defects on the surface.
- The best base for tiles is concrete. This finishing material fits well even on wood and plastic.
- The working surface must be well secured in the opening.
- Finishing should begin after installing the window frame and external sill.
Cutting tiles
Tip 4: Use roller blinds
There may be several options here, ranging from designs like curtains in railway cars, and ending with standard roller blinds, which should be placed at the bottom of the window frame. This solution will be a real salvation not only for people who are annoyed by the view from the window, but also for owners of apartments on the ground floor and people whose windows are periodically looked into by neighbors of nearby buildings (for example, if the buildings are located at an angle).
What is necessary
To lay ceramics efficiently, you need to prepare the necessary tools and consumables. The standard list includes:
- Universal primer.
- Adhesive solution.
- Tile.
- Grout for seams.
- Pliers.
- Glass cutter.
- Hacksaw.
- Building level.
- Small rubber mallet.
- Standard spatula.
For the window sill in the kitchen, porcelain stoneware is the best choice. This material has high strength.
Porcelain tiles are durable and high-density. The finished structure perfectly resists the influence of adverse factors. You can place hot dishes and heavy objects on porcelain stoneware.
Subtleties of preparing the base
Each time cladding work should begin with this procedure. Carefully remove old enamel, putty, and other coating. You also need to remove all dust and dirt. After this, a deep penetration primer is applied to the surface. Increased attention is paid to the selection of high-quality ceramics.
If the window sill is compact, then the finishing material should be small. Elements measuring 10x10 or 15x15 cm are quite sufficient.
For large window sills it is better to choose larger tiles. In some cases, the choice can be made on elements measuring 40x20 or 30x30 cm.
It is not difficult to choose high-quality finishing ceramics. This material is available in a wide range.
Fitting
My husband and I decided to decorate the window sill with mosaics, because this material was left over after renovating the bathroom. Mosaic, compared to a new window sill, costs several times less, so this decor does not require any special material costs.
Cut the mosaic into squares. We put them on the windowsill. You can choose a plain material, or multi-colored to make it look unusual and original. We make a pattern out of squares. We attach self-adhesive tape on top. Then we put everything aside.
Masonry technology
There are two options: along the entire window and perpendicularly. The choice should be based on minimizing the resulting trimming of parts. To adjust the die, you can use a classic glass cutter.
The location of the cut should be marked in advance using a marker. The trim is placed on a flat and stable base in order to trim along the marked points. During the procedure you need to press hard on the material.
It is difficult to achieve a high-quality result without a rubber hammer. Using this tool, carefully tap the ceramic product on the back side at the site of the intended cut. If such a hammer is not at hand, then you can use the handle of a spatula, which is first wrapped in a towel or thick cloth.
The required fragment is broken off with a sharp, confident movement. If the master has the necessary skill, then cutting the ceramics can be done with a grinder. This electric tool saves a lot of effort and time.
Rational approach
Tip 2: Mask the glass
Multi-colored stained glass windows - magical “pictures” assembled from pieces of glass, bound in lead, will help decorate a window and harmoniously hide a bad view from it. All you need to do is install a frame with stained glass as a “second strand” of glazing or use a special glass film. The big advantage of the second method is that you can easily remove the film when you get tired of it and stick on a new one, for example, with curls in the Art Nouveau style.
Instead of stained glass, you can use another method of disguise, namely curtains with a print in the form of your favorite landscape. Take a photo of any part of nature you like or find a suitable picture on the Internet and enjoy as much as your heart desires.
Traditional installation method
Before you begin installing ceramics, you need to prepare high-quality glue. The solution is applied with gentle movements to the back side of the finish and the work surface. You can use a spatula to distribute the composition. During installation, you need to ensure that the elements of the pattern match.
There must be a gap between the dies. To ensure that all the parts lie at the same distance from each other, special plastic crosses are used, which also differ in size.
Experts recommend forming a slight slope of the structure from the window to the outside. Thanks to this, it will be possible to avoid the accumulation of condensation, since all the water will flow from the base of the frame to the very edge. The end parts are mounted only after the laying of the horizontal dies is completed. Once all the tiles have been laid, you can proceed to using putty. It is more practical to use a dark shade. Popular options:
The choice of putty shade depends on the color of the tile. Once the solution has completely hardened, the window sill is thoroughly cleaned. After this, the updated surface is completely ready for use.
Attention! During work, you need to ensure that all vertical and horizontal elements are as consistent as possible with each other at the joints.
Sheathing base made of wood and plastic
The process of finishing window sills from natural materials is no different from finishing concrete surfaces. But in this case, the craftsman will have to cover the entire structure with plasterboard slabs in order to then lay the colored tiles. You can do without cladding gypsum board, but in such a situation you should use an acrylic primer, which is used to cover wooden window sills. For installation you will need epoxy glue and grout.
It is much easier to decorate plastic bases. Instead of an adhesive solution, you can use liquid nails. The reliability of adhesion directly depends on the texture of the plastic. Specialists use special compounds for laying ceramic products on plastic or wooden bases.
Tip 1: Shift the focus
A window can easily be an accent in a room by painting it from standard white to a bright, rich color, such as yellow, blue or green. In this case, it is the decor that will attract all the attention, and the unsightly view outside the window will remain in the background. To implement this idea you will need paint, a roller, masking tape and some free time.
Please note: Plastic double-glazed windows offered by modern manufacturers are not intended for “home painting”. Therefore, the color will have to be brought out through the window slopes. Another option is to immediately order colored double-glazed windows.
You can also place some bright object in front of the window. How about an electric fireplace? In this case, you will want to look exclusively at the fire, which pleases the eye in front of the window, and not peer into the unattractive landscapes surrounding the house.
Original mosaic decoration
This facing material looks unusual. The installation process is more accessible than the option with ceramic tiles, since the procedure for finishing the window sill takes less free time. A correctly selected mosaic decorates the room.
The only drawback of such cladding is that there will be many seams on the surface, which can become the main reason for the rapid growth of mold and mildew. Such areas are difficult to clean from contamination. To avoid this problem, you need to use high-quality grout.
The dimensions of the mosaic can be easily adjusted. Before laying, the work surface is prepared in the same way as with tiles. At the final stage, the base should be thoroughly cleaned of dirt and construction dust.
When laying transparent mosaics, the glue should be white. Insulation of the base is carried out before finishing work.
The video shows an original version of finishing a used window sill with homemade mosaics:
Shutdown
There is very little left until the work is completed. The surface must be treated with a special solution. Water-repellent antifungal liquid will do the job perfectly. Apply a little product to a rag and wipe the entire surface with it. This is necessary so that the window sill remains so attractive and beautiful for many years. After this treatment, it is not afraid of either dust or moisture.
This window sill looks very beautiful and original. And indoor plants will complement the composition. All this will create an atmosphere of comfort and warmth. This modification took only three hours of working time, and the window sill will delight you for many years.
Found a violation? Report content
Window sill tiles
There is a wide window sill. Almost 60 cm wide. I really want to put a tile on it, size 10x10 cm. What needs to be done for this. What should I glue the tiles to? Is this option even possible? Thanks in advance for the answers.
The window sill is plastic, or what?
What a fool, I didn’t write the most important thing. Wooden window sill.
I saw this option with mosaics, the idea is not bad. But I don’t know how it will look with 10*10 tiles, but offhand mosaics are better. On a pre-screwed sheet of gypsum fiber board or gypsum board.
antipst Mosaic was my dream, but after looking at what was offered I had to refuse. Initially, the idea was to lay out the apron and window sill with mosaics. But what you like is very expensive, and what you can afford is not what you like. I found a nice 10 x 10 tile. I want to make a chocolate apron, and a beige window sill, from the same tile, the same texture for the fabric, but a different color. And I want to put it on the windowsill diagonally.
The question is what to lay the tiles on? So that it doesn't fall off the next day?
On a pre-screwed sheet of gypsum fiber board or gypsum board using tile adhesive.
Mosaic was my dream, but after looking at what was offered, I had to refuse.
If I were doing work for you, I would persuade you to use a mosaic window sill. That's why consulting exists.
Thanks for the quick response. We didn’t think about this option, but it’s really good. Another question is what to do with the end of the window sill. Should I glue tiles on it too? No other options come to mind.
antipst wrote: On a pre-screwed sheet of gypsum fiber board or gypsum board using tile adhesive.
Better than GVLV 10 mm or GKLV 9.5 mm.
2levran and what size is the end? In principle, you can do the same.
I measured it, the end is 5 cm.
Better than GVLV 10 mm or GKLV 9.5 mm.
Suitable for the author - Moisture-resistant Gypsum Fiber Sheet.
koris65 wrote: what size is the end? In principle, you can do the same.
antipst wrote: Moisture-resistant Gypsum Fiber Sheet.
Thank you for clarifying. The truth has already managed to get into the search engine in order to give my husband ready-made information. Thanks again everyone for the answers. I really like the forum. And since we do repairs ourselves, sometimes we really need advice. Finally finished the fight with paint and now there is a lot of work to do.
levran wrote: I measured it, the end is 5 cm.
This is the thickness, right? What about the length?
levran wrote: And since we do the repairs ourselves
You will regret this more than once, based on your experience. although I am the same shoemaker, I still won’t do all the work myself
Yes, thickness – 5 cm, length – 145 cm.
koris65 wrote: This is the thickness, right? What about the length?
No wonder I asked. Apparently I wanted to figure out what size tile would be better for this length.
levran wrote: And I want to put it on the windowsill diagonally.
There is a lot of hassle. The end will not come out very nicely.
Well, my husband does it very well. There is a lot of information on repairs on the internet, the main thing is to learn how to filter it. What to do if there is no other option. We bought an apartment on credit, we have two children, only my husband works now, but I want to live in cleanliness and beauty. But we made the screed ourselves, covered the window to the bathroom and the door to the neighbor’s loggia with foam blocks. Well, we learned to remove paint from the wall in every way possible, even if it didn’t come off. So in any case it will be much better than it was. But I think we will have to find workers for the bathroom and toilet.
Tip 9: Rearrange
How often we look out the window depends not so much on our desire as on the arrangement of the furniture. Yes, yes, if you place it correctly, the window may not be in the field of view at all. For example, you can place a sofa, bed or chair with its back to the windowsill - in this case, sitting comfortably on them, you will look into the depths of the room. As an option - on the photo wallpaper from the previous paragraph (another reason to choose an image of some forest or tropical beach, the view of which will be relaxing).
Don’t be afraid to harmoniously combine several of the listed options if one of them doesn’t work. Place furniture near the window, place flowers on the windowsill and hang blinds - voila, you have forgotten about the landscape outside the window.
Did you like the article? Then support us, click
:
Window sill made of tiles.
If a similar idea came to different people and in different lands, then this is a sign of healthy thought. “Schiza” usually arises in one place, and then it is “swept around” according to V. Vysotsky.
WINDOW SILL MADE OF TILES.
This means that there are more and more window sills made of tiles:
The advantages of such solutions:
- Ceramic is easier to clean than plastic.
- Cheap plastic turns yellow in the sun and changes shape.
- The main advantage is strength, despite the vulnerability of the tiles.
Especially if you consider how plastic window sills are installed (in most cases):
If you press on the foam, it will shrink. If the thickness of the foam is large, then it will compress more significantly; if you install pads, then it may not compress; if you don’t sit down and stand, then nothing will happen…. There are too many “ifs”, but that’s a different story.
Installation process - step-by-step guide ↑
The correct sequence of work and compliance with technical nuances are a guarantee of the quality of the window sill. The process of attaching to a plastic window is not complicated and does not take much time.
Sequence of work - how to avoid mistakes ↑
At what stage of the renovation is it most appropriate to install a plastic window sill? The correct answer is immediately after installing the windows, before finishing the internal slopes.
If you install it later, the slopes will have to be partially or completely redone. After all, for installation you will need to select grooves in the slopes. It is not recommended to remove the protective film from the plastic board until all repair work is completed.
Advice! When installing a window sill, the protective coating must not be completely removed. But only in those places where the panel fits into the grooves (near the frame and on the sides). If this is not done immediately, the film will be difficult to remove completely.
Preparatory stage - creating a strong support ↑
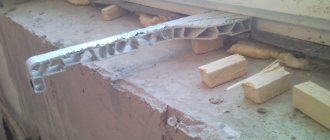
How to properly install a window sill on plastic windows:
- If you are installing the window yourself, form a foam mounting seam under the frame. A seam larger than 8 cm should be foamed in several passes with an interval of 7 minutes. And after hardening (after 20 minutes), install a vapor barrier tape on top. If the window installation is carried out by craftsmen, this stage must be completed by them.
- How to install a window sill if the window is already standing? Select grooves on the sides of the window opening (from 10 to 60 mm depending on the size of the “ears”). If you need a grinder for this, it is better to cover the double-glazed windows with cardboard sheets during the work. Since flying sparks can damage windows (melt plastic).
- Screw 51 mm support screws into the support profile under the frame. They should be located at a distance of 17-19 mm from its lower edge. This technique will increase the maximum pressure that the structure can withstand.
- If the window sill distance exceeds 40 mm, it should be increased with plaster. After all, at this size the foam will not completely polymerize. Which will lead to a decrease in its supporting and thermal insulation characteristics.
- Next, you need to thoroughly clean the window sill using a construction vacuum cleaner or brush. And also - prime the rough surface. The point here is in the features of the polyurethane foam. For adhesion to the surface, the latter must be wet. The primer also further increases adhesion.
- Measure the surface and, if necessary, adjust the plastic board to size. The end should not be placed close to the wall. You need to leave 1 cm for thermal expansion.
- Lay out support points in increments of 50–60 cm. To do this, fold the plastic wedges into a “jack” and rewind with electrical tape or masking tape. For reliability, you can grab the support points with self-tapping screws, since during installation you need to be careful not to move them out of place.
Advice! If some of the liquid gets on the glass during priming, you need to wipe it off immediately. Since when it hardens, the composition forms a film that is difficult to remove.
We fix the window sill - the secrets of proper installation ↑
How to install a window sill to a plastic window:
- Check the window sill for voids in the foam. If gaps are found in the wall, foam them to prevent the windows from freezing.
- Install the window sill into the profile with force. Align it centrally so that it has a 2-3 mm slope from the level into the room for every 20 cm of depth. This is necessary for moisture to drain out.
- Foam the space under the window. Place a load on top (for example, 5-liter bottles) around the entire perimeter. The foam tends to expand, squeezing out the board. To prevent this from happening, a load is needed.
- Install end caps.
- Apply a layer of sealant to all cracks.
- After the foam has completely hardened (about 12 hours), remove the load.
Window sill made of tiles. Peculiarities.
- The base for tiles on the windowsill must be prepared especially carefully. A lot of side light falls on the slopes. Any, even slight, difference in tiles is noticeable and attracts the eye. Due to the side light, the differences seem significant.
- The screed should be 1 cm lower (for tiles of normal thickness) than the bottom edge of the window. Then the tiles can be placed under the window block and with a minimum gap. And without sealing with silicone.
- The end of the window sill should be the same in width, and form one line along the bottom edge.
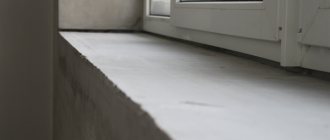
In new buildings, replacing a plastic window sill with a concrete one provides an interesting solution. The window sill (as in the photo) can already be used as a seat.
The end of the tile can be closed with a corner:
Tiled corner on the windowsill.
Some points of preparatory work before tiling:
MANUFACTURING A CONCRETE WINDOW SILL.
Another option is to lay an electric cable mat under the tiles (transfer the excess length of the heating mat along the wall to the floor). Then (perhaps) there is no need for a heating radiator and ventilation grilles on the window sill-bench.
TILE WINDOW SILL + HEATING MAT.
“Can I lay tiles on a plastic window sill?”
Can. Instead of glue - silicone or “liquid nails”. But the disadvantages of the plastic window sill remain - when pressed, the grout may crumble. You can skip the grouting, but it has its own disadvantages.
Add a comment Cancel reply
This site uses Akismet to reduce spam. Find out how your comment data is processed.
Source: 101ohibka.ru
The truth is in size - choosing the optimal parameters ↑
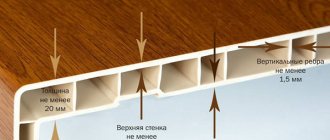
Installing a plastic window sill with your own hands should begin with careful measurements. How to choose the optimal parameters? Based on the following conditions:
- Depth. On average, this figure ranges from 20 to 50 cm. There is only one rule: the narrower the panel, the more reliable and stronger it is. And, the more weight it can withstand when pressed.
- Width. To paraphrase the classic, even the window sill has “ears.” This is what the projections on the sides of the window are called. They are necessary, firstly, to fix the slopes. Secondly, to compensate for the thermal expansion inherent in plastic. And thirdly, for a more finished and aesthetic appearance of the window.
Measurements should be taken from the concrete base.
Advice! When measuring the depth, add 15 mm for the entry under the frame and 50 mm for the extension. These are the optimal window sill sizes.
- install at least 10 cm from the radiator (battery);
- the panel overhang should not block the heating source by more than ⅔;
- the window sill board should not be at an angle of 90° to the window - an inclination of at least 1° into the room is required.
Restoration of an old window sill with insulation
Restoration of a window sill without replacing it with insulation and glass mosaic covering.
To be honest, we wanted to replace the old window sill after replacing the windows with new ones. However, when the window installers finished their work, it became clear that simply replacing the window sill would not be enough: the window frame turned out to be significantly higher than the level of the window sill. What to do in such a situation? You can replace a thin window sill with a thick kitchen countertop. But we decided to make do with a simpler and more effective solution: we will increase the thickness of the window sill using extruded polystyrene foam (EPS) and cover its surface with glass mosaic. Such a window sill will look stylish, its surface will be resistant to water, sun, high temperatures, and a layer of polystyrene foam will create additional insulation against the cold.
Before gluing the EPS sticker, we washed the window sill and primed its surface with an acrylic primer.
To improve the adhesion of tile adhesive to the smooth surface of the window sill, we attach fiberglass mesh to self-tapping screws.
After this, we glue 3 cm EPS boards, cut to the size of the window sill, onto the old window sill using tile adhesive.
Afterwards, for reliability, we fix the EPS with self-tapping screws to the old window sill.
And prime the EPS with a layer of tile adhesive over the fiberglass mesh.
The base of the new window sill is prepared. We leave it for one day to gain strength.
Then we proceed to gluing the glass mosaic sheets onto white tile adhesive. To distribute the glue, use a 4 mm comb.
We level the glued mosaic on the surface using a foam float.
Now you need to glue small parts of the mosaic to adjoin the shaped surfaces. We bite off the mosaic pieces with ordinary nippers.
And glue them onto the windowsill with tile adhesive.
A day after gluing the mosaic, we begin grouting the seams. Apply the grout with an elastic plastic spatula.
After 15-20 minutes, we begin to wipe the surface of the mosaic with a barely moistened sponge. You have to wipe the surface several times with 15-minute breaks until the surface is completely clean.
This is the new window sill covered with mosaics that we got. Previously, we made a similar window sill in the kitchen at the dacha.
In the same mosaic style we made the wall apron by the balcony door.
Source: dom.dacha-dom.ru
How to lay out a mosaic
Mosaic is a type of facing tile with small format elements on a supporting base. There are ceramic, glass and natural stone mosaics.
Tools
Materials
Work process
Surface preparation
| Attention! If the surface of the wall is not completely smooth, it is better to sand it using a grinder with a disc for stone or ceramics. |
- If it is necessary to remove a layer of more than 2 mm to level the surface, it is recommended to use leveling materials. The surface ready for installation must be absolutely dry, clean and level; in addition, to obtain a high-quality result, it is necessary to ensure a temperature regime ranging from 5 to 30 degrees C.
Tip 3: Hang shelves
This multifunctional solution has several advantages. Firstly, you can improve the view from the window by turning your attention to the shelves, secondly, you can make good use of the available space that usually goes to waste, and thirdly, you can optimize the storage system, which is especially important in a small room. The shelves should be removable so that they do not interfere with cleaning the windows. The most successful option would be not classic wooden ones, but glass shelves that will seem to dissolve in space. Supplement them with vessels made of the same material, and this area of the room will immediately sparkle with new colors.
If you collect figurines, love beautiful dishes, or do handmade things, your pride items can also be displayed on a couple of narrow shelves installed across the window. Complete the composition with transparent glass or plastic dishes, which will create beautiful reflections on a sunny day. To prevent the window from seeming visually overloaded, give up the idea of displaying colorful things. It is better to create a composition of plain objects without a pattern - for example, snow-white vases, books and candles.