Expanded polystyrene, which is a common type of foam, can be attached to wood using several methods. The easiest way is to use glue; it will firmly hold the material in the right place. Adhesive foam and special dry mixtures are also suitable. To secure heavy structures, lathing and “liquid nails” are used.
Residents of big cities have increasingly begun to move closer to nature, so the demand for private houses is constantly growing. Both traditional and modern materials are used for their construction. Buildings are erected from brick, concrete, and various blocks. There are many convenient and budget solutions, but wood still does not lose its position. This is due to its naturalness and environmental friendliness, pleasant appearance and health benefits.
Insulation of a wooden house Source fasadec.ru
Recently, there are more and more opportunities to create comfort in the home. In particular, it is extremely important to ensure a constant comfortable temperature that will remain so at any time of the year. Most often, for these purposes, insulation is carried out with expanded polystyrene, which is a well-known type of foam. This material is lightweight, practical and reliable, which is why it is popular among builders and craftsmen. Using this product allows you to significantly save on heating costs during the cold season. To get a strong and durable result, you need to know how to attach foam to wood.
Types of material
The product is one of the types of polystyrene foam, therefore it has many of its characteristics. This is a special polymer filled with gas. The composition of the material is foamed polystyrene, various additional substances that improve its structure, as well as a small amount of water. Manufacturing technology allows us to obtain a unique product with high thermal insulation properties. Expanded polystyrene also perfectly prevents sound transmission.
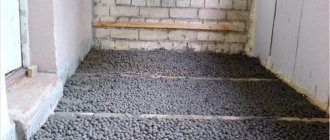
Floor insulation in the house Source masterskayapola.ru
The material is produced by various methods, depending on which it acquires certain characteristics. The result is products with different densities, so each type is used in a specific area. Also, the manufacturing method affects the final cost of the substance. Main production methods:
- Pressless. These are granules dried several times and then foamed. This material is very fragile and retains moisture well inside.
- The pressing method has low thermal conductivity. The granules are subjected to additional compression, due to which they close and change the structure of the product. The material turns out to be of higher quality, but the manufacturing technology takes longer, which increases the price of such foam.
- The autoclave method is used quite rarely, since its production requires a special device. This material is practically not used for home insulation, since its characteristics do not meet the task.
- The extrusion option provides for the production of household products. Various foams, packaging and other products for household needs are made from it. This polymer is not used for insulation.
- The extruded method is most often used to produce materials that can then be used to insulate a home. This is a type of pressless manufacturing, but it must involve an extruder. The product retains heat well, since its pores are very small in diameter, they are maximally closed to external influences. Thanks to these indicators, this type has become widespread among craftsmen and users; it is presented in a large assortment on the construction market.
Work on insulating a wooden house Source rubankom.com
How to insulate a wooden house with foam plastic
To understand how to glue foam to wood, it is important to study its structure. The material is most often supplied in the form of lightweight but durable slabs, the thickness of which can vary significantly depending on the type and purpose. The structure of the substance allows it to work effectively in any weather and temperature conditions - it is not afraid of mechanical damage and natural factors.
Walls of a house with polystyrene foam Source otdelkaexp.ru
Due to its unique composition, expanded polystyrene is successfully used for both internal and external insulation of homes. The difference will only concern the method of fastening the material:
- The house can be insulated from the inside by placing sheets of polystyrene foam on wooden walls. This method is not used often because it has significant disadvantages. Expanded polystyrene for interior decoration has high heat-insulating properties; it also does not allow moisture and water vapor to pass through it. As a result, the walls will not warm up well, but they will be exposed to cold and wind from outside the room. This can lead to the formation of a dew point inside the room, which can lead to the accumulation of condensation between the wood and the insulation layer. Constant exposure to liquid is dangerous by the onset of putrefactive processes, the appearance of fungus and mold on the surface of the walls.
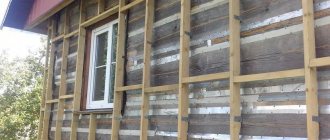
- The external method of insulation is increasingly used by craftsmen in the construction and renovation of houses. Its second name is a ventilated facade, which has special properties. When installing insulation, waterproofing is used to protect it from the effects of weather factors. Also, this method allows the sheets to be constantly ventilated, which has a good effect on the durability of such a coating. The only drawback of the solution is the high cost compared to the internal option.
A wooden floor can also be insulated using expanded polystyrene - in this case, sheets of material are laid between the floor joists. If the first floor is being finished, this method prevents cold air from entering from the ground, and in the case of intermediate floors, stabilization of the temperature regime is achieved. The heat is evenly distributed between the rooms, which avoids overheating of the upper rooms. Insulated floors help create a normal microclimate in the house if the upper floors are not heated in winter.
Scope of application
The extraordinary consumer properties made Penoplex an ideal solution for thermal insulation of any buildings. Using this material, thanks to its unique characteristics:
· protect the foundation and plinth from heat loss;
- equip basements with thermal insulation;
- thermally insulate floors and ceilings of buildings;
- line water supply systems and swimming pools;
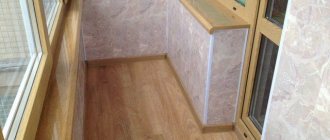
- insulate loggias and balconies with slabs;
- manufacture of multi-layer sandwich panels;
- develop highways and runways;
Extruded polystyrene foam is used throughout the construction industry. It solves problems of heat conservation at facilities built in the climate zone with the lowest temperature.
Advantages and disadvantages of the product
The production of the material is possible only in production; polystyrene foam cannot be made at home. The substance contains styrene, which is a waste product from oil refining, so the product is not highly safe and environmentally friendly. Despite this circumstance, polystyrene foam has significant advantages:
- Low price, which is significantly inferior to other types of insulation.
- Good density, allowing you to effectively retain heat indoors.
- Low weight and excellent elasticity.
- Does not allow sounds to pass through walls.
- Easily tolerates interaction with liquids.
- Widely distributed in stores, you can find different types of products for specific tasks on sale.
- Large selection of structures and shades.
- High resistance to various adhesives and dyes, chemical inertness.
- It does not rot and is durable - the decomposition of the material can last for years.
- It is not subject to ignition, which allows you to protect a wooden house from fire.
- Long period of operation, which is more than 15 years.
- Easy to cut and install, they can be done even without the use of special equipment.
Building walls with foam plastic Source remontami.ru
The negative aspects of the material are associated with its synthetic origin, as well as its complex structure, including many chemical compounds. Among the disadvantages of polystyrene foam are the following:
- Poor tolerance to sunlight, prolonged exposure to which leads to damage to the product. Also, the initial properties of a substance can change significantly.
- Flammable substances and solvents can damage the structure of the material. It is dangerous to use gasoline and fuel oil.
- Animals and insects can easily destroy or damage polystyrene foam.
- When ignited, a large amount of harmful substances are formed that are extremely dangerous to human health. Inhaling them can be fatal.
- The material should not be heated, as this results in the formation of toxic compounds. For this reason, it is prohibited to use polystyrene foam in baths and saunas.
Insulating a house from the inside Source stroyrem-nn.ru
Conclusion
Using penoplex allows you to significantly save on heating at home. Laying thermal insulation is not a difficult job, so you can easily do it yourself. The video in this article will give you the opportunity to find additional information on the above topic.
Insulating the ceiling with penoplex is the best option for increasing living comfort, improving sound insulation and reducing heat loss in a living space. At the same time, the ratio of price and quality of material and work is optimal for a wide range of owners. According to numerous reviews, insulating the ceiling in a house with penoplex can significantly reduce the costs associated with the purchase of energy resources.
Expanded polystyrene insulation
Any type of material is subject to environmental influences. Products are affected by temperature fluctuations, humidity changes, sunlight, precipitation and other natural factors. Therefore, to prevent the gradual deterioration of the foam, insulation is used to protect vulnerable areas. In the case of a wooden house, the fight against humidity, which provokes putrefactive processes, is especially important.
Arrangement of the frame on the building Source ultra-term.ru
Laying the material
In a private home, it is important not only to know how to attach polystyrene foam to a wooden wall, but also to understand the features of installation on the floor. In the latter case, the material is laid along the logs. Work begins by creating a foundation at the bottom of the structure.
Expanded polystyrene sheet on the floor Source beton-house.com
The easiest way to do this is by two methods. The first of them is to install boards under the joists, on which a layer of insulation is then laid. The second method involves installing slats on both sides of the joists, which serve as the basis for laying the material.
Laying polystyrene foam on the wall Source baurum.ru
Before installing insulation, it is necessary to lay waterproofing so that moisture from the ground or concrete does not penetrate deep into the material. This requirement is relevant even for monolithic types of foundation. After this, you can lay the polystyrene sheets themselves directly. It is best to install the slabs in layers, in a checkerboard pattern, so that the visible seams overlap.
Installation of foam plastic boards Source remoskop.ru
When placing insulation under the joists, it is necessary to leave a 2 cm gap for ventilation. If the installation was made too high, the structure will need to be raised using lathing.
Base insulation with polystyrene foam Source uteplix.com
To prevent steam from the room from penetrating the material during the heating season, a layer of vapor barrier is laid. Lastly, they begin to organize the subfloor. To do this, use a board, plywood or OSB board.
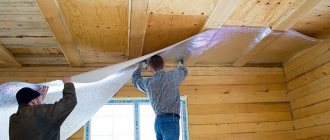
Insulation of the roof of a house Source svoidomstroim.ru
Fastening the material to the walls
Typically, insulation is laid on the facade using frames. This technology allows you to effectively hold the material and simplifies the installation of the entire structure. The procedure is performed gradually, step by step.
Preparatory work
Attaching expanded polystyrene to a wooden wall begins with preparing a reliable base. Since wood is very sensitive to external factors, it must be protected as much as possible from damage. Both old and new buildings are periodically insulated, so you need to pay close attention to the quality of the surface. It is important to remember that before starting the main work, the wood must be dry; remaining moisture can provoke putrefactive processes and even destruction of the structure of the material.
In painted rooms, all coating should be carefully removed, and the joints between the logs should be well sealed. All procedures must be completed before the start of insulation work. Damage is also eliminated; any remaining bark is removed, if there is any on the surface.
Scheme for attaching foam plastic Source masterfasada.ru
The prepared and dried wall is treated with antiseptic solutions. Particular attention is paid to this point, since after installing the insulation, this area will become inaccessible for viewing. As a result, it will not be possible to notice the formation of mold or the appearance of insects and fungi there.
Installation of sheathing
Installing the frame allows you to securely hold the insulation in place, prevents sliding and sagging, and also allows air to freely penetrate and ventilate the walls of the house.
Application of adhesive foam for installation Source opechkah.ru
Polyurethane-based compositions
For the installation of penoplex such products are often used. Most are sold in cylinders, so they are convenient and easy to use even for a beginner. The products are ready for use, they do not need to be mixed, and the consumption is economical. The most popular composition of the series is “Insta-Stik”. It is sold in 750 ml cylinders, the consumption when gluing is 12-15 sq. m, setting time - 20 minutes. Pull-off force – up to 400 kPa. The disadvantage is that it is not frost-resistant - you cannot glue penoplex to walls at temperatures below 0 degrees.
Another well-known glue is Titan Stiro-753. Its consumption is approximately the same (about 14 sq. m). The product has a high peeling force (600 kPa), and the setting time is even shorter (15 minutes). Penosil Fix&Go Montage is frost-resistant; it is used at -65...+130 degrees. Using the described means, it is easy to connect foam sheets together, stick them on wood, attach them to a brick wall, or to concrete.
Adhesive foam Penoplex Fastfix
This foam with adhesive properties is widely used for attaching thermal insulation made of extruded polystyrene foam to all kinds of substrates - ceramic tiles, concrete ceilings, floors and walls, plasterboard, aerated concrete, brick. Adhesive foam Penoplex Fastfix (“Penoplex Fastfix”) is produced in 750 ml cylinders, the product itself is light blue.
If necessary, the adhesive will provide adhesion to most building materials. Among them are plaster, stone, wood, expanded clay concrete blocks, metal, cork, cellulose. If the material had to be foiled, this product is incompatible with it. Foam is also not suitable for polyethylene, silicone, and Teflon. Here are the main characteristics of the material:
- drying – 10-12 minutes;
- complete hardening – 24 hours;
- possibility of cutting – within 30-40 minutes.
The product is used both for external work and for internal thermal insulation indoors; it is suitable for insulating loggias and balconies.
Video description
How to glue foam plastic?
If you have a choice between glue and foam, then it is better to choose the first option, since the consumption of the product will be much less, and the quality of gluing will remain the same. The substance is applied between the wall and the insulation in a thin, uniform layer to securely attach the material to the surface. Before starting the procedure, it is important to thoroughly clean the area, remove traces of paint and varnish, repair potholes and damage, and dry the wood.
Applying glue to polystyrene foam Source balkon4life.ru
This method is well suited for timber buildings, but it makes no sense to use it for log buildings. This is due to the heterogeneous surface of the latter, which reduces the area of contact between the material and the glue. Differences in the size and shape of the logs will make it difficult to create an even and smooth area, so the results of the work may be far from ideal.
After glue or foam is applied to the foam, sheets of material are laid evenly across the entire work area. Compared to using a frame structure, covered areas are more difficult to process and must be treated with caution in further finishing. The easiest way is to resort to plastering the surface, but this method is not very suitable for wooden houses. It would be better to build additional sheathing for the facade so that the choice of design becomes wider.
Adhesives for foam plastic in tubes Source samodelino.ru
Finishing
Using polystyrene foam allows you to create a kind of “thermos” that effectively retains heat inside the home and prevents cold from entering the building. This way you can significantly reduce heating costs and save significant money in winter.
Universal polymer glue Source samodelino.ru
After preparing the base and sheathing, a layer of insulation is laid, and then the finishing of the building begins. If you approach this process responsibly, you will eventually be able to bring almost any idea to life. The most commonly used materials are wood - lining, imitation timber or block house. Sidings are also popular. Each type of finish differs in the method and type of fastening. Usually, to equip the facade, an additional frame is used, which is installed on top of the main sheathing.
Polymer adhesives
Is it possible to fix penoplex with adhesives in small cans? Typically, polymer adhesives are sold in such containers; they are ready for use on any surface. Bonding by this method is practiced if it is necessary to attach penoplex to metal. It is better for beginners not to buy such compositions - they set instantly, and it will be impossible to correct defects.
A good product for slabs is Moment glue. It is resistant to humidity and temperature changes, and is produced in convenient packaging of 0.25-1 liters. Consumption is low, even a small pack is enough for 4-5 square meters. m. Another product is “Emphikol 225”, its technical characteristics are similar. After use, you should ventilate the room well for 2-3 days, but it is ideal to work with it in the air.
Gluing foam to a wooden surface
Before fixing the material, the surface is thoroughly cleaned and dried. To remove dust and small debris, use a sprayer and a regular brush.
Sheet of foam plastic on a wooden surface Source blog-potolok.ru
The base must be coated with a primer, and then a mesh must be glued for subsequent reinforcement. Using a stapler or adhesive, the material is securely attached to the surface.
Since the mesh is supplied in the form of rolls, before starting to work with it, it is necessary to cut identical strips approximately 40 cm wide. It must be secured in such a way that at least 10 cm is under the foam layer. After installing the insulation, the remaining sections of the product are wrapped and glued to the sheets.
Foundation insulation
First, the foundation wall is leveled if the differences in unevenness are ≥ 2.5 cm. The cement-sand mortar is applied directly to the surface or to a chain-link mesh secured with staples. Then waterproofing is carried out, bitumen mastic is applied in a layer 2–4 mm thick, and a roll of material is glued on top. Acrylic glue is applied pointwise (at 5-6 points) to the foam sheet. After this, the plate is pressed against the surface for 30 - 60 seconds. The following slabs are glued above the bottom row.
After sheathing, the seams are filled with glue, the surface is covered with fiberglass reinforcing mesh, and the foundation is plastered again.
Video description
How to attach foam to the wall?
To secure polystyrene foam to wood, you will need the following devices:
- A construction stapler fixes the material with special staples.
- The adhesive composition is usually applied with a wide spatula.
- Use a small spatula to remove excess glue from the surface.
- Reservoir for mixing the solution.
- Brush for applying primer.
- Construction mixer for stirring the adhesive mixture.
Protective covering
Scheme for attaching penoplex to a brick or concrete wall
In order for the surface of the insulation to look beautiful and be durable, it must be protected. The simplest and cheapest way to protect insulation is plastering, which is carried out in stages.
- Selection of plaster mortar.
- Selection of reinforcing mesh for plaster mortar.
- Fastening the reinforcing mesh using a certain technology.
- Laying the mortar, leveling the surface, grouting with a plastic float.
- Primer the surface for the finishing coat.
- Finish plaster. After drying, painting is done or a transparent protective layer is applied.
Video instruction:
In general, attaching penoplex to concrete and brick walls, as well as insulating the foundation of a building, is not difficult. It is enough to follow the installation technology and carry out the work carefully to ensure that the insulation is attractive and durable.
Subscribe
Video description
What is the best way to glue polystyrene?
Before directly applying the glue, the surface must be treated with antifungal and antiseptic drugs. It is important to choose the right composition, since subsequently access to the junction of materials will be very difficult.
The cheapest option is dry polystyrene foam adhesive, which is made from cement. For use, this product is diluted with liquid. The result is a reliable and durable compound for attaching foam to virtually any type of material.
Also recently, solutions based on polymer cement have become increasingly widespread. They are universal in use and are well suited for gluing insulation to any type of base. To work with facades, you can use products that contain various mineral fillers. Many companies produce products to increase the protective properties of polystyrene foam. After applying glue to the front surface, the material becomes resistant to various environmental factors. In addition to the advantages, such substances also have disadvantages - a long polymerization time, which is about 3 days.
There are also aerosol mixtures containing polyurethane. They can be used as glue or to fill gaps and seams between sheets. These are universal substances that behave equally well both indoors and outdoors. They can be applied to facades, roofs and walls of houses, flooring and other wooden surfaces. In all these cases, the products set quickly and hold the material securely for a long time. And although the prices for such mixtures are relatively high, they are justified by the convenience of applying the glue.
Expanded polystyrene sheets usually begin to fix within 2 hours after gluing the surface. For better stability, the material is secured with anchor bolts for facades.
The main advantages of polyurethane products are: fire resistance, good tolerance to changes in humidity and temperature, environmental friendliness and safety for health. Modern production technologies make it possible to obtain high-quality and easy-to-use compositions. When choosing an adhesive, it is important to consider its chemical reactions with the material. To prevent the destruction of polystyrene foam, you need to purchase products that do not contain acetone or gasoline.
Sometimes sheets of expanded polystyrene need to be glued together. For these purposes, use any wet or dry glue that does not contain solvents. When choosing products, a specific task is taken into account, and then the most suitable product is selected to solve it.
Mineral adhesives
Mineral-based adhesives contain cement, gypsum, and alabaster. They harden very quickly and must be applied immediately. The adhesives are mixed in small portions. Only cement compositions are usually used outside the room; products with gypsum components are suitable for interior work. The setting time is long, up to 1.5-4 hours, so it is possible to correct flaws.
The disadvantage of the compositions is that the base must first be well primed and wait until it dries completely, otherwise the connection will not be strong. Another disadvantage is the need for dilution; to obtain a high-quality homogeneous mixture, you need a construction mixer.
The most popular brands of mineral adhesives:
- Ceresit CT 83 - used directly for gluing penoplex, suitable for any substrate, pull-off force - 500 kPa, high frost resistance class.
- “Atlas Stopter K-20” – has an increased tearing force (600 kPa), is viable for 4 hours, consumption – 4.4 kg/sq.m. m, contains special reinforcing fibers.
Products of this type are sold in bags of 5-25 kg and cost about 300-500 rubles. for 25 kg. If the frost resistance class F50 is indicated on the bag, the product is suitable for interior work. Class F100 means that the boards can be glued outside.
Fastening foam with dowels
For external finishing of facades, sheets of expanded polystyrene are used, which are attached to the frame using disc dowels. These elements are considered mandatory for reliable fixation of the material. The parts act as insurance in case the slabs sag, so that they cannot slide and peel off from the wall. Dowels are placed according to certain patterns, which are selected for each specific building.
Most of the elements will be needed to fix the material on the plaster. For solid foundations, 2 to 5 dowels per square meter of area will be sufficient. To calculate the appropriate length of fasteners, it is necessary to measure the thickness of the plaster layer. The size of the element must extend through the entire layer and be fixed at the base of the wall.
The foam is secured using dowels as follows:
- Fixation is carried out 4 hours after applying the glue, so that it has time to set well and is not damaged during installation of fasteners.
- Surface drilling is performed with high precision, having previously installed a special limiter in the hammer drill, which does not allow penetration beyond the size of the fastener.
- A disc-shaped dowel is placed in the completed opening. Inside the element there is a plastic core, which is designed to open it in the hole.
- Drive the fasteners very carefully so as not to deform the surface of the insulation. Otherwise, its characteristics will suffer, the foam will be less effective at retaining heat inside the building. If you have difficulty placing the core, you will need to replace the drill with a new one.
Execution of work
As a rule, it is possible to insulate the ceiling with penoplex without involving a professional team. You need to start from one edge and move gradually towards the exit.
Each slab can be easily mounted close to another using a special L-shaped joint. However, in order for the installation to be successful and not take longer than required, it is necessary to prepare special additional materials and tools in advance.
Prepare yourself with this list:
- Penoplex sheets calculated for the ceiling area with a small margin;
- Level - electronic or mechanical;
- Hammer and drill set;
- A sharp knife, it is better to take a construction or office knife with replaceable blades;
- Not too heavy a hammer;
- Stirrups. stand or ladder to work under the ceiling at a comfortable height.
Fixing polystyrene foam to a wooden ceiling
Before starting the main work, the ceiling must be carefully prepared, whitewash, dust and debris must be removed from it. You should also immediately place the electrical wiring, which will then be covered with plates.
The sheathing for insulation is made from wooden blocks. They are laid at such a distance from each other that the sheets of material are tightly located between them. Then the foam itself is mounted, and adhesives or fasteners are used to secure it. The cracks and recesses are filled with sealant. You can also use polyurethane foam for this purpose.
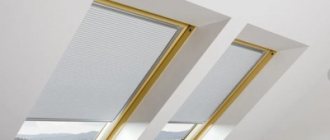
Next, a vapor barrier is placed on the frame. This is a film that will prevent moisture from entering the ceiling from inside the room. Lastly, the foam boards themselves are laid.
During preparatory work, the ceiling should not only be thoroughly cleaned, but also its surface should be disinfected using antiseptics. Then the entire area is covered with primer. If it is impossible to remove all the whitewash, it is recommended to completely treat the ceiling with special glue. The product is applied to the material with a dotted line. The sheets begin to be placed from the middle, moving them slightly. For greater reliability, it is advisable to add fasteners. Expanded polystyrene is also strengthened using a reinforcing mesh, which is subsequently puttied and processed.
Preparing the sheathing step by step installation
To make the lathing, you need to decide on the material from which it will be made:
Wood is more environmentally friendly, but more complex in terms of installation. The aluminum frame is much more convenient and practical. Let's move on directly to installing the sheathing:
- The first step is to clean and prepare the surface for future lathing.
- At the second stage, you will need certain tools to attach the frame to the prepared wall.
- The third step is to mark the entire surface where the sheathing frame will be installed.
- After all the preparatory work, you can begin installing the sheathing elements according to the marked marks.