Aluminum windows, installed in apartments, residential buildings and office premises, are gaining popularity among consumers every year.
There are a large number of companies on the market competing with each other and offering high-quality products at reasonable prices.
However, producing a quality product does not mean its comfortable operation.
To ensure that the handles turn effortlessly and the sash does not touch the profile when opening, you should adjust the aluminum windows.
Recommendations for installing hinges
Installation and adjustment of door hinges is carried out when a new door block is installed or old worn-out fittings are replaced with new parts.
When performing any installation and repair work, it is recommended to comply with the established requirements for the installation of door structures. All actions must be carried out consistently according to the instructions so that no problems arise with the doors during operation.
When installing overhead hinges, it is necessary to accurately measure the drilling points of the holes for fastening the products so that the canvas does not become skewed after installation. For some overhead models, manufacturers provide additional fasteners.
What needs to be updated or restored?
The most common problems with fairly strong and durable aluminum windows are failed fittings, deformation of the profile, frames, as well as problems with the sashes and seals. The following factors may indicate that the structure requires restoration, after visual diagnostics and measurements taken by a specialist:
- Accessories . All types - difficult closing, opening, non-functioning ventilation functions or breakdowns, indicating that they were not prevented, used incorrectly or installed with improper installation.
- External wear and deformation of the profile , broken geometry. The structure is skewed and deformations are visible. The reason is improper installation and mechanical stress. Occurs due to various damages.
- Seals . Poor quality of the material will indicate that they peel off after the first season of winter use. In the process of poor-quality use, noise and cold penetrate into the windows all winter, and condensation forms.
- Casements . Bad things open and close. The reason is sagging or curvature of the sash as a result of improper operation, shrinkage of the building, various mechanical and man-made reasons. Here, the cause may also be wear of seals and fittings, dust and dirt getting between parts of the structure.
- Pen. The locking element broke, the fittings came off and became loose, broke, and rotated along their axis. The main reason is improper operation or poor quality, loosening of the bolts that hold it in place.
- Double-glazed window (one-, two- or three-chamber). It failed - it cracked, broke, they decided to replace it with a new, denser one, and depressurization occurred.
Additionally, there may be problems with :
- slopes, with mechanisms responsible for moving the sashes apart;
- violation of the level of constipation in relation to the response plates, which will lead to the appearance of drafts, cracks, condensation, darkening of the frame in places where there is blowing or icing.
A professional technician can make adjustments or restore all important points.
How to adjust correctly
The nuances of adjustment depend on which element of the sliding aluminum windows is not functioning correctly. To set up the rollers and latches, you must first study the instructions and prepare a basic set of tools.
Rollers
There are roller mechanisms located at the top and bottom of the aluminum sliding structure. They are placed on runners along which they move to open and close the window. If, when trying to move apart, the structure cannot be pushed or does not move smoothly enough, adjustment is required in the following way:
- Find the adjusting screws, which are located under the protective linings on the bottom of the sash at both ends. To adjust standard-sized screws, you will need a hexagon with a 4 mm base.
- Place the hexagon in the opening and scroll to the left.
- Adjust the height of the sash on both sides by continuing to turn the screws and moving the roller mechanisms. At this stage, it is recommended to use a building level to prevent skewing in the diagonal direction.
Having fixed the location of the rollers, you need to check the condition of the sliding aluminum structure. To do this, close and open the window several times, making sure that it is functioning correctly.
latch
The procedure for adjusting the latch depends on the type of problem. If there is no adhesion of the tongue to the bar due to placement at different levels, then it is enough just to move the counter part to the required height. For this purpose, the bar is unscrewed using a hexagon with a 2.5 mm base. When the bar moves smoothly along the frame, it is installed so that the lower edge of the mating part in front of the bevel is located at the same height as the upper part of the latch tongue.
In a situation where the problem is associated with a strong recess of the tongue into the window frame on the balcony, you need to carefully move the opening handle down, place a 3 mm hexagon in the free hole and turn the fixing screw. The hex key should be turned in the opposite direction from where the fittings are located.
If the handle is located on the left end of the window sash, then the key is rotated to the right, and vice versa.
Having loosened the fixing screw, the tongue is carefully pulled out to the desired level, after which the screw is tightened in the opposite direction. If the sliding structure is adjusted correctly, the sash will close tightly with the latch. After completing the adjustment, you need to immediately check the operation of the structure.
Peculiarities
The main advantages of sliding windows are ease of operation, lightness of the system and saving of usable space in the room.
The adjustment is quite accessible to a non-specialist. The main reasons for their failure may be:
- incorrect or careless operation;
- if the building is new, then its shrinkage is quite possible;
- incorrect or poor-quality installation;
- marriage.
If the sliding doors begin to close poorly and gaps appear in the opening, then you should start adjusting them. You will need a special hex wrench, as well as instructions, so you know where to make the adjustments
Now you need to carefully inspect the sliding windows, paying attention to the lower and upper sashes. Using a hexagon, adjust the screw, turning it in one direction only
After that we look at the result. Only by trial will a non-specialist be able to determine in which direction the screw should be turned. By closing and opening the window again, you will understand whether you were turning in the right direction and whether additional scrolling is needed. A positive result will be a tight fit of the sashes, absence of noise and drafts.
Installation for windows The design of window openings, which is done quite carefully, can make the appearance of the building very worthy and.
Most finishing materials can be installed independently, with the exception of particularly complex structures where the help of a partner may be needed.
Main decisions
Many aluminum windows have adjusting units on the fittings, which makes it possible to achieve high accuracy when adjusting.
So how can you determine if your window is adjusted correctly without waiting for the weather to get colder? There are several signs by which it is easy to understand that everything is not ok with your setup.
- Sagging of the sash. This problem is easy to spot. Even with the slightest sagging, it will be noticeable upon closer inspection. This threatens you not only with drafts, but also with scratching of surfaces, which will also have to be corrected. This problem can be resolved by simply tightening the loops. To do this, you need to unscrew the decorative panel and tighten the bolts.
- Poor performance of latches and hinges may be the result of missing or insufficient lubrication. This can be eliminated just as simply: use machine or any other technical oil for lubrication. For windows to function properly, they only need to be lubricated twice a year. Be sure to thoroughly remove dirt and dust before lubrication.
- If the handle is broken, you can replace it yourself. To do this, you need to rotate the plate at the base of the handle 90 degrees. Under the plate you will find screws. After unscrewing them with a screwdriver, remove the handle. After installing the new handle, secure it with screws and put the plate in place. In addition to these usual nuances, each fitting has its own characteristics. In the instructions mentioned earlier, you will find out exactly what accessories you have.
- Poto fittings require constant monitoring, namely, you need to monitor the wear of the main parts. Mounting problems can be easily resolved by tightening the mounting screws. Well, you won’t be able to cope with replacing parts yourself. Here you will need the help of specialists;
- Winkhaus and MACO fittings are of a rather complex design. To avoid problems, it is not recommended to carry out repairs yourself.
We adjust windows from any manufacturer
We adjust aluminum windows with any type of sash opening: swing, tilt, turn-and-tilt, dormer, and doors. Our specialists equally successfully correct defects in fittings from domestic and foreign representatives: Roto, Maco, Sigenia-Aubi, GU, AGB, WinkHaus. Each employee of the company is equipped with the necessary tools and special lubricant, so simple adjustments do not take more than 30 minutes.
If the cause of the malfunction is a broken part, we replace it. In this case, we replace the part only with original spare parts from your manufacturer. We always have the necessary parts for locking and turning mechanisms in stock: scissors, strikers, angle gears, hinges, gearboxes, etc. We provide a 1-year warranty on all spare parts.
Features of adjusting fittings with your own hands
Before you begin adjusting the plastic window, you should acquire tools and materials such as a 4 mm hex wrench, a set of star screwdrivers (T and TX markings), pliers/pliers, a 3x4 Phillips screwdriver, WD-40 aerosol/machine oil . It should be noted that adjusting sliding windows is much simpler - in this case, only the distance between the roller carriages in which the sash is fixed is adjusted.
Self-adjustment of plastic windows may include adjustment of the sash, its pressure, as well as adjustment of the handle and pins.
The position of the window sash can be changed in 3 planes thanks to the adjustment of the hinges. From the video below you will learn clearly how to adjust window fittings at home.
Handle adjustment
If the window handle is loose, you just need to tighten its fastening by removing the trim and tightening the bolts with a Phillips screwdriver. In this case, the mount should be removed without using any tools - you just need to turn it ninety degrees.
To replace the handle or install one that is equipped with a fuse, you should perform an operation similar to the previous one, only in this case the bolts are unscrewed, and then the old handle is carefully removed from the connector and a new one is attached in its place.
If the handle jams or it no longer reaches any of the positions, perhaps the clamping mechanism should be loosened slightly, and the handle itself, having previously been dismantled, should be cleaned and lubricated.
Also, self-adjustment of windows is carried out if the handle is jammed. In this case, it is necessary to adjust the locking mechanism located on the handle side at the end of the window sash.
Sagging window sashes
If the window sash “scrapes” against the frame or touches the fittings when opening and closing, it means it is sagging. The window sash is adjusted using a hexagon, which can be used to raise/lower the sash or move its upper/lower part towards the hinges.
Pressing the sash to the frame
In this case, you need to “work” with the eccentrics (aka trunnions) located around the perimeter of the window. In this case, in the winter the pressure can be strengthened (the eccentric rotates clockwise), and in the summer it can be weakened (the eccentric rotates counterclockwise).
In the case of aluminum windows, adjusting the windows yourself is done in the same way - by tightening the hinges (lower or upper) with a hexagon.
Adjusting the fittings of wooden windows is a much more complex process than in the case of plastic or aluminum windows. In this case, you should definitely call a specialist, because even he will make the correction step by step.
Main decisions
So how can you determine if your window is adjusted correctly without waiting for the weather to get colder? There are several signs by which it is easy to understand that everything is not ok with your setup.
- Sagging of the sash. This problem is easy to spot. Even with the slightest sagging, it will be noticeable upon closer inspection. This threatens you not only with drafts, but also with scratching of surfaces, which will also have to be corrected. This problem can be resolved by simply tightening the loops. To do this, you need to unscrew the decorative panel and tighten the bolts.
- Poor performance of latches and hinges may be the result of missing or insufficient lubrication. This can be eliminated just as simply: use machine or any other technical oil for lubrication. For windows to function properly, they only need to be lubricated twice a year. Be sure to thoroughly remove dirt and dust before lubrication.
- If the handle is broken, you can replace it yourself. To do this, you need to rotate the plate at the base of the handle 90 degrees. Under the plate you will find screws. After unscrewing them with a screwdriver, remove the handle. After installing the new handle, secure it with screws and put the plate in place. In addition to these usual nuances, each fitting has its own characteristics. In the instructions mentioned earlier, you will find out exactly what accessories you have.
- Poto fittings require constant monitoring, namely, you need to monitor the wear of the main parts. Mounting problems can be easily resolved by tightening the mounting screws. Well, you won’t be able to cope with replacing parts yourself. Here you will need the help of specialists;
- Winkhaus and MACO fittings are of a rather complex design. To avoid problems, it is not recommended to carry out repairs yourself.
Cases when it’s time to contact specialists to adjust the fittings
- The window does not close tightly; you have to apply force when closing it;
- When opening or closing windows, you hear extraneous noise: creaking, clicking, etc.;
- Hinge malfunction;
- Condensation appeared on the windows;
- The geometry of the window is broken, the distortion is visible, the sashes are sagging, etc.
If you notice any irregularities in the window design, do not hesitate to call specialists, they will make adjustments and, if necessary, replace fittings.
Company employees will determine on site which element needs repair. After this, a comprehensive adjustment of the window fittings and lubrication of the rotating mechanisms with a special aerosol is carried out.
Adjusting window fittings in summer - winter mode
In principle, the only thing that can be done without turning to specialists is to adjust the sash pressure for winter or summer. The only tool you need for this is a hexagon. The first step is to determine the places where the vestibule will be strengthened or weakened.
After this, you need to find the trunnion closest to this place. It has a pressure indicator (dot or notch). To switch the window to winter mode, turn the trunnion with a hex key, the notch should be towards the room; for summer mode, the notch on the trunnion is turned towards the street.
In conclusion, we remind you once again that manufacturers of windows and window fittings recommend that you do not carry out the adjustment yourself, but contact specialized companies. And remember, if your windows are under warranty, service is carried out by the company from which the windows were purchased.
Video: How to adjust the sash pressure density
- Window fittings G-UWindow fittings from the German company Gretsch-Unitas (GU) can be installed in almost any window.
- Window fittings - hinges As a rule, fittings for wooden windows are non-metallic or metal.
- Fittings for Roto windows The service life of the windows depends on the fittings that come with wooden windows.
- Winkhaus fittings Winkhaus window fittings began their life more than 100 years ago. In the distant
Adjustment of window units with “summer” and “winter” modes
Window shutter modes “summer” and “winter”.
Read more about how to adjust plastic windows according to the “summer-winter” position. For this purpose, you should increase or decrease the level of pressing of the web to the box by changing the position of one of the trunnions.
Modern windows made of metal-plastic, plastic and aluminum do not have to be completely sealed. They should be built into the ventilation system of the room. This can be done by adjusting the unit in winter-summer modes. This way you will reduce the flow of street air during the cold season and increase it during the warm season.
It is very simple to calibrate the seasonal sash shutter according to the stated principle. The whole procedure involves acting on a cylinder that has an offset center (eccentric), which presses the panel against the window frame. This cylinder is called a trunnion.
The eccentric is rotated using a suitable screwdriver. In some window models, this has to be done manually by slightly pulling the cylinder towards you.
Manufacturers provide three eccentric positions. So, there is a middle location of the roller journal. This seasonal shift is called “spring-autumn”. In this case, the window covering is sufficient, but not excessive.
Calibrating the narthex before the winter period
Eccentric positions in different modes.
With a decrease in outdoor temperatures, especially during the transition period before the heating season, it is necessary to minimize heat losses. For this purpose, the maximum vestibule is used.
“Winter” displacement of the trunnion places the maximum load on the window seal. Based on this, it is extremely undesirable for a very recently installed unit.
In addition, with minimal ventilation, the room will not be additionally ventilated. However, in the cold season, ventilation is rarely used, and sometimes completely absent.
The displacement of the eccentric increases the pressure load on the seal. This will not harm a window that has already been standing for some time. Because the sealing material had already partially lost its elasticity.
For a new window block, a maximum rebate is very undesirable. In this case, the seal will retain deformation compression and may not return to its original state. This threatens to replace the material. Based on this, the longer the winter displacement of the trunnion is applied, the higher the likelihood of quickly changing the seal.
On some window models, the pin can be moved simply by hand.
- To create maximum rebate, the trunnion should be pulled slightly towards you.
- Next, move it in a circular and at the same time translational movements to the right. Do this in such a way that the gap between the eccentric and the edge of the sash becomes minimal.
- When there is a notch on the trunnion, then with proper displacement it will move towards the sealing material.
Setting for summer season
The end of the heating season occurs when the weather is sufficiently warm. Based on this, it is necessary to reduce the load on the seal of metal-plastic windows by means of a “summer” displacement of the axle.
In this case, the pressure on the sealing material is minimal. Because of this, this mode is beneficial for any window models.
It should be noted that moving the eccentric to the summer position slightly increases air circulation in the room. But here the question arises about the feasibility of such a transition. Indeed, in the summer season, windows are often opened for ventilation even without this.
- To adjust the minimum rebate, slightly pull the trunnion towards you.
- Then, using rotational and translational movements, move the roller to the left. Do this in such a way that the gap between the edge of the blade and the eccentric becomes maximum.
- If the trunnion has a notch in the form of a strip, then with proper movement it will move towards the window handle.
What does setting up the block according to the “summer” and “winter” principles give?
If you follow the “summer” and “winter” regimes, this will not happen.
From what is written above, it becomes clear that calibrating the window’s “summer-winter” modes helps extend its service life and maintain normal air circulation in the room. But I want to warn you that the level of fabric pressure needs to be increased gradually, from season to season.
Only under this condition will you not destroy the seal of the block and avoid blowing it out, which is completely unnecessary in the cold season of the year. To ensure that modern windows serve as long as possible, do the following in different annual seasons:
- do not leave the trunnion in the “winter” position all year round;
- loosen the porch after the end of the heating season;
- change the sealing material when it is critically worn;
- Correctly and competently calibrate the window unit, otherwise you will have to repair it.
How to adjust sliding aluminum windows?
The final installation of windows involves installing double-glazed windows, hanging the sashes and adjusting all the fittings. Installation of double-glazed windows requires the participation of at least a team of 2 people.
When adjusting windows, you must firstly carefully read the instructions for adjusting the structure, which is necessarily included in the delivery package.
It is necessary to pay attention and, if present, eliminate the following shortcomings using a special adjustment tool - a hexagon. Alternately inserting the hexagon into the adjusting screws, we adjust the frames, achieving a tight fit of all structural parts
Alternately inserting the hexagon into the adjusting screws, we adjust the frames, achieving a tight fit of all structural parts.
Sequence of operations: 1. Place the liners around the perimeter of the structure. 2. Carefully install the double-glazed window. 3. We fix the double-glazed window. 4. Install the sashes.
Before installing a double-glazed window, all fittings are inspected.
We adjust the fittings for the correct installation of all components of the structure using adjusting screws.
And also watch a video about aluminum windows:
Sliding aluminum windows not only create a cozy atmosphere in the house, but also do not take up an extra centimeter of free space when opened. Due to the strength of aluminum profiles, sliding windows are reliable and durable, and also have maximum light transmission. Such windows look great in any interior.
Similar to a wardrobe, sliding windows are an ideal option for balconies and loggias. They do not interfere with free movement in a small room. You can arrange a whole greenhouse on the balcony, filling the window sill with flowers, without worrying about constantly rearranging the flowerpots when the window is opened. The sliding window sash is equipped with a special lock that secures the window in the closed position, protecting the apartment from dust and precipitation.
In this article we will take a step-by-step look at how to assemble an aluminum sliding window yourself.
Return to content
Typical problems and malfunctions
Before it gets colder, start adjusting your aluminum windows to prevent serious damage. Typical problems include:
- Sagging of the sash. Such a breakdown not only causes drafts, but also spoils the appearance of the loggia. To eliminate it, you will have to move the decorative panel and tighten the bolts.
- Poor performance of profile latches and hinges. Usually occurs as a result of insufficient lubrication. For normal operation of windows, it is recommended to lubricate the elements with any technical oil twice a year.
- Broken handle. In this case, you need to unscrew the screws under the plate and remove the broken handle. After installing a new one, it must be securely fixed with screws.
Each fitting has its own characteristics, so before you begin repairing or replacing broken parts, you should carefully read the instructions, and if any shortcomings appear in the operation of the system, immediately eliminate them in accordance with the recommendations given. In many cases, a special hexagon that can adjust and lift the sash rollers will help to repair and adjust aluminum sliding windows.
How to adjust the fittings of an aluminum sliding frame
Next, we will consider both situations of problems with an aluminum sliding frame and ways to solve them.
How to adjust the rollers on the sash of an aluminum sliding frame
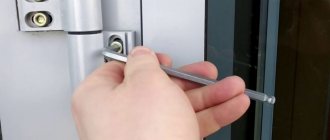
To adjust (raise the sash), you will need a key number 4, that is, 4 mm. At both ends of the sash at the bottom there are holes in the frame with a black lining, looking into which we see an adjusting screw; it rotates with a 4 mm hexagon.
To lift the sash, you need to rotate the key counterclockwise. The same is done from the other end. When adjusting the height of the rollers, you must ensure that the sash is not skewed diagonally, otherwise it will not close with a latch. To do this, it is best to use a level or, in extreme cases, a plumb line.
How to adjust the latch of an aluminum sliding frame
If the problem is that the mating part is not screwed on correctly, then you just need to twist it. To do this, take a key No. 2.5, insert it into the central hole of the part and unscrew it until the answer moves freely in the frame. Now it needs to be screwed in such a way that the lower part of the tongue in front of the bevel is level with the upper part of the tongue in front of the bevel.
In the second case, when the tab does not latch, you need to pull it out. Take key number 3. The tongue holds the fixing screw. To get to it, you need to pull the opening handle down (step 1 in the picture). A hole will appear at the top into which a 3 mm hexagon is inserted and rotated in the direction opposite to the location of the fittings (step 2 in the picture). For example, if the latch is located on the left end of the sash, then the key rotates to the right and vice versa. By loosening the fixing screw, you can safely pull the tongue, which has become movable, outward until it is flush with the edge of the frame (step 3 in the picture).
To complete the process, the fixing screw is tightened. If everything is done correctly, the sash will close tightly with the latch!
Types of structures
Aluminum windows have a long service life due to the design features unique to them.
The design features of aluminum windows ensure a long service life
The window configuration can be:
- folding - the sash works exclusively for ventilation. This type of opening is used in rooms with a lack of free space;
- rotary - this is a traditional swing type of opening the sash;
- tilt and turn - a combination of opening the sash for ventilation and the swing method. This type of opening is common when glazing residential openings;
- blind is a continuous glazing of an opening without the possibility of opening due to the lack of a sash. This type of glazing can often be found in public spaces and offices. In residential buildings, some openings are glazed in this way if there are more than two of them in one room - this is typical for houses of old construction;
- multi-leaf - with this type of opening, several sashes are used in a large window opening, when each sash has its own type of opening;
- sliding – opening the door in a “compartment” format is common for narrow rooms where every square meter counts – on loggias and balconies.
The configuration of the window system is selected based on the purpose of the room
Depending on the degree of thermal insulation, aluminum profile windows are divided into “cold” and “warm” types.
The “warm” window profile has a thermal insulating insert in its design. This affects the width of the profile, which is larger than that of the “cold” one.
The warm profile includes a thermal insulation layer
“Cold” window profiles are not used in residential premises. They can be found as partitions or doors in offices and other non-residential premises.
Assembly diagram of aluminum sliding windows - general progress of work
Before assembling an aluminum sliding window, it is very important to inspect the surface of the glass unit and frame for the formation of cracks and scratches. A sliding window with any defects found will be returned to the company where it was purchased.
A sliding window found to be defective will be returned to the company where it was purchased.
When starting to install sliding aluminum windows, you need to carefully dismantle the old window with a window sill and prepare the window opening.
Having dismantled the old structure, the remaining fragments of concrete and fasteners are removed from the window opening. Severely damaged or skewed openings are leveled with cement mortar and left until it hardens completely.
Before installing aluminum sliding windows, it is better to prime the opening.
Frame installation
Installation of aluminum sliding windows begins with installing the frame. The video below shows in detail the process of assembling the frame of aluminum sliding windows.
1. Basically, the structural parts of sliding windows come already disassembled, the frame is separated from the double-glazed window with fittings. Once the structure is assembled, the frame is freed from the glass unit and sashes, and with the help of wedges it is placed in the window opening and leveled.
2. Holes for fasteners are drilled along the length of the frame and the wall, into which screws are screwed in so that the double-glazed windows can be inserted back in the future. To avoid getting confused with the glazing beads, you can mark them with a marker.
3. If the gap between the side opening and the sliding window frame exceeds 5 mm, additional plates must be used.
4. The frame is attached to the wall with an anchor bolt or using an anchor plate. It is better to use an anchor plate; it does not damage the profile as much. It is secured with two self-tapping screws. One is screwed to the frame, the second to the wall.
5. The installed frame is foamed with mounting foam throughout the entire window from bottom to top. After two hours, the wedges are carefully removed from under the frame. The resulting voids are filled again with polyurethane foam.
A sliding aluminum window is a track system with built-in sashes. Sliding sashes move in the desired direction using rollers and can be combined with fixed sashes.
1. Installation of sliding window sashes begins with the installation of guides. Using a tape measure, the length of the top and bottom of the window frame is measured and markings are applied to the guides, along which the required length is cut. The cut area is smoothed with a file.
2. The finished guides are attached to the frame with screws, first at the top and bottom of the frame, then at the sides. The gap between the screw holes is 30 cm.
The gap between the guides and the frame should not exceed 5 cm, since in winter the wall can freeze.
3. Next, a U-shape is formed from the upper and lower and one side elements of the sash, into which a double-glazed window or single glass with a thickness of 4-5 mm is inserted. The sides of the glass must be covered with a rubber seal in advance. To ensure a better fit of the seal to the surface, cuts are made in the corner parts of the glass. The finished window glass is inserted into the sash, to which the second side of the sash is secured with screws.
The sash is supported on 2-3 rollers, which are secured at the bottom of the sash with screws 5 cm from the edges. Screws must be screwed at low speeds.
4. A brush seal is inserted into the grooves of the sliding window sash with the bristles facing each other. The shegel should protrude beyond the dimensions of the workpiece by a couple of millimeters.
5. The sliding window sash is placed first in the upper part of the frame, and then placed on the lower runners of the guide.
6. Once the aluminum sliding window is completely assembled, the height of the rollers for better sliding of the sashes along the guide rails is adjusted at the bottom of the sash with an adjusting screw.
Closing an aluminum sliding window for the first time will require a lot of force to get the sash into place. The fact is that the holes in the upper corners of the sash are made larger in size compared to the lower corners in order to prevent incorrect placement.
Aluminum sliding windows are easy to maintain. A beautiful appearance is ensured by wiping the glass unit and frame with a soap solution or special detergents.
For a longer service life, the fittings must be cleaned of dirt once a year and the moving parts lubricated with oils.
Healthy? Save it to your wall! Thank you for like!
Product design
Sliding windows are a system of guides with sashes built into them. Thanks to the rollers, the shutters move in the desired direction in the runners. They mainly produce sets consisting of two or three guide profiles with sashes, the number of which can vary from one to five.
The convenience of installing sliding aluminum windows lies in saving space, because the balcony does not have a large area. When opening, the shutters do not take up space; they move along the window.
For sliding window designs with two guides, an aluminum profile with a thickness of 64 mm is used. When manufacturing the system, they begin by making an aluminum frame into which the sashes are inserted. Glass is used with a thickness of at least 4 cm. The entire structure is sealed with a brush system, which provides a high level of noise and heat insulation.
Rollers are responsible for moving the sashes, which are considered the weak point of the entire structure due to the heavy load. To prevent their damage, the surface of these elements is covered with a polymer shell. It makes the rollers practical and wear-resistant, so the system has a long service life. The package also includes fittings consisting of handles and locks. Some system models have additional parts that improve their performance properties.
Adjustment cost
For those who need window adjustment, the price of the service is as important as the professionalism of the craftsmen. The cost depends on the following factors:
- complexity and type of work performed;
- the need to replace broken fittings with new ones;
- urgency and duration of work.
The price for window adjustment is affordable and acceptable for a wide range of consumers. You can find out more about the cost of this service by calling our representative at any convenient time.
Is it possible to adjust a casement window with your own hands?
Some people prefer to do without the help of specialists and fix problems on their own. Is it possible to adjust aluminum windows yourself? If you have the necessary skills and tools, then yes.
Do-it-yourself adjustment of aluminum windows may include the following steps:
- If the hinges and latches do not work correctly, it is necessary to provide these fittings with a sufficient amount of special lubricant. To prevent the recurrence of this problem, the window mechanisms should be lubricated at least 2 times a year.
- If the sash is sagging, you should first remove the decorative trims from the hinges using special tools. Then you need to tighten the bolts well. Such adjustment of the window sash is carried out according to instructions, which you can download on the Internet at specialized sites.
- If the handle breaks, you should perform the following actions: rotate the decorative plate located under the handle, thereby providing yourself with access to the screws. Then you need to remove the broken handle, replace it with a new one and securely fix it using special tools.
Typical problems and malfunctions
Without waiting for the weather to get colder, start adjusting the aluminum windows to prevent the development of serious damage. Common problems include:
- Sagging of the sash Such a breakdown not only becomes a prerequisite for drafts, but also spoils the appearance of the loggia. To eliminate it, you will have to move the decorative panel and tighten the bolts.
- Poor operation of profile latches and hinges Usually appears as a result of insufficient lubricant. For normal window operation, it is recommended to lubricate the elements with at least some technical oil twice a year.
- Breakage of the handle In this case, it is necessary to unscrew the screws under the plate and remove the broken handle. After installing the new one, it needs to be firmly fixed with self-tapping screws.
Any fittings have their own characteristics, therefore, before starting repairs or replacing broken parts, you should carefully read the instructions, and if any shortcomings appear in the operation of the system, immediately remove them in accordance with the tips given. In almost all cases, a special hexagon that can adjust and raise the sash rollers will help to repair and adjust aluminum sliding windows.
Aluminum sliding frame: Adjustment of the lock - latches on sliding aluminum frames
ALL ON http//oknatuning.ru How to adjust
lock - latch on
sliding
aluminum structures and almost everything else.
Aluminum sliding loggias Insert the sash into the frame
All types of work: Window
made of PVC and aluminum.
Wholesale sales of windows
. Guarantees. Slope finishing.