But installing them requires more time and knowledge than installing conventional swing doors.
Therefore, we will consider the general principle of installation, what materials or tools are needed for assembly, as well as how to properly install and adjust sliding aluminum windows.
We will analyze possible difficulties or errors during work, as well as the average cost of installation by specialists.
Eurowindow - what is it and how is it done?
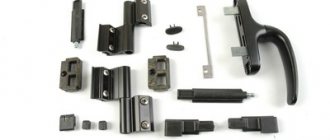
Perimeter fittings are a prefabricated harness made up of several parts mounted along the entire perimeter of the profile. It provides locking of the sash at several points, using one handle, which allows you to achieve the tightest possible fit and eliminates blowing. Thanks to this fittings, a window with an opening sash can operate in two modes – tilt and turn. In the rotary mode, the window opens only by turning; in the combined mode, the window sash opens and tilts.
The fundamental design difference between Euro windows and conventional windows is one frame, which can accommodate several double-glazed windows. The main technical characteristic of the “euro” is complete tightness, achieved through various seals. Thermal conductivity will depend on the number of air chambers, and on the type of glass in the double-glazed window, and on the correct installation of the window. Therefore, the material from which the profile is made does not play a role; what is important is the functionality of the structure and its characteristics.
Sequence of work for installing an aluminum frame
Let's take a closer look at the installation of aluminum frames on the balcony. First you need to prepare the necessary tools for installation.
Tools
To work on cold glazing you will need the following tools and materials:
- hacksaw for metal;
- roulette;
- drill;
- self-tapping screws;
- screws;
- screwdriver;
- brush seal (schlegel);
- weather-resistant silicone sealant;
- polyurethane foam;
- hex wrench.
The balcony is glazed with an aluminum profile in the following order:
- dismantle the old frame (if any);
- clean the parapet and slabs from debris and fragments of cladding;
- assemble a frame from fragments;
- fix the assembled structure to the parapet using galvanized self-tapping bolts and mounting loops;
- install guides for the sashes, for which measure the length of the horizontal sides of the balcony opening, transfer the dimensions to the guides and cut them out
- polish the cut area with a file;
- Drill holes in the opening for self-tapping screws in increments of 0.3 m. Install guides using screws. The gap between the outer edge of the frame and the guide should be no more than 5 cm, so that the frame does not freeze in the winter;
- install a brush seal along the contour of the valves;
- insert the sash into the upper guide, and then with the rollers into the lower one;
- place a steel canopy covered with a decorative and protective polymer coating under the mounting loops;
- connect the canopy to the balcony slab using self-tapping screws;
- draw a cast on the polymerized steel strip. Cut it out with roofing scissors;
- install the ebb outside the frame;
- seal the joints of the ebb and flow hood with weather-resistant silicone sealant;
- fill the corners between the frame profile, balcony slabs, walls and parapet with polyurethane foam;
- install glazing on blind sashes. To do this, install clamping strips for a tight joint between the frame and the glass.
Eurowindows: do-it-yourself made of wood
The process of manufacturing a wooden euro-window will require certain financial investments - the cost of wood, components, equipment. It is also easier to order double-glazed windows from professionals, although some craftsmen manage to assemble this unit themselves. But even taking into account the impressive cost of the finished product, which is an elite and therefore quite expensive product, the savings will be significant. If we are talking about building a new house or completely glazing an old one, the difference can be tens of thousands.
Do-it-yourself windows: step-by-step instructions
Windows are constantly exposed to external influences and temperature differences between indoors and outdoors, which inevitably leads to changes in the geometry of the structure when it comes to wood. To minimize possible warping, frames and sashes are made not from solid timber, but from laminated veneer lumber. You can purchase a ready-made one if there are reliable suppliers, or you can glue it yourself. In the second case, a workpiece of at least three lamellas is assembled, so that the fibers are directed in opposite directions. If possible, choose radial sawn wood; tangential sawn wood “leads” more. For gluing, special, moisture-resistant compounds should be used.
The section of the beam is chosen based on the number of double-glazed windows - for a window with one chamber, a 6 x 4 cm beam is usually used. In production conditions, grooves are selected in the frame not only for the double-glazed window and external seals, but also for internal ones. One of the former manufacturers of wooden European windows shared his drawings, by simplifying which you can get high-quality structures that are almost as good as ready-made ones. In order to make a window with your own hands, the drawings are quite suitable.
Do-it-yourself wooden windows - characteristics and manufacturing rules
When making wooden windows with your own hands, it is necessary to maintain precision in your work. A discrepancy of a few millimeters can lead to distortion of the entire structure during installation. As a result, there is a risk of thermal insulation failure.
However, if plastic double-glazed windows are produced only at the factory, then if you have the necessary tools and work experience, you can actually make wooden products yourself. This design is especially in demand in country houses and dachas.
Khrushchev-era buildings and private houses that were built a long time ago are especially in need of replacing window frames. Replacing old shutters with wooden windows is the best option. It is important to make the right choice of product profile. Sometimes single glass is used. Another method is double-glazed glass.
If in the first case the advantage is low cost, then double glass provides better heat retention due to low thermal conductivity. This is especially important for those areas where frosty weather sets in in winter. Inert gas is pumped into the gap. Over time, it comes out, but this does not make the double-glazed window lose its characteristics.
There is another type of window - Finnish 3-chamber double-glazed window. A system of 2 glasses is installed on one side, and a single version on the other.
Before starting work on making a wooden structure with your own hands, you need to make the right choice of type of wood:
- 1. Oak. Good material for these types of work, but very expensive.
- 2. Birch. Is the best option. The wood is easy to process and has a low price. The disadvantage is the difficulty of acquisition.
- 3. Pine. With proper use it lasts for a long time. The material is inexpensive. Considering its accessibility, even a beginner can work with it.
Before starting work, a drawing of the future window structure is created with your own hands. Then materials and tools are prepared:
- wooden beam;
- boards;
- glass;
- glazing beads;
- self-tapping screws;
- PVA glue;
- hammer;
- drill;
- glass cutter;
- milling machine with a set of cutters;
- saw.
Step-by-step instructions for making wooden windows consist of the following steps:
- 1. Formation of the box.
- 2. Making the frame.
- 3. Glazing.
It should be remembered that the wooden material is selected with precise geometry and without cracks.
The production of the box is carried out when it is absent from the structure of the house. Its necessity lies in taking on the main load and unloading the frame.
Stages of its manufacture:
- 1. An L-shaped groove is made in a board with a section of 15x5 cm. Its depth is 1.5 cm.
- 2. Four boards are connected in the form of a box.
- 3. Holes are drilled in the corners to a depth of 3 cm.
- 4. Wooden pins are driven into them. This gives the structure rigidity.
Related article: How to process rubber bands on plastic windows
When making a frame, a drawing provides assistance.
A quarter is taken from the side and intermediate slats. This is a sample of wood where the glass will be inserted.
At the end of the beams, grooves are made of the tongue-and-groove type. An end mill is used for this. If it is missing, then use a regular chisel.
The places are filled with PVA glue, fastened and pressed.
A sash is placed in one part of the frame. For this purpose, samples are made in the bars. The sash is made according to the same principle as the frame. It should fit tightly into its intended place. After this, markings are made for attaching the hinges.
Holes are drilled in the marked places and the hinges are fixed. Next comes the installation of handles. To do this, a groove is milled in the sash rail and a mechanism is inserted. In the response part, a place is formed for the tongue to enter.
When installing glass, it must be cut accurately with a tolerance of no more than 0.5 mm. A diamond self-tapping screw is used for this. Final polishing is done with sandpaper.
If the deviation in size reaches 1 mm, a cold bridge is formed. The window will not perform its function.
Glazing work requires compliance with safety precautions:
- 1. To avoid injuring your hands, wear gloves.
- 2. Glasses are required. The eyes are protected from glass microparticles getting into them.
- 3. It is not recommended to breathe through the mouth and talk. Together with the air, glass chips settle on the mucous membrane of the throat.
The operating procedure is as follows:
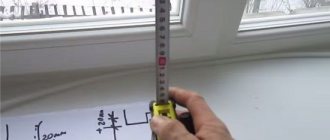
- 1. The glass that needs to be cut is pre-measured. To do this, use a meter ruler that exceeds the dimensions of the material.
- 2. A line is drawn with a diamond glass cutter.
- 3. A board is applied to the glass so that its cut coincides with the line and is pressed well.
- 4. By pressing the hand, the glass breaks off with a characteristic crack along the break line.
- 5. Fitting is underway. If the cutting is done accurately, then the glass is installed and pressed with glazing beads into which thin nails are driven.
- 6. When installing double glass, a beam with selected grooves is attached between them.
The fully assembled window should be installed in the opening. All garbage is removed from there first. Then you need to make holes for the dowels in 80 mm increments. After installing the window, it is fixed using self-tapping screws. All cracks are filled with polyurethane foam. This allows you to insulate the window opening. The installation is accompanied by regular checking of the window geometry.
An important step is installing the window sill. It should be remembered that the length is 100-200 mm longer than the window opening. The protruding part is around 70 mm.
The installation procedure is as follows:
- 1. The required size is cut from a board or purchased product.
- 2. The outside is lined with felt.
- 3. It is being placed under the frame.
- 4. The window sill is leveled relative to the ground using wedges. A slope to the outside of up to 2 degrees is allowed.
- 5. All empty space is filled with foam using a gun.
To properly paint a window frame, you need to consider the following points:
- 1. The surface to be painted is primed. This will not only reduce the consumption of paint material, but also increase the service life of the frame.
- 2. A brush is used to apply paint. Several layers are superimposed on one another.
- 3. A specific paint is applied to the exposed surface. The inside of the frame can be painted in any color.
Making a frame with your own hands is a job that requires high precision. To do this, you need to stock up on the necessary tools. Some types of work are best performed on a machine to ensure dimensional stability. As a result, although a homemade product will be inferior to the factory version, it will cost much less.
What is required for adjustment?
To adjust sliding aluminum windows you will need:
- screwdrivers of different sizes and shapes;
- building level;
- thermal imager;
- set of hex keys.
How to properly adjust the structure?
A hexagon is used to adjust the height of the sashes.
To do this, there is a special screw at the bottom of the sash end. If you rotate it clockwise, the structure will rise, and if counterclockwise, it will lower. To avoid distortions, a building level is used during adjustment .
It is recommended to carry out the position change synchronously on both sides.
In some cases, the mating part for the roller is installed incorrectly, which can cause it to break . In order to avoid this (or correct the breakdown), using a 2.5 hex wrench, the part is screwed so that the upper and lower parts are at the same level before the bevel.
If the tongue and the bar on the latch are at different levels, the window will not close. To adjust them you need a 2.5 key. To do this, the bar with the fastening must be unscrewed in order to move it to the desired level.
The 2 parts need to be installed so that the lower part of the strike plate, which is located in front of the bevel, is at the same level with the upper part of the latch tongue, which is located in front of the bevel.
In order for the tongue not to sink in the frame, it is required:
- Turn the opening handle to the down position.
- Insert a 3 mm hex key into the hole that appears.
- Turn the latch in the opposite direction from the fittings (if the latch is on the left, then turn it to the right).
- After loosening the screw, pull the tab to the desired level and screw everything back.
Important . When installing moving parts, it is recommended to clean them from dust and lubricate them with a special oil (without resin or acid), for example, silicone.
This is necessary so that the doors and closing mechanism work more smoothly and also wear less during friction.
To determine the presence of cracks or blowouts after adjustment, you can use a thermal imager or improvised means (candle, cotton wool, fluff). To do this, you need to check all joints in the open and closed positions to check for the formation of cracks.
Sliding windows for terraces: features and benefits
The outdoor terrace can only be used during the warm season. Rain, snow, and gusty winds make staying there uncomfortable. Proper glazing will solve the problems. To keep warm and enjoy fresh air, you should give preference to sliding windows. They are much more convenient than monolithic glazing or swing options. The advantages of sliding frames include:
- excellent heat and sound insulation;
- possibility of self-installation;
- aesthetics of the design;
- convenience of ventilation;
- saving scarce space.
Sliding windows will decorate the veranda of any country house. They open and close smoothly, the doors do not slam in gusts of wind. The frames can be supplemented with soft curtains impregnated with PVC. The structure does not deform from moisture; if desired, it can be easily insulated, providing the necessary microclimate on the veranda. If desired, you can install French sliding windows to the floor, allowing you to admire the landscape. Such a transparent wall must be planned at the construction stage. The glazing of an already built veranda involves ordinary windows of standard height. With some construction skills, it is not difficult to assemble and install them yourself.
All designs can be divided into several categories according to the materials from which the profiles are made, as well as the type of glazing. Windows can be:
- wooden;
- aluminum;
- metal-plastic;
- polycarbonate.
The choice of material depends on the financial capabilities of the owner, the material from which the veranda and the cottage itself are built, the length of stay and other important factors. Sliding windows are suitable not only for a terrace or veranda, but also for a spacious gazebo, which is used in the off-season.
Other types of balcony glazing
For comparison, let’s take a look at other types of balcony frames available on the market of building materials and structures.
PVC frames
“Warm” glazing is made using a frame made of polyvinyl chloride and multi-layer double-glazed windows. The design of the glass unit and the use of rubber seals ensures:
- high noise insulation;
- reliable protection from the cold (hence the name);
- no draft.
Among the disadvantages of plastic glazing (which aluminum glazing of balconies does not have) are:
- impossibility of use on cantilever balconies;
- difficulty of repair;
- high cost compared to its aluminum counterpart;
- high electrostatics of polyvinyl chloride, which actively attracts dust microparticles;
- accumulation of condensate due to the tightness of the frame and, as a result, the need for frequent ventilation;
- heavy weight (due to which the PVC frame can only be installed on a reinforced parapet).
Intermediate type of glazing
This system consists of reinforced PVC profiles connected by corner elements, and works on the principle of a sliding wardrobe. Glass with a thickness of 4 to 8 mm is installed in the sliding system profiles containing the fittings inside. Combining the advantages of the two previous options, the intermediate option is devoid of the disadvantages of “cold” glazing.” However, the disadvantage of this design is its heavy weight.
Wooden frame
A classic method of glazing a balcony, used for a long time. The wooden frame is treated with a fire-resistant and anti-mold composition, which improves its performance characteristics. Thanks to rubber gaskets, the frame fits tightly to the walls of the loggia without gaps. The rotating mechanism allows you to easily ventilate the room. The advantages of a wooden frame include:
- environmentally friendly wood, which does not release chemically harmful substances into the space;
- long service life (up to 50 years) with proper care, which consists of annual painting and varnishing and timely repairs;
- exquisite eco-design.
Wooden frames have their advantages, but they are more expensive than aluminum ones
But, along with the advantages, glazing also has significant disadvantages:
- wood swells when exposed to moisture, increasing in size; as a result, the doors close poorly;
- high price compared to installing an aluminum frame;
- the frame may change its linear dimensions over time (shrink or warp);
- Installing such a frame requires certain professional skills; it is difficult for a beginner to cope with it.
Frameless glazing
To glaze a balcony without frames, tempered impact-resistant glass with a thickness of 7 to 9 mm is used, which moves on special plastic hinges. In order to wash the glass, they are moved into an “accordion”. The advantages of this type of glazing are as follows:
- burglary resistance;
- wind and noise insulation;
- simplicity and ease of use (the doors open and close with a slight movement of the hand);
- Beautiful design;
- no obstacles in the form of a frame in the path of sunlight.
Significant disadvantages of frameless glazing make this design less than ideal. Let's list them:
- absolute transparency - this, at first glance, dignity turns into excessive publicity and the inability to hide from prying eyes;
- leakage of the structure, which acts as a decorative barrier: such a frame does not provide thermal and sound insulation, moisture can penetrate through it;
- the inability to attach a mosquito net makes the balcony vulnerable to insects;
- deformation of metal guides due to temperature surges.
Features of balcony glazing with extension
In order to expand the area of the balcony, the level of the floor or window sill can be shifted forward by up to 35 cm. In the first case, a profile is welded along the contour to the base plate, sheathed underneath with sheets of metal. The old railings are removed and new ones are installed. Upon completion of the work, the outside of the balcony is lined with clapboard, PVC panels or siding. For such redevelopment, which increases the load on the facade, it is necessary to obtain permission from the relevant departments.
When carried out along the window sill, the floor level remains the same, but the area at the window sill level increases. Using brackets, windows are pushed out towards the street or on the sides. The disadvantages of such glazing is the risk of the balcony collapsing due to non-compliance with technical conditions when its area increases.
Thus, of all types of balcony glazing, the “cold” version with an aluminum frame is one of the most preferable.
It is very important to make a balcony with removal in compliance with all safety requirements
Aluminum windows
A very practical option for a country house or city house is windows with aluminum frames. These are often installed on unheated verandas. Among the advantages of aluminum structures:
- Long service life. A properly installed structure will not require replacement for 50 years.
- Attractive appearance. Windows do not need to be painted every 2-3 years; they do not fade or become deformed.
- Easy installation and maintenance.
- Light weight, which does not create additional load on the foundation.
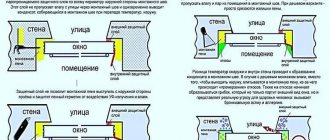
Despite numerous advantages, aluminum windows also have disadvantages. The design will not be cheap; the first generation profiles quickly heat up in the heat and freeze in the cold. The tightness of the windows provides warmth and protection from noise, but requires frequent ventilation of the room. Aluminum windows are best installed on verandas made of materials that allow air to pass through: wood or brick.
There are 2 options for aluminum profiles on sale: cold and warm. The first is suitable for unheated verandas, which are used only in summer. They provide single glazing without additional insulation. Windows with a warm profile are suitable for houses where people live all year round. Such windows are equipped with special gaskets and inserts that guarantee excellent sound and heat insulation. It is not necessary to make all windows sliding. A more convenient option is a combination of fixed and sliding glazing.
Which balcony is better: sliding or hinged, selection criteria
Modern trends are pushing people to purchase innovative developments that can make life much easier and reduce possible discomfort. Sliding windows on the loggia save space, give the interior a modern design and make it easier to open and close structures.
Sliding windows are purchased and installed on balconies more often than hinged windows, as they are much more comfortable to use.
A hinged balcony is relevant only when there is a lot of space for the doors, and they do not open very often. For families with small children or with small space on the loggia, sliding windows will be most relevant.
Metal-plastic windows
Metal-plastic products are suitable for heated verandas. They are distinguished by excellent sound insulation properties, durability, and attractive appearance. Such windows are recommended for cold regions with harsh winters. Among the disadvantages is the significant weight of the structure; metal-plastic should not be used for light wooden buildings.
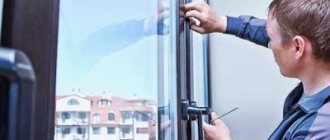
It is better to entrust the installation of metal-plastic windows to specialists. If this is not possible, you need to carefully measure the window openings, order profiles of the appropriate size, and then install them yourself.
Sliding structures go well with panoramic glazing. If desired, you can mount a combined tilt-and-slide system from metal-plastic profiles. Such windows not only slide to the side, but also tilt towards themselves. This function is used for micro-ventilation; the movement of the door can be controlled using the handle.
Types of window profiles
Sometimes the balcony is turned into a kind of closet or storage for cans of canned food and vegetables. An aluminum profile is ideal for these purposes. Some owners choose PVC sliding windows for glazing. Hinged window systems are preferable for loggias and balconies used as living rooms.
Aluminum profile for window installation
If you want to choose a budget glazing option, you can install aluminum windows on your balcony yourself. This profile is inexpensive and is most often suitable for balconies and loggias without insulation. This is, as a rule, a sliding window system, which is a definite advantage, because it allows you to maximize the space used by residents. Aluminum profiles are painted in different colors. However, aluminum glazing does not tolerate low temperatures well; the profile is subject to deformation when exposed to cold.
Plastic PVC windows
A PVC-based sliding profile is warmer than aluminum. During cold weather, the doors do not freeze, since the rails in the window profile are higher. Prices for PVC window systems are slightly different from prices for aluminum windows. However, PVC profiles are more practical and functional. These are the windows that need to be installed on insulated loggias and balconies. To prevent cold air flows from entering the room, you can further enhance the effect of the insulation material using special inserts. When installing a double-glazed window is not practical, you can use ordinary glass instead.
Plastic windows with hinged sashes
Hinged window systems are much more airtight than sliding ones. They retain heat longer and have better sound insulation properties. Therefore, these windows are ideal for balconies converted into living rooms. However, on narrow loggias such structures can “eat up” space, making furnishing difficult. Some discomfort, however, will not greatly affect the functionality of the balcony as a living space.
Metal-plastic windows are multifunctional and suitable for various rooms. Usually, the installation of window systems on loggias is carried out by craftsmen, but this work is quite within the capabilities of anyone and can be carried out independently. Installing windows on a balcony with your own hands does not require special technical equipment.
For installation, you just need to prepare some tools: a drill, a level, screws and dowels, a chisel and metal scissors. You will also need polyurethane foam, hydro-vapor-proof tape and special metal plates. All this will help fix the structure in the opening.
Thus, having a clear idea of what type of metal-plastic windows you want to see on your balcony, you can calculate what part of the work you will do yourself and what part you will entrust to a specialist. All types of windows are made in factories; it is not yet possible to make them at home, and no one is trying. However, installing plastic windows on your balcony yourself is a very real task. Installation will not take much of your time and effort. In addition, you can ask a relative, friend or neighbor for help.
Glass or polycarbonate: what to choose
You can insert regular window glass, plexiglass or polycarbonate into the frames. Each material has its own advantages and disadvantages. Glass is transparent; for the terrace you can choose transparent, tinted, matte modifications. However, this material is quite heavy and very fragile; it requires special skills when cutting. It is difficult for a beginner to avoid a high percentage of defects. If you decide to use glass to decorate your terrace, it is better to choose an impact-resistant material, although it will cost a little more.
Plexiglas is much stronger, has good light transmission, and is suitable for panoramic and frameless glazing. It can be used for cold and heated verandas, gazebos and other buildings. Plexiglas can withstand heat and scorching sun very well, is quite resistant to cold, and does not require additional protection from ultraviolet radiation. The material is cheaper than polycarbonate and regular glass and is suitable for self-installation.
The main advantage of polycarbonate is increased strength. By installing such windows on the terrace, you don’t have to worry about their safety. Falling icicles, hail, and sharp gusts of wind will not harm the windows. Polycarbonate is easy to cut and install. Among the disadvantages is less transparency.
Polycarbonate windows
For wooden, brick or siding-lined terraces, simple, inexpensive and easy-to-maintain polycarbonate windows are suitable. You can use different types of this practical and modern material. Cellular polycarbonate has excellent heat and sound insulation properties, it is very durable, not susceptible to weather changes, and can withstand low temperatures well. An additional advantage is the affordable price. Monolithic polycarbonate is rigid and requires greater care when cutting. The material is not highly transparent; finished windows will create a slight darkening on the terrace. This option is suitable for buildings facing the sunny side.
Sheet polycarbonate resembles ordinary glass. It is absolutely transparent, flexible, suitable for creating fancy windows with small sashes. There are different shades on sale, which significantly expands the designer’s capabilities. The disadvantage of this type of material is its rather high price.
Manufacturing and installation of polycarbonate windows: step-by-step instructions
For self-assembly, you will have to purchase cellular or sheet polycarbonate, as well as additional consumables and tools:
- wood, aluminum or plastic for making frames;
- profiles for ends and junctions;
- sealants;
- fasteners;
- roller mechanism or guides;
- jigsaw or hacksaw;
- screwdriver;
- perforator;
- pencil and tape measure.
Before starting work, you need to measure the window openings and draw up a drawing with precise dimensions. The next stage is making the frames. Wood or metal is cut at an angle of 45% in accordance with pre-made measurements. Then the parts are fastened with self-tapping screws and flat window corners. You can avoid installing screws from the outside by making a groove of the required depth around the perimeter of the frame and inserting glazing material into it. The frames must be assembled very firmly, all parts are carefully adjusted to each other. Only in this case will the window be reliable, beautiful and durable. For additional strength, sealant is applied around the perimeter.
A very convenient option is ready-made plastic frames. They can be purchased in the form of blanks and assembled yourself, following the attached instructions. In the store you need to choose frames with a roller mechanism or reliable guides. There are products on sale in different colors that look beautiful in combination with tinted or transparent polycarbonate. Plastic frames do not require additional processing; they are strong, durable, do not lose their attractive appearance and do not dry out.
If wooden frames are chosen, they must be impregnated with an antibacterial compound, covered with stain or painted. Windows treated in this way do not deform and tolerate excess moisture and temperature changes well. If the polycarbonate sheet has been rolled into a roll, it is carefully unwound and the material is laid out on the floor to straighten it. It is advisable to protect polycarbonate from direct sunlight.
It is convenient to cut polycarbonate sheets with a construction knife. First you need to outline the dimensions, checking a pre-made drawing. To make the lines even, the contours of the future insert are outlined using a ruler. Then the sheet breaks easily. The ends are sealed with a special tape coated with silicone.
The most crucial moment is the insertion of polycarbonate blanks into the frames. The simplest way is to mount it from the outside with self-tapping screws. Polycarbonate will hold securely, but the appearance of the frame from the inside will not be the most aesthetic. A window in which a polycarbonate sheet is inserted into the grooves of the frame and reinforced with glazing beads looks more beautiful. Flexible polycarbonate is easier to insert than fragile glass; even beginners can do the operation.
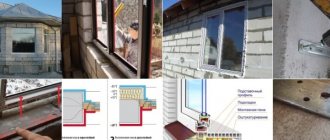
Features of window installation depend on the material of the veranda. To install windows on a wooden frame, self-tapping screws are needed, concrete and brick are drilled with a hammer drill, and anchors are used for fastening. First, guides or roller mechanisms are installed, and then the frames are strengthened. If the measurements are taken correctly, the finished profiles will fit exactly into place; polyurethane foam will help fix them.
Frame installation process
The installation diagram for sliding windows is as follows:
- If the windows are already assembled, double-glazed windows are taken out of them and the sashes are removed.
- In order to subsequently attach the frame to the wall, holes are drilled into which screws are screwed. It is recommended to mark the glazing beads that are being removed. This will help you install them back and not mix them up.
- In the window opening, using wedges, the frame is leveled. Adjustment of its position and preliminary fixation is carried out using wedges. In this case, bending of the frame structure should not be allowed.
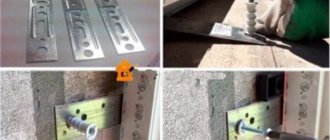
- Having secured the anchor plates to the wall with dowels, screw the frame to them using self-tapping screws: one of them is screwed into the wall, and the other into the window profile. The cracks are sealed with polyurethane foam. You can use anchor bolts for fastening. But there is a risk of damaging the profile surface.
If the gap between the frame and the wall exceeds 5 mm, then additional plates are used. In this case, foam alone will not be enough.
- After the foam has hardened (usually it takes about two hours), its excess is cut off and the wedges are removed. The holes from them are foamed, after drying the excess foam is removed.
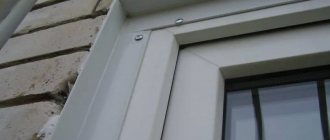
The window sill and ebb are being installed:
- The outer perimeter of the frame is covered with a special tape. It is impermeable to water, but breathable.
- The ebb is attached to the bottom edge of the frame. All gaps are filled with foam. A pause is taken while it hardens. After this, cut off the excess with a painting knife.
- There is a special groove at the bottom of the frame. The window sill is inserted there and leveled using a building level.
- The gap between the window sill and the wall is filled with foam, and the gaps between it and the window frame are sealed with silicone sealant.
- After the foam has dried, its protruding excess is removed.
Self-installation of sliding windows in a gazebo
The harsh Russian climate does not allow us to enjoy warm days for a long time, enjoy the sun, or spend our leisure time on terraces and open verandas. After a short summer period, we are forced to hide from the weather conditions in our homes.
Sliding windows for terraces and gazebos will come in handy for people who want to extend their time enjoying nature in the autumn. This type of glazing has become increasingly popular in recent years due to its practicality and compactness. Such systems make it possible to use the area of the structure to the maximum, since when opening they do not take up space, and in strong winds the doors do not slam.
Positive traits
The sliding window system is a lightweight design that is very practical and easy to use. It has excellent sound insulation, excellent thermal insulation, is environmentally friendly and has a presentable appearance.
Among the main characteristics of sliding systems:
the sash moves easily along the window;
Metal-plastic windows
Sliding sashes, which have a single layer of glass, are the simplest and easiest to install. Such metal-plastic windows easily open in the intended direction. Another plus to the fact that they perfectly protect against drafts, rain and wind is the low cost of installation. Anyone can afford to make glazing in this way.
Sliding window designs can be developed individually. A project created specifically for a specific gazebo will be a little more expensive, but at the same time it will become a highlight of the suburban area and will add special charm and respectability. Among such original solutions, for example, is the use of semicircular windows, which create a semblance of a bay window structure.
Aluminum windows
Among the materials of profiles for sliding windows, aluminum is especially popular. It is most popular for small architectural forms, including gazebos and verandas. Such sliding systems are also suitable for glazing rooms that will be used throughout the year, provided that additional heating is provided. This creates a comfortable temperature for staying inside.
The advantage of aluminum systems is that they are applicable for both conventional and panoramic glazing due to their thin profile that does not interfere with the view. They are equally often used for glazing gazebos made of various materials, it can be wood, brick, metal, or plastic.
The advantage of aluminum systems is that they are applicable for both conventional and panoramic glazing due to their thin profile that does not interfere with the view. They are equally often used for glazing gazebos made of various materials, it can be wood, brick, metal, or plastic.
The advantages of aluminum sliding windows:
- anti-corrosion properties;
- long service life;
- ease of care;
- lightness of structures;
- acceptable price.
strength;
Aluminum profile systems can have the color of natural metal or be laminated with a film of different textures and shades.
Materials and tools
To install an aluminum window you need :
- concrete (cement, water, sand);
- drill;
- screwdriver;
- Master OK;
- putty knife;
- polyurethane foam;
- plaster;
- wooden wedges;
- mallet;
- crowbar;
- perforator;
- screwdrivers of different sizes;
- drills for metal and concrete;
- stationery knife;
- metal saw or electric jigsaw;
- chisel or chisel;
- hammer;
- sandpaper;
- file;
- screws;
- anchor plates;
- washers made of rubber or stainless steel;
- dowels;
- building level;
- foam canister gun;
- waterproofing.