To eliminate malfunctions, you need to adjust the plastic windows. To do this, you can call specialists, or you can do everything yourself, following the instructions.
A prerequisite for the effective performance of the functions of a plastic window is correct adjustment. It maintains the tightness of the rebate, the necessary tightness, and the smooth movement of the sash without distortions or touching the frame. The initial adjustment of plastic windows is carried out by installers during their installation. After this, they should work without defects or irregularities. However, over time, small gaps appear and the sashes begin to sag a little. In the future, these deviations intensify, which interferes with the normal operation of the structure.
What tools will you need?
To adjust plastic windows yourself, you will need a fairly simple kit, including:
- Hex wrench No. 4;
- Pliers;
- Phillips and flat screwdrivers;
- A screwdriver with a set of bits of different shapes.
The tools from this set are usually always available at home. An exception may be a hexagon, without which the work cannot be completed - this is the main regulatory tool. If you don’t know what key is needed to adjust plastic windows and where you can find it, then contact any furniture hardware store. 4 mm hexagons are used when assembling any modern cabinet furniture, so finding such a key will not be a problem.
A screwdriver and screwdrivers will be needed to work with the screw connections with which the hardware elements are attached to the profile. Pliers are needed as an auxiliary tool.
It is recommended to additionally prepare silicone grease for the fittings. You can also use WD-40 or other similar spray lubricants.
Cleaning the fittings from accumulated dust
Once every 5-7 years, windows need deep cleaning to remove accumulated dirt in hard-to-reach places. Without cleaning them in a timely manner, sooner or later you will have to repair them, since their functioning will be impaired. Repairs are quite labor-intensive in terms of the weight of the structure, so it is advisable to carry out the work with assistants.
(function(w, d, n, s, t) { w[n] = w[n] || []; w[n].push(function() { Ya.Context.AdvManager.render({ blockId: "RA-510923-1", renderTo: "yandex_rtb_R-A-510923-1", async: true }); }); t = d.getElementsByTagName("script")[0]; s = d.createElement(" script"); s.type = "text/javascript"; s.src = "//an.yandex.ru/system/context.js"; s.async = true; t.parentNode.insertBefore(s, t) ; })(this, this.document, "yandexContextAsyncCallbacks");
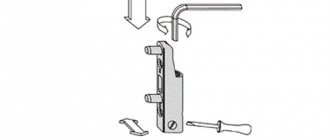
Scheme for adjusting elements to keep them clean and tidy:
- remove the sash from its hinges, removing the overhead frame elements;
- remove the top axle;
- remove the sash from the lower hinges;
- carefully set aside.
Removal of elements must be done with an assistant.
The surface of the sash is carefully inspected and the screws attached to it are unscrewed. The mechanism parts are washed well, preferably using specialized solutions that are easy to apply with a brush. After this, the structure is dried well in the fresh air or with cold air from a hairdryer. Lubricant is applied to each driving mechanism. The fittings are assembled in the reverse order and installed in their original place.
Before assembling the window, all fittings must be lubricated.
Main components that need adjustment
Adjustment may be required for any moving elements of plastic window fittings, which include:
Bottom swivel hinge
Top hinge with tilt and turn mechanism
Locking pins
Do-it-yourself repair and adjustment of plastic windows may be required at several points. In particular, it may be necessary to adjust the sash vertically, horizontally, adjust its pressure to the frame, and set the lower angle correctly
How much does the service cost?
Despite the fact that the process of adjusting the tilt-and-turn mechanism of a window sash is not complicated, many owners, especially of expensive window units, prefer to invite specialists for this work. Often such balancing is carried out as part of other operations, for example, when preparing a window for operation in a certain season of the year.
The cost of services for such work depends on the window model, modification of the installed tilt-and-turn mechanism and the area where services are provided; in Moscow and St. Petersburg these prices are usually 15-20% higher.
Prices for certain types of work on setting up POM windows:
Profile cleaning - 250 rub. per p.m.- Sealing - 500 rub.
- Adjusting the opening sash - 350 rubles.
- Adjustment of the swing-out flap - 850 rubles.
- Replacement of POM - 1230 rub.
- Replacement of seals with labor and material - 150 rub./l.m.
- Lubricating window fittings - 300 rubles.
- Binding accessories - 1800 rub.
- Repair work on the folding mechanism - 1260 rubles.
- Repair work on fittings - from 1400 rubles.
- Visit of a specialist - from 300 rubles.
When do you need to adjust plastic windows?
Adjustment of windows is required in case of any violations of their normal operation. The following signs may indicate the need for its implementation:
- Tight movement of the valves;
- Visible subsidence or distortion of the sashes;
- Violations of the tightness of the closure - cracks appear, blowing from the window;
- Switching modes is difficult;
- Loose or jammed handles;
If such signs are detected, it is not recommended to delay taking action. In most cases, you can adjust the plastic windows yourself and quickly restore their normal operation. If you do not make adjustments in a timely manner, soon enough you may encounter a serious malfunction of the window structure, which will cause a lot of inconvenience and require significant repair costs.
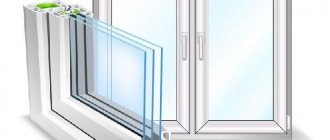
When to change the glazing mode?
When the frame begins to blow when the temperature drops to 4-8°C below zero, it’s time to switch it to winter mode. When the outside temperature rises in the spring, the operating mode of the windows is changed to summer. In winter mode, the sealing contour wears out greatly. If there is no need, it is better to operate the window in summer mode. When the rubber in the opening wears out, it is replaced.
Adjusting the pressure of a plastic window
Most often you have to adjust the pressure on the sash of a plastic window. This parameter characterizes the force with which the sash is pressed against the frame when closed. Pressing of the sash is ensured by locking trunnions located at its end part. When the handle is turned, the trunnions move vertically, entering or leaving the mating part located in the frame opening. When the axle completely extends beyond the mate, the sash is pressed against the frame with maximum force. The magnitude of this force is subject to adjustment.
It is recommended to adjust the pressure of plastic windows at least twice a year to switch to winter and summer mode. The maximum pressure is set for the winter. It provides increased tightness and prevents cold air from entering the room due to insufficient sash cover. However, strong pressure accelerates the wear of rubber seals, so it is recommended to loosen it in summer.
It is also necessary to adjust the pressure of the plastic window if there is a blow from the area where the sash adjoins the frame. The reason for this may be incorrectly adjusted pressure or wear of the seals. You can check the presence of draft using the flame of a match or a lighter brought to the window. If the flame fluctuates, adjustment is necessary.
The plastic window does not close tightly - how to adjust
To ensure that the sash closes tightly, you can adjust the pressure of plastic windows yourself according to the instructions.
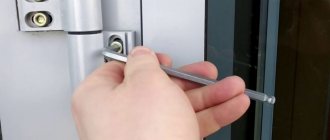
The axle has an eccentric that needs to be turned in a certain direction to adjust the pressure of the PVC window. Depending on the model of fittings used, there are oval or cylindrical trunnions. In the first case, the adjustment is performed by turning the trunnion itself with pliers. When the oval is positioned in a vertical position, the minimum clamping force is ensured, and in a vertical position, the maximum is ensured.
More popular today are cylindrical pins, which have sockets at the end for a No. 4 hex wrench offset from the axis by 2 mm. In this case, you can adjust the pressure of the plastic window by turning the pin using a hex key. Turning to the left increases the pressure, and turning to the right weakens it. Maximum pressing is achieved when the eccentric is positioned in such a way that the key socket is located on the outer side of the sash. The minimum pressure is achieved in the reverse position of the eccentric - the key socket is located on the inside of the sash.
Another eccentric is located on the underside of the top hinge plate. It must be rotated similarly to the eccentrics of the trunnions around the perimeter of the sash. This will allow you to adjust the pressure in the top hinge area. To access this eccentric, the window must be open in two positions. First, you need to open the sash and switch it to ventilation mode by pressing the lock lever.
To evenly press the sash around the perimeter, all eccentrics on the trunnions must be in the same position. Uneven pressing accelerates wear of the seal and leads to a violation of the tightness of the closed window.
The sash stopped closing: problem solving
Adjustment of the pressure must be made when the window has difficulty moving from the open position to the closed position. Often the reason is the lock device, which does not allow the handle to be turned. The exact sequence of actions depends on the specific manufacturer. Some examples are equipped with a thin plate equipped with a spring on the inside, which must be pressed and the handle turned to close the window. Other copies are equipped with a tongue under the handle - when you press on it, the lock of the adjusted mechanism is removed.
If the sash stops closing, you need to unlock the lock
In a situation where the window still does not want to close, minor repairs will be required. It is necessary to open the sash, find the element of the mechanism that serves as a hook for the tongue, unscrew and install a thin plate on the inside. The solution helps to shift the mechanism closer to the response element. As a result, the contact area will increase, allowing you to easily close the window.
How to adjust a plastic window so it doesn't blow
In some cases, adjusting the window trunnion does not allow achieving the tightest possible pressure, and the closed sash continues to blow. This occurs when the sash moves vertically or horizontally. As a result, part of the trunnions may not completely extend beyond the mating part.
To determine the place where incomplete pressure is created, you need to remember the locations of the trunnions or make corresponding marks on the inside of the sash profile. After this, you need to close the window and, in the marked places, try to press the sash away from the frame with your hands. If it remains motionless, then the trunnion is working properly. If the sash moves, and a gap appears at the point where the force is applied, then the trunnion does not completely fit into the mating part. In such cases, additional adjustment of the plastic window sash horizontally and/or vertically is required.
Adjusting the plastic window horizontally
To eliminate slight distortion and displacement of the sash in the horizontal plane, you need to adjust the plastic window horizontally. This adjustment can be made on the upper and lower hinges, which have special hexagon sockets. Therefore, you can adjust the position of the sash using the same 4 mm hex key that was used to adjust the trunnions on plastic windows.
On the bottom hinge, access to the hexagon socket is available from the outside and inside. Thanks to this, you can adjust the window both open and closed. When you turn the key clockwise, the sash will move in the direction opposite to the hinge, while its lower corner on this side will rise. Turning the key counterclockwise causes the sash to move towards the hinge, and the lower corner on the opposite side is slightly lowered.
Horizontal adjustment of the plastic window sash can also be done on the top hinge. In this case, work is carried out only with the window open. On the hinge you need to find the hexagon socket and turn it with a key in the same way as working with the lower hinge.
These manipulations will allow you to move the upper or lower part of the sash horizontally up to 2 mm. It is recommended to adjust the sash with limited displacements - no more than 1 mm per turn of the key.
Adjusting the plastic window vertically
Self-adjustment of plastic windows vertically is performed on the lower hinge. The required hexagon hole is located at the top of the hinge, so to access it you need to remove the decorative plastic cap. For ease of adjustment, it is recommended to switch the window to ventilation mode. Turning the key clockwise raises the sash, and counterclockwise causes it to lower.
As with the horizontal adjustment, the window sash movement range is 2 mm.
At the very beginning of work on the site, I published a small material - a guide on adjusting plastic windows. Despite the short and insufficiently informative post, in my opinion, it is still in demand. Many years have passed since then, and it seems that the time has come to expand the information “in depth.” So what can you do yourself, and what is better left to the master?
Content:
What is window adjustment Preliminary diagnostics Adjustment of windows by width and height using a key Adjustment of slot ventilators Strike plates and their correct installation Adjustment of windows by clamping Adjustment of sashes by geometry, or “crossbar” Adjustment of windows - profitable Summary
What is window adjustment?
As a rule, people think about adjusting plastic windows when they close or open poorly, touch and stick, blow out from different sides, etc. That is, when the window is not yet broken, but is already acting up and has difficulty performing its functions. Many people believe that window adjustment is a simple “tightening” of the trunnions and hinges of the fittings, which need to be “tightened” almost every year. And it’s not surprising, because sooner or later your plastic window sags again and starts to blow. Think about it: PVC structures have been installed in Russia for three decades now. Everything was calculated, even by the Germans, down to the smallest detail, and tested in practice. However, the same problems with windows are observed year after year. Why is this happening? How to adjust the window “once and for all”, and is it possible? The answer is yes, it’s possible if you know what to do. Window adjustment is a process whose ultimate goal is not just eliminating basic faults and bringing it into working condition. The window must again (or for the first time) become the way the manufacturer intended and designed it. This is, in fact, a whole set of measures in which, contrary to popular belief, screws and hinges are assigned a modest, auxiliary role.
In all the years of my work (more than 15 years), I remember only a couple of cases when it was more expedient to replace windows rather than repair them. Adjusting windows, even those that have served for many years, and “returning them to service” is much more profitable than replacing them. After all, in addition to the obvious costs of purchasing new double-glazed windows, you have to go through the entire “debacle” of installation work again, and, often, renovate the apartment. The material will go “from simple to complex.” You can easily do the simplest adjustment of the window fittings yourself (twist it a little, so to speak), but, for example, I strongly recommend entrusting disassembling the sash and correcting its “geometry” (that is, shape) to an experienced specialist.
Diagnostics of the sash position of a plastic window
To determine the algorithm for future window adjustment, it is advisable to make simple diagnostics. You need to take a regular pencil and mark the position of the corners and the middle part of the sash, as shown in the photo.
Then open the window and measure how many millimeters the sash “overlaps” the frame. The average amount of the so-called “overlap” should normally be approximately 8 mm.
For correctly assembled and installed windows, the overlap on all sides is almost the same. If a window does not close well, after diagnostics it will be immediately clear whether it is sagging too much. By comparing the marks in several places, you will get an idea of how much the sash is skewed relative to the frame. If there is a slight (1-2 mm) deviation from the norm, it is enough to adjust the window by tightening or loosening the screws on the fittings. If the difference in height between the corners is more than 2-3 mm, the sash geometry may need to be corrected (this is done from the inside; here, adjusting the window with a key will not help).
If the “overlap” is too large, the sash will constantly touch the frame, and if it is too small, it will blow from the window.
Adjusting the window sash position using a key
If the window does not close well, touching the frame from below, above or from the side, the easiest option is to adjust it with a key, using screws specially designed for this. As a rule, these keys are not some special “window” keys - one suitable for our purposes can almost always be found at the nearest auto parts store. Most often you need a regular 4 mm “furniture” hexagon, but there are other options, for example, stars. The problem can only arise when adjusting windows with non-standard keys, but this rarely happens. For example, a branded key for the lower hinges of Aubi 300 fittings, due to its discontinuation, can be difficult to find on sale (however, most experienced craftsmen have it).
Window adjustment when sagging and touching the lower corner under the handle
When closing a window that has sagged downward, it usually has to be “pushed” into the frame. To raise it, you can use two screws - a height adjustment screw in the bottom hinge, and a width adjustment screw in the top hinge. We screw these screws in clockwise, and the angle under the handle rises (the features of adjusting the lower hinge of the Aubi 300 fittings can be found here).
In some fitting systems, for example Winkhaus, the top hinge can be tightened by turning the screw counterclockwise. On Roto swing doors, the width adjustment screw is located on the opposite side of the hinge, along the same axis.
In the Aubi 300 system, instead of a screw, there is a shaped washer for several fixed positions.
If the sash knocks on the top striker on the frame when closing
To eliminate the knocking, screw in the screw for adjusting the upper hinge width, and the sash moves away from the strike plate.
When touching the side of the window (in the center) , the width adjustment screws of both the upper and lower hinges are used. At the same time, the sash moves towards the hinges.
If the contact occurs above the sash , you can try to slightly unscrew the height adjustment screw in the lower hinge (the sash will drop lower). Problems with slot ventilators are discussed in the next section.
When opening a window, does something click between the hinges? Try to lift the sash up a little using the same screw for raising the height of the lower hinge. In addition, it may be necessary to rearrange the corresponding striker (see below).
That, in fact, is all you need to know to adjust a window that slightly touches the frame.
If the window is sagging a lot, and simple adjustment does not help (for example, when you try to lift the sash, the top immediately begins to touch), you need to correct its “geometry”. I will tell you about the features of window sash at the end of the article.
Adjustment of slot ventilators and their counters
The fittings on the swing-out doors may include a 45-degree slot ventilation system. For all its advantages, it requires fairly precise adjustment of the window, often causing jamming, noise and knocking in the mechanism. Diagnosing this malfunction sometimes causes difficulties, since the ventilator is usually located in the upper part of the sash and is not visible during operation.
To adjust the window, it is better to stand on a window sill or stepladder and look from above the sash. When turning the handle strictly horizontally or vertically , the pin of the fittings should be at the same distance (2-3 mm) from the central protrusion of the bar, without touching it. Correct position of the strike plate relative to the fittings (using MACO as an example):
Displacement of the plank or sash causes rubbing and knocking.
To adjust the position of the strip, the holes for the screws are usually made oval. You should completely unscrew them, remove the bar and install it correctly. If the cause of the jamming is the sideways movement of the window sash (determined by the overlap), use the corresponding screw in the upper hinge. Plastic windows with ROTO NT fittings may require sash height adjustment.
Due to the design features of the slot ventilator, the locking pin of the fittings works “closely” to the strip and often touches it. You should adjust the sash using the key, lowering it down a little, and if this does not work, adjust it according to the geometry.
Before rearranging the strikers on a plastic window, you need to make sure that the sash is not skewed relative to the frame.
Pressure counters and adjustment of their position
The clamping of the plastic window sash is provided by strikers on the frame. They are the hooks for the locking pins of the mechanism and must be installed correctly.
Checking the position of the strikers
Have you determined whether the sash is level, or even adjusted it to overlap, but it is still blowing from the window? This often happens when the strikers are incorrectly positioned on the frame. Even in the most modern window factories, there is a “human factor”, not to mention the fact that the assembly of sashes and frames usually takes place in different areas. In general, the distance from the strike plate to the locking pin of a plastic window should be 3-5 mm (with the window open, the handle is strictly horizontal).
If the gap is significantly larger, the sash may simply not be pressed all the way, and if there is practically no gap, knocking and clicking can be heard when opening and closing the window.
Errors especially often occur when installing strips on swing-out sashes on the hinge side (they are not visible if the sashes are not fully open).
There are also frequent cases of intentional rearrangement of strikers by installers after unsuccessful attempts to adjust the window. When you remove such a strip, you will see a second hole from the screw.
If the sash is level and does not sag (the overlap at the top and bottom is the same), the planks should be installed in the desired position and the screws should be screwed into new places. However, you should be aware that such discrepancies may also indicate serious deformation of the sash. In the case of a strong diagonal distortion, first of all you should adjust the window according to its geometry - then most likely there will be no need to rearrange the slats.
If the distance between the locking pin and the strike plate is too large, the fittings do not work - therefore there is blowing from under the seal, and attempts to adjust the window to the clamp do not bring results.
Adjusting windows for pressure
To begin with, you need to answer yourself the question - why, in fact, adjust the clamps? To eliminate the blowing - most likely, you will say. There are many such recommendations on the Internet, and, in part, they have a right to exist. But only under two conditions that do not always occur simultaneously: - your window sashes are not deformed; - windows (or their seals) are more than 10 years old. Then adjusting the window to the pressure will help delay the replacement of “tired” tires for some time. If there is a deflection of the plastic profile of more than 2-3 mm, most likely, such an adjustment will not help, and closing the window will become much worse. In practice, on the contrary, I often have to loosen the clamps (return them to the factory position), since after adjusting the windows according to their geometry, the tightness is usually completely restored - the window stops blowing. That is why the “winter-summer” adjustment is not discussed in this article. After all, under maximum load, and even in winter, the seal does not last long, and the fittings behind it, due to constant torsion back and forth and increased wear, will require replacement ahead of schedule. I consider absolutely unnecessary any regular manipulations with fully functional plastic windows, except for mandatory annual lubrication . As they say, don’t interfere with the mechanism working properly :). And I answer clients’ questions about their service life like this: it will last for our lifetime!
A simple adjustment of the windows to the pressure is done as follows.
If you want to increase the pressing density of the sash, the eccentric (usually this is the locking pin) must be installed with a point (or its wide side) to the sealing rubber .
If, on the contrary, you need to loosen the pressure and make the handle move easier, turn the point (or the wide part of the eccentric) away from the rubber .
With the “old” Roto Centro fittings (the one in which the eccentric is located in the striker), to adjust for increased pressure, you should turn that part of the strip towards the rubber, on the side of which the locking pin is located.
The pins of the Winkhaus AutoPilot fittings are adjusted without a key, simply by hand, by pulling and turning in the desired direction.
Adjustment of the sash pressure in the lower hinge (not available for all windows). There are options for both an asterisk and a regular screwdriver.
It is also possible to adjust the pressure in the top loop.
However, the latter adjustment is used extremely rarely, since the degree of pressure practically does not affect the blowing through the upper loops (in most cases, in the upper loop, air constantly passes through small gaps, this is a normal situation).
And remember, the rubber window seal is not designed for constant operation in “winter” mode. Being strongly “flattened”, it will quickly lose its elasticity and finally stop retaining heat.
Adjusting windows according to geometry (“crosslinking” sashes)
What happens to a plastic window sash over time? To put it simply, the main influence on it is exerted by two forces - the force of gravity and the force of, so to speak, “friction” (it occurs when the window is closed).
The first turns the rectangle of the plastic profile into a parallelogram, causing the corner under the handle to sag and problems with opening and closing. This also causes air to blow through the top of wide windows, and the pressure in the area of the handle deteriorates. The second causes a significant deflection of the “hinged” vertical part of the sash, due to the lateral pressure of the rubber on the plastic when closing the window. The notorious blowing between the hinges begins, which has become almost a “calling card” of low-quality plastic windows. Sometimes the deflection is so great that, combined with installation defects, the fittings on the hinge side simply do not engage. The window, in fact, does not close completely, and often you can even hear the street. Therefore, the usual adjustment of the window trunnions with a key in this case is pointless, and replacing the seal does not help for long, or does not help at all. The problem with skew and deflection of profiles also has internal reasons. The fact is that the rectangular shape required for normal operation is given to the window by a double-glazed window. Yes, yes, everything is supported by glass and special adjustment plates. This is how plates under a double-glazed window should be installed according to GOST 30674-99.
Why is this so? Let's look at a simple example, using a children's construction set as a model of our window sash.
If you assemble a rectangle from planks, under the influence of gravity, at the slightest loosening of the screws, it will tend to turn into a parallelogram (provided that one side is rigidly fixed).
A plastic window sash without a double-glazed window behaves the same way - the profiles are reinforced with metal, but there is no reinforcement in the corners. If we install another bar diagonally, then our “sash” will no longer sag, right? A block of 2-3 glued glasses, or a double-glazed window, is one of the load-bearing elements in the design of a plastic window, and must expand (or “wedge”) the sash in a strictly defined way. For this purpose, there are special support (leveling) and adjustment plates (or pads). The linings, indicated in the GOST diagram in black, give the sash the necessary rigidity, holding it diagonally. In cases where they are located differently, are incorrectly selected in thickness, or are missing (and are not visible from the outside), there can be no talk of any successful window adjustment with a key . Moreover, despite GOST, in practice it is often necessary to install additional side plates (in the center of the vertical sides) to prevent deflection, especially on high sashes.
The adjustment plates have a thickness of 1 to 6 mm, different colors corresponding to their thickness, and must be installed with the flat part against the glass unit. Available in different widths, in the photo - 32 mm plates.
Attention! The following outlines the general principles of adjusting plastic windows “according to geometry”. I categorically do not recommend doing this to “home craftsmen”! To correct the shape of the sash, it is necessary to remove and reinstall the glazing beads, and sometimes the glass unit. The re-linking should be done by a window repair specialist, or at least an installer with relevant experience and special tools. Without practice, you can dent and scratch the plastic, as well as seriously cut your hands on the sharp edges of the glass (or even break the glass unit). I am not responsible for the consequences of disassembling and repairing windows myself. This section is purely informational in nature and will help you understand what an experienced, knowledgeable master should do.
When the sash sag
Often, when disassembling such sashes, it is discovered that one or several adjustment plates are missing at all, or they are not in the right place, or their thickness is incorrectly selected.
To correctly adjust the window height, it is enough to achieve the same “overlap” at the top and bottom by rearranging and adding adjustment plates of suitable thickness. Sometimes it is enough to simply move the existing plates as close to the corners as possible to eliminate sagging of the sash.
Before adjustment:
After adjustment:
An attentive reader may notice that according to GOST, the linings are installed at some distance from the inner corner of the sash, but in my photos they are right in the corner. The fact is that in reality, the rigidity of modern metal-plastic window profiles is usually, alas, significantly lower than it should have been according to the calculations of German engineers. Therefore, I install the plates in this way to reduce the deformation of the sash (which occurs mainly at the bottom, due to the weight of the glass unit).
When touching the middle of the lower part of a wide sash
If a wide sash rubs a lot from below, in the center (often against the striker bar), and does not close well, you should, again, move the lower adjustment plate to the very corner, until it stops. The load on the profile is reduced and grazing stops in most cases.
Please note that when adjusting the windows according to geometry, the hinges do not need to be “twisted” at all - they remain in the optimal, middle position.
When blowing
When blowing from the side (usually the window blows between the hinges), it is often necessary to install additional adjustment plates in the center of the sash.
Thus, the sash is leveled, the fittings engage, the seal is pressed against the frame, and the blowing stops. If the window blows from the side of the handle, the actions are similar. The width of the “overlap”, again, is checked with a pencil (should be approximately 8 mm).
You probably already realized that the main thing in adjusting the window geometry is to ensure uniform overlap of the sash along the entire perimeter of the frame . Without this, there will be neither a normal fit of the rubber seal nor correct operation of the fittings. No matter how you twist the screws, it is usually impossible to achieve such a result with them alone.
Using a crossbar can also correct some mistakes made during the installation of plastic windows. For example, if the frame was “stretched” during installation, the craftsman can slightly pull the sash in the same direction. In this relatively simple way, it is often possible to ensure good pressure on the seal and eliminate blowing without redoing the installation (no need to break and rebuild the side slopes again). Visually, a slight “barrel” bend of the sash will be invisible.
If even after all the manipulations, alignment of the geometry and adjustment of the window, it still blows from it - then, and only then, the seal should be changed.
Window adjustments, done correctly, will save not only your health, but also your money.
At the time of writing this article, the author was repairing windows in a new building. The satisfied housewife said that she will now reduce the temperature of the radiators in the apartment to a minimum, and the monthly heating bill will immediately decrease. It turned out that earlier, when it was blowing strongly from the windows, she was forced to pay for heating the street - heat meters were already installed in the house. Over time, such metering devices will appear in all apartments, so the cost of calling a specialist, sooner or later, will pay off many times over. The service life of the seals and fittings of plastic windows, adjusted according to geometry (and therefore operating without unnecessary loads), also increases significantly.
Summary
Simple window adjustment with a key is within the capabilities of almost anyone. But this should only be done in case of minor faults. If your windows close very poorly, or there is a lot of wind coming out of them, it is better to contact an experienced specialist who will correctly adjust them according to their geometry just once. And you can, as they say, continue to sleep peacefully!
Replacing the handle and adjusting the fittings of a plastic window
In addition to insufficient pressure and airflow, other problems may arise in the operation of a plastic window. Often during operation, problems may arise with turning the handle, which moves slowly when switching modes or even gets stuck in a certain position. Therefore, owners need to know how to properly adjust plastic windows themselves in such cases.
One of the common causes of such problems is a faulty handle. Most often it just becomes loose and starts to wobble. In case of such a malfunction, it is enough to tighten the fastening screws. To access the screws, you need to pry the decorative plastic trim on the handle body from above and below with your fingers and turn it horizontally.
Stiffness of the handle can be caused by clogging of its mechanism. To remove dirt, the handle must be removed by unscrewing the fastening screws and cleaned with a brush or vacuum cleaner. It is recommended to lubricate the seat of the handle inside the door with WD-40 aerosol lubricant with a nozzle. Another reason why the handle turns tightly may be that the sash is being pressed tightly. If it is not necessary to maintain maximum pressure, it is recommended to adjust the trunnions by reducing the force.
If the handle does not turn at all, this is most often due to incorrect operation of the lock, which is designed to prevent it from turning when the sash is open. To unlock the handle, you need to find the lock and release it. Depending on the model of fittings used, the blocker can be made in the form of a clip that fits onto the seal, or in the form of a shaped plate screwed at an angle to the seal.
The solution to the problem in case of severe wear is to replace the handle. You can find a new part in almost any hardware store or order it from a window manufacturing company. All handles have a standard design, so there will be no problems with selecting a suitable element. After this, you just need to dismantle the old handle and put a new one in its place.
Basic window adjustment points
Rice. 2. Basic window adjustment points.
Self-adjusting windows is not a difficult task, because there are only five points, working with which will save us from problems that arise:
- on the lower hinge there is a point for the vertical position of the sash adjustment;
- on the lower loop we find the point of horizontal adjustment of the lower angle;
- working with the top hinge, we adjust the upper part of the sash horizontally;
- in the center, next to the locking mechanism, there is a point responsible for the abutment of the sash and for the pressing force;
- At the bottom of the trunnion the force of contact of the sash is also adjusted.
In addition to these points, problems with heat, water and sound insulation may be caused by improper design or sealing of slopes. Therefore, be sure to find the cause of the problem before starting work, because if it is in the slopes, a hexagon and a screwdriver will not help us, and the help of a specialist will be required.
The plastic window closes tightly - how to adjust
If the plastic window does not close well, self-adjustment will also help eliminate the problem. The reason is usually the misalignment of the sash, as a result of which it touches the frame when opening or closing. To solve the problem, you need to eliminate the skew by adjusting vertically or horizontally. First of all, you need to carefully inspect the window to determine the place where the sash comes into contact with the frame. Contact between surfaces usually occurs on the bottom edge or on the side edge of the sash on the side opposite the hinges.
If the sash rubs the frame from below, it must be moved up and towards the corner adjacent to the top hinge. To adjust a metal-plastic window with your own hands, you need to open the sash and turn the adjusting screw of the top hinge clockwise a few turns. After this, you need to close the sash, remove the decorative cap from the lower hinge, insert the hex key into the hole of the adjusting lift and turn it several turns clockwise. After adjusting the PVC window, you need to check the movement of the sash. If necessary, repeat the manipulations.
If the sash comes into contact with the frame when opening and closing, then adjusting the fittings of a plastic window with your own hands involves moving it towards the hinges. If there is friction only on the lower side of the side edge, it will be enough to tighten the adjusting screw, which is located in the lower part of the lower hinge on the side, with a hex wrench. If the sash rubs the frame along the entire height of the side surface, then it must be moved additionally towards the upper hinge. To do this, you will have to tighten the adjusting screws on both hinges. After completing the work, you need to check the movement of the sash. If its friction on the frame is not completely eliminated, the adjustment manipulations must be repeated.
What exactly needs to be regulated?
Before making adjustments to the POM, you need to know its design. This mechanism is divided into 2 parts: the upper one, which the craftsmen call “Scissors” and the lower one, which is responsible for the upper movement of the sash. The upper adjustment occurs with a slight shift to the left and right, and the lower adjustment is adjusted by shifting up and down.
The balancing process begins with the upper part of the POM, then adjusts the lower part. To do this, you will need to open the sash, find the upper part of the mechanism and there is a small adjustment hole on it that fits a hex key.
In certain cases, adjusting the POM is not able to solve the problem of a poorly functioning sash, since the failure may be caused by a defect in the mechanism itself. In this case, you need to invite specialists who installed such a block, especially if the window is still under warranty.
PVC window lubrication
A significant part of the violations that require adjustment of the mechanism of plastic windows occurs due to its poor lubrication. In new windows, the fittings are coated with a sufficient amount of lubricant for effective operation. However, over time, these compounds degrade and lose their properties. These processes occur especially intensively in houses that are located near busy highways, industrial enterprises, and other sources of air pollution. Dust settles on the moving elements of window fittings and penetrates the lubricant, which significantly deteriorates its quality. This leads to jamming of the mechanisms and their accelerated wear. Therefore, adjusting old plastic windows always involves lubricating them.
To prevent accelerated wear of fittings and complex repairs, you need to lubricate them at least once a year. It is best to lubricate windows twice a year - before the onset of the winter and summer seasons. In addition, it is recommended to lubricate after carrying out any maintenance work on any hardware elements, for example, after adjusting the scissors of a plastic window, hinges or pins.
What to lubricate with?
Special compounds are used as lubricants for servicing plastic windows, which are sold in specialized stores or can be ordered from window suppliers. They are supplied in bottles with convenient attachments designed to work with certain elements of fittings. If such special lubricants are not at hand, you can use technical petroleum jelly and any technical oils, for example, sewing machine oil. Silicone grease or aerosol lubricants such as WD-40 can also be used. The use of edible, cosmetic and other types of oils that are not intended for use with mechanisms is not allowed.
To achieve maximum beneficial effect, the lubricant should be applied to clean and dry metal surfaces. Therefore, after adjusting the window fittings, it must be thoroughly cleaned of any dirt and wiped with a soft cloth. Dirt from hard-to-reach places is removed with a brush or sponge. Before applying the lubricant, it is recommended to further inspect the window fittings to ensure they are clean.
What to lubricate?
Lubricant is applied to all moving elements. Lubricated including:
- Trunnions;
- “Scissors” of a plastic window;
- Hinge adjustment mechanisms;
- Fastenings;
- Latches, etc.
A few drops of lubricant are applied to each of the moving parts. After this, I let the mechanism work in normal mode to distribute the lubricant evenly.
In addition to the mechanisms, rubber seals must be lubricated. For this, a special composition is used. The lubricant maintains the elasticity of the rubber and prevents it from drying out. It is better to treat seals twice a year. Be sure to lubricate them in the fall when adjusting the pressure of a plastic window with your own hands in winter mode.
Regular lubrication of window fittings will extend its service life and eliminate unnecessary repairs and adjustments. In some cases, it serves as an alternative to adjustment work. For example, before adjusting plastic windows that do not close well, it is recommended to lubricate the fittings. In many cases, this is enough to solve the problem.
Hardware mode
Modern fasteners for plastic windows operate in winter and summer mode. It happens:
- budget,
- standard,
- specialized.
Budget fittings of domestic production, popular in new buildings, are limited in functionality. It is not transferred to another mode in the off-season.
Widely demanded high quality standard fasteners. It is switched to “winter” and “summer” modes. It is produced by foreign companies.
Specialized fittings are installed depending on the operating conditions of the window and switched to different seasonal modes. This includes anti-burglary fasteners, reinforced, at the entrance doors.
You can find out whether the fittings are adjustable depending on the season by the presence of trunnions (eccentrics) on the side of the sash, by their shape, by the holes for a hex key, screwdriver, or sprocket.
Adjusting the sash sag
It is worth adjusting the shutters if the plastic window does not close, and the frame is being touched from above or below. To adjust, you will have to remove the cover and set the ventilation mode.
The cover is removed from the loop by prying its lower left edge and pulling up. Now it’s worth checking if the plastic window does not close at the top or bottom - both the adjustment methods and the angles of rotation of the key will depend on this.
Tips for installing and operating plastic windows
Specialists must install window units in the opening. Many companies provide a warranty period for their work, during which they correct defects and adjust fittings free of charge. If the finished window is installed by third parties, there is no guarantee; the adjustment is carried out independently or they invite craftsmen for money.
Care instructions:
- Windows are washed regularly, from twice a year;
- the fittings are lubricated at the same frequency; resin-based products are not used;
- Rubber gaskets are washed with conventional means, then wiped with glycerin;
- Hard-to-reach areas are cleaned with cotton swabs.
Do not use abrasive products for maintenance, and you should not use alcohol, acetone, or gasoline.
Double-glazed windows are washed with store-bought glass cleaning products. Regularly remove dirt from flow channels for condensate removal and ventilation. Mosquito nets are removed and washed with soapy water.
Rules before correction
When working with plastic windows, it is important that every movement of the key is thought out and executed correctly. Otherwise, the mechanism can be seriously damaged. Returning to the correct settings is much more labor-intensive than adjusting the sash.
When choosing/purchasing such a window, you should choose models with reliable elements:
- You should check that the profile complies with GOST standards. We are not talking about the good or bad quality of the materials, but rather about their class.
- It is worth paying special attention to the fittings. The durability and correct operation of the structure often depends on it.
High quality fittings will protect you from a large number of problems during use, increasing the service life. Such an element not only provides convenient interaction with the sash, but is also responsible for tight pressing against the window frame.
The sash touches the window frame
This problem occurs quite often. It is also not critical; you can deal with it yourself without replacing hardware parts and without repair costs.
The sash may touch the edge of the frame in cases where the fittings become loose or deformed. This can happen if the window is constantly open. In this case, the fittings are damaged under the weight of the sash.
The second reason for the malfunction is opening or closing the window too sharply and quickly, which leads to deformation of the parts, as well as to loosening of their fastening.
To carry out the setup without problems, it is advisable to seek help from the hardware manufacturer, whose logo is visible on the parts. By visiting the manufacturer's website and reading the adjustment instructions, you can quickly and accurately make the adjustment.
There are general tips for changing the position of the sash if the closure is broken:
- The sash touches the frame with its upper end: the sash must be turned towards the lower canopy or the entire structure must be lowered down.
- The sash touches the frame with its lower end closer to the handle: the sash is lifted and turned towards the upper hinge.
- The sash touches the frame in the middle of the end part (where the handle is): the structure is shifted towards the hinges. Sometimes it is necessary to slightly rotate the sash towards the lower or upper canopy.
To make the adjustment, you will need to use a hexagon to turn the bolts located on the scissor system on top of the window, as well as on the lower canopy.
Let's look at how to adjust the sash for the most common violations of its position.
- If the sash has dropped, or you need to slightly turn it from below, you need to adjust the bolt located on the lower canopy. Once you remove the trim, you will see a hole at the top of the canopy. By inserting a hexagon into it and turning it, you will adjust the height of the sash. Turning clockwise raises the sash, counterclockwise lowers it.
- If you need to move the sash to the left or right, you need a bolt located at the bottom of the hinged mechanism parallel to the plane of the window. There are two accesses to the bolt: from the window and from the slope; adjustment can be made from either side. By turning the bolt clockwise, you will move the sash to the right, counterclockwise - to the left. It is imperative to check how the window closes after each turn of the bolt. Manipulations are carried out until the desired result is achieved.
- To adjust the sash at the top, it is necessary to adjust the scissor mechanism. To move the sash in the upper part, you need to find the hexagon head, which is located on the side of the mechanism. It will be accessible if the window is fully opened.
If you need to adjust a heavy metal-plastic sash or door, then you need to configure special closers, whose task is to lift the sash when opening and closing.
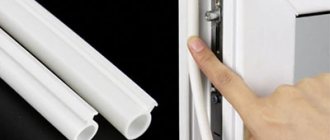
REPLACING THE SEAL
Since blowing through windows can occur due to wear of the rubber seal, do not forget to monitor its condition. It is a gasket made of various materials (rubber, silicone or thermoplastic) with a tubular structure. Its main task is to seal joints, which increases the protective properties of the profile.
Over time, even the highest quality material will need to be replaced. Regular exposure to different temperatures, water, and dust leads to the loss of the rubber seal’s functional properties—insulating properties. Typically, this problem occurs 5-7 years after installing a plastic window structure (balcony door).
Initially, cracks form that are no longer able to prevent the penetration of moisture. At low temperatures, wet rubber is highly susceptible to ruptures, which is why wind, cold, dust, and noise easily enter the room.
In addition, a violation of the tightness can cause water to enter the window parts, and this in turn reduces its service life. Timely replacement of the gasket will help avoid this.
A dried out or damaged seal can be easily replaced. You need to remove the old rubber band from the groove, and then carefully put the new one in, without stretching it (this is important). To ensure that it maintains the required level of insulation longer, wipe and lubricate it with silicone grease several times a year. Try not to use aggressive cleaning agents that may damage the parts.
How to prevent window elements from sagging
Repair efforts can be avoided by taking special precautions when using the window.
They are:
- Do not place books under the opening of the sash;
- do not add load to the sash with objects that have an impressive weight (or better yet, do not hang anything at all);
- careful interaction (without sudden movements or jerking) with the handle of the window system;
- It is better to ventilate the room with the window in the folding position;
- do not allow the sash to hit the frame;
- during the adjustment process, in the room, you should cover the work area with tape (to avoid debris);
- Metal elements should be coated with machine oil from time to time;
- To lubricate rubber parts, it is better to use classic glycerin (pour on a napkin and walk over the rubber).
In addition, once every two years, it is worth cleaning the drainage channels from blockages. After all, they help keep the sash in the desired location and prevent it from lowering.
Important: in addition to hanging various things around the window itself, it is prohibited to put any pressure on the window structure.
Problems with windows that you can solve yourself
Troubleshooting some hardware problems is a task for specialists. When doing repairs yourself, there is a risk of damage to the sash mechanisms, and even the entire glass unit. However, in most cases, repairs and adjustments can be performed by you without contacting specialists. The list of tasks that are easy to perform includes: 1. Setting the mode for winter or summer. Modern models make it possible to quickly and easily adjust winter and summer plastic windows in order to function better at different times of the year. 2. Setting the sash to “catch” the frame when closing. 3. Adjustment of the moving parts of the window unit when the structure is jammed in the open position or the plane does not fit tightly to the window seal. 4. Replacement of the rubber seal, which leads to seal failure. It is performed on average every 5-7 years, as it wears out. 5. Elimination of the problem with the activation of the erroneous action blocker. Occurs when the handle is accidentally turned if the sash is slightly open. The upper part in this case falls out when opening. The handle is blocked, but the sash does not close, sagging on one hinge. 6. Adjusting the handle, which can become loose or, conversely, jam.
In order to encounter fewer problems, you should immediately choose high-quality and inexpensive plastic window blocks that have good fittings. Moreover, low-quality plastic can warp and lose shape, making it impossible to close the window. Instead of repairing such glazing, problems will often have to be solved only by replacement.