In most cases, glazing a balcony is a necessity, regardless of whether it is an apartment or a private house on the ground. A closed loggia retains heat well in the apartment, and thereby saves heating costs. On the other hand, a balcony can be combined with a room, thereby increasing its area, or you can create an additional recreation area or workplace. The most suitable method of high-quality glazing is installing plastic windows on the balcony.
Advantages of plastic windows
Among all the available materials, PVC windows are considered the best for insulating a balcony. Here are their main advantages:
- Affordability.
- Huge selection of designs.
- Dimensions, design and opening of the doors are made according to customer preferences.
- Large selection of colors and styles.
- High-quality protection from drafts, cold, and noise.
- Does not require constant maintenance, as is the case with wooden windows.
- You can install windows yourself.
The correct choice of windows for a balcony will allow you to efficiently insulate the room for decades.
Should I install wooden frames?
Wood is a natural, beautiful material. Window systems using wooden profiles are lightweight, have good thermal insulation and sound insulation properties. But, in terms of price, such hardwood windows will not be cheap. In addition, they will require special care - regular impregnation with protective compounds or painting.
Another disadvantage of wood is its vulnerability to moisture and temperature changes. For example, in humid weather, the doors may “stick” and open poorly. In the heat, on the contrary, they shrink and crack.
Regarding environmental friendliness, factory frames are made from Euro timber. The resulting structure is resistant to deformation. But the material itself is thin wooden cuts, connected to each other with glue and resin.
Choosing a plastic window
To save money, it is possible to install plastic windows on the balcony with your own hands, the main thing is to properly prepare for the process. First, we choose the type of window, or rather, how the structure will open: vertically, horizontally, in both directions, or slide apart to the sides. Sliding sashes are mainly installed on balconies, where there is very little space, or something interferes with the opening of the sashes. But if you want to keep the heat in your apartment as much as possible, it is better not to install sliding windows, as they do not have a good seal.
When buying double-glazed windows, pay attention to the profile. Its width must be at least 1.2 millimeters, made of galvanized steel that is not susceptible to corrosion. To maximize heat retention, choose windows with glass thickness of at least 4 millimeters. However, such double-glazed windows weigh a lot. It is worth initially taking into account the total weight of the structure, and whether the balcony can withstand such a load. Double-glazed windows filled with argon are in great demand.
Which windows are best to choose for a loggia?
Warmth on the loggia is provided by windows with a high degree of thermal insulation.
When starting to install glazing on the loggia, the question arises of how to choose the right plastic windows for this. It all depends on what functional load the loggia or balcony will carry in the future.
To ensure a warm room, you need special glass that has a high degree of thermal insulation. It consists of a special alloy that has heat-resistant properties, which provides reliable protection from the effects of climatic conditions.
Plastic windows from German manufacturers enjoy great authority.
Cold glazing is suitable for a balcony used only in the summer.
In the case where there are no plans to change the direct purpose of the loggia, the quality of the glass is not particularly important.
The main thing is that it has soundproofing properties and protects the room from rain, snow and dust.
In addition to the quality of glass, we pay attention to the structure of double-glazed windows:
- for an ordinary loggia you can purchase single-glazed windows;
- for warm - you need to order two-chamber or three-chamber double-glazed windows.
For loggias that are located above the 5th floor, it is better to install sliding structures rather than swinging ones. Since the influence of the external environment at height is greater than at the bottom.
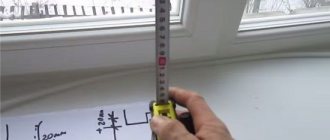
Window opening measurement
Before purchasing windows, you need to decide how the window blocks will be located and measure the opening. Most often, balconies are shaped like the letter “P”. This means you will need two side windows and one or more front windows, depending on the length of the balcony. Using a tape measure, we measure the opening of each block in three places: on the sides and in the middle. The required window height is the smallest measurement parameter. It is desirable that the height and width of the window be approximately 5 centimeters below the opening. The free space will be filled with polyurethane foam.
There is no need to dismantle the balcony railings. They will add rigidity and serve as a good support for the window structure. The main thing is that the railings are strong, otherwise installing plastic windows on the balcony can deform them. It may be necessary to strengthen the balcony with metal rods to the load-bearing walls.
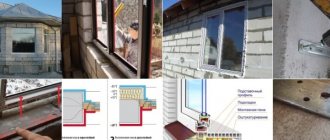
Filling the support profile with foam ↑
Correct installation of plastic windows provides for this moment to eliminate the slightest possibility of a thermal bridge forming in the lower part of the window opening, but it is not always carried out by window installers.
So, it is necessary to foam the internal space of the profile with polyurethane foam in the area where the stand profile is attached to the frame.
It is best to do this procedure a day before installing window structures on the balcony. This way, the foam will have time to fill the entire space and then harden thoroughly.
Installation tools
Not everyone has the opportunity to spend money and call a specialist to glaze a balcony. You can do this yourself, since the installation technology is not complicated. In addition, self-installation of plastic windows and balcony glazing will allow you to timely track installation errors and correct them. You will need these tools:
- Level for measuring the horizontal plane of the window.
- A plumb bob with a good center of gravity to adjust the vertical of the frame.
- Dowels with spacer sleeve.
- Rubber hammer.
- Drill.
- Polyurethane foam.
- Construction tape.
- Wooden wedges.
- Pencil.
If more than one window is installed, sealant is applied along the edges of the frame joints, and a batten is installed on top.
Installation of double-glazed windows
We first remove the old windows from the balcony, very carefully. We clear the opening from dust and debris. We measure the future fastening points along the perimeter of the balcony opening and drill holes in increments of 70 centimeters. The fasteners are attached to the window frame with self-tapping screws.
If it is not possible to lift the entire window unit, you can remove the packages from the frame. Carefully remove the plastic beads and glass. We install the window frame and level it with a building level, if necessary, inserting several wooden cushions at the bottom and top of the window. We fasten the profile with dowels to the side walls. The lower part of the frame is attached with anchors to the railings or brickwork. The drain is also attached. We mount the drain to the lower profile using self-tapping screws, and the remaining space will then be sealed with polyurethane foam. Having installed plastic windows on the balcony, we fix the profile and check all the corners using a level.
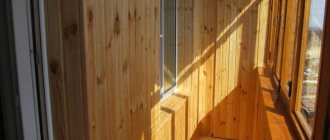
DIY installation of a plastic balcony made of siding
Before installing windows on the balcony, you should deal with the balcony itself and sheathe it. Siding is most often used. It's beautiful, practical and convenient. To cover a balcony with siding you need to have the following set of tools:
- level;
- hammer drill, drill and magnetic attachment for self-tapping screws;
- Screwdriver Set;
- pliers;
- a hacksaw and a number of other tools that may be needed during the work.
It is not recommended to fasten siding with nails, as the surface may be damaged. It is better to use self-tapping screws; this is where you will need a special magnetized attachment for the drill.
To ensure that the siding strips fit on top of each other without problems, it is worth stretching a regular fishing line between the wire staples. This will allow you to insert the siding even alone.
How to level a window?
We insert the frame into the window opening, placing several wooden wedges from below, lifting it. Then we install the same wedges on top until the frame holds tightly. For better support, you can secure the glass unit with an anchor plate. Using a building level, level the window from the bottom and top sides. Only after this do we install wedges on the sides. When installing windows on a balcony with your own hands, this is the main rule: the window is installed according to the level indicators, and not along the opening.
Video master classes on the topic
Detailed videos that will help even a beginner install a balcony block with a window sill and slopes on their own:
Tuning the opening and installing the BB:
Independent installation of a window and door unit on a balcony is a labor-intensive process that requires a lot of time and financial costs. Directly installation is preceded by a large amount of preparatory work. Both are based on certain theoretical knowledge and practical experience. If you are not willing to risk a PVC structure by installing it yourself, consider hiring a professional.
YOU MAY ALSO BE INTERESTED
Visor installation
To protect the balcony from moisture, if possible, a metal canopy is attached over the window. The installation of a canopy on a balcony under plastic windows is carried out at the preparatory stage, so that its structure fits tightly between the slab and the double-glazed window profile. The canopy frame with holes for anchor bolts is welded in advance. The hole spacing is approximately 40 centimeters. Place the frame against the wall, leveling it using a level, and mark the locations for the bolts. We drill holes in the wall and secure the frame with anchors.
Slope blanks and cross members are welded to the lower surface of the canopy. When everything is ready, you can begin installing the roof deck. This may be galvanized steel or other material. A groove of about 6 millimeters and a depth of up to 2 centimeters is made along the top of the frame. We install the upper edge of the roof slab in the groove, and then fasten the flooring to the frame with bolts or welding. The holes are sealed with mortar.
Variety of frames and their properties
There are several types of balcony frames, each with its own pros and cons:
Tree. Wooden frames are considered universal because they are environmentally friendly, have high sound and heat insulation properties, have an attractive appearance and a relatively low price. In addition, wooden frames can be made of any configuration. For a long service life, they must be treated with special impregnations that have moisture resistance and antiseptic properties. If cold-type glazing is planned, then preference should be given to larch frames. Every two years the frame must be coated with paint or varnish.
PVC. Frames made of polyvinyl chloride are highly durable and have a long service life. In terms of their heat and sound insulation properties, they are not inferior to wooden frames; moreover, they do not need to be processed or painted. Thanks to double-glazed windows, heat loss in the room is reduced to a minimum.
Aluminum. Aluminum window frames are very light, they are indispensable in situations where it is undesirable to load the balcony with heavy structures. In addition, aluminum frames are durable and provide high levels of thermal and sound insulation. The material is moisture resistant, does not deform over time and does not require complex maintenance.
Galvanized frames. They are used only in cases where the balcony simply needs to be closed from wind, dust, rain and snow. As a rule, the glass in such frames is single-layer, making this design particularly lightweight. This is an ideal option for balconies, the insulation of which is strictly contraindicated.
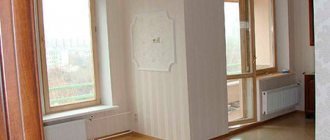
Internal glazing of the balcony
To replace old windows and doors, double-glazed windows can also be used between the room and the loggia. Installation of plastic windows and doors on the balcony is carried out according to the same principle described above. Just first you have to connect the window and door frames to each other. Some manufacturers immediately supply double-glazed windows in assembled form. We fasten the frame with anchor plates along the entire perimeter of the opening at intervals of 50 centimeters.
The installed block is leveled and fixed with wooden pads. The voids between the wall, window and door become foamy.
Preparatory work
Preparing a wall opening for installation of a balcony block begins with dismantling the old structure.
Note! Before removing the old block, it is necessary to clear the window sill and remove the curtain rod and curtains. Furniture located close to the window should be moved away or covered with film to protect it from dust.
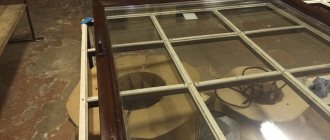
Dismantling the old block
Dismantling of a wooden window and door unit is carried out as follows:
- Remove the opening doors and balcony doors from their hinges. The glass is removed from the blind sashes, after removing the glazing beads.
- The window sill is dismantled. The concrete is broken with a hammer, cutting the reinforcing elements with a grinder. A wooden, aluminum or plastic window sill is simply removed from the opening.
- Remove the tides.
- Remove the old frames from the opening. To do this, they can be cut, starting from the bottom, or pryed with a construction cutter.
- The slopes are dismantled and the insulation is removed.
Dismantling an old wooden structure
If you are dismantling old PVC windows and doors, first remove all fasteners and then remove the frames.
Try to perform the work as carefully as possible to maintain the integrity of the opening.
Preparation of window and door openings
According to the current GOST, which regulates the connection of PVC windows to openings, the latter must have a flat surface. The presence of chips, potholes, and other irregularities, the depth of which exceeds 10 mm, is not allowed.
If the walls crumble, they are strengthened with binders. Oily surfaces are degreased. Irregularities are eliminated with the help of plaster, and cracks in brick and block masonry are eliminated with the help of high-rigidity foam insulation or the same plaster.
You can clean the opening from dust and debris using a stiff brush or vacuum cleaner. If installation work is carried out in winter, then snow, frost, and ice are also removed from the working surface.
The walls of the opening must be aligned horizontally and vertically. Their deviation from the axes is acceptable, but not more than 4 mm per 1 m. Accurate measurements can be made with a building level or a laser plane builder. You can also control the equality of the diagonals in the opening.
The process of installing the frame in a clean and leveled opening
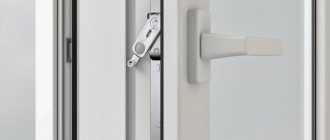
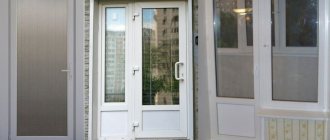
Connection of door and window frame
To connect the window and door parts, you must first remove the movable sashes from their hinges.
To do this you should:
- knock out the top hinge rod;
- open the locking mechanism by turning the handle;
- remove the sash from the bottom hinge.
Metal rod under the decorative hinge plug
Then prepare a connecting strip, self-tapping screws and an electric drill with a set of drills.
- Place the tie strip between the door and window frame.
- Place the entire structure “upside down” on a flat surface, making sure that there are no distortions in it.
- From the door side, drill tunnels in the end part of the frame in increments of 30-40 cm.
- Insert the fasteners and tighten them.
- Cover the visible parts of the fasteners with decorative caps.
- Apply sealing tape around the perimeter of the structure.
Profile for connecting balcony door and window
Fixing the sealing tape
If you want to make fastening units from the side of the window, you will have to remove the blind part of the window. To do this, you need to pry the glazing beads with a spatula, remove them, and then expose the glass.
Note! Choose self-tapping screws with a length of 80-90 mm so that when screwed to the end they do not violate the tightness of the window in the balcony block.
Connection diagram of individual parts of the block
Selecting fasteners for a balcony block
Before installing the balcony block, you need to make markings for the fasteners that will hold it in place. For these purposes, anchor plates or spacer frame dowels are used. What is the difference, what are the advantages of each option?
Anchor metal plates are attached at one end to the outer end of the window and door frame, and at the other to the wall of the opening.
Plate bent to the wall
Some of them (“with ears”) are first inserted into special grooves on the frame and only then screwed with self-tapping screws. Others (without “ears”) are fixed immediately, simply by attaching them to the box.
Fastening anchor plates “with ears”
The main advantage of anchor plates is that to install them you do not need to remove double-glazed windows from the blind parts of the window. This reduces the risk of damage to the PVC structure significantly, which is especially important for inexperienced craftsmen.
But anchor plates cannot always be used. They are unreliable fasteners for large (more than 4 m2) and structures with actively used sashes. They are also not suitable for installing a balcony door. However, many experienced craftsmen skillfully combine plates with spacer dowels, using the former in the upper part of the window-door unit, and the latter in the bottom and sides.
Fastening the balcony block to anchor dowels is the most reliable option. These elements are a set of a bushing and a durable metal bolt. When the bolt is screwed into the bushing, it expands, due to which the frame structure is reliably attracted to the walls of the opening.
However, the use of dowels requires the preliminary removal of even blind sashes, which may lead to a violation of the integrity of the double-glazed windows. If you are not a professional, then you cannot do without an assistant, or even two.
Removing the bead using a spatula
Note! To install the box using dowels, you will need a powerful hammer drill.
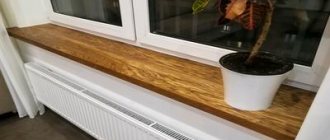
Window sill installation
As a rule, all window sills are standard in width and length, with a small margin for correction. For non-standard window sizes, window sills are made to order. If loggia space allows, we install a wide window sill. You can later put something on it, for example, flower pots or books. The space under the window sill can also be put to good use by installing built-in cabinets, or you can arrange a workplace.
We think in advance about what the space under the window will be like. Either we install the frame of the cabinet, or we finish the balcony along the ledge of the window sill. We prepare the base by clearing it of dust and filling all voids with foam. We cut the tabletop to the size of the window so that it fits under the slopes by about one centimeter. Then the window sill is installed on the plastic windows on the balcony; if necessary, wooden wedges are placed. We level the surface with a level, with a slight slope of up to 10 millimeters. This will prevent moisture from getting under the base of the window.
The window sill board can be fixed in several ways:
- Polyurethane foam.
- Cement mortar.
- L-shaped brackets.
- Spring brackets. They are attached to the profile under the window, and the bracket firmly presses the window sill to the window.
- If you lean the window sill directly against the window frame, then an adhesive mixture is applied under the base of the board. And the joint with the window is sealed with sealant.
When all the work is done, the cracks are sealed with foam, we place a weight of about 10 kilograms on the tabletop, check the slope of the surface and leave it to dry.
Cornices for windows
If there is no possibility or desire to attach ceiling cornices for curtains, install a cornice for plastic windows on the balcony. You can do this yourself. The so-called mini-curtain rods are attached to windows without drilling, using double-sided tape or special latches. You can choose any color of the cornice, model and material from which it will be made. The curtain is strung on a rod in close proximity to the window. Looks beautiful and saves space.
There are also curtain rods that are attached over the open sash of a window, or metal tubes with a cable, but they are secured with self-tapping screws either to the sash or to the wall.
The final stage of work and tips
So, the work on installing plastic windows on the balcony has come to an end. Now let's move on to the final touches - assembling the structure. We hang the sashes in their places, insert the glass and attach the glazing beads back. Once again we check all the windows with a level. If during the work you monitored the alignment of the frame, then there will be no problems.
We check whether the doors open and close well. It is impossible for an open sash to move spontaneously or open on its own. If everything is in order after installing the plastic windows, we seal the joints between the wall and the window frame along the entire perimeter of the balcony.
Finally, a few useful tips that will come in handy when installing windows, doors and glazing balconies yourself:
- Beads should be removed starting from the vertical sides.
- It is necessary to fill the spaces with foam only after the final check of the installed frame level, vertically and horizontally, and the good operation of all mechanisms.
- It is better to cut off excess foam after 2-3 days, when it is completely dry.
Many years of practice have shown that the use of plastic windows is one of the best ways to glaze balconies.
From measurements to installation ↑
Having completed all the measurements correctly, you can safely contact a company producing plastic structures that is suitable in terms of quality and conditions, and then place an order for the product according to your preferences.
Correct installation of plastic windows with your own hands is possible only after detailed familiarization with the recommendations of qualified specialists regarding balcony glazing, taking into account all the features and nuances of your home.
It is worth noting that installers of many window manufacturing companies often neglect important installation stages in order to save their own money and time. Even if you carefully monitor their actions, you will not always be able to voice your wishes and comments.
Let's look at the step-by-step installation of PVC windows with your own hands , starting with the key point - taking measurements.