- April 12, 2020
- Windows and Doors
- Anna Gorbenko
When plastic windows first appeared on the supply market, for many consumers they became a real salvation. Indeed, if we compare them with standard classical window coverings, then against the backdrop of the huge list of advantages of the plastic device, there are virtually no disadvantages. This is now, in the age of modern technologies and reconstructions, when almost every person has plastic windows installed in their apartment, people accustomed to comfort after several seasons of active use often discover or try to identify flaws, defects, shortcomings. Whether it is pickiness or whimsicality is difficult to say, but the fact remains: minor breakdowns and disruptions in the stable functioning of such windows still occur.
How to adjust handles on plastic windows? Will it be possible to do this at all? How to adjust the pressure of a plastic window? Is it possible to repair such a structure with your own hands? And are plastic windows adjustable at all?
In fact, it is quite possible to eliminate some shortcomings on your own. But in order to understand everything and try to eliminate the problem that has arisen, you need to have the appropriate tools at hand, as well as have the necessary information. We will be happy to provide it to you in this article.
The role of the handle in the design of a plastic window
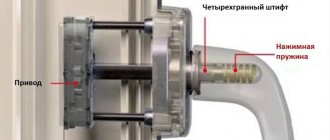
In a plastic window structure, the handle is the main control element for all declared sash positions. Indeed, its functioning almost entirely depends on this small lever built into the window frame.
It is the handle that is the guide that influences most of the accompanying transmission mechanisms of window fittings. Therefore, it is not at all surprising that it is often the handle that fails first. It is constantly subjected to tugging, jerking, turning, twisting, rotating, etc.
It is noteworthy that problems with the handle can occur even immediately after installing the window, if it is not adjusted accurately enough or has a manufacturing defect. If you find that your handle is broken, jammed, locked in an incorrect position and does not turn, or still turns, but not completely, do not despair.
Like any mechanism, in case of typical errors in installation, as well as small nuances that arise after long-term or careless use, the handle device must be adjusted and adjusted.
The fittings are installed incorrectly
Door hardware includes hinges, locks, latches and handles. Quite often the reason for doors not closing is incorrect installation of hinges.
- When they are set too deep, when opening and closing the canvas, the hinged shelves bend and the fastening screws become loose. To eliminate this reason, remove the hinges and straighten their position along the adjacent surface. All self-tapping screws are tightened as much as possible with a screwdriver or screwdriver.
- An option is possible when the loops, on the contrary, are not recessed into the canvas or box, but protrude above the surface. They will have to be removed, and using a chisel and hammer, carefully deepen them, leveling them along the surface of adjacent door elements.
- Another possible reason is that the hinges are not designed to support the weight of the installed blade. They simply cannot withstand the load and become deformed. In this case, it is necessary to replace the hinges with stronger ones or install an additional hinge approximately 20-25 cm below the top fittings.
- Incorrect installation of hinges vertically or horizontally can also lead to defects. Their shelves attached to the canvas and the box must clearly coincide. Otherwise, not the entire core works, which gradually causes its deformation. If the hinges are fixed at different distances from the edge, then the door leaf will not be perfectly vertical, which means that cracks will appear when closing. These errors will have to be corrected by reinstalling the hardware.
- With prolonged use, the loop core gradually wears out. This leads to backlash. The door begins to wobble and the core begins to deform. You can temporarily correct the situation by placing a metal ring on the core. It is more correct to replace the worn element with a new one.
Important ! Locks and latches can often prevent doors from closing tightly. The cause may be installation errors, wear and tear due to prolonged or improper use, or design defects. Problems with this hardware will be discussed below.
Common problems
To repair the handle on a plastic window, you must first understand the reason that caused the breakdown or malfunction. What are the most common problems that users encounter when using plastic windows?
- Handle jamming.
- Handle not turning.
- Incorrect turning.
- Handle loosening.
- Mechanical failure.
Based on the nature of the malfunction, it is necessary to trace its cause and evaluate the possibility of adjusting the mechanism.
Preventive measures to prevent the valves from jamming
All problems with doors can be prevented if you periodically perform some simple steps. First of all, the window mechanics must be maintained in good condition.
This requires:
- maintaining cleanliness;
- lubricant;
- inspection and securing of mechanisms.
Cleaning of mechanisms is carried out only partially, within the limits of accessibility. It is difficult to clean them completely, since this requires disassembling the mechanics. However, if lubrication is performed, some of the contaminants dissolve and are removed from the body of this unit.
However, it is prohibited to use aggressive brands of oil with solvents. In addition, you cannot use vegetable oil - it polymerizes over time and completely stops the operation of the mechanics.
Liquid machine oil is used for lubrication (available on sale specifically for plastic windows, safe for PVC). The oiler should have a long spout to make it convenient to supply lubricant to hard-to-reach areas.
All fasteners must be periodically tightened. They weaken over time, and handles and other mechanical elements begin to loosen. This creates conditions for accelerated wear of rubbing parts. The process of tightening fasteners does not take much time, but can significantly increase the service life of plastic window fittings.
Causes of malfunctions
Why doesn't the handle turn? And if it does turn around, then why does it happen with such difficulty and not completely? Let's look at the most common situations that lead to deformation of fittings or reduced functionality of the handle.
- Clogged fittings. Often, after renovation work is carried out indoors, construction dust and dirt quickly fill the fitting recesses, thus clogging them and complicating the operation of the handle as a whole. In this case, you need to remove the fittings, clean their elements, lubricate them and install them in their original place.
- Incorrect location of responses. The answer in the design of a plastic window is a special part (bar) that is attached to the frame. Incorrect position of the response leads to the fact that the handle does not turn. In this case, mandatory re-adjustment of the window fittings is required.
- Manufacturing defects. There are times when the production control department, by chance, passes through a product that is not functioning correctly. In this case, the only correct solution lies in dismantling the fittings and reinstalling the window panel.
Required Tools
To repair, you will need an adjustment kit, including keys and screwdrivers. Tools can be collected separately, we list them and additional tools:
Important! Under no circumstances should you use substances containing solvents, such as acetone or acids, to clean the window or its elements: they corrode plastic and rubber. And also, there is no need to use abrasives (hard rags, brushes, soda) - they will scratch the PVC, the surface will lose its gloss, and dirt will get into the microscratches, which will make them noticeable.
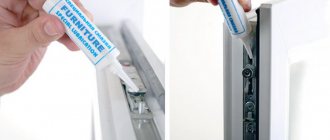
If the window is jammed closed and the handle turns and does not transmit commands, then remove it, twist the tetrahedral pin with pliers, or use one on the adjustment module (pictured above in the blue case).
You rarely come across models where the handle is attached with self-tapping screws at the end of the sash (we described such a case at the end of the article), that is, to remove it there is nothing left to do except drill it, you will need a drill or a screwdriver with a drill.
Tools needed for repairs
How to finish the handle on a plastic window? What hexagon is needed to adjust the window sash mechanism?
To counteract one or another vagaries of a plastic window, you will need the minimum of tools that will ensure a complete repair of the identified faults.
- First: screwdrivers. You will need both a cross and a flat one.
- Second: a set of “stars”. The fittings in the windows of individual manufacturers differ, so you cannot do without screwdriver attachments.
- Third: hexagon. This must be a 4mm furniture wrench; you can find one in almost any tool set.
- Fourth: In some cases, WD-40 spray may be required.
If the handle is jammed
You have probably encountered a situation in which the window handle was in a position that was completely inconsistent with the position of the sash. You try to turn it, but this is not possible - the handle is jammed.
For example, a window panel may be open, but for some reason the handle is in the “closed” position. You are planning to close the window, but nothing comes of it because it is completely impossible to turn the handle. What to do in this case?
The first and most important rule: do not pull the handle, do not subject it to strong mechanical stress, this will not bring you any results, especially positive ones. The cause of such a malfunction is a late reaction to the action of the blocker, and tugging will not help here.
A lock is an element of window fittings aimed at preventing the handle from turning in a certain position. The purpose of its installation is to prevent accidental breakage of the window structure.
At the moment the handle is turned to the folding position (when it looks up) or to the rotary position (when it is in a horizontal position), this same blocker is activated. It resists involuntary turning of the handle. And sometimes it happens that the blocker’s response to movement is not triggered in a timely manner. The reason for this may be moving the handle too quickly from one position to another. That is why it is very important to handle it carefully, smoothly, without haste.
How to act in a situation where the handle of a plastic window is jammed? The first priority is to determine the labeling of a specific hardware manufacturer. Depending on the specific company, the methods for disabling the blocker may be different. You can read its name on any metal component of the window leaf.
- AUBI. To turn off accessories from this manufacturer, you must move the handle to the vertical position. In the case of a tilt-and-turn position, the lock will become an obstacle to turning the handle. Therefore, in order to adjust the handle on a plastic window, you need to move the sash to the vertical position, find a plate with a spring on the end side of the sash in the area where the handle is located and press it against the seal. After this, you can safely return the sash to its usual position.
- Roto, Maco, GU. The fittings of these manufacturers also contain a metal plate, but it is not located vertically, but at an angle to the sash and frame. It is necessary to apply pressure on it so that it is parallel to the frame (strictly vertical). After this, you will be able to turn the window handle to the desired position. If the handle still does not turn, this means that the lock is slipping and is not in contact with the response mechanism due to thermal expansion. The problem can be resolved by removing the response mechanism by unscrewing the screws from the frame and placing a piece of thin plastic between it and the frame. When you screw the mechanism with the backing back to its original place, the blocker will begin to cling to it again, and the operation of the handle will resume.
- Winkhaus. Some systems from this manufacturer only provide a blocker, without a response mechanism.
The lock is located on the scissors of the folding element. During operation, it tends to wear out quickly and, accordingly, become malfunctioning: the handle can only be turned upward and horizontally.
You should not try to lower it down, because this can break the main locking gearbox. If the window is still under warranty, it is recommended to contact a professional. If you decide to repair the window yourself, then you will have to completely remove the sash from the window hinges, pull out the decorative trim, and remove the pin using a screwdriver and pliers. Remove the scissors, remove the blocker and install the scissors back. Consistently perform the above steps in reverse order and return the window panel to its place.
If all of the above procedures did not help you and you were unable to achieve the desired result, do not be zealous. Experts will help you adjust the handle on a plastic window (or replace it).
Mechanical damage to the element
The inside of the handles may have a broken locking ring (gear), which ensures interaction with the tilt-and-turn mechanism, or elements that secure it. The body itself or the base may crack, causing the handle to simply fly off.
Note! The pin breaks extremely rarely, but this is also possible. Breakage is especially typical for cheap primitive products installed by developers in new buildings, since their parts are often made of silumin and plastic.
The network describes a case when the handle of a balcony window was turned with some effort, but it did not open/close. The user drilled it out, and it turned out that one of the two rods that engage the locking ring was turned to the side, that is, there was originally a factory defect.
For some time the engagement occurred, but then the silumin became thinner, and the described breakdown occurred. In this case, it turned out that the handle can only be removed by unscrewing the screws at the end of the sash (usually they should be located on the front side of the frame). That is, if the window were stuck in the closed position, the handle would have to be drilled out to remove it.
Replacement:
You can try to repair the pen body using the algorithm shown below, but most likely it will not last too long:
If the handle does not turn completely
If the handle of your plastic window does not turn, this means that the problem is of a different nature. Accordingly, troubleshooting work will be based on a different methodology.
The problem may look like this: you are trying to close the window, but something prevents you from lowering the handle all the way. At the same time, when trying to perform a similar procedure with the window open, when you have access to the locking clamp, the handle turns completely unhindered.
What could be the reasons for this state of affairs?
- The first reason is the lack of lubrication in the fittings. When it dries out, the mechanisms stop working properly. In order for their movements to be easy and smooth (as required by standard settings), the set of transmission mechanisms must be treated with an appropriate composition. If the lubricant in the fittings dries out or dirt gets into it, the operation of the entire window functionality is disrupted. And if it’s just a matter of dried grease, it will be enough to spray the contents of the above-mentioned WD-40 aerosol into all moving components of the fittings. To develop the mobility of the handle, you will need to turn the lever several times, first in one direction, then in the other. If this is the only reason, the manipulations performed will be enough to restore the operation of the pen.
- The second reason is a sagging sash. This may not be noticeable to the naked eye, but only one millimeter is enough for the handle to stop moving properly and not return to the “closed” position. This kind of malfunction of a tight handle on a plastic window can be eliminated by using adjusting screws. To do this, remove the decorative plug from the bottom of the sash, and use a hex key to turn the mechanism located in the upper part of the hinge freed from the plug. If you turn the key clockwise, the sash will rise; if you turn it counterclockwise, the sash will lower. Therefore, in order to clearly understand whether you need to lower or raise the sash, check the sash for closure every time after the next turn of the hexagon. If the mechanism does not jam and the handle on the plastic window turns, it means that you have managed to eliminate the problem.
In the same way, you can adjust the movement of the sash to the left or right if necessary. Only the process is carried out by screwing the hexagon into the adjustment groove not on the front surface, but on the inside at the base of the sash.
If you move the hexagon in a clockwise direction, the sash will move to the left, if counterclockwise, then, accordingly, to the right. This way you can restore the correct position of the handle on the plastic window. The closing sash will not sag, which will ensure unimpeded closing of the window when required.
Swelling
The problem with wooden doors is swelling when exposed to high humidity.
You often encounter it in bathrooms with poor ventilation. The door leaf swells when exposed to moisture and cannot fit into the frame. Repairs are carried out in this order :
- The door leaf is removed from the hinges.
- The dimensions of the opening and the canvas are carefully measured.
- Using a plane, a layer of wood is removed from both sides of the canvas.
- The processing areas are aligned in color with the main body.
To prevent the problem from recurring in the future, it is necessary to eliminate exposure to excessive moisture. The ventilation system needs to be checked. Condensation should not accumulate on the door. It is important to ensure sufficient draft, and for this you should clean the air duct and replace (if necessary) the grille. If the draft is too low, it is recommended to install an exhaust fan.
If the handle is loose
It’s another matter if the handle on the plastic window has become loose. You twist it in different directions, but you don’t see any result. The thing is that the fastening has weakened due to frequent rough use, and the mechanism no longer clings to the fittings.
In fact, solving this problem is quick and easy. You will need a Phillips screwdriver: with its help you will simply tighten the two mounting screws on which the window handle, in fact, is held.
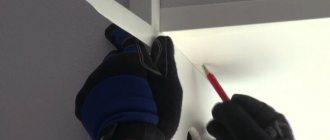
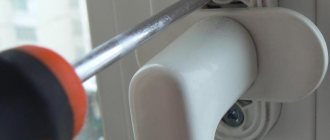
To expose the location of these screws and see the problem area, you need to remove the plug from the base of the handle - a decorative element that hides the mechanics of attaching the handle to the frame. You need to carefully pry the plug with your hands, pull it towards you and turn it to a position perpendicular to the base. You will see two bolts: these are the ones you need to tighten with a Phillips screwdriver.
If your handle on a plastic window does not turn due to a loose fastener, the problem will be fixed.
Tips for caring and using window mechanisms
PVC windows require careful handling. By following all the advice, there is a high probability that you will not encounter a situation where the double-glazed window does not close. 10 simple rules of use:
- Close the window in strong winds to prevent it from being blown off its hinges.
- Turn the handle completely to the desired position. Do not leave it in two modes at the same time. This leads to displacement of the fastener.
- To wash glass, use only soft cloths.
- Do not allow the glass unit to come into contact with high temperatures.
- It is better to use a sponge to wipe off dust.
- Remove the mosquito net from the window in the fall/winter (it may break due to the wind).
- Don't press yourself against windows.
- Do not hang objects on the vertical sash.
- If a breakdown occurs, seek help from specialists.
- Follow the instructions.
It is important to remember that windows are the most important component of an apartment. This design must not be neglected. The quality of air in the room and the level of moisture depend on the double-glazed window. Reliably installed windows guarantee the safety and comfort of your home. You should not forget about safety measures and regularly check PVC mechanisms.
Rate this post
If the handle is broken
How to replace the handle on a plastic window if it is broken?
The need to replace the handle may arise not only due to a breakdown of the mechanism: it may crack, it may become unusable due to too long a period of use, and it may require replacement if you simply decided to install the handle with a lock so that small children cannot adjust its condition.
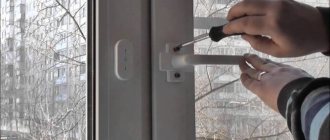
One way or another, the old handle is removed by unscrewing the two screws described above that secure it to the base of the frame. It is important to first open the window so that the handle is locked in the “open” position.
Having removed the screws from the frame and carefully removed the handle, you perform the same steps in reverse order, but using a new spare part. Anyone can carry out such manipulations; it is not at all difficult. You just need to insert the pin of the new handle into the corresponding hole and screw it to the frame with a Phillips screwdriver using the same screws.
Deformation of the structure due to the fault of manufacturers
Serious defects in door manufacturing can lead to the problem in question. One of the common reasons is the use of poorly dried wood in production .
When the material dries, it shrinks and the size of the door leaf decreases. Quite large gaps may appear. The canvas cannot fit tightly into the box and constantly opens on its own. Sometimes even the latch tongue does not engage.
To correct the position, the canvas needs to be raised to a level where its dimensions coincide with the opening of the box. The gap formed at the bottom is closed with a bar (threshold).
Another possible defect is poor-quality gluing of the canvas elements . They begin to protrude beyond the edges, touching the frame jamb and preventing the doors from closing.
This fabric is removed from its hinges. Using a grinding tool (grinder), all protruding defects are removed. The joints are carefully coated with adhesive. The processing area is carefully sanded and matched in color with the main body. As a rule, coating is done with a paint and varnish material. After drying, the canvas is put back in its place.
Reference ! In order to get rid of these problems, it is necessary to carefully check the product when purchasing. It is necessary to check the quality of the corners, all joints, and fittings. Particular attention should be paid to the moisture content of the wood.
Which pen to choose
It is noteworthy that all handles for plastic windows are absolutely identical in their fastening characteristics. That is, almost any window handle is considered universal and will definitely fit any window model and fittings. They can differ in color, shape, texture, they can have a lock or a groove for fingers, they can have a “comb” that prevents children from opening the window - these can be a wide variety of models. But all options will fit the standard cross-section of fasteners on the window frame.
At the moment, consumers are not limited in any way in choosing the appropriate model. You can purchase a pen from Chinese, Turkish, Austrian, German, Polish manufacturers and be completely satisfied with your choice.
The price category varies depending on the quality of the manufactured product and the country of origin: here everyone has the right to choose a pen themselves, based on their capabilities and wishes. A Chinese pen will cost you 200 rubles, a German one – up to 750.
How to prevent breakdown
To avoid having to think about how to adjust the handle on a plastic window, you need to treat the window device with care. There are a number of precautions that can be taken to protect windows from deformation and malfunction for a sufficiently long period of time.
- Firstly, immediately after installation, specialists recheck the serviceability of the mechanism several times: open and close the sash, study the functionality of the ventilation mode, turn the handle and watch how the lock moves. This way you can protect yourself from manufacturing defects and ask professionals to correct any noticed defects immediately, on the spot.
- Secondly, when opening and closing a window in everyday life, take your time: carry out the turns carefully, slowly. After all, it is the haste and rough use of the handles that leads to their jamming and inability to turn.
- Thirdly, if you are starting a renovation, take care to protect the window openings from clogging. Flying construction dust and dirt can quickly lead to mechanism dysfunction. If it is not possible to cover the windows and protect the fittings from clogging, do post-repair cleaning of the window elements.
- And finally, fourthly, do not forget to treat the fittings with a lubricant. The long-term functioning of them and the serviceability of the sliding sash system as a whole depend on this.
By adhering to the basic rules for preventing breakdowns and having studied the given instructions for debugging the most common malfunctions in the operation of the handle, you can quickly and easily adjust plastic windows yourself. Adjusting the handles is not as technically difficult as it might seem at first glance.
Be careful with the handles on your windows and you won't have to fix them.
Replacing gaskets
Sealing gaskets are designed to protect residents from cold that can penetrate from the street, from noise, and from moisture. But the sealant also loses its properties over time, and then the material needs to be replaced. This work is not such a labor-intensive process, so by following the algorithm of actions that will be given below, you can do it yourself.
But before you start work, you need to check the availability of the following materials and tools:
- Glue.
- Scissors.
- Seal.
The following is an algorithm of actions:
- You need to remove the old sealing material, after which you need to clean its place from dirt and dust, armed with a brush. After cleaning, you need to wipe the area with a rag.
- Now you need to apply glue to the corners and to those areas where the new sealing material will be fixed.
- Then you can begin laying the sealant cord. Excess parts must be cut off with scissors, and the joint must be glued with glue.
That's all! The old seal was replaced with a new one.