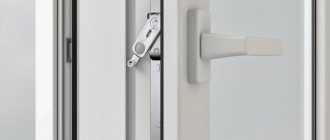
The nodes are numerous and interconnected: handles, transmission-actuating segment (gearbox), strapping, strikers on the frame, hinges, locks, switches, blockers, trunnions, elbow joints (scissors).
Is the load increased due to the high optionality and significant weight of the PVC double-glazed window? Therefore, the need to replace fittings arises quite often due to wear and tear. They also change the system if you are not satisfied with its type, for example, they remove the rotary system and install a tilt-and-turn system instead.
Let's consider when it is necessary to change the fittings, whether it can be done with your own hands, how to do it step by step, what is required, mistakes, difficulties.
What does the procedure mean?
Window fittings mean auxiliary parts, executive elements that provide control, operation, and adjustment. This is a set of mechanisms that open/close and move the valves in different modes. Of course, the fittings can be changed, leaving the same old sashes. If only some parts are broken, then you can update them specifically , for example, just scissors or a pen.
The number of fittings, their types, and design may differ slightly depending on the model, brand, and especially on the range of optionality and type of mechanism. There are such systems:
- rotary (including shulpovy);
- tilt and turn;
- with horizontal suspension: mid-hanging, transom;
- types according to the direction of opening of the valves;
- parallel-sliding (sliding windows).
The hardware parts themselves are divided into groups: hinged, tilt-and-turn, and locking. Let's consider replacing the kit of the most popular type - tilt-and-turn. The principles of the procedure are similar for all other options, and for rotary varieties they are similar.
To summarize, fittings are all metal functional parts and control elements. These are hinges, handles, shut-off valves (gearbox, hooks, mating parts on the frame and tongues, pins on the doors), parts of the ventilation system that provide movement and retention in certain modes (switches, scissors).
Here is an example of a standard kit:
- Pen.
- Constipation:
- lower;
- main (turn-out);
- rear.
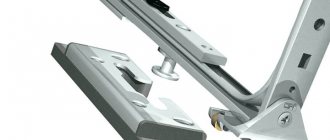
- Angle switches (gears): simple and for scissors.
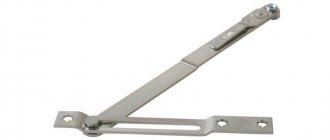
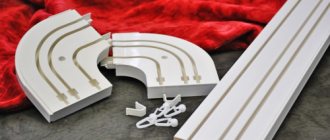
- Scissors (turn-and-tilt bar) and tires (slats, strapping, that is, reinforcing metal strips, power frame).
- Hinges: sash and frame parts.
- Decorative overlays for hinges.
- Microlift: lever and strike plate.
- Blocker.
- The seal is also an element of the fittings.
- Additional elements depending on the complexity and additional options: the handle can be with a key lock, limiters against sudden opening, protection for children, anti-burglary elements.
If we consider the fittings of plastic windows in particular detail, it also includes:
- pins;
- self-tapping screws;
- linings;
- latches;
- hooks;
- trunnions.
There are plenty of diagrams on the net; the names of the parts may differ slightly, but it won’t be difficult to figure them out.
However, to replace it, it is enough for us to know the names of the main segments, as in the drawing below, on which other and smaller elements are located.
The list of all fittings is large; you might think that installation would be difficult, since each part will have to be fixed separately. But this is not so: you only need to assemble a few solid elements on which other parts are already installed, and a small number of small spare parts.
Important! After replacing the mechanism, it will be necessary to adjust the shutters horizontally, vertically, and according to the pressing force, so that there are no distortions. In addition, it is necessary to provide lubrication, which is vital for plastic windows due to their large weight, many moving parts, and seals.
Diffusion tape
Installation of plastic windows requires the use of additional materials, such as diffusion tape. It is used for external finishing of the assembly joint together with vapor barrier tape or foam. In addition to providing vapor permeability, this material reliably protects the gap between the frame and the opening from moisture and exposure to direct sunlight, under which the polyurethane foam tends to collapse .
The diffusion tape is mounted outside the window opening
When finishing joints, diffuse material retains natural ventilation when unimpeded air exit from the middle part of the bottom seam is ensured.
When might it be required?
Details change in such cases:
- Breakdowns of a critical nature, when repairs do not give the desired results. In these cases, it is not necessary to change the entire system - if diagnostics are carried out and it is discovered that some specific parts are causing the incorrect operation, then only those can be updated.
- I am not happy with the optionality, for example, a rotating mechanism is installed, but it was decided to mount a tilt and turn mechanism.
This may not always be possible if the system types differ significantly in their design. If interchangeability is possible, then sometimes it is enough to change or deliver one or several units, but often it is necessary to radically update the entire system, as a rule, when products of a not particularly well-known brand are installed. - If the design does not work well: the doors often warp and begin to creak. In other words, if there is a desire to install better and more reliable products.
- Mechanisms become deformed and lose their geometry due to deficiencies in the fixing parts.
Incorrect operation of a plastic window does not always lead to a mandatory replacement of the fittings: for example, a sash misalignment often occurs over time due to natural wear and tear, and it is enough to adjust it. Stiff movement, not closing completely can occur due to irregular cleaning and lubrication (the mixture accumulates dirt over time, becomes abrasive, thick).
If irregularities are observed when setting window modes or fixing them in a certain position, then the scissors may have come out of the grooves, and it is enough to put them in their places. Looseness of the handle can be caused by spontaneous unscrewing of fasteners due to vibration - you just need to tighten them.
If we consider critical breakdowns that lead to the need for a complete or partial update of the fittings, then these are, for example, the following:
- The handle and its functional parts are broken.
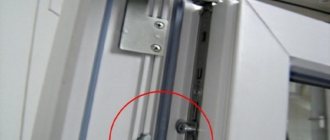
Of course, if there are similar small spare parts, for example a retaining ring, then it is enough to replace them. But usually there are rarely any spare individual special small elements of the handle on the farm and they are difficult to find on sale. Two parts of a broken body can be attached with self-tapping screws and reinforced with metal plates, but most likely the part will not last long, since constant loads will destroy even the highest quality connection if the element is not solid. It is more advisable to buy a higher quality handle made of a strong alloy (not plastic or silumin). - The gearbox is broken (crushed, cracked).
This is the response actuator-rotary part on the frame, which transmits commands from the handle, located immediately opposite it on the frame. It is a bar with a ring with a square cutout, into which a tetrahedral handle pin fits. Signs of failure - the handle, which is in good working order by itself, rotates, while control commands are not transmitted to the rest of the fittings. Usually this causes a grinding or squeaking sound. - Iron parts, hooks, pins, scissors, etc. were bent, fell off, cracked, and the hinge was torn out.
- Problems are constantly observed, the window does not work well, often jams, warps, the movement is tight - this means that the set is of poor quality, and here it is advisable to make a complete replacement.
Hardware repair
The main load during window operation falls on the fittings. Therefore, despite its high quality, safety and reliability, over time it can break, wear out and fail. However, everything can be easily corrected and repaired. In addition, the cost of repairs is low, and the work itself is carried out very quickly.
Repair of fittings is necessary in the following cases:
- the appearance of clicks, crunching or other suspicious sounds;
- fastenings become loose;
- basic elements do not work;
- the window seal is broken;
- the doors are difficult to open;
- the handle moves hard;
- The tilt-and-turn sash opens simultaneously in two planes.
What tools are needed?
The following tools will be required for the job::
- Tape measure, pencil, felt-tip pen - for measurements.
- Drill/driver with drill bits. If they install a copy/analogue of the system and all the holes match, then there is no need to make new ones, but if the system differs in the specified parameter, then it will be necessary to drill other seats, for example, for hinges.
- Screwdrivers (or one, a screwdriver with a set of bits): Phillips, star, flat (useful for lifting strips and trims).
- Pliers, pliers - for auxiliary actions.
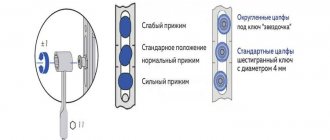
- Hex keys. In most cases, 4 mm, less often you come across models of fittings for 5 or 6 mm. These keys will also be used for final adjustment of the sash.
- Silicone grease (for seals, metal), machine oil, gun oil, WD for primary cleaning. Or special kits with care products for PVC double-glazed windows.
- Construction knife. Will be required when replacing the seal.
- One of the following tools: hacksaw, grinder, bolt cutter. For trimming/trimming strapping slats, slats. Metal scissors will not work as the parts are too thick.
- Special mounting handle for removing the sashes from their hinges. However, this can be done without it, but then you need to prepare a hammer to lightly tap the pin so that it comes out. The same mounting handle has a tetrahedral rod, that is, it can be used as a handle for a double-glazed window.
- Sponge and rags for cleaning – soft, non-abrasive (plastic is easy to scratch).
Separately, among the tools, we will highlight special templates (two: frame, per sash) for drilling holes for attaching hinges. You can do without them if you install an analogue, an exact copy, when the holes of these elements coincide. But if they install fittings with other options for placing hinges, then the specified tools must be available, since maximum accuracy is required.
Attention! When cleaning and lubricating plastic windows, you should completely avoid any products with solvents or cyanoacrylate - they corrode/weaken polymers and rubber.
The seal is lubricated only with silicone lubricants; products containing petroleum products (machine oil, grease) harm it. When cleaning, do not use abrasive brushes or sponges - if they are accidentally or intentionally passed over the plastic, it will lose its gloss due to micro-scratches.
Adjusting the horizontal position of the frame
To set the correct horizontal position of the frame, you do not need to repair the fittings or the windows themselves. You just need to move the sash in the desired direction, using the adjustments provided in both hinges. This operation is performed with a single tool - one of the VIRA hex keys.
Adjusting the horizontal position of the sashes can only be done if they are fully open. Only then will the nodes be visible, which will be discussed below.
To access the bottom hinge, remove the decorative trim, which will provide access to the adjustment groove.
To move the top of the structure in the horizontal direction, you should find the adjusting screw located on top of the sash in the top hinge block. The selection of the required position of the sash is ensured by turning the adjusting screw.
Pros and cons of working independently
The advantage of doing it yourself is saving a significant amount , which would go into the master’s pocket. It should be taken into account that at the same time you can carry out lubrication and adjustment, for which they charge a separate fee.
If a similar kit is installed, then only ordinary tools are required, the scope of actions is reduced. The planks simply snap into place, the parts are placed in the same places with the holes, and this is a significant advantage of this case.
But if you install fittings from other brands, you will often need to drill holes, at least for the hinges, as in our example, you will need two additional tools - templates.
This is a disadvantage of this particular option for self-replacement, since the devices are special and it is unlikely that the average user will have them on the farm.
The disadvantage of doing it yourself is that it is quite a troublesome task : you need to select a kit, you will have to remove the heavy sashes, hang them again, you may have to cut the slats. At the end you will need to make adjustments and lubrication.
How is installation done?
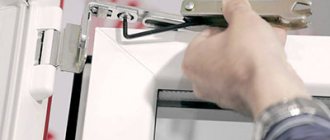
Installing fittings on plastic windows with your own hands can cause some problems, as it requires precise drilling of the frame for the parts. When purchasing accessories, make sure that they come with instructions: this will make the work much easier. First of all, strikers and fragments of elements are installed on the frame, which are located above and below the frame. After this, work must be carried out without violating the sequence:
- First of all, the corner drive mechanisms are installed. The main element must be fixed only in the open position of the sash: it must be selected strictly according to its size. The drive type can be either constant or variable. It depends on which side the additional strip will be on and how many of them will be needed. Don't forget to make holes for fasteners. Please note that moving structural elements should not be fixed; they should still be able to move along the contour.
- After this, you can install the scissors.
- Installation of hinges and sashes. Before securely tightening the fasteners, you should check whether the sash closes correctly and whether it is locked in the closed position if it is level. If necessary, you can adjust the fittings.
Fitting adjustment points
It is not difficult to check the correct operation of the sash: to do this, you will need to see how easily the handle opens. It should turn easily, without any difficulty. If a problem occurs, the elements that were installed incorrectly are removed and reinstalled.
Possible difficulties and errors
Common mistakes when replacing PVC window fittings yourself:
- Placing the trunnions in the wrong position, their mismatch with the mating parts, hooks.
- Use of ordinary rather than elongated self-tapping screws (38...45 mm) for fastening hinges.
- Do not remove burrs when cutting slats.
- They forget to lubricate and clean.
- The order of an event is incorrect, if a specific version of it is provided for in the instructions for a certain product (below is an example of a VHS brand manual).
- Do not use templates when drilling new holes for hinges: even a fraction of a mm matters here. It is entirely possible to carry out this procedure manually, taking very careful measurements, but at the user’s own risk, it will be impossible to correct the error.
Our services
offers services for repairing broken fittings, as well as replacing faulty elements.
Services of our company:
- cleaning and lubrication of moving elements;
- adjustment;
- replacement of parts;
- changing the opening method;
- tightening of fastenings;
- modernization;
- installation of additional mechanisms.
Remember that timely contacting specialists in case of hardware malfunctions will allow you to avoid expensive repairs and complete replacement.
How much does it cost: average prices
When ordering services, you must take into account that most companies do not work with customer materials , that is, you need to clarify which brand is used.
The cost includes the price of products and installation; there is a minimum amount for a free visit (for example, if the order is over 2,500 rubles). The figure depends on the brand of fittings: there are expensive products (MACO, ROTO), mid-segment (Winkhaus) and cheap (Turkish Vorne, Kale). They charge a separate fee for lubrication and adjustment - this significantly affects the final estimate.
Average prices for replacing a complete set of fittings (without cleaning, lubrication, adjustment) range from 4,000 to 6,000 rubles.
Features of plastic windows
Plastic structures are more popular and affordable. They have the following advantages:
- Installing fittings on plastic windows is not difficult; the structures can be easily disassembled.
- Plastic is not afraid of external influences and can be used in any climate zone. It does not rot, does not burn, does not require additional maintenance and care, and is not susceptible to infection by fungus or mold.
- You can choose a design not only of the standard white color, but also one that imitates other materials, for example, wood of different species.
- Copes well with heat and sound insulation.
- Long term of use.
- Affordable price.
- Possibility to order a design of any size and any complexity.
The disadvantages include the following properties:
- Inability to microventilate. You have to either ventilate manually or install special valves for this.
- In cold temperatures, the plastic narrows, and in warm weather it expands, so the hinges need to be adjusted every six months so that the window does not warp during the season.
- In case of serious mechanical damage, a separate fragment cannot be repaired, and the window must be replaced completely.
Installation of fittings for a plastic window is carried out taking into account the design features; the choice of fittings largely depends on what type of opening is planned and what functions the window should have.
Conclusion:
There is such a saying. If you want to do it well, do it yourself. This statement best describes window installation.
If you install plastic windows yourself, then such installation will be much better and cheaper. The approximate price of three types of tapes is 1000 rubles. The cost of installation from the company according to the “bungle-blunder” principle is 2500-3000 rubles. Total direct savings for self-installation will be 1500-2000 rubles.
At the end of the article, I suggest watching two videos on this topic.
Removing the old window
Before dismantling, it is advisable to close the doors to the room and cover all things and furniture in the room with film. This is necessary to make it easier to clean the room from dust, as there will be a lot of it.
Everything else is simple. The window sashes are removed. They are easy to remove with a pry bar. Then the old frame is sawn and dismantled using a crowbar or pry bar.
After removing the old frame, it is necessary to remove the plaster layer around the perimeter of the window opening.
If time permits, it is advisable to putty all the cracks and irregularities in the window opening. Mostly, this stage is skipped, since no one wants to wait a day for the putty to harden. Therefore, at least do not forget to cover the window opening with primer.
We remove the doors.
During dismantling, you cannot do without a wood saw.
Removing the old window.
Preparing to install a window structure
After you remove the old window, you will need to inspect the resulting opening, remove all parts that may fall off or collapse; if there are protruding elements, they should be knocked down. Then clean the opening from construction debris and dust. If there are large depressions, it is better to cover them with cement. You can also treat everything with primer.
The base will need to be cleaned before installation.
(function(w, d, n, s, t) { w[n] = w[n] || []; w[n].push(function() { Ya.Context.AdvManager.render({ blockId: "RA-510923-1", renderTo: "yandex_rtb_R-A-510923-1", async: true }); }); t = d.getElementsByTagName("script")[0]; s = d.createElement(" script"); s.type = "text/javascript"; s.src = "//an.yandex.ru/system/context.js"; s.async = true; t.parentNode.insertBefore(s, t) ; })(this, this.document, "yandexContextAsyncCallbacks");
Having finished working with the opening, you need to prepare the PVC window, which is to be installed. To do this, you need to remove the window sashes; if it is solid, double-glazed windows. If your frame has small dimensions, then you can install it without removing the double-glazed windows and sashes . The outer part of the frame should be freed from the film that protects it.