Roller blinds “Day-Night” are a new word in window sun protection systems. The main purpose of the new product remains the same as that of conventional textile curtains, blinds or Roman blinds - control of the level of light. But thanks to innovative technology, which allows you to adjust the lighting in a room from complete darkness to partial shade and bright lighting, day-night roller blinds are becoming increasingly popular.
Roller blinds “Day-Night” combine practicality, versatility and aesthetics
Description, distinctive features
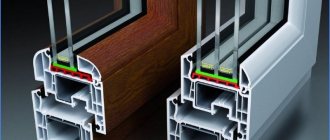
“Day-Night” is a simple design that consists of only three parts - a fabric sheet, a rotating shaft and a weighting tube. The closed type also has a plastic box.
The main parts of the “Day-Night” type curtains
The principle of operation is approximately the same as that of most roller blinds. But there is one significant difference. In conventional roller shutters, the fabric consists of one layer and falls only on one side of the driving shaft. The day-night system is double, consisting of two layers. The fabric is on both sides of the shaft.
The main difference between the “Day-Night” curtain and other rolled products is its unusual fabric, consisting of transparent and opaque strips
Operating principle
Roller blinds contain small features of classic curtains and standard blinds. In the situation of blinds, the principle of operation involves winding them onto a shaft, thereby covering the window opening. And in a roll system, day and night, the strips of fabric remain in the same plane.
The darkened part will block the sun, but, nevertheless, transmit sunlight through the light areas. If necessary, you can raise the product, and then sunlight will fill the room.
How do day-night security roller shutters work?
The canvas is assembled from strips of fabric of different densities - from translucent to light-proof. They are arranged alternately, which is why day-night roller shutters are often called “zebra”. When the shaft rotates, the fabric passes in a circle, the strips overlap each other, forming the desired degree of illumination. If two transparent strips are combined, then soft, diffused light enters the room. If the transparent strip is blocked by a dense one, then the room will be in semi-darkness.
By turning the mechanism you can get one of three options for lighting the room
This design allows for smooth light transitions, letting in the right amount of light into the room. At the same time, the person inside the room remains invisible to prying eyes from the outside.
Assembly of vertical blinds
Vertical blinds are installed exactly as described above. The difference is that the slats are installed after the cornice (the guide along which the runners move) has been secured. For convenience, before attaching the slats, you can use an adjustment cord to turn the sliders so that the slots in them are perpendicular to the cornice. Next, we simply snap the slats into the runners, inserting the strip until it clicks. So, we fasten all the slats one by one.
Fastening plastic vertical slats
If the slats are made of fabric, then after installing them do not forget to insert the lower weight. Next, we attach the lower connecting chain to the lamellas.
How to assemble vertical blinds
The installation of vertical blinds is complete.
What is the fabric made of?
The fabric is made of high-quality synthetics with Teflon impregnation. Thanks to this, the material is easy to care for - easy to clean, repels dust, is highly durable and antistatic. In addition to increased functionality, roller blinds have excellent design characteristics.
Synthetic curtain fabric does not fade in the sun and does not attract dust
Clean the curtain with a dry brush or a vacuum cleaner with a special attachment.
Transparent stripes look like organza. Dense stripes can be made in various variations - plain, decorated with patterns, with a shiny coating. A wide selection of colors allows you to choose a model to suit any room design.
Fans of natural materials can choose curtains made of viscose or silk
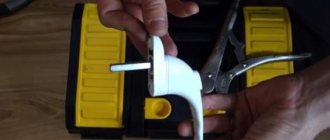
What tools will you need?
For high-quality adjustment and final elimination of the problem, a small number of tools are required. They are in every home and are always at hand, so adjustments can be made at home. You will need the following tools:
- pliers and pliers;
- machine oil or aerosol;
- standard Phillips screwdriver;
- 4 mm hex key;
- screwdriver or Phillips screwdriver bits.
The priority tool that you must have from this list is a hexagon. It is also used for furniture repair, so having it in the house is very useful and important. The remaining tools will help fasten the bolts that have become loose holding the window sashes together. These tools help restore the original distance between the sashes, thereby raising them and eliminating the problem.
Types of zebra roller blinds by type of control
- Chain.
Control is carried out using a plastic chain. If you pull it, the rotation mechanism starts. To stop it, it is enough to stop controlling it. The canvas will automatically lock at the desired height. Chain control is the most common way to regulate curtains - Remote.
The electric drive does not require an electrical cable. The motor has a built-in battery, which is charged using an adapter. At the same time, the charge lasts for a long time - for 6 months or more. The automation is controlled using a remote control. You don't have to get up from the sofa to open the motorized blind - Spring. Non-automatic control is carried out using a spring, which constantly keeps the winding shaft in tension to roll the web. There is a special mechanism for fixing it in the closed state. This could be a handle, a hook, a ring, or a hole in the bottom bar.
Setting in winter mode
In the autumn period of the year, it is recommended to switch the window system to winter mode. This will avoid heat leakage from the home and the appearance of drafts.
Sometimes before winter the windows may not be adjusted. This usually depends on the condition of the sealing rubber. If it is new and in good condition, then the windows can be left in “summer” mode and not worry that it will be cold in winter. But if the rubber has already worn out and lost its elasticity, then you should think about reconfiguring the window.
Adjusting windows for winter
Advice! The windows must be switched to summer mode in any case. In this case, less pressure will be exerted on the rubber seal and it will last longer. It is also advisable to regularly clean the rubber band from dirt and lubricate it with a special silicone lubricant.
In general, during the first three years of operation, the windows serve without any complaints, even in summer mode. Then natural wear and tear of the elements is noted, and adjustment is no longer possible. The degree of window pressure will have to be increased every year. But you shouldn’t “tighten all the bolts” right away, so as not to deform the seals ahead of time.
During the first three years of operation, the windows serve without any complaints.
It is easy to determine which mode the windows are currently in. It is necessary to inspect the sashes and assess the degree to which they are pressed against the frames. To do this, you can take a piece of paper and insert it between the frame and the window, and then close the window. If, after it has been closed, the leaf falls out or is easily pulled out, then the window is in summer mode and needs to be adjusted. If the sheet sits tightly or breaks when you try to pull it out, then the window is in “winter” mode and does not need adjustment.
Do-it-yourself adjustment of plastic windows “winter-summer”
You can also see how the eccentric is oriented. There is a special mark on it that will show how the window is configured. If the pin is turned towards the street, then the window is in the “summer” mode; if it is oriented towards the apartment, then the window is in the “winter” mode. If the trunnion is oval, then you need to look at how it is positioned: if it is vertical, then the window pressure is weak, if it is horizontal, then the pressure is stronger and this is winter mode.
On a note! When the eccentric is in the middle position, the window is adjusted for spring and autumn.
Locking pin (or eccentric)
How to install roller blinds day and night on plastic windows?
Before installing the zebra, you need to decide where it will be placed - on the sashes, on the wall or in the window opening. Then installation is carried out depending on the type of fastening. There are three types of fastening:
- Self-tapping screws.
- Brackets.
- With special tape.
Installation using self-tapping screws
- We assemble the roller shutter and install the chain mechanism on the side where it will be convenient for you to operate it.
- We make markings on the profile with a pencil: mark the location of the first bracket. Drill a hole and install a dowel. We screw the mount.
- Mark the location of the second fastening. To avoid distortions, use a level. Install the second bracket.
- Next, installation is carried out according to the instructions that come with the device.
Installing curtains with self-tapping screws
Important. To prevent the curtain from sagging, it is recommended to additionally install a guide line or string.
Installation of curtains with string included in the kit
Installation using brackets
In this case, brackets on special tape are used. This type of mount is best suited for sash windows. Installation instructions look like this:
Installing a curtain on a moving sash without drilling the frame
- Remove the protective film from the tape on the back of the brackets.
- We attach brackets to the top of the open sash.
- We install the structure according to the diagram attached to the manual.
Installation with tape
The easiest way to fix the roller blind, since no drilling is required.
- We use a special degreasing compound to treat the window profile in the places where the zebra stripe will be installed.
- Remove the protective layer from the tape and glue it to the profile.
- We carry out installation according to the instructions.
How to install curtains with double-sided tape
Important. Before gluing, the tape needs to be heated a little. This way it will be better fixed on the profile. Use a regular hair dryer for these purposes.
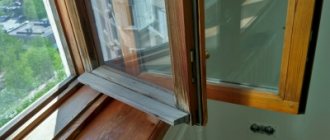
Distorted sash geometry
Soon after installing the window, the sash becomes noticeable clinging to the lower part of the frame or individual parts of the fittings. There is a fact of sagging. The greatest likelihood of such sagging is associated with violation of the rules for transporting the plastic system. Deformation occurs at the time of delivery of the finished product.
If the problem of sagging due to broken geometry is confirmed, it can be restored thanks to the glass block of the sash itself. It is enough to return the sash to the correct shape. It is recommended that work to correct the geometry of the sash be carried out by specialists.
links to materials that complement this article: How to properly care for plastic windows?
How to make plastic windows ventilated?
What to do if the plastic window does not close well?
Photo ideas for decorating windows with curtains “Day-Night”
PreviousCurtainsSizes and types of ceiling curtains: mounting methods
Next
CurtainsRoller blinds for plastic windows with photo printing
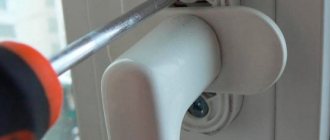
Adjusting and replacing handles
A fairly common problem: the handle is difficult to turn. If the problem is not eliminated in time, due to excessive efforts, it breaks, leaving a short stump with which you definitely can’t do anything.
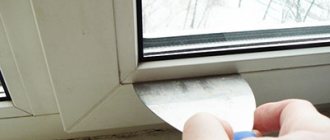
First, how to make the handle close again easily. The locking mechanisms must first be cleaned and lubricated. First, accumulated dust and dirt are removed, wiped dry, then all moving parts are lubricated. You need to use pure oils, without alkalis and acids. The best option is machine oil, you can use any analogue or modern product from a spray can.
Places for lubrication of plastic windows
Having lubricated all the rubbing and moving parts, open/close the sash several times and turn it on its hinges. Everything should move smoothly, without jerking.
If there are still problems, most likely during the process of adjustments or changes in the geometry of the window, the blocker has shifted. It should fit easily into the mating part and press tightly against the frame. Then the handle turns easily. Move the sash and try again.
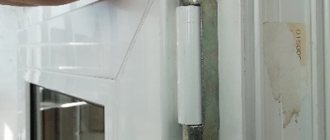
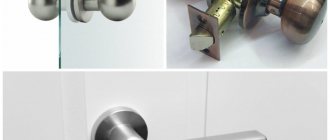
Now about how to change the handle. The fastener on which it is held is hidden under a decorative overlay. If you look closely, you will see that there is a thin lid. You grab it with your fingers or pry it with your nails, pull it slightly toward you and turn it to one side. Two bolts open. They are unscrewed, the handle is removed, and a new one is put in its place.
The fastener is hidden under a decorative trim
We looked at the most common problems and how to fix them. Now not only is adjusting plastic windows not a problem for you, you can also do minor repairs yourself. You can also carry out maintenance yourself (lubrication once a year).