When choosing a Euro window, few buyers pay attention to the sash, which provides the window with functionality and the room with an interesting interior.
Therefore, it is considered an important element of the window unit and can be produced with different characteristics.
In order to replace the sash, you do not need to buy a new entire window unit; you can simply purchase a less expensive special repair kit.
What does it represent?
A window sash (OS) is an element of a window structure that holds a double-glazed window, which is installed for ventilation of the room and maintenance of the window unit .
It can be movable or fixed, rotary, folding and combined.
also be produced in any geometric shape from rectangle to circle.
The most functional sash is an opening one; it is fixed on the hinges of the main frame, can open in several ways, and has stops and a lock. Its task is to ventilate the apartment and provide fresh ventilation.
Important! Each room must have at least 1 opening OS in order to ventilate the room, wash the window or carry out any type of maintenance.
In appearance, the sash is similar to a separate blind PVC window. It also has its own base, made up of a frame profile. In which a similar double-glazed window with smaller dimensions is installed.
A locking mechanism is attached to the block in a specialized groove - for different opening/closing modes and other fittings: hinges, locks and a handle. One group of elements is installed on the impost, and the other in the sash frame part.
Why is it needed?
The purpose of the sashes is to provide ventilation and window maintenance. They are important to the overall design and durability of the window structure . Therefore, they are made durable so as not to deform during operation.
Otherwise, this will lead to improper operation of the window and even blocking or leaking of the structure, which will become a source of drafts in the apartment or house.
During operation, the window sash
can be adjusted .
And if it cannot be adjusted due to warping of the frame or worn-out fittings, it must be replaced with a new one from a special repair kit.
To accurately integrate the new OS into the old frame structure, it must be of the same brand as the main frame.
Adjustment issue
Cases of need for regulation:
- With an old and worn-out structure.
- With incorrectly installed windows.
- If the sash is not closed tightly enough.
- When the window sash sags.
- When the shape of a window sash or frame changes due to an installation error.
- When the sash leaks or freezes.
Tools required for adjustment:
- screwdrivers of different sizes;
- hexagons;
- star-shaped keys;
- pliers.
Related article: French windows in an apartment
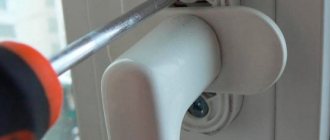
Horizontal adjustment is made on the sash hinges with a hexagon recess. When the window structure is open, the hexagon is inserted into the recess and rotated clockwise.
As a result, the sash structure moves away and its opposite side lowers. Regulation of the lower canopy is carried out externally with the window structure in the closed state. Its shift is carried out no more than 2 mm.
Vertical adjustment is possible using a hinged loop located at the bottom. Start by lifting the cap. When the hexagon rotates clockwise, the sash element is raised, and counterclockwise, it is lowered. It is permissible to adjust the window by only 2 mm.
To press it to the frame, the eccentric is shifted clockwise, to loosen it - counterclockwise. To change the state of the eccentrics, which is the same for each of them, a rotation of 2 mm is sufficient.
Determination of the pressing density is done by scoring. When it is directed toward the seal, there is tight pressure. When it is directed away from the seal, the pressure is weakened.
Depending on the type of profile, you can use a wrench or pliers to turn the eccentrics. Pressing with plates is also possible.
In this case, the clamping mechanism with the tongue is located on the hinge side. When the tongue is extended, the sash is pressed against the frame. When the hinges are located on the left for pressing, the key rotates counterclockwise, when positioned on the right, the key rotates clockwise.
Adjustment is recommended to be carried out in spring and autumn. In spring, air flows will penetrate the room and reduce the load on the window mechanism. In the fall, this will get rid of drafts.
It is more correct to carry out the adjustment along 3 planes in order to distribute the mass along the perimeter of the sash and ensure the seal fits.
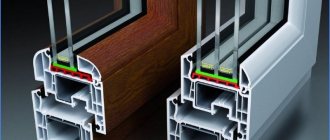
What does a PVC window structure consist of?
A standard, rectangular OS consists of the following main components and elements :
- The frame profile can be made from various raw materials and made in a Z-configuration. The upper convexity is responsible for mounting the glass, the lower one is responsible for pressing it to the frame.
- Double-glazed window.
- Accessories for the functioning of the sash.
- An impost that divides the OS.
- Beads securing the glass unit to the OS.
Important! In addition, the OS is equipped with a polymer seal in the form of a cord, which ensures the tightness of the areas where the sash is pressed against the frame, preventing drafts from entering the room.
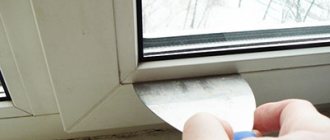
Preparatory work
During dismantling, construction dust is generated, so it is wise:
- cover the floor with dense material, for example polyethylene;
- free the room from equipment and household items;
- insulate walls and furniture with protective film.
Protect the workplace by pulling marking tape, which is important during large-scale work on replacing window openings on the street side in order to prevent construction debris and elements of the old frame from falling on passers-by.
Requirements
The design of windows and sashes is subject to the requirements of dozens of regulations in the field of materials, manufacturing technology, installation and operation.
They are subject to the following basic requirements :
- It must be strong, reliable and durable with a service life no less than that of the main window frame. Many well-known manufacturers of PVC blocks set their products to have a service life of at least 50 years.
- High level of safety, since it has moving parts so as not to pose a threat to the lives of users and neighbors.
- High quality glass units.
- Energy efficient, should not be a source of cold air entering the apartment.
- High heat and noise protection.
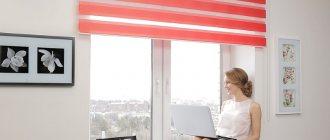
Features of washing balcony windows
Due to constant contact with the external environment, dust, drops, splashes, smoke, and exhaust gases accumulate on the surface of window glass and frames. Washing balcony windows is a labor-intensive and time-consuming process. The most convenient in this regard are sliding structures. To reach their top, you do not need to stand on a stepladder, stool or other elevated surface, since they are easily removed.
It is enough to pick up the plug with a screwdriver, hold the sash along the edges, and then lift it and pull it towards you by the lower edge, remove it from the guides and release it. After washing, you need to wait until it dries completely and insert the sliding balcony window into its place, performing the above steps in reverse order.
To more accurately understand how to remove windows on a balcony, instructions that differ for each type of frame material will help.
How to clean balcony windows on high floors
It is important to follow basic safety precautions:
place working tools and cleaning products in a convenient place at a short distance; take care of a stable position during the washing procedure; use cleaning tools with long handles; put on a safety belt (fasten one end around your waist, and attach the other to a heavy, stable object); Do not start cleaning windows if you are not feeling well.
To work you will need the following tools:
- sponges with a soft texture (products with an abrasive surface are not suitable);
- containers for clean water and detergent solution;
- absorbent microfiber cloths;
- scraper with a rubber nozzle and a long handle;
- stable stepladder.
In order to combat more severe pollution, it is recommended to use any of the types of mops:
- regular, equipped with a soft nozzle and a long handle;
- steam, which cleans the surface of the glass with steam and does not require the use of detergents;
- telescopic, equipped with rubber and microfiber attachments.
Window cleaning procedure
Standard regular cleaning of balcony windows is carried out using an aerosol cleaner. It should be sprayed onto the glass surface and wiped with an absorbent paper towel.
During the procedure, you need to pay attention to the corners where the maximum amount of dirt, dust and remains of dried insects accumulate
The disadvantage of this method is the inability to overcome old traces of stains, soot and other contaminants.
Alternatively, you can prepare the solution yourself. Add table vinegar or a mixture of ammonia and salt to warm water.
Apply the resulting liquid onto a foam sponge and spread it over the glass in a circular motion. Next perform the following steps:
- Wet a rubber scraper in warm water.
- Run along the glass, moving from the top to the bottom, but not reaching the very bottom.
- Rinse each time in clean warm water.
- Remove any remaining dirt using a scraper, moving horizontally.
- Finally, wipe the surface with paper towels to ensure no streaks remain.
What varieties are there?
Window sashes for Euro-windows are grouped by type of opening :
- Rotary with rotation relative to vertical hinges .
Their advantages include the possibility of ventilation, a lower price of the product than that of tilt-and-turn designs, and they are convenient to clean and maintain. The disadvantages include a small number of pressure points, which can be a source of drafts. In addition, in order for nothing to prevent such a sash from opening, the window sill must be free. - Folding with rotation relative to horizontal hinges, open only from the top. The preferred design for small rooms, since the OS does not take up additional room space.
The advantages of the design include the possibility of ventilation, the tight fit of the OS to the frame, which does not allow air flow to leak through it, you can use a window sill at the discretion of the owner, since it does not affect the operation of the OS.Disadvantages include low level of maintenance and inconvenience of cleaning glass units.
- Tilt and turn - has two types of opening, horizontal and vertical, so it can open in any position.
This design is the most preferable, since it has absorbed all the advantages of the previous two variants of sashes. Users cite the high cost as a disadvantage. - Non-opening , the cheapest option, saves the customer up to about 3,000 rubles per sash.
Its advantages also include good light transmission and the ability to use a window sill in the form of a shelf. Disadvantages include poor functionality and maintenance, and the inability to ventilate the room.
How not to make a mistake in choosing?
After the block model is selected, the sash is selected primarily by opening type .
The most preferable option for both apartments and private cottages is a tilt-and-turn window with micro-slot ventilation.
Next, they pay attention to the PVC profile, and there are 3 classes: premium, standard and economy. The first ones are the most reliable, but at the same time expensive.
Important! The more expensive the profile, the higher the energy efficiency of the window unit, since thermal insulation is guaranteed by internal air chambers, and strength is guaranteed by metal reinforcement. In addition, the higher the class, the thicker the outer wall.
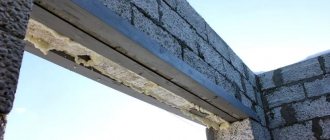
Cut the frame
Cutting the frame with a grinder on concrete
Make several cuts on the frame using a regular saw. You can also use a grinder with a concrete attachment, but the formation of dust will be more significant. Please note that you should absolutely not use a regular nozzle for metal, as it can get stuck or burst, which in turn is very dangerous. The wood bit will also not work.
Step-by-step installation instructions
Before installation, decorative caps are placed on the hinges, since if the OS is already installed on the frame, it will be very difficult to put them in place.
Check the position of the handle on the sash - it should be in a horizontal position. If it is in a different position, then first install the microlift vertically downwards, otherwise it will be blocked.
Check that the handle is attached to the OS correctly, and in a horizontal position, the locking fitting pins are located exactly between the 2 risks that correspond to the middle position. Now you can begin installing the sash on the frame.
First, hang it on the lower loop, then insert a corner loop into the upper one and fix it with a pin, pushing it up until the latches engage.
Note! For easy insertion of the pin into the hinge hole of the hinge without jamming, the sash is pressed with its plane against the frame. In this position, the flat pin cut should align with the proper protrusion located in the inner hole of the hinge.
Learn more about how to install the sash yourself in the video:
How to remove the flap of a plastic window
To figure out how to remove the flap of a plastic window, let's look at its features. Canopies in this design are horizontal. Therefore, the dismantling process must begin with the removal of limiters. There is a lever on both sides of the window door. It must be turned so that the bar comes off the mounting slot.
To remove the limiter, you need to turn the lever clockwise; you can remove the bar with a screwdriver. Then you need to remove the decorative casing, remove the pins, open the locking elements and the entire structure will be removed. The second fastening element is also dismantled.
There are other methods of dismantling the structure. Sometimes users wonder how to remove the swing sash of a plastic window. To do this, you can use the following dismantling method:
- Remove all foreign parts near the window;
- Make sure the structure is closed;
- Remove all decorative parts from the loops using specialized equipment;
- Pry the edge of the pin and press it on top;
- Grab the tip of the spindle with pliers;
- Pull the elements out of the sleeve and support the structure with your hands;
- Remove the bottom pin.
When all the elements have been repaired and installed in their place, you can begin adjusting the plastic window sash.
Possible difficulties and errors
How the window will function as a whole depends on the correct installation of the sash on a PVC window. It will be very difficult to practically correct mistakes made during selection and installation ; the sash will not be able to close tightly, cold air will enter the room, it will be cold and the owner of the room will have to spend more on heating.
In addition, incorrect installation of the OS leads to severe fogging of the glass block.
The main mistakes made when installing a sash:
- Incorrect OS type selected.
- Violation of installation technology.
- The handle is not set to a horizontal position.
- The pin is jammed in the hinge hole.
- The fitting pins were not set to the middle position.
Easy removal method
If you need to repair a double-glazed window or remove the door to bring bulky objects into the room, then dismantling is simple. Especially when you have already had to deal with window installation or see how craftsmen work.
You will need a simple set of tools. To release one door:
- open the handle, find the loop in the upper corner;
- remove the pin;
- lift the structure up;
- remove after the fastening element has been removed.
When might replacement be needed?
In fact, for good PVC window manufacturers and owners who properly operate such a structure, the sash should last as long as the main frame. In practice, the service life of such units exceeds the figures stated by their manufacturers.
Note. Major failures of the sashes occur due to the fault of manufacturers if they have manufactured a low-quality product.
Cases when it is necessary to replace the sash:
It does not perform its functions, does not open, which makes it impossible to maintain the window as a whole.- Violation of the indoor microclimate due to lack of ventilation.
- Due to technical and climatic characteristics, it is impossible to install a new PVC window.
Required Tools
For this technological operation, you will need tools to dismantle the old sash and install a new one:
- folding knife and chisel for removing glazing beads;
- pliers;
- a set of screwdrivers with replaceable heads;
- rubber mallet;
- electric screwdriver.
How to remove it with your own hands?
First, a set of preparatory interior work is carried out: they cover the floor with thick polyethylene and clear the work area of excess furniture and equipment.
Important! Before starting work, it is necessary to make an external fencing of the area under the window so that the dismantled parts of the window do not fall on your head.
algorithm for dismantling a PVC window sash:
- Check that the OK is tightly closed so that after removing the stem it does not fall out.
- Remove the figured panels from the two hinges. To do this, insert a thin flat screwdriver between the frame and the cover and lift it slightly, after which you can simply remove it by hand.
- Release the upper loop from the iron cotter pin. Press on it from above with a screwdriver so that it goes down a little, then grab the tip with pliers and pull it out.
- Holding the OS with one hand, use the other handle to open the lock.
- Lifting the OK slightly, remove it from the lower loop rod.
More information on how to remove the target can be seen in the video:
Tools
Independent removal of double-glazed windows requires the following equipment and tools at hand:
- pliers;
- putty knife;
- chisel, screwdrivers;
- knife with a folding blade;
- medium sized crowbars;
- hacksaw for metal and plastic;
- chisel, hammer;
- screwdriver;
- hammer drill
Average prices for products
The cost of the sashes depends on the brand of the main frame, the type of opening, size, quality of fittings and metal profiles. In the retail chain you can purchase sashes at the following prices :
- Deaf up to 0.5 m2, 2000 rub.
- Rotary up to 0.5 m2, 2980 rub.
- Tilt-and-turn with micro-ventilation up to 0.5 m2, 4590 rub.
- Deaf over 0.5 m2, 2400 rub.
- Rotary over 0.5 m2, 3670 rub.
- Tilt-and-turn with micro-ventilation over 0.5 m2, 6480 rub.
Prices for the service
The installation of a PVC window sash depends on its area, type of operation, manufacturer's brand and number of floors of work. For example, in Moscow and the Moscow region, these works can be ordered for the following price of one set :
- Removal of a rotary OS and installation of a tilt and turn over 0.5 m2, 1450 rubles.
- Removing the rotary OS, installing a tilt and turn one up to 0.5 m2, 1130 RUR.
- Removal of blind OS, installation of rotary, up to 0.6 m2, 7500 rub.
- Removal of blind OS, installation of tilt and turn, over 0.6 m2, 9500 rub.
Important! For sashes over 1.5 m2 prices increase by 20%.
Components of the limiter
A typical blocker is called a “comb” or “crocodile” due to the appearance of the device. The latch has a simple design and operation scheme.
The simplest model of a window stop consists of two parts:
- Comb. An extended bar with grooves and a hinged connection for raising/lowering the mechanism. The number of “notches” on the plate determines the opening range of the window. The most popular are four-position models.
- Latch. The response part is located on the movable sash. A small metal pin holds the comb in position.
Window stop device
The use of a limiter involves selecting the window opening level and placing a pin between different positions of the comb.
Making a limiter with your own hands
For the windows of a country house, you can build a homemade device to regulate ventilation. You will need some simple materials:
- a piece of wire with a diameter of 2-3 mm;
- 2 small nails - will act as a pin;
- 2 large nails - for making staples and then fixing the limiting device on them.
Making a window blocker
Assembly algorithm:
- Bend the wire in half, forming a loop in the middle and small curls along the edges.
- Make an arch using long nails. Use pliers to give them the desired shape.
- Drive staples from long nails into the fixed frame of the sash at a height convenient for adjustment.
- Thread one end of the wire into the bracket.
- Attach a small nail - a tripod - to the movable door.
- To adjust and fix the position, the wire ring must be put on the clamp.
If the invention provides several turns of wire, this will expand the number of window opening modes.
A homemade device does not require financial investments, but in terms of strength it is noticeably inferior to purchased analogues.