Modern metal-plastic translucent structures are complex systems. They consist of many parts, the purpose of which not many buyers know. But all the components of a plastic window make up the cost of the finished product. Therefore, some users try to reduce the cost of purchasing a new glass block, sometimes refusing those elements that, in their opinion, do not affect the functionality of the entire structure.
But this approach can lead to sad results. Therefore, do not rush to refuse to purchase some parts. It’s better to try to understand their purpose, and only then make a decision.
The most mysterious element in a plastic window is the microlift. This element of the system is needed to swing open and fix the doors of the structure in a certain position. And this detail is not a luxury, but one of the components of the window model.
Microlift for plastic windows
Modern plastic windows are very complex structures. They consist of many parts, the functions of which not every user can understand, although it is quite obvious that any component is an integral part of a single system.
Many people, when ordering plastic windows, try to save money by discarding “extra” structural elements whose purpose they do not understand. However, such savings can cause significant costs in the future.
One of the elements of plastic windows, the necessity of which is beyond doubt, is a microlift. It is clear that a microlift significantly simplifies the procedure for opening and closing window sashes, but without it this process is not so labor-intensive. Maybe this is an unnecessary luxury in the composition of window fittings? The answer to this question is this: a microlift is not an excess in any window design, and sometimes it is simply irreplaceable for plastic and other windows.
Expert advice
- In order to protect the door from damage and eliminate the need for frequent adjustments, you can install an opening limiter. This device will protect the hinges from becoming loose, as it will prevent them from touching the door jamb.
- Another useful device is a microlift. It takes on the weight of the door leaf in the closed position and prevents it from sagging.
- To extend the service life of the seal, it must be treated with silicone grease.
- You can't hang anything on the door handle.
- All parts of the opening mechanism must be lubricated regularly
Following these simple rules will extend the life of the door, avoiding frequent adjustments.
The operating principle of a microlift for plastic windows
A microlift is a mechanism located on the side of the sash and controls the process of opening/closing the window. The structure of the mechanism is formed by two strips, one of which is fixed to the window frame, and the other is located on the sash frame. At the moment of opening the sash, the strip fixed on the frame “rolls” onto the counter strip, which is fixedly fixed to the frame. As a result, the sash rises by 3 mm, relieving the window hinges of the load. During the reverse stroke, the sash easily and smoothly returns to its original position.
Modern microlifts are usually combined with erroneous opening blockers, which protect the sash from “sagging” on one hinge due to inaccurate opening of the window. The joint operation of these mechanisms protects against damage caused by sagging sash.
Currently, there are microlifts that regulate the operation of window systems in both tilt and turn modes.
How to adjust MACO fittings yourself?
November 19, 2015
09:40
What to do when you need to adjust the window sash, but you can’t call a technician, for example, on weekends? Global hardware manufacturer MACO has developed convenient and clear instructions for users on how to properly adjust their products. Moreover, specialists from a well-known brand have created a guide that allows you to prevent and avoid problems with fittings. It turns out that learning this tricky business on your own is not at all difficult.
Adjust the sash horizontally (right-left)
Incorrect horizontal position can be corrected by adjusting the lower, upper hinge and swing-out scissor mechanism.
Bottom Hinge Adjustment
First the loops. Find the second screw on the side, near the base of the sash. We will regulate it. By moving the key non-clockwise, you move the door away from the hinge; by moving it clockwise, you move it closer.
Adjusting the top hinge
We open the sash: on top, near the hinge, there is a slot in which there is an element, by adjusting which we correct the incorrect position. We use a hex key, turning it left or right.
Adjusting the scissors
Now you need to adjust the scissors, which are located at the top of the sash. Locate the adjusting screw on the stationary bar of the scissors.
Operate it clockwise or counterclockwise as in the previous description. At the end, you need to check the position of the sash with a plumb line.
You can measure the overlap by going around its entire perimeter so that it is uniform.
Checking the pressure. Correct adjustment
The pressure on the sash over the entire surface of the window should be uniform. To check the pressure, use regular office paper. Close the window by placing a wide strip of paper over the seal. After this, try to pull out the paper and feel the force with which it comes out.
If the paper stretches out easily in some places, it means that the pressure is weakest here and adjustments are necessary. Thus, check other pressure points around the entire perimeter of the window. Specialists check the quality of the sash pressure using a caliper and a depth gauge.
But it’s easier for the average user to do this with paper.
Adjusting the pressure of the MACO lower loop
This loop is unique because it is adjustable on three sides: vertically, horizontally and for clamping. To adjust the sash pressure from below, you need to find the adjusting screw at the base of the hinge. Use TX 15 key.
Adjusting the pressure of MACO scissors
When the pressure of the scissors at the top of the sash is not tight, it may sag. You will have to adjust the screw in the scissors near the top hinge. Find it and tighten it with a hex wrench. As usual, approaching the frame ensures that the key moves clockwise.
Why is it necessary to adjust the locking pins?
Locking pins are movable oval-shaped metal heads. You can identify them by opening the sash and moving the handle a little. Adjustment of the trunnions is necessary when the window sash is not tightly pressed to the middle part of the frame. There are summer, winter, and intermediate setting modes.
The neutral position is when the trunnions are at an angle of 45 degrees. For the tightest clamping, you need to turn the spanner or pliers clockwise to a horizontal position. The house will be warm! For summer mode, a counterclockwise rotation and a vertical position of the trunnions are required.
Prevent sash sagging
Unfortunately, sagging does not only occur in the open position. The friction that occurs when closing a window from the contact of the locking pins with the strikers contributes to the fact that, over time, the sash sags.
To prevent this annoying phenomenon, Maso manufacturers have included a micro-lift blocker in the fittings, in other words, a lifter. This is a special lever that is activated by the window handle.
When the window is closed, part of the load is transferred to the impost and frame.
The microlift has another important option - blocking the handle when turned incorrectly, which prevents the sash from operating incorrectly when it opens in two positions simultaneously.
Precise adjustment is necessary for the bollard to function properly. Pay attention to its lower edge - it should be 1-1.5 mm below the counterplate.
Take the Torx T15 key you know and loosen the locking screw by moving the slider to the side (movement increments - 0.5 mm) - try several positions until you adjust it as needed.
Do all windows need a microlift?
Plastic windows are quite heavy structures. For example, one sash of a plastic window can weigh up to 50 kilograms or more. And no matter how strong and reliable the hinges are, no matter how firmly they are attached to the frame, over time the sashes still begin to sag under their own weight. The main purpose of the microlift is to increase the service life of window fittings by maximizing the protection of the sashes from sagging. Its installation is simply necessary on the sashes of large-sized and energy-saving windows. It will also be useful on windows that have a non-standard shape.
There is no extreme need to install a microlift on typical windows, transoms or small sashes, however, even on such structures it will not be superfluous, especially if we are talking about actively used windows.
Adjustment
In most cases, the sashes have to be adjusted when installing plastic windows. More precisely, the fittings need adjustment.
Correct adjustment of the window should ensure tight closing of the sash around the entire perimeter without jamming of the mechanism, and also guarantee free closing, opening and tilting of the sash without the pins touching the sash or the frame.
In addition, a precisely adjusted microlift should reliably protect the sash from sagging. For adjustment, a 4 mm hexagonal angled wrench and a T15 Torx angled wrench (6-tooth sprocket) are required.
We start by simply trying to slam the sash (in the sense of pressing it against the frame, closing it without turning the handle).
If something interferes with the free slamming, we first inspect all the hinges and trunnions opposite them, and especially the unit in the lower part of the impost: a folding locking bar on the impost + a folding lock on the sash. The trunnions should not touch the strikers.
Eliminating sash sagging
The most common problem is a sagging sash. It appears in the lower corner of the sash: the hinged lock hits the bottom of the locking bar.
The first way to solve this problem is to raise the sash higher by screwing down the adjusting screw in the lower hinge of the sash with a hexagon:
During this adjustment, we control the operation of the tilting sash: the scissors should not cling to the frame.
We also check the fit of the sash elastic to the frame along the bottom edge, especially in the corners (the elastic should not rise anywhere above the edge of the profile so that the seal of the closure is not compromised).
If this measure does not eliminate the problem or creates another (the scissors begin to cling to the frame when tilted), you can try the following adjustment method.
This method involves turning the sash slightly relative to its center point.
If the sash is right, then push the top to the right, and the bottom to the left: If the sash is left, then push the top to the left, and the bottom to the right: This adjustment is carried out by rotating the horizontal screws in the lower and upper hinge.
From below, the horizontal axis of the hinge rotates with a hexagon, the key can be inserted into it either from the right end: or from the left end when the sash is open: From above, the hexagon rotates the adjusting screw at the end of the upper rail of the scissors, which can be reached by opening the sash:
The third, most radical way to eliminate sagging is to pull the sash diagonally using straightening plates.
To understand the essence of the method, it is necessary to understand how the sash frame is protected from sagging.
The secret lies in a clever scheme for installing spacer straightening plates between the double-glazed window and the sash frame.
As you can see, the plates are placed in the area of the lower hinge ( 3, 4 ) and in the diagonally opposite upper corner of the sash ( 1, 2 ) according to the principle of a conventional gate, in contrast to which in the sash the role of a diagonal spacer is performed by a double-glazed window, tightly spread in two corners with straightening plates . Imagine that the free edge of the sash (left in the figure), trying to fall down under the influence of its own weight, presses through the plates onto the upper corner of the glass unit. This force is transmitted through the package diagonally to the lower corner of the sash, held by a loop on the window frame. Thus, the overhanging edge of the sash receives rigid support (in this example, in the lower right corner), which prevents it from sagging. Of course, if it were not for the additional side struts, the glass unit could simply unfold inside the frame, and the sash would still sag. Therefore, the presence of plates in all four places indicated in the diagram is mandatory.
All other installation points for straightening plates in the sash have a different meaning:
- middle-side (6, 7) prevent the side profiles from bending inwards, due to which the side axles would eventually begin to slip past the wings, and the microlift - past the lifter bar;
- the second lower one (5) no longer serves as a support for the double-glazed window, but as an additional expansion element that prevents loosening of the stretched sash.
Thus, in order to raise the overhanging edge of the sash, it is necessary to increase the thickness of the upper ( 2 ) and/or lower ( 4 ) plate.
To do this, of course, you need a set of plates of various thicknesses, but if you are not constantly installing windows, you may not have a supply of plates of different sizes.
Then, perhaps, 1-2 extra plates will do, probably left over after sealing the capercaillie (usually left over from the top). In extreme cases, you will have to cut a couple of plates from the sash itself in half or make them from scrap material.
You can tighten the sash without removing it from the frame. To do this, remove all the glazing beads except the side one on the hinge side.
If the assemblers installed plates from below under both corners of the glass unit, then we leave only the one that is near the hinge, and remove the second one ( 5 ) using a spatula.
If the upper ( 2 ) and lower ( 4 ) plates are close to the middle of the profile, we “accelerate” them closer to the corners along with the liners (at a distance of 5-7 centimeters from the corners of the glass unit).
We lift the upper corner of the sash using a spatula inserted between the bag and the frame next to plate 2 , and add an additional 2-3 mm thick to this plate, or replace the old plate with a thicker one (also with a difference of 2-3 mm).
Usually this is enough.
Advantages of a microlift for plastic windows
In addition to the fact that the process of opening/closing plastic windows equipped with microlifts becomes much easier and more comfortable, these components provide window structures with a number of other advantages:
- there is no weakening or loosening of the window hinge fastening mechanisms, so the adjustments of the plastic window do not go astray;
- the service life of plastic window hinges increases significantly;
- the wear resistance of the window seal increases;
- the service life of fittings used in the process of opening and closing plastic windows (for example, window handles) is significantly increased.
To summarize, we can say that plastic windows equipped with microlifts have much greater wear resistance than profile structures that do not have such mechanisms.
Prevention of possible malfunctions
In order not to face the need for “treatment,” it is better to prevent its symptoms from appearing. Such troubles can be avoided if:
- buy quality products, because it guarantees that the fittings and materials used to make the door will be just as reliable;
- select fittings that match the characteristics and dimensions of the selected type of door; modern products are designed for heavy weight - from 100 to 130 kg;
- purchase a special compensator element - a microlift, which prevents the structure from sagging under its own weight if you choose a door with a double-glazed window;
- buy an additional tire that will limit the opening of the sash.
Control during installation is not necessary, but is desirable, since the haste of the craftsmen often has a negative impact on the installation. Therefore, it will not be superfluous to know that:
- uniform, tight fit of the box to the door frame is a mandatory condition;
- opening/closing should not cause any problems - it should be easy;
- an independent level check will give owners a chance to verify the correct installation;
- the appearance of drafts with a newly installed door is an unacceptable “weakness”;
- A half-closed sash, installed level, should not close or open on its own.
Reliability of microlift for plastic windows
Many consumers, based on the considerations “the more parts, the more frequent breakdowns,” refuse many elements of fittings whose purpose they do not understand. When talking about a microlift, such conclusions are, to say the least, unfair, since the main purpose of this device is to minimize the amount of damage.
The device itself is reliable. The metal used as the basis of the structure is extremely resistant to corrosion and other harmful effects of external factors. Not to mention the fact that microlifts undergo constant testing and certification by manufacturing companies.
First, let's look at what problems may arise during operation:
- The door has dropped and touches the threshold;
This is all due to the load of the canvas with glass on the hinges, which causes sagging.
- The door does not close or closes poorly in the middle of the leaf;
The canvas may move towards the free edge of the box due to temperature or increased constant humidity.
- The canvas does not close tightly, and cold air or a draft enters the room from the door;
It can occur during operation when the control mechanism becomes slightly loose.
- The handle is loose;
The handle begins to loosen due to frequent use and this is a common practice when using a plastic door.
The choice is up to the consumer
In any case, the final decision on the need to install a microlift on your own windows is made by the consumer. The risk of refusing it is known: the inevitable adjustment of the sashes, and over time, repair work, which requires much more money than the initial installation of a microlift.
This option is also possible: you, being the owner of plastic windows without microlifts, want to equip your window sashes with them. This task is quite feasible, however, it makes no sense to equip old plastic windows with expensive fittings. For this reason, it is worth first consulting a specialist who will help you choose the most suitable device for your windows.
Be that as it may, installing a microlift is not a senseless expenditure on another incomprehensible “bells and whistles” in the window design, but, on the contrary, a successful investment in the long-term and uninterrupted operation of plastic windows, which you should not deny yourself.
Submit your application
What does the structure consist of?
Each door block has main and additional parts. And before you begin to carry out any installation and adjustment work, you need to familiarize yourself with the design of the structure. It is important to understand the operating principle of the fittings used.
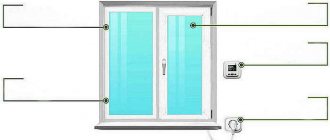
Typically, the standard design of plastic balcony doors includes:
- PVC frame, which is connected using special fasteners;
- a sash that is assembled according to the same principle as the box itself;
- hinges that allow you to open and close;
- handle with a lock for closing the sash in the pressed position;
- seals for the tightness of the structure;
- glass unit
Depending on the functionality, the design of the fittings may change slightly. So, sometimes a mechanical or hydraulic closer, as well as stoppers and other necessary parts are added to the standard package.
When is it time to adjust the balcony door?
A plastic door does not require intervention if:
- the sash does not move, it is tightly pressed to the frame profile;
- It doesn't move on its own if it's open.
As soon as you notice any deviations, there is no need to shelve this problem. Urgently call a professional who will adjust it, or do it yourself by reading the instructions carefully.
In order to repair it effectively and efficiently, you need to know exactly what caused the problem.
Methods for adjusting the closer
The closer must ensure smooth closing of the sash. This is achieved by the cylinder and oil; the closing force itself is provided by the spring of the mechanism.
Each of these elements can be adjusted depending on what problem arose:
- If you are not satisfied with the opening angle of the door leaf, then in order to adjust the iron door, you need to adjust the rotation of the nut. Turn counterclockwise to decrease the angle, clockwise to increase it.
- By turning the valve, you can adjust the speed of movement of the valve.
- The spring tension can also be adjusted. It has a special nut that can be loosened or tightened with a wrench.
In order for the door closer to function longer, you should not forcefully pull the door before it closes or fix it in the open state.