The building codes of the past did not require the tightness of premises that can be observed now. Air circulation was largely ensured by door and window openings, the density of the vestibule in which left much to be desired.
A fundamentally different approach to glazing minimizes heat loss and provides excellent sound insulation of rooms. But at the same time, if you do not pay due attention to ventilation, it is difficult to imagine comfortable living in such premises.
Why do you need a supply valve?
When building or renovating a house, we do everything possible to keep it warm. One of the key points is the installation of sealed plastic windows. The house becomes much warmer. But tightness has a downside - there is no supply of fresh air. Therefore, sometimes, even a properly designed ventilation system may not work. After all, if there is no air flow, then there is nothing to pull out.
Ineffective ventilation means increased humidity, which contributes to the development of mold and fogging of windows. When there is a lack of fresh air, we feel discomfort. We find a way out - open the window and ventilate the room.
If the window is open, there is always enough air, but this is not always a good solution
But when the window is open, noise interferes, dust flies into the room, and in winter it quickly becomes too cold. And all because the air supply is too intense. You should choose the flow so that you can breathe easily, but not feel cold. Adjustable inlet valves help solve this problem.
Ventilating your home is the basis for good health
Ventilation of a house or apartment is the basis for the well-being and health of its residents. Regular ventilation ensures a comfortable microclimate in the house for work, sleep and rest, and also protects the premises from excess humidity and prevents the development of mold and mildew that are hazardous to health. Modern solutions for window ventilation are varied, effective and not labor-intensive to install and will allow everyone to choose the most convenient and affordable option for their home.
| The OKNA MEDIA portal recommends: Window breaking is the most common type of burglary |
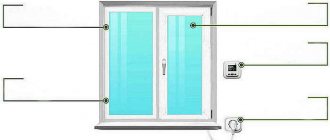
Window inlet valve device
Any adjustable supply channel is a hole with a damper that allows you to change its cross-section. Thus, the intensity of air supply is regulated.
General arrangement of the inlet valve
The supply valve device mainly consists of three parts:
- The internal part consists of an adjustment mechanism and, as a rule, a filter.
- Air channel.
- External, street part. Protects from precipitation, and if there is a dust filter, then partially from noise.
The basic principle of operation of this device is as follows: by opening the damper more or less, the air flow into the room is adjusted to the current conditions.
For the ventilation valve to work effectively, hoods must be running in the apartment, while the doors must be open or have a small gap from the floor.
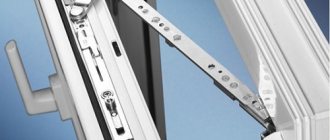
Step-by-step instruction
Experts recommend installing stepped micro-ventilation on windows (if it is not available) with your own hands. This will require a hidden system, which relates to the corresponding fittings. The process involves replacing the angular gear with an analogue with a beak. The latter product, together with the comb, can be purchased from special companies that produce and sell plastic windows and fittings. There are two types of angular gears:
- for left/right leaf;
- universal.
For installation you will need a set of screwdrivers, a level, and a tape measure. First unscrew the retaining plate and the angular gear mount from the top and side. Using a flat screwdriver, remove the main lock and scissors. A new angular gear is being installed (with the beak on the side).
This arrangement of the mechanism increases the range of ventilation levels. The clamp plates are installed in place, the screws are tightened. Subsequent work is carried out on the frame.
The strike plate is removed and installed 120 mm upward (in the center). A 5- or 7-tooth comb is mounted in its place.
If, when closing the window, the beak catches the comb, the upper hinge is adjusted.
To fix the sash in the desired position, you will need to slightly turn the handle. Independent micro-ventilation of plastic windows was completed successfully.
Types of supply valves
Ventilation valves for PVC windows are divided into three categories according to design features:
- slotted;
- folded;
- invoices.
In addition to these main groups, ventilation valves are divided into two more types:
- with manual control;
- automatic.
Valves that have a manual control mechanism are more common. In automatic devices, the control mechanism responds to pressure or humidity, and for convenience they can be equipped with a remote control and integrated into the “smart home” system. The essence of their work remains the same, but the price is much higher.
Slot devices
Perhaps the most common type of ventilation valves. It gained such popularity due to its ease of installation and throughput.
The slot-type valve gets its name from the gap that is formed as a result of removing part of the seal on the window frame and the double-glazed unit. Its size can be 17–40 cm wide and up to 16 mm high. The valve is manufactured in two versions, with one or two blocks.
The slot valve is easy to install and aesthetically pleasing
The advantages of these devices include:
- Possibility of installation without removing the glass unit;
- good throughput (up to 20 m³/h);
- protection from noise and dust.
The disadvantages include the need to mill plastic when installing two-block models.
Seam models
The stitching performed on rebated models is also very popular, although its installation is somewhat more complicated. During installation, there is no need to remove the glass unit, and changes to the window design are minimal.
The air channel is equipped in the frame or sash of the window. Plastic can be drilled either with a simple drill or with special tools - cutters, hence the name milling. When installing, you need to carefully select the location so as not to damage the internal elements.
The rebated valve requires intervention in the frame elements
Pros:
- ease of installation;
- low cost;
- maintaining window sound insulation;
- availability of automatic models.
The disadvantage of rebated valves is their small flow capacity - up to 5 m³/h. To increase flow, it is recommended to install two sets.
If the rebated “inlet” is equipped with a humidity sensor, then give preference to models where the sensor-drive is located at some distance from the ventilation duct, this will increase its accuracy.
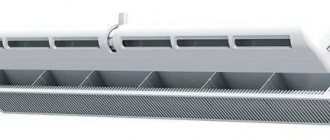
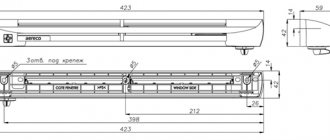
Overhead valve models
Such a supply valve in the window is pre-installed during its production. However, it can be made to individual sizes for an already installed window. In this case, it will be necessary to dismantle the glass unit and change its size. These devices have a high productivity of up to 100 m3/h and their use is rational, for example, in office premises. Overhead valves easily allow street noise to pass through and reduce the thermal insulation of the window.
Blitz tips
If you need to save money when choosing devices for micro-ventilation, then you should consider the option with a limiter. The main thing is to choose high-quality combs that have a lock in each groove. This will prevent a small child or pet from easily opening the window for ventilation.
Micro-ventilation systems in the mid-price segment are slot ventilation using internal fittings.
The most expensive option is to install an automatic valve. When choosing a climate valve, experts do not recommend saving. Designs of unknown and untested brands are often made from low-quality materials that may not withstand winter temperature changes and become deformed.
Why on the window?
Air flow can be organized in two ways - through a window or wall, outflow occurs through an exhaust hood in the bathroom and/or kitchen.
They are often done in a window for several reasons: first, it is easier to do than making a hole in the wall, and second, it is cheaper. In addition, there are two more arguments for:
- Previously, it entered through loose window slits in wooden frames. But the influx was unregulated and often unnecessary.
- Usually there is a heating radiator under the window. Warm air rises from it and, mixing with the street air, ensures its effective movement.
Pros and cons of devices
Ventilation systems for plastic windows solve the problem of fresh air entering the apartment - this is the main advantage of these devices and not the only one. However, they are not without drawbacks.
Advantages
Any additional equipment is an additional expense, but by using these inexpensive devices that ensure proper ventilation operation, you can get by with a small investment.
A sufficient amount of oxygen is what a ventilation valve for plastic windows is for
By installing the valve on a plastic window, you will receive:
- fresh air flow;
- reduction of heat loss;
- no draft.
This is important for families with children, because the door is always closed, so the child cannot fall out. There is no need to open and close the doors many times a day, reducing the load on the fittings.
Another plus is that you don’t need a mosquito net. Even if the model is the simplest, the likelihood of insects penetrating through it is very low. And to reduce it to zero altogether, you can put a piece of mosquito net into the cover.
Disadvantages of window ventilation
Like any technology, window ventilators have several disadvantages. They may be associated with poor product quality, installation errors, as well as typical product defects. The main ones are:
- freezing in cold weather near the installation site;
- reduction in heat and sound insulation;
- in hot weather they do not provide ventilation;
- automatic models are too expensive;
- in certain wind directions there may be a characteristic whistle.
All these shortcomings manifest themselves to varying degrees. Depends on the position of the windows, prevailing winds and the specific model.
Here are the disadvantages you can expect: ice in winter, and traces of dust in summer
If the house is located along the highway, then noise will become a serious problem. Of course, it will be less than with the sash open, but it can be quite noticeable. To solve the problem, some manufacturers offer additional pads that are installed on the frame from the outside.
Another disadvantage is that some models require cutting holes in the profiles for installation. And this is a loss of warranty. The solution is to order valves from the same company that installed the windows or refuse warranty service.
If not micro-ventilation? Alternatives
If there are no micro-ventilation mechanisms on the windows, you can use a household wall heat exchanger. This is the name of a reversible ventilation unit, which provides air supply and exhaust. It is also known as a wall ventilator. The device is more expensive than kits for micro-ventilation of windows. But it brings more air from the street into the building.
You can buy plastic windows with micro-ventilation mode in Moscow at manufacturer prices from our window company. For more than 11 years, we have been producing and installing window structures ourselves. Our specialists carry out orders of any complexity.
Popular models
According to the control method, there are manual supply valves for windows and automated ones. With manual control, everything is clear - by moving the damper handle, we change its position. The most popular in this class is the Air-Box supply valve (in common parlance “air-box”). This is a manually adjustable ventilator. Filtration and noise protection are not provided. But an attractive price.
The Air-Box supply valve is the most popular model of device for ventilation without opening windows
Air-Box air supply device
Air-box is the simplest of the valves and is a plastic trim installed in the window rebate. You only need to cut out a piece of sealing rubber and replace its thinnest seal, which is included in the package. The elastic is tucked into the groove, the lining is fixed with self-tapping screws.
The Air-Box eco modification has an external pad that is fixed to the frame from the outside. The cover contains an additional filter, which solves the problem of dust and slightly reduces the noise level.
Automatic valve Aereko
On our market, window valves for ventilation with automated control are presented by Aereko. It produces hygroscopic supply valves, including those for windows.
The damper is automatically controlled by a hygro-controlled system, the operation of which is based on responding to the external temperature and humidity in the room. They have a filter element, as well as a switch for switching to manual operation.
The air valve "Aerdeco" has an external lining that increases the level of protection against noise and dust
An additional external lining allows you to reduce the noise level to 42 dB. Installation requires milling in the profile, sash and frame. To simplify installation, the kit includes a template from which the necessary holes can be cut.
Models from Rehau (Rehau)
Rehau products are more diverse. This company produces window profiles and has solutions for various categories of consumers. The simplest “Aerovent” are intended for standard-sized apartments, AR75 – for cottages and large apartments, Invisivent – for commercial properties.
Ventilation from Rehau
Installation varies between models. Aerovent can be installed on an existing window, AP75 can also be installed without replacing the frame, but the double-glazed window will have to be changed. And Invisivent (“Invisivent”) is installed only during the production of the window unit.
MASO products
The MACO company makes ventilation valves for windows that adjust the gap depending on the wind force. The stronger the wind, the smaller the clearance becomes. At a wind speed of 20 m/s and above, the valve closes completely.
The intensity of the flow is regulated by the position of the metal tongue, which deviates depending on the wind force
Features of this valve:
- installed vertically near the corner of the block;
- can be placed on an existing window;
- It is possible to completely close the gap.
In general, the developers took into account most of the shortcomings of simple models.
OKFIL window filter with handle
The ventilation system does not have to look like an overlay on the top of the frame. There are options that are built into the part where the handle is attached.
The ventilation system for plastic windows can be arranged using a handle with a filter valve
The valve can be used for ventilation both in a private house and in an apartment. There is a modification without a handle that can be placed on a blind window at any point in the profile.
When installing these devices, profile milling is required, that is, you will need to drill holes through the shape of the lining, through which air will flow. After this, a cover with a filter insert, a valve and a handle are installed. One device is designed for 10 m² of area. In large rooms, an additional second filter is installed, but without a handle.
Adjusting the sash position
Sometimes installation and repair of windows includes adjusting the position of the sash in the horizontal and vertical planes. The structure deviates from its standard position due to damage to the moving parts due to the window being open for a long time or due to careless handling of the mechanisms.
Setting the tilt angle of the sash during ventilation
The plastic window handle has 4 positions, two of which are tilting the upper part of the sash. Turning the handle all the way up is the maximum tilt, positioning it between the horizontal and vertical positions is a micro-ventilation mode, useful in severe frosts.
In some cases, it is absent - the window reclines exactly the same distance as with full ventilation. Adjusting windows for winter involves changing this distance. To adjust the degree of pressure on the upper part of the sash, a pin on scissors is used.
This is done this way:
- The window opens in ventilation mode.
- If there is no access to the scissors in this position, you should open the window in two modes at once - fully open and ventilate. Sometimes a blocker prevents you from doing this; you can disable it by pressing the metal tab on the handle mechanism.
- When the scissors open, an eccentric will be visible on them - the same as for adjusting the sash pressure. Tightening it with a hexagon will reduce the tilt angle, loosening it will increase it.
When the adjustment of the plastic window fittings with your own hands is completed, the sash returns to its original position.
How to choose a fresh air valve
To choose a window ventilator, you do not need to make any global calculations. Data on the area that the valve can serve is usually indicated in the specification. For an accurate calculation, you need to divide the area of the room or apartment by the area indicated in the characteristics. The resulting number indicates the required number of devices.
For large rooms you need to install a more efficient model or install two smaller ones on both doors
If the capacity for which the supply valve is designed is indicated, you need to estimate the intensity of air exchange that you need. According to the standards for one person, this is 3 m³/hour.
Choose a specific model based on the parameters that you consider most important. If the house is located in a quiet place and the winters are not too severe, an inexpensive micro-ventilation aero valve for PVC windows such as Air-Box or its analogues will be suitable.
If you need protection from noise and dust, go for something more expensive. If maintaining burglary resistance is important, consider window replacement options. Now there are profiles with built-in valves.
How to organize slot ventilation if there is no separate mode?
The lack of a mechanism for creating micro-ventilation provided by the manufacturer is, although a problem, but solvable. Even if the window does not have such a function, you can implement it yourself, for which two methods are used.
The first option is to use a comb to maintain the window open at a certain angle. The second option is to install a window valve that creates a controlled flow of air masses from the outside (with protection against street litter or insects getting inside the room).
The first option is cheaper and easier to implement, however, its effectiveness is lower (but not in all cases) than that of the second. The second option is more expensive financially, but more effective, and many types of valves allow you to regulate the intensity of the influx of street air masses.
Installing a valve on a plastic window
Not every window supply air valve can be installed in an existing window of a room or balcony. There are two types of ventilation valves: with and without the need for milling. Air-Box models are installed without milling. Installation is simple:
- Select installation location. Most often this is the top part of the glass unit.
- Mark the length of the valve on the sash and on the frame.
- Using these marks, cut the sealing rubber and remove the cut piece.
- Insert the thinner seal from the kit in place of the removed area.
- Attach the plastic housing of the hood to the sash. Self-tapping screws for fastening are usually included in the kit, and you will only need a screwdriver or screwdriver for work.
Aero valve installation is complete. As you can see, no milling. The three additional holes are not considered a design change by everyone. So the warranty remains valid, but it is better, of course, to check with the installer or seller.
Other models require through holes to be made in the profile for installation. Most of these kits come with an overlay template, according to which the seats are milled and holes are drilled. See the video below for a couple of examples of installation of different models.
Example of installation of a ventilator with perforation
It is advisable to install the valve for perforation in the upper part of the window. The complexity of the work lies in the need to mill the frame - this cannot be done without special equipment and skills in working with power tools.
Carrying out preparatory work
When planning a valve insertion, you need to consider some points:
- It is better to install the ventilation device on a removed sash;
- installation is carried out in the warm season;
- When sawing a hole, you must work carefully so as not to damage the seal on the sash.
The sash is removed from its hinges and installed in an inclined or vertical position.
Part of the fittings (scissors and corner gear) are removed from the frame, and the counter strips are removed - they can interfere with milling
List of required tools
To install the inlet you will need:
- electric drill and drills (diameter – 5 mm and 10 mm);
- fine-grained file;
- jigsaw;
- template for marking holes;
- silicone sealant.
You can prepare a groove without a template, but it’s easier to work with. You can make a template yourself from plywood or hardboard.
Step-by-step installation and fastening
The entire process of installing a supply valve is divided into several stages:
Stage 1. Marking. Place a template on the vertical protrusion and mark the place where the device will be inserted.
Stage 2. Milling the sash. Using a large diameter drill, drill several holes in a row and connect them using a jigsaw. Repeat the operations on the frame fusion.
Window chambers opened during the milling process must be filled with sealant - this will prevent moisture from entering and whistling during air circulation.
Stage 3. Installation of the mounting strip and valve. Treat the back side of the plank with sealant, attach the part to the sash and secure with self-tapping screws.
Install the indoor unit of the ventilation device to the frame and snap the fasteners onto the bar. Check the evenness and strength of the valve location
Stage 4. Installation of the visor. Secure the protective visor on the outside of the frame with self-tapping screws. Treat the joint between the parts with sealant. It is advisable to use insurance during installation.
Stage 5. Completion of installation. Put the fittings back in place and hang the sash on the hinges. Set the ventilation device to the ventilation mode.