The undoubted advantage of installing plastic windows is increasing the degree of sound insulation and reducing heat loss. However, impermeability contributes to glass fogging and the proliferation of pathogenic microflora.
One way to solve this problem is to equip the windows with an Air Box valve, which provides self-ventilation and reduces the likelihood of moisture on the windows. Ventilation valve for plastic windows
The main purpose of the climate valve is to improve aeration, impaired due to the impermeability of plastic windows, regulate air humidity by reducing the likelihood of condensation, and maintain an optimal microclimate in the room with the windows closed.
The window ventilator is made of plastic; it is a body with 2 or 3 fastening loops and an adjustment knob for natural air exchange. The kit also includes seals; they are used instead of those that are removed from the window frame during installation of the device.
Kinds
There are several valve options on the market today:
- Air Box Comfort. This type of device can be mounted directly on the window transom, as well as with profile milling. When choosing the latter installation method, the appearance of the window is preserved in its original form, while making it possible to expand the ventilation duct. The design of the system does not complicate the installation of a protective insect net. The model is compatible with any types of tilt and turn windows made of polyvinyl chloride, regardless of the brand of window profile.
- Air Box Comfort S. Installation of this type of system is carried out by milling. The model is intended for closed windows and windows where there is no possibility of using a ventilation mode. The principle of operation of the device is that a flow of fresh air penetrates through a hole made by milling the window frame, and then through an air duct located opposite the penetrating hole, the air flow penetrates into the room. The air flow is adjusted using a rotating knob on the device body.
The advantages of using a ventilator include:
- No drafts.
- Creating a comfortable indoor microclimate without overcooling it.
- When air flows, the design of the device does not allow dust to pass through.
- Reducing the humidity level in the room.
- Possibility of adjusting the air flow by rotating the handle, as well as completely closing the valve.
Creating a comfortable indoor microclimate without overcooling it
Design and operating principle
The product is a narrow plastic case that is attached to the sash of the window frame. From the outside, such a valve is completely invisible on the window, since there are no external elements (located on the street side) as standard. Structurally, it resembles the Aereco ventilation window valve, differing in a large selection of models.
Air-Box Valve Kit (any series) includes:
- The plastic housing of the ventilation valve is installed on the window sash and led inside (into the room).
- A set of window seals that replace standard ones.
- Set of fasteners.
The operating principle of Air-Box air vents is to replace the standard window seal with a narrower one. Thanks to this, a gap is created between the sash and the frame, into which air from the street enters.
In the upper part, the valve itself is attached to the sash, allowing air flow inside. There is a regulator on the body of the product (its shape varies depending on the model), which allows you to change the degree of opening manually.
Ventilation of this type is natural (the valve does not have a fan), and only works if the apartment has a ventilation shaft or exhaust hood and is functioning normally.
Air Box Comfort (left) and Standard (right) valve kit
In this case, a pressure difference is created - outside it will be a little higher, indoors - a little lower, due to which air will flow into the apartment. The average statistical value of the difference is considered to be 10 Pa.
The air flow entering through the ventilation valve is directed upward, so that there is no draft in the room and the temperature does not drop.
Why use it?
The use of any air (or climate, as they are also called) valves is necessary for two reasons:
- To provide humans (as well as animals and indoor plants) with sufficient fresh air to breathe.
- To prevent the humidity level in the room from exceeding.
According to current sanitary standards, one adult living in a living space needs approximately 30 m³/h of fresh air. And this is if he is sleeping or doing some “quiet” activity: reading, sitting at the computer.
With more active activity - even ordinary cleaning of the room - this need grows. Therefore, the valve must provide an influx of fresh air so that the body receives the necessary oxygen.
Regarding the second point: in winter, when the humidity level in the room increases, drops of liquid will begin to condense on the window glass, frame, slopes and window sill (due to the temperature difference: it’s cold outside the window, warm inside).
The greater this difference, the more and the faster the moisture will condense . Because of it, mold can form on the windows, spoiling the finish and harming the body.
Advantages and disadvantages of the device
Inlet window valves from Air-Box have the following advantages:
Diagram of air flow through the Air Box valve
- possibility of installation without drilling holes in the frame and sash (for the Standart and Comfort series);
- simplicity and speed of installation (as a consequence of the previous paragraph);
- cheapness;
- the ability to manually adjust the amount of air supplied (for the Comfort and Comfort S series);
- autonomy (the product does not require connection to the electrical network).
However, there are also disadvantages:
- lack of automatic control depending on the humidity level (like Aereco ventilation valves, for example);
- Low throughput of the Standart series, installed without drilling the frame.
Valve installation
Let's consider options for installing a window ventilator:
Installation without drilling:
- Determining the installation location of the device. It is installed on a movable window sash. At this stage, you should try on the device, then open and close the window. The valve should not rest against the slope. If the ventilator hits a slope, it is advisable to choose a different installation location. Alternatively, it could be the top side of the sash.
- Marking the area where the valve will be installed. The device is applied to the installation site, then using a knife, the seal is cut on the sides of the device. Remove the ventilator and remove part of the seal.
- Installation of the structure on the window. Before installation, you must thoroughly clean the area where you plan to install the device. To do this, the sash is wiped and cleaned of dust. Sealing gaskets and dowels are placed in the window recesses. Remove the yellow protective film from the ventilator and install it in a specific place. During operation, all fastening elements of the device must be in close contact with the dowels, otherwise, when screwing in self-tapping screws, the device may move and damage the adhesive tape. Using self-tapping screws, fix the device and install auxiliary seals 16 cm long in the gaps between the fasteners. Finally, the glass seal is cut out to the window frame opposite the ventilator and a 35 cm long seal, which comes with the ventilator, is installed instead.
Installation with milling:
- We determine the installation location of the device.
- On the sash, remove a part of the seal 35 cm long. To do this, place the device against the sash and mark the boundaries.
- In place of the cut seal, place the seal included in the design kit.
- The place for milling is marked on the sash and 2 holes 1.5 cm deep are drilled at a distance of 12 cm from each other.
- Remove the protective film from the seal and install the device.
- Using self-tapping screws, the device is firmly fixed to the sash.
Installation nuances
Installation of Air Box window valves can be done in two ways:
- Without milling, by replacing the standard frame seal (Standart, Comfort).
- With milling (Comfort, Comfort S).
The first option is faster and simpler, however, the performance (amount of incoming air) through the valves in this case will be lower than in the second case.
The second method is suitable for those who need to get the maximum possible amount of fresh air.
Installation without milling
To carry out the work you will need:
- A stationery knife (if you don’t have one, any other knife will do, as long as it’s sharp).
- Screwdriver.
Air Box Valve Installed
Stages of work:
- We decide on the location of the valve on the sash.
- We attach the valve to the sash and mark its length on the seal.
- Cut off the marked section of the seal.
- In the vacant space we insert the seal that comes with the valve (for the Standart model, install a piece 250 mm long).
- Remove the protective film from the valve.
- We install the product on the sash and fasten it with self-tapping screws (4 pieces for Standard and 3 for Comfort).
- We close the window and mark the dimensions of the valve on the frame so that we know where to cut the seal from it.
- Cut off the marked section of the seal from the frame.
- We install the seal from the valve kit in the vacant space.
The cost of installation by a master is about 1000 rubles. The procedure takes no more than half an hour – even for those who have no experience and are doing it for the first time.
Air Box Comfort valve installation process (video)
Installation with milling
For this method, in addition to the tools mentioned above, you will need:
- Drill (drill diameter – 10 mm for Comfort and 12 – for Comfort S).
- Jigsaw.
Sequence of steps for installing Comfort models with milling:
- Selecting a location for installation.
- On the flap we cut off a part of the seal 350 mm long (for accuracy, you should mark the cut points by placing the valve on the flap).
- We install the seal from the kit in the vacant space.
- We apply the valve to the sash, close it and mark the location on the frame.
- On the overlay of the frame, we mill two slotted holes with a height of 12 mm and a length of 157 mm. The distance between the holes is 12 mm.
- We install the valve on the flap with 3 self-tapping screws.
Hole milling diagram for installing Air Box Comfort S
To install the Air Box Comfort S, the work is done differently:
- Selecting a location for installation.
- We mill or drill holes for air passage according to the diagram (choose any option).
- We insert the support sleeve and fasten it with self-tapping screws.
- Reinstall the valve by tightening the regulator.
The installation procedure with milling will cost about 1000-1500 rubles.
Reviews about the model
We will also mention reviews about this type of attachment from users.
Yulia F., 30 years old, Ekaterinburg:
When the windows were being replaced, the store saw a frame with some kind of plastic strip at the top. The consultant explained that this is an inflow. We decided to try this: our window is almost always open in the summer, but mosquitoes are annoying (there is a forest plantation right outside the window, in which there are a huge number of midges in the summer).
We began to choose the valve ourselves and settled on Air Box Comfort. The model is excellent - there is a regulator, and there is enough fresh air.
Ruslan G., 36 years old, Ivanovo:
I chose Air Box on the advice of a neighbor. At one time he was installing windows, and he also installed ventilation units. He says it’s a cool thing, much better than wall models, for which you need to make a hole in the wall.
Installed 2 years ago - really useful. It doesn’t provide much air - we ventilate it sometimes - but the windows have stopped “sweating”, and this is already a serious plus.
Description of the “Finnish window”: advantages of the KIV-125 air vents
Inflow with automatic adjustment: about the advantages of Systemair VTK series valves
Related Posts
Reviews about the application
Based on consumer reviews and manufacturer recommendations, for the valve to operate effectively, reliable operation of the hood is required.
Let's take a look at several reviews about the use of the Air Box Comfort ventilator:
Olga, Ryazan: “For the test, we installed it in one of the rooms for now. The air in the room is fresh, and indeed draft-free, which is an advantage for us - we have 2 small children. Now we will install the valve in the remaining rooms and in the kitchen. We want to check whether the windows there will fog up.”
Vyacheslav, Moscow: “I would like to share my impressions after installing the valve. Our ventilation only worked in the toilet, but it should be understood that the door was constantly closed. Now the windows in each room fog up half as much as before installation. The humidity in the premises is 56-58% - measured personally. After cleaning the kitchen hood, the apartment cooled down well, but the temperature did not drop. The windows are dry, without a hint of condensation.”
Mikhail, Tver: “The device turned out to be practical and useful. The installation took no more than 10 minutes, with most of the time spent reading the instructions. I did not install the gaskets that came with the valve. This did not affect the appearance in any way, and the air flow increased. They can be installed at any time. There is virtually no external noise, which I really like. Therefore, I recommend it!”
Andrey, Khabarovsk: “The device fulfills its purpose, however, due to significant temperature fluctuations (-5 - -30) it blows a lot in extreme cold. During the day you have to open it more, in the evening you have to almost close it. And since the valve is located at the top of the window, you have to climb onto the window sill several times a day to change the setting. Over time, it becomes very annoying and annoying.”
Nikolay, Svetlogorsk: “At first it was unusual: it was windy outside, but in the bedroom it was warm, as before, you just felt fresh air. My son climbs on the floor, but it’s warm and not cool there. The windows are dry. The humidity in the room does not exceed 50%, which has never been observed. The temperature remained the same, only there was a constant flow of fresh air. Installing the ventilator does not damage the window. We are glad."
Types and parameters
The Air Box lineup currently includes three product series:
- Air Box Standard.
- Air Box Comfort.
- Air Box Comfort S.
The series differ from each other both in the installation method and in the parameters and partly in appearance.
In addition to the valves, you can separately purchase a noise protection visor, which is mounted above the inlet. It can be located both outside, on the street (on the frame), and inside (on the float of the frame).
Now let's look at the characteristics of each series in more detail.
Air-Box Standard Series
The inlets of this series consist of two white valves that are installed next to each other. The kit includes 2 pieces of seal of different lengths and 4 self-tapping screws.
The purpose of the model is to prevent condensation from occurring on sealed plastic windows. The ventilation Air Box Standard is installed without milling holes - its installation is carried out by replacing the window seal with a narrower one.
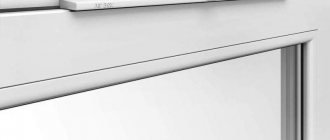
Air Box Standard valve on frame
As a result, a small gap is created between the sash and the frame, through which fresh air passes to the valve, and through it into the room, moving upward. When passing through the channel, the air flow is partially heated (due to heat exchange with the frame and sash).
Movable dampers are installed inside the valve, the purpose of which is to prevent drafts. In calm weather or light winds they are completely open.
When the wind increases, the damper begins to close, until the valve is completely closed - in order not to create a draft in the room and to prevent the valve from freezing.
Air-Box Standard vents are available in three variations, each of which is compatible with various types of window profiles:
- KR.
- V.A.
- TF.
For your reference, here is a compatibility table:
| Window system | Valve model |
| Adeplast | V.A. |
| Aluplast | V.A. |
| ARtec PAD | V.A. |
| Brushbox | V.A. |
| Brugmann | V.A. |
| DIMEX | V.A. |
| LAOUMAN | V.A. |
| LG Chem | V.A. |
| Montblanc | V.A. |
| PIMAPEN | V.A. |
| REHAU | V.A. |
| ROPLASTO | V.A. |
| Schuco Corona | V.A. |
| SOK | V.A. |
| TROCAL | V.A. |
| Veka | V.A. |
| Tantronix | V.A. |
| Wintech | V.A. |
| Winhouse | V.A. |
| Weltplast | V.A. |
| PROPLEX | KR |
| PLAFEN | KR |
| Novotex | KR |
| COMMERLING | KR |
| KVE | KR |
| GEALAN | KR |
| FUNKE | KR |
| EXPROF | KR |
| DECEUNINCK | TF |
Now let's get acquainted with the characteristics of Air-Box climate valves of this series:
| Dimensions | |
| Valve body KR, W x D x H, mm | (2 x 125) x 43 x 14 |
| Valve body VA, W x D x H, mm | (2 x 125) x 32 x 13 |
| Valve body TF, W x D x H, mm | (2 x 125) x 26 x 11 |
| Length of the first section of the seal, mm | 245 |
| Length of the second section of the seal, mm | 250 |
| Self-tapping screw diameter, mm | 3.9 |
| Production characteristics | |
| Air flow, m³/h (difference – 10 Pa) | 4.8 |
| Noise insulation, dB | 32 |
The price of products in this series is around 600-700 rubles per set.
Air-Box Comfort Series
More productive and more common model. It can be installed either by replacing the window seal (like the Standart series) or by milling holes in the overlay of the frame (in this case, the ventilation performance will be higher).
Structurally, it consists of one white valve, in the center of which there is a flat “tongue” of the regulator, moving in a horizontal plane.
Air Box Comfort valve on a closed window
Move it to the right - we get maximum air flow. Move to the left - completely close the damper. The air flow from the valve is directed upward.
The Air Box Comfort supply ventilation valve is universal: it can be used on any tilt-and-turn and rotating plastic frames, regardless of the manufacturer. The product comes with 2 equal-length pieces of seal and 3 self-tapping screws.
The characteristics of the model are as follows:
| Dimensions | |
| Valve body, W x D x H, mm | 350 x 42.5 x 8.5 |
| Self-tapping screw diameter, mm | 3.5 |
| Seal length, mm | 350 |
| Production characteristics | |
| Air flow (installation without milling), m³/h, (difference – 10 Pa) | about 31 |
| Air flow (installation with milling), m³/h, (difference – 10 Pa) | about 40-42 |
| Noise insulation, dB | 32 |
The price for inlets of this type is about 900 rubles.
Air-Box Comfort S Series
Climate control valves of the Air Box Comfort S type can be used for any window frames made of wood or aluminum, as well as for “blind” (non-opening) plastic windows.
There is only one installation method - on milled holes. The seal is not included in the kit - since it does not have to be cut from the window for installation.
Structurally, it consists of one white valve with a regulator installed in the center. It is different from the “tongue” regulator used in the Air Box Comfort model: here it is round and does not have marks or a scale. Adjustment is carried out by turning clockwise (closing) and counterclockwise (opening).
Air Box Comfort S valve with regulator
Another difference from the models mentioned above is the air direction: for Comfort S it is two-way. In the valve body, the flow is divided into two parts - one goes up, the other goes down. This is good because the window will be better blown with fresh air.
Here are the characteristics of valves of the Air Box Comfort S type:
| Dimensions | |
| Valve body, W x D x H, mm | 350 x 29 x 16 |
| Self-tapping screw diameter, mm | 3.5 |
| Production characteristics | |
| Air flow, m³/h, (difference – 10 Pa) | about 40-42 |
| Noise insulation, dB | 32 |
The product costs the same as the Comfort model - around 900 rubles.
Blitz tips
- When purchasing a valve, you should check the complete set of the device, which consists of the valve itself, metal self-tapping screws for fixation and rubber gaskets. Depending on the type, the number of gaskets can be two or three pieces. In addition, there can be one seal 35 cm long and two, 15 cm long each.
- When installing a climate control valve, it is necessary to take into account that milling the window frame weakens the structure. In addition, milling breaks the tightness of the chamber, which can lead to moisture penetration into the cavity of the window frame.
- To ensure effective operation of the device, periodic cleaning is required. As a rule, twice a year. To do this, use a vacuum cleaner to remove layers from the external visor, and clean the body itself with a damp cloth. The use of chemicals is unacceptable.
- In severe frosts, the valve cannot be completely closed. This may cause it to freeze and become icy.