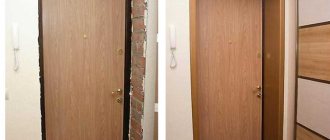
Platbands are an important part of framing any doorway in the wall. These products are decorative strips installed perpendicular to the door frame or additional elements. In order for the doorway to have a completed look and not spoil the overall interior of the room after finishing work, the craftsman needs to know how to install trim on interior doors, as well as in what sequence to carry out this work.
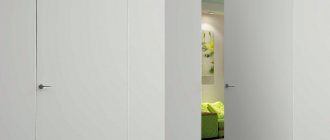
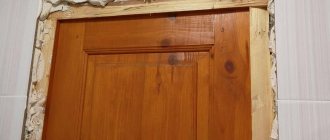
Rice. 1. Interior door with massive frame
The main types of platbands for interior doors
Manufacturers of interior doors often offer their products in the form of a ready-made kit - with a frame, fittings, extensions and framing, so that the owner of the room does not have any unnecessary problems during installation. However, in some cases, platbands have to be purchased separately. Products vary in cross-sectional geometry, length, width, but the main parameter when purchasing is the material from which they are made. The following types of frames for internal doorways are available on the market in a wide range:
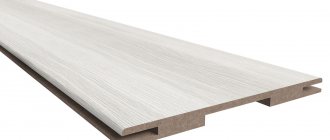
- Planks made from natural solid wood are considered to be of the highest quality. As a rule, the slats are painted in the color of the canvas and the box. Massive elements are not in high demand among the population due to their high cost, especially when it comes to valuable wood species (sandalwood, amaranth, etc.).
- A more economical option, widespread among consumers, is frames made of MDF (pressed wood fiber boards) with a laminated coating. Polymer film has a variety of textures and shades, which helps the buyer choose the element most suitable for the installed canvas.
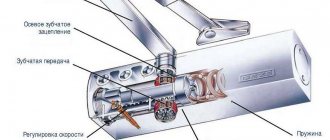
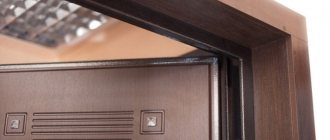
Rice. 2. Cashing device made of MDF
- If you have internal doors made of PVC profiles, the best solution would be to purchase the same plastic frames.
- In rare cases, a consumer may need a steel or aluminum “cashing”, but such elements are most often not mounted on interior doors.
When purchasing these decorative products at a retail outlet, you should pay attention to the type of fastening. The simple design of the extensions allows you to purchase overlay strips and fix them with adhesives or nails, and if there are seating grooves on the extensions, you should consider purchasing only telescopic trims.
Nuances of the work
Every job has its secrets. Here are some tips from professionals.
How to join the platband to the baseboard
The platband is installed close to the floor. The length of the plinth is adjusted to it. The plastic baseboard has a beautiful cap at the end. Wooden ones are processed: the end adjacent to the baseboard is beveled at an angle of 45o.
I wonder who would like this connection between the casing and the baseboard.
How to trim the platband
When working with a jigsaw, all cutting lines must be very clearly drawn. If you only have a hand saw, then it is advisable to have a miter box on hand. Another important point concerns the width of the cut. It can eat 3 mm from the length of the platbands. Therefore, when applying markings, the easiest way is to raise it by 1.5 mm, and cut exactly along the line.
For a jigsaw, the cutting line must be well drawn.
How to align the plane of the platband with the wall
When installing a door block, it is not always possible to achieve the same plane of the wall and frame. In this case, preparatory work is carried out to eliminate the defect, as discussed above.
A few more tips
Finally, here are some more tips.
- Platbands are installed after finishing the walls.
- Significant wall defects are well hidden under wide, about 12 cm, platbands.
- Errors when joining platbands at an angle of 45o can be eliminated with putty, tinted after drying with a corrector to match the tone of the panels.
To eliminate the gap you will have to work hard: first putty and then paint over it with a corrector.
- Visible gaps between the platband and the frame are sealed with acrylic sealant, and then tinted to match the materials with a corrector.
The main problem when installing platbands is not the technological process, it is simple, but the correct choice of strips in color, width and shape of the front surface.
What tools are needed for installation?
Installing platbands is a simple procedure that requires a minimum set of tools:
- Precise markings are carried out using a construction pencil, tape measure, ruler and high-precision square.
- To position the bar in a vertical plane, you need to stock up on a standard level with a length of 500 mm and a plumb line.
- As a rule, “cash out” consists of 3 elements connected to each other at an angle of 45 degrees. To make the cutting even, you will need a plastic miter box with a seat width of at least the size of the product.
- To cut parts, it is better to use a circular cutting machine on a rotating frame, which can be set at any angle.
- In the absence of high-precision equipment, a hacksaw with small teeth is suitable, which will not leave marks on the edge of the casing.
- If the elements are fixed mechanically, you will need a manual or pneumatic hammer.
Rice. 3. Tools for installing trims
To fix the plank without leaving marks on its surface, you can use liquid nails. To use them, you must purchase a mounting gun.
DIY installation instructions
The bar is placed first on the hinge side. Next, install the second vertical stand. The top trim is installed last. At first, all the details of the harness are fixed minimally in order to be able to adjust.
The final fixation is carried out using the chosen method. Glue is applied to the back side, the cash is nailed, screws are screwed in, or locks are snapped into place. Pay attention to sealing the joints and holes of the hardware, and process the visible ends.
There are holes left on the front surface from the installation of nails and screws. They need to be sealed with colored sealant to match the main color scheme. Wooden trims are treated with varnish, while laminated and veneered ones are left as is.
Loose joints are treated and acrylic-based sealant is placed into them. Subsequently, such places are tinted with acrylic paints. Silicone sealants are not used because paint does not adhere to the surface. If there are unscrewed screws or protruding nails, they are installed to the installation depth.
How to apply markings
In order to obtain an even cut of the trim strip, it is necessary to carry out a number of preparatory steps in measuring and marking each of the framing elements:
- Using a tape measure, the height of each side of the frame is determined (if the opening is correctly aligned during finishing work, the vertical parts should be identical in length). Measurements are taken taking into account the width of the plank, since diagonal trimming takes into account the abutment of perpendicular parts with a joint at 45 degrees.
- All 3 sizes are recorded on paper with the corresponding markings for each platband.
- Next, the part is laid on a horizontal surface face down.
- The master puts down the readings obtained when measuring the opening on the bar, marking the surface of the part with a pencil.
- Measuring an element can begin from the end if its factory cut is made perpendicular to the vertical plane. Otherwise, you need to set aside 1 - 2 cm from the edge and draw a perpendicular line using a square for its subsequent trimming.
- A similar segment, perpendicular to the long part of the casing, is applied along the marked mark.
Rice. 4. Marking elements
The marking is repeated for all 3 platbands, and a distance equal to the width of the opening plus 2 thicknesses of the elements is set aside on the horizontal bar.
How to cut material
Upon completion of marking and checking the obtained measurements, the master can begin trimming the parts before installing them. This action is carried out in accordance with the following steps:
- First you need to prepare a flat surface - a large table or workbench is suitable for this purpose. If there is no such surface, the procedure can be performed on a flat floor.
- Trimming is easiest done with an electric trimming machine with an adjustable bed. If it is not possible to rent or purchase a machine, you should use a miter box and a fine-tooth hacksaw.
- The bar is placed in the miter box so that the extreme marking point coincides with the slot in the tool template.
- The master holds the saw in a horizontal position, having previously installed it in the slots of the template.
- The cut is made at an angle of 90 or 45 degrees. On the seating plane, the miter box has a small recess where the saw blade is placed when cutting the element is completed.
- A similar procedure is performed with all marked parts.
Rice. 5. Trimming frame parts
After finishing the cutting work, it is necessary to assemble a template for the future frame on the floor, see how accurately the elements join, and check all the dimensions. Having made sure that the cutting is accurate, the master can begin installing the “cash out”.
What to look for when choosing
When selecting a door frame, emphasis is placed on the following factors:
- Plank sizes. Its compatibility with the character of the door is important. A thin, narrow door cash will go well with a light canvas. The massive option is successfully combined with wide thick planks.
- Material. The requirement for it is a harmonious combination with the rest of the additional elements and the style of the door leaf.
- Features of cashing installation. Some installation options are accessible even to a novice specialist; in other cases, you have to resort to the work of an experienced craftsman.
- Design characteristics. They are associated with the surface treatment of the planks. It can be smooth or covered with patterns and various shapes.
Methods of attaching platbands to interior doors
Installation of the doorway framing system can be done using different adhesives or mechanically. Professionals identify 4 ways to perform this type of work:
- Using finishing nails.
- Using a special adhesive composition “liquid nails”.
- Using thin screws.
- Using special connecting pins.
The choice of the optimal method for fixing the strip depends on what material it is made of, as well as based on aesthetic considerations, because some hardware may remain visible after installation is completed.
How to attach "cash" to nails
Fixing the trim with finishing nails is a popular and simple method of finishing a doorway. In order to get the desired result, you need to adhere to the following recommendations:
- The length of the hardware should be from 30 to 40 mm.
- Nails with an invisible head can be driven either with a hammer or from a clip using an air gun.
- As a rule, such fasteners are more suitable for planks made of wood, chipboard or MDF.
- It should be remembered that the body of the nail must pierce through the platband and go into the end of the box, or extend at least 15 - 25 mm.
- If nails with flat heads are used for fixation, the work takes place in 2 stages. First, the fastener is driven in so that the head lags behind the surface of the casing by 5 mm, after which it is bitten off with the side of the pliers, and the body of the nail is sunk into the wood completely.
- To securely fix the frame, the nail spacing must be at least 400 - 500 mm along its length.
- It should be remembered that when driving a nail, the body of a thin strip may crack. To prevent this from happening, before fastening it, you should drill miniature holes in the platband along the diameter of the fastener, and after that hammer it in with a hammer.
Rice. 6. Fastening with nails
If the end of the nail or the head on the surface of the frame is very noticeable, you can use a wax furniture pencil that will hide these defects.
Fastening planks with adhesive compounds
This method of fixing the frame of doorways greatly depends on the quality of the adhesive composition. Fastening with “liquid nails” has both advantages and disadvantages.
pros
- The advantage of this method is aesthetics, because after installation the fastening remains invisible.
- Can be used for elements made of any material - wood, MDF, plastic or metal.
Minuses
- If the wall surface where the elements are installed is uneven, fastening with “liquid nails” should not be done, since a loose connection can cause a loss of adhesion and the platband will fall off.
- If it is necessary to dismantle the frame, the planks installed with glue may break.
Rice. 7. Glue installation
To install platbands, you need to apply a layer of adhesive compound to the back side of the plank using a mounting gun, and then simply press it against the wall. The setting time of the glue depends on its composition and manufacturer and is usually indicated on the label.
Kinds
There are different types of cash. The determining criteria are material, shape, type of fastening.
The form is:
- Straight and flat, have a rectangular cross-section. Due to their neutrality, they are suitable for any interior, but especially for the minimalist style. They are usually joined at right angles, but they can also be cut at 45°.
- Figured or carved. They have a chic appearance thanks to the relief surface. Used in a classic style. Add elegance to any room. Expensive products are made of wood and decorated with designs of flowers and leaves. Cheaper are analogues made from MDF, which have a simple and less pronounced relief.
- Rounded, have an oval cross-section. They have an interesting shape, milled. When joining, corners are always filed at 45°. Quite neutral, suitable for any interior. They are made from various materials and come in different colors.
According to the internal structure, door trims can be simple, or monolithic, and with a cable channel.
According to the method of fastening there are:
- telescopic (with tongue-and-groove fastening);
- invoices.
Wooden
Wooden frames are in demand, although not the cheapest. The popularity is due to practicality and environmental friendliness. They are made from different types of trees, but most often from pine. For the production of more expensive products, beech, oak, and wenge are used.
They have a long service life and retain an attractive appearance for a long time if installed correctly. Decorative wooden door trims are considered universal because they are suitable for canvases made of different materials. But best of all, they are combined with wooden ones.
The disadvantage of such products is that they become deformed under the influence of environmental factors (high humidity and temperature changes), but restoration can easily correct this. Deformation can be avoided by applying stain or impregnation to the wood. It is recommended to use these planks in buildings with a stable microclimate. Wooden trims are mounted using glue and nails without heads.
MDF
MDF planks are cheaper than wooden ones, but at the same time they are not inferior either in external characteristics or in quality. Since such planks have a protective PVC film (lamination), they are even more resistant to moisture. However, such products are recommended for use in rooms with low humidity levels: living room or bedroom.
The disadvantages include the fact that the film may peel off in places where cuts are made. The best option is considered to be products veneered with natural wood (the front part is pasted over with a thin cut of solid wood). This cashing is attached with glue or liquid nails.
Plastic
Plastic door trims are the most practical and durable. They are lightweight and require no maintenance (just wipe them with a damp cloth); they retain their appearance for a long time, since they are resistant to sunlight and moisture. Not prone to mold. They can even be mounted on street doors. It is recommended to use glue for fastening so as not to damage the surface.
Metal
Metal ones are considered the strongest. Most often made of steel or aluminum. They look quite original, so they are not suitable for all interiors. Resistant to temperature changes and moisture, do not deform. Such platbands are mounted on metal street doors, strengthening the door frames. They look harmonious with glass doors.
Plaster
Original gypsum stucco molding is used to decorate rooms in a medieval style. The most appropriate use of such cashing is considered to be in a room with ceiling or wall stucco. In a room lined with wood, such door trim would be inappropriate. Gypsum is more fragile than other materials and crumbles when struck. Installation and restoration require special skills.
Ceramic
Ceramic platbands are used in rooms with stone cladding. In most cases, such products are installed in kitchens and bathrooms. Disadvantages include the heavy weight and high cost of the products.
Polyurethane
Polyurethane is less popular compared to other types. Although they are easy to care for, they have an attractive appearance and a long service life.
Telescopic
Telescopic door frames are curved along the entire length and are easy and quick to install. There are special grooves for fastening, so that joints and gaps are well masked. One side of the product is rounded and lies directly against the wall, and the other is bent down in a special way, so it fits into the groove. Such strips can be attached not only to the box, but also to the extensions.
Arrangement of platbands using self-tapping screws
Self-tapping screws are a reliable and time-tested method of attaching cash. During installation, you must adhere to the following algorithm:
- Similar to the nailing method, before starting work you need to mark the strip along its length, marking the installation locations for hardware every 400 - 500 mm along the length.
- Next, in accordance with the markings, through holes are made in the plank using a drill with a thin drill bit.
- Using the same drill, but with a drill of a larger diameter, each hole is carefully expanded to a depth of 2 - 3 mm.
- The element is applied to the wall in the design position.
- The master tightens the self-tapping screw manually so that it is fixed in the strip.
- Next, you need to tighten the hardware using a hand screwdriver or a screwdriver set to low speed.
- The self-tapping screw is driven into the thickness of the plank to the very end, recessing the head into the recess. It should be remembered that when the screwdriver is running at full speed, the metal of the screw, after being fixed all the way, can easily break the fragile frame part.
Rice. 8. Self-tapping screws
If the work is done correctly, the platband will be tightly fixed to the box or frame, and a recessed screw head will remain on the surface, which is closed with a plastic plug or puttyed with a colored wax compound.
Preparatory work
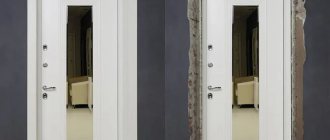
When installing platbands from the extension side, as a rule, no problems arise. But on the side of the door frame, carpenters quite often encounter a situation where the door block is either slightly recessed into the opening or protrudes outward. In this case, it is necessary to carry out work to hide these shortcomings.
The box is recessed
If the structure of the door block is recessed into the opening, and there is no way to correct the mistake by adding more, a thick platband is taken and an undercut is made in the wall under it. The work order is as follows:
- the platband is attached to the box;
- the line of the platband is marked on the wall;
- using a grinder with a cutting wheel for concrete or brick, an incision is made into the wall along the drawn line;
- use a chisel and hammer to knock out a recess for the platband - no need to be afraid to make the cut deeper or go beyond the line;
- a small amount of cement mortar is made (it is better to use ready-made putty);
- the knocked-out recess is lightly covered with mortar and the casing is immediately applied, as tightly as possible. Excess mortar that appears is removed first with a trowel or spatula, and then with a rag or rag;
- The casing is removed, and the solution is given time to set.
To prevent the solution from sticking to the back of the plank, it is first moistened with water.
The platbands will look strange if the box is slightly recessed into the opening.
The box protrudes
If the box protrudes beyond the wall, a plane and wooden trim will help. The technology is simple: the size of the box is marked on the back side, after which a quarter is selected from the back side of the casing using a plane. You need to work slowly, constantly monitoring the process of selecting a recess for the box.
Fastening the planks to mounting studs
A similar method of fixing platbands was invented relatively recently. Mounting spikes in professional jargon are called “beaks” and their use has the following features:
- A metal fastening element is fixed to the back side of the element using small self-tapping screws that do not cut right through the body of the bar.
- The extension or box, in turn, has grooves for installation.
- The craftsman carefully presses the part with the “beaks” against these indentations until a characteristic click is heard.
Rice. 9. Fixation with “beaks”
With such a connection, dismantling while maintaining the integrity of the elements is practically impossible, since the wedge of the fastener always breaks the groove in which it is fixed.
Arrangement of telescopic frame elements
The simplest and most technologically advanced way to frame a doorway is to use a telescopic “cashing”. Each plank has a special ridge of a complex profile, and the end of the extension has a groove of the same shape.
To install the platband, its ridge is aligned with the groove and snaps into place mechanically according to the principle of the designer. As a rule, such elements come from the factory complete with interior door parts.
Rice. 10. Arrangement of telescopic platbands
Size standards
For standard doors 80x200 cm, the cashing width is 6-10 cm. The width of the strip does not have to be standard; the range allows you to choose an option based on your preferences. The optimal width of the interior door frame is 6.4 cm.
The size of the bar also depends on the type of product: for flat products - 6.4 cm, for semicircular ones - 7 cm, for embossed ones - 8.5-15 cm.
The standard width of telescopic models is 6-8 cm. The optimal size is 7.5 cm.
How to install plastic trims
Door frames made of PVC materials should be considered separately, since it is not recommended to use self-tapping screws or adhesive compounds to fasten such elements. In order to install such parts yourself, you should follow certain stages of work:
- A special fixing profile should be sold complete with the “cash out”, which must be cut to the same length as the framing element, or 3–6 mm shorter.
- The fastening profiles, together with the frame parts, are cut at an angle of 45 degrees in the places of their orthogonal joining.
- The fastening element is attached to the extensions or door frame using special self-tapping screws or screws included in the kit. To ensure that the platband does not wobble during operation, the profile must be firmly fixed to the door elements.
- On the side where the plastic strip is attached, the profile has a special mounting groove into which the frame element must be snapped.
Rice. 11. Installation of plastic frame elements
After fixing the elements, the master checks the tightness of the connection along the entire perimeter, as well as in the corner joints.
How does the platband join with the baseboard?
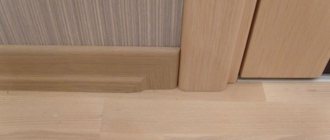
In order for the frame of the doorway to have a finished look, it is necessary to ensure its correct connection with the floor plinth. When performing this type of work, craftsmen adhere to the following rules:
- First, the door frame is installed, which reaches the finished floor mark.
- If a plastic plinth is used, then each linear element has a special factory-made plug. With the help of this part, a tight connection of the plinth to the platband is ensured.
- In the case of installing wooden plinths, the joining process is a little more complicated. Initially, the element is cut at an angle of 90 degrees to form a smooth end and ensure accurate joining. Next, the craftsman measures the thickness of the framing piece, and places this measurement on the edge of the plinth, after which he places it in the miter box, aligning the seating groove with the mark on the end. The plinth is cut at 45 degrees, and as a result, you get a trimmed element with a complex end - according to the thickness of the “cash”, the cut is 90 degrees, and everything beyond it is 45. In this form, the plinth is attached to the wall.
Rice. 12. Joining the door frame and baseboard
If the work is done correctly, no gaps will form in the joint area, and the structure will not be conspicuous.