To prevent doors from remaining open, they used to use a banal spring, but today they install a door closer. Its design is also based on a spring, but it is more powerful, hidden in a metal case and filled with oil - for “braking” when closing. Installing a door closer is not a difficult task. Self-installation will take 20-30 minutes. Hardly any more. So we take a drill and install it ourselves.
Most popular model
Adjustment
After installing the door closer, all that remains is to adjust the door closing speed. Depending on the model, the closers differ in design and location of the screw for speed adjustment. Detailed information is usually contained in the product data sheet or installation instructions. But the operating principle of regulation in various models of entrance door closers is similar:
- Rotating the screw clockwise increases the door closing speed;
- Rotating the screw counterclockwise slows down the closing speed.
When adjusting, it is not recommended to turn the screw several turns at once, since there is a high probability of disturbing the balance of the closer, which is quite difficult to adjust back. In addition, several sharp turns of the adjusting screw can cause damage to the mechanism, for example, oil leakage from the inside. Most often, a ¼ turn is enough to achieve the required speed.
In order for the closer to perform its function efficiently for many years, it is strongly recommended not to press the door or slow it down with foreign objects when closing, as this can lead to damage to the internal parts of the mechanism. In addition, it is recommended to change the lubricant in the hinge at least once every 2 years when installing closers for entrance doors indoors and annually when installing the mechanism from the outdoor part of the door. It is recommended to adjust the external closer every six months to reduce the consequences of temperature changes.
Where is it wise to install a door closer and where is it not worth it?
Most often, devices are installed on those doors for which it is important to be constantly closed: street and entrance doors. When installing the housing, they try to place it not outside, but inside the house or apartment
Frost-resistant models exist, but they are much more expensive, require more frequent maintenance and still have temperature restrictions. It is not recommended to install door closers on lightweight interior panels, especially those with glazing or stained glass. Frequent activation of a spring that is too strong can lead to loosening, rattling and even glass falling out
When installing, they try to place the housing not outside, but inside the house or apartment. Frost-resistant models exist, but they are much more expensive, require more frequent maintenance and still have temperature restrictions. It is not recommended to install door closers on lightweight interior panels, especially those with glazing or stained glass. Frequent activation of a spring that is too strong can lead to loosening, rattling and even glass falling out.
The door to the sauna also requires external installation of a door closer or a recessed structure. A conventional device will quickly fail due to changes in temperature and humidity.
Installing a door closer on a plastic door (video)
Since the easiest to install is the top overhead mechanism, this is what we are talking about. It requires a minimum number of holes and operations for fixation.
The work algorithm is as follows:
Before installing the door closer on a plastic door, you need to read the instructions that are always included with the product.
Therefore, it is important when purchasing to make sure that it is in an understandable language. Along with the instructions for the closer there is always a layout
It is made on a 1:1 scale to make marking and installation of the product easier. You need to attach a template to the door using tape in the place where the door closer is planned to be located. The sketch already shows places for fastenings, so you just need to mark them on the box and canvas. The door closer lever should be located on the door frame, and the rest of it should be fixed to the plastic sash. After this, you need to carefully drill all the necessary holes for the fasteners. This can be done with a regular electric drill. Attach the closer body to the sash. Its valves to regulate the speed of the rebate must “look” at the door hinges. The lever must be divided into two parts by unscrewing the screw. The lever rod, which has a thread and a fastening shoe, must be fixed to the door frame. The second part must be attached to the main part of the closer, which is located on the sash. A screw is included for this purpose. After installation, it is important to adjust the length of the rod with the shoe located on it so that, after connecting both parts of the lever, it is exactly at an angle of 90 degrees to the door leaf. After this, both parts of the lever can be connected.
Finally, you need to check the functionality of the mechanism, adjust the speed of finishing the canvas and closing it using screws. The correct operation of the closer is when the sash closes smoothly, without jerking, without slamming, the door closes completely and fits well to the frame.
Device selection
Before installing a door closer on a plastic door yourself, you need to select it correctly. When choosing it, it is important to consider many factors, the main ones being:
- The width of the canvas and its weight. If this is not observed, then very soon the device will become unusable due to its inability to withstand the loads placed on it;
- Installation location. Installation is divided into top, floor and hidden. The top installation option is the most common among buyers;
- Location on the canvas. If the door is used outdoors, then when choosing a door closer you should pay attention to such operating characteristics as air temperature: minimum and maximum. Basically, the mechanism operates at temperatures from -45 degrees to +70 degrees;
- Since the choice of door closers on the market is very large, it is necessary to familiarize yourself with their functions and only then make the final choice in favor of one model or another.
Installing a door closer
Most often, a rack and pinion closer with hydraulics is installed in residential premises, and it is with its example that the procedure for self-installation of the device will be described.
Choosing a door closer operation option
The closer on a plastic entrance door is, first of all, installed based on the opening side of the door leaf. If it opens away from itself, then a lever is installed on the canvas itself, and the body is installed on the jamb. If the door opens towards itself, then everything is done in reverse - the lever is on the jamb, the box is on the door leaf.
It is important to install the closer so that the adjusting bolts are on the side of the door hinges, which will greatly facilitate the adjustment of the structure in the future.
Marking the installation site
Each mechanism comes with an installation template, which greatly simplifies the installation process, especially if you have no experience in this matter. The template is made on a 1:1 scale and is universal in its kind, because it takes into account various options for opening the canvas.
All you need to do is place the finished stencil in the right place and use it to mark the points for drilling the channels for further installation of fasteners.
Fastening mechanism elements
At this stage, the housing and lever are installed in the required places using hardware supplied with the mechanism. After this, they begin to connect the halves of the rod.
If the mechanism is mounted not on a plastic door, but on a metal one, then during the drilling process, bolts are used that in appearance resemble threaded bushings. If you work with a regular drill, you can deform the blade and the problem will no longer be corrected.
When installing the door closer yourself, you must be extremely careful, because the slightest mistake will lead to the door not fitting tightly to the jamb. Or, on the contrary, the canvas will close very slowly, which will lead to heat loss. It is not always possible to correct these shortcomings purely by adjusting the closer. To avoid all this, the installation of the mechanism must be taken with full responsibility. But if it is installed incorrectly, then in the future it will not be possible to avoid skewing the canvas.
To understand whether the closer is installed correctly, you need to pay attention to the following signs:
- Smooth opening and closing of the sash (there should be no strong jerks on the part of the user);
- Complete absence of extraneous sounds (creaking, noise, grinding, etc.).
Installation of a floor-mounted closer
This method is somewhat more complicated than the previous one. The closer itself is installed on the floor, and is attached to the bottom of the door.
When installing the mechanism, it is necessary to take into account that it is about 4 cm thick, so in order not to trip over it every time, the closer is recessed into the floor. Basically, this is done during the construction of the house, because otherwise it will be necessary to carry out a whole range of work to prepare a niche in the floor.
Different types of fittings are offered for the upper and lower closers. In the first version, the design consists of two parts, one is attached to the box, and the second to the canvas. In the second case, the fittings are built into the floor niche and then attached to the device.
Installation instructions for the finishing mechanism
When installing the finishing mechanism on interior doors yourself, rack structures equipped with a lever mechanism are usually used. Devices equipped with a slider rod are rarely used for such purposes.
The installation technique for all types of finishing structures is practically no different.
Definition of installation diagram
First of all, the procedure for installing a door closer on your own is determined. The installation technique will differ depending on the direction of opening of the door leaf:
- The canvas opens to the finishing device. In such a situation, the body is mounted on the canvas, the lever mechanism on the box;
- The sash opens from the closer. The body is mounted on the door jamb, a sliding channel is fixed to the door leaf;
- It is also necessary to take into account that the adjusting bolts are placed in the direction of the door hinges.
Using a template
The product delivery package necessarily includes an installation diagram made in actual dimensions. The areas for fixing the product body and the lever mechanism are clearly marked on it. This makes it much easier to install the mechanism yourself.
At the same time, the template provides all possible options for attaching the door closer: for external and internal door opening, for right-handed and left-handed leaves. The template also suggests a class of door blocks for which the product can be used.
Performing installation
Before installing a closer on the door yourself without a specialist, a product template, which is included in the product package, is attached to the plane of the door leaf. It must be applied to the fastening area exactly according to the diagram and secured with transparent tape. After this, the points for drilling holes for fasteners are marked on the canvas using a center punch.
The procedure for installing the mechanism:
The housing is installed and secured with mounting bolts. Correct installation is determined by the position of the adjustment screws.
A lever structure is mounted on the opposite side of the door. Sometimes it is included in the package already assembled. The hinge is temporarily removed until the closer operation is adjusted.
Next, the knee is mounted - the non-adjustable part of the lever mechanism. To install the part, the axis of the finishing device is used. Fastening is carried out using a special wrench and nut.
If the door is expected to close silently and smoothly, the knee is fixed perpendicular to the door leaf, and the lever is fixed at an angle. The connection of the elements of the finishing device is carried out only with the door tightly closed. If the purpose of installing a closer is finishing force, then the rigid lever is fixed perpendicular to the door leaf. This installation scheme is used for doors with latches and seals.
At the next stage of installation, it is necessary to adjust the length of the adjustable elbow to the rigid mechanism. This technology makes it possible to strengthen the spring of the device and speed up the closing of the door when closing.
The final stage of self-installation of the finishing mechanism is the connection of the individual elements of the knee with a hinge.
If the model of the closing device is suitable for installation on door blocks made of any material (steel, wood, plastic), then the delivery set must include fasteners for all types of doors.
How to properly install a door closer on your own is shown in detail in the following video:
Features of non-standard installation
In some cases, it is necessary to use a non-standard technique for installing the finishing device on door blocks, for example, with a heavy metal leaf. For this, corners and plates are additionally used. Such fastening elements are already included in the package of individual products. But, often they have to be purchased separately.
In case of a deep entrance opening, which does not allow installation of a lever bracket on the frame, a construction angle is additionally used. Sometimes it is used to mount the housing and working system.
Installation of the housing is not always possible due to the design features of the door block. For example, the door block is equipped with a high glass insert. In such situations, the device body is mounted on a special plate. They are also used for leveling and fixing the body of the supply system when there is not enough space above the sash to fix the lever mechanism.
Installing an external door closer with your own hands
The first thing to do is to apply the markings correctly. All manufacturing companies put the template in a box with a device onto which it is attached. You can glue it to the canvas with tape, and then mark the attachment points through it. The template diagram is removed, but the marking remains.
Using a drill and a drill bit, holes are made for the screws. The recommended drilling depth is 15 mm. The closer body is attached to the door so that the adjusting screws face the hinges. In this case, its installation must be strictly parallel to the door.
The leg is disassembled into two parts (if it is assembled) and the traction foot is attached. Next, the main lever is put on the tetrahedral shaft and secured with a screw. It must be attached strictly at an angle of 90 degrees. It is necessary to apply locking fluid to the screw. When installing it yourself, you can use any paint for these purposes.
The response lever is moved perpendicular to the door and its length is adjusted. After this, both parts of the lever are connected and secured with a bolt. The fastening of all elements must be reliable, since the closer is constantly under stress when opening and closing the door.
After adjusting the device, installation can be considered complete. To make sure it is done correctly, check the operation of the door. It should close smoothly and without jerking.
Additional functions
In cheap products, looking for additional functions is a waste of time. More expensive models may provide a number of additional amenities.
Fixing the open position (hold-open)
From time to time there is a need to leave the doors wide open. For example, in order to bring in or take out a large item. Holding conventional door closers for a long time spoils the mechanism. In order not to damage the device, there are special models with the function of fixing the open position. They are equipped with a mechanical or electromagnetic latch. The operation of a mechanical latch is simple: when the door is opened at an angle exceeding 90o, the latch is activated. It is easy to remove: you need to pull the canvas towards the closing side. In models with electromagnetic latches, the doors are held as long as there is current in the network. Once the chain is broken, the doors are unlocked (there is a special unlock button).
Opening delay (damper)
This is a feature that prevents the door from opening very quickly. This eliminates the possibility of injury to the person on the other side of the door.
Closing delay
It is necessary in those rooms through the doors of which some kind of cargo is carried out. However, the flow of people should not be large.
Installation process
Let's find out what stages of work will need to be done to install a door closer on a metal door. Will disassemble the installation of the top closer, as the simplest and most popular type.
Preparation
At this stage, you need to familiarize yourself with the instructions supplied with the device and read it carefully. This will eliminate possible “jambs” during work. In addition, you need to make sure that the necessary fasteners and tools are fully available. Each device is supplied with a corresponding template, with which you can easily and effortlessly carry out installation.
Marking
This stage is necessary in order to determine exactly where the device will be mounted. Precisely marking the mounting location will greatly simplify subsequent work. The marking includes attaching the template included with the device with tape to the door. Then, using this template, all the holes that will need to be made in the door are marked with a core. The template should be secured closer to the door hinges at the top of the door block. Keep in mind that the device mechanism is located on the door leaf itself, and the lever is located on the frame.
It will also be useful for you to learn about how to install interior doors yourself.
The video shows how the door closer is installed and operated:
Checking the drill
To make sure that the selected drill diameter is suitable for the closer’s fastenings, take an unnecessary sheet of metal and make several test holes on it, then checking it with the device’s fastenings. This measure will allow you not to make a mistake with your choice, especially if you do not have much experience in such work.
Installation
If the test was successful and you are sure that the holes will fit the door closer mounts, you can start drilling according to the template markings. After the holes are ready, the closer is attached and its progress is checked. Position the closer body so that the speed control valves are directed towards the door hinges.
The lever must be divided into two parts, and then the side lever tab must be screwed to the door frame. To do this, we need the thickness of the door frames of the interior doors. Place the main lever on the tetrahedral shaft available for each closer, and then secure it with a screw and washer. Move the side lever to a perpendicular position and connect it to the main lever. Make sure that the device is level, without distortions: securely and firmly.
Adjustment
Once the device is locked in place, it must be adjusted to ensure perfect smoothness. Adjustment is carried out by rotating certain screws. How exactly to rotate, and in which direction, is indicated in the instructions. This work is carried out using a hex wrench.
It is necessary to clarify that the typical door closer model has only two adjusting screws. In this case, the first is responsible for the speed of opening and closing the door, and the second is responsible for closing at the last stage - completely reaching (finishing) the door leaf to its destination. Some more functional devices are equipped with additional adjustment options. So, you can set a forced slowdown, which will not allow you to suddenly open the door with a jerk. You can see how the apecs door closer is adjusted here.
After adjustment, put the protective cap on the lower part of the closer.
Video of door closer adjustment:
Door trim
After the closer is installed and adjusted, it is necessary to hide traces of installation from the door leaf: remove all defects, eliminate any shortcomings that spoil the appearance of the door
You should also pay attention to how to change the lock on a metal entrance door
Rules to follow when operating door closers
There are several things that cannot be done when the door closer is installed.
- The first common mistake when we try to help the door close faster is to press on it. This should not be done, otherwise the mechanism will break much faster than it should.
- The second no less common mistake is that rolling on the door will have a bad effect on the closer and the hinges. So it’s worth keeping an eye on the children, or clearly explaining that this cannot be done.
- The third mistake is to keep the door in the open position or place some objects under it to fix it in the open position. For such cases, the closer has a locking function. But this is worth taking into account before purchasing a door closer, since there are special mechanisms that are designed to hold the blades open. For such purposes, select the hold-open function.
This concludes my article, my advice to you is to choose closers that are suitable for your door and correctly calculate their class. After all, as you can see, there are many nuances that are worth paying attention to. After all, when you know why a breakdown may occur, you can avoid it. Good luck to you!
Box fastening
The holes on the box itself are already ready, so now you need to make them in the wall. To do this you will need a hammer drill with a set of drills. Holes are made using a drill with a diameter of 11, the distance between which should be 30 cm around the perimeter.
Dowels are installed in the resulting holes, but the screws are not screwed into them completely, because first you need to check the evenness of the installation of the box and only then tighten the screws tightly.
Once the box is installed, you can begin hanging the canvas on the hinges. If it turns out to be a little skewed, then this problem can be easily eliminated by adjusting the hinges. If the sash sags, the hinge at the bottom of the structure is tightened, and if it is not pressed tightly against the frame, then the hinges are twisted alternately from below and from above.
Purpose of the mechanism
Let's look in more detail at how the door closer works and what function it performs. This is a device that ensures gradual smooth closing of the door until it is fully pressed. This creates many conveniences and priorities:
- silent movement of the canvas;
- Always close the door tightly;
- performing the function of maintaining heat in cold weather;
- in some cases provides automation of the design.
Newer and improved products have ventilation and locking functions.
Installation process
Let's find out what stages of work will need to be done to install a door closer on a metal door. Will disassemble the installation of the top closer, as the simplest and most popular type.
Preparation
At this stage, you need to familiarize yourself with the instructions supplied with the device and read it carefully. This will eliminate possible “jambs” during work. In addition, you need to make sure that the necessary fasteners and tools are fully available. Each device is supplied with a corresponding template, with which you can easily and effortlessly carry out installation.
Marking
This stage is necessary in order to determine exactly where the device will be mounted. Precisely marking the mounting location will greatly simplify subsequent work. The marking includes attaching the template included with the device with tape to the door. Then, using this template, all the holes that will need to be made in the door are marked with a core. The template should be secured closer to the door hinges at the top of the door block. Keep in mind that the device mechanism is located on the door leaf itself, and the lever is located on the frame.
It will also be useful for you to learn about how to install interior doors yourself.
The video shows how the door closer is installed and operated:
Checking the drill
To make sure that the selected drill diameter is suitable for the closer’s fastenings, take an unnecessary sheet of metal and make several test holes on it, then checking it with the device’s fastenings. This measure will allow you not to make a mistake with your choice, especially if you do not have much experience in such work.
Installation
If the test was successful and you are sure that the holes will fit the door closer mounts, you can start drilling according to the template markings. After the holes are ready, the closer is attached and its progress is checked. Position the closer body so that the speed control valves are directed towards the door hinges.
The lever must be divided into two parts, and then the side lever tab must be screwed to the door frame. To do this, we need the thickness of the door frames of the interior doors. Place the main lever on the tetrahedral shaft available for each closer, and then secure it with a screw and washer. Move the side lever to a perpendicular position and connect it to the main lever. Make sure that the device is level, without distortions: securely and firmly.
It is also worth learning more about what the installation kit for installing interior doors looks like.
Adjustment
Once the device is locked in place, it must be adjusted to ensure perfect smoothness. Adjustment is carried out by rotating certain screws. How exactly to rotate, and in which direction, is indicated in the instructions. This work is carried out using a hex wrench.
It is necessary to clarify that the typical door closer model has only two adjusting screws. In this case, the first is responsible for the speed of opening and closing the door, and the second is responsible for closing at the last stage - completely reaching (finishing) the door leaf to its destination. Some more functional devices are equipped with additional adjustment options. So, you can set a forced slowdown, which will not allow you to suddenly open the door with a jerk. You can see how the apecs door closer is adjusted here.
After adjustment, put the protective cap on the lower part of the closer.
Video of door closer adjustment:
Door trim
After the closer is installed and adjusted, it is necessary to hide traces of installation from the door leaf: remove all defects, eliminate any shortcomings that spoil the appearance of the door
You should also pay attention to how to change the lock on a metal entrance door
Installation procedure
In residential buildings (apartments), rack-and-pinion closers with hydraulics are mainly installed. Using the example of a device from this group, we will consider the recommended procedure for the wizard. Having understood the specifics of the work, it is easy to understand the nuances of fastening other types of products.
Installing a door closer on a plastic door is absolutely identical to the procedure for installing it on wooden and metal counterparts.
Scheme is selected
If the door swings outward, a lever is fixed on the leaf; accordingly, the body is on the jamb. When opening inward, everything is exactly the opposite. But in any case, the closer is installed so that the adjustment screws are located on the side of the door hinges. This will facilitate the process of “adjusting” the position of the canvas and its further adjustment. And this will have to be done, since its “subsidence” will gradually appear. It’s not difficult to figure it out, especially since the product always comes with instructions that contain typical diagrams for installing a door closer.
Recommendation
The closer should be installed so that its “body” is always inside the building. External placement is impractical for a number of reasons - metal corrosion; low temperatures, as a result of which the oil thickens (and at high temperatures it becomes more liquid), and the hydraulic part of the mechanism begins to work incorrectly; possible icing, which interferes with the free movement of the lever.
Marking in progress
And here the master’s task is greatly simplified. The products are supplied with special installation templates. They are made on a 1:1 scale and are universal, as they take into account various ways of opening doors and hanging curtains. All that remains is to place the closer stencil in place and mark the drilling points for the channels for installing fasteners.
Fixing the components of the device
After marking, secure the lever and the mechanism body to the base with hardware (included with the product), and then everyone can connect the halves of the rod.
Adviсe:
- Installing a door closer on a metal door has one feature. It is necessary to use so-called “bonks” in the process of drilling thin sheets. These devices are threaded bushings. The fact is that working with a conventional drill can cause deformation of the metal, and it will not be possible to correct this defect (straighten the dent) on your own.
- When determining the position of the lever, you should focus on its base arm. It should be located perpendicular to the door leaf. If the angle is less than 90º, then the “slam” of the sash increases.
Installing a door closer with your own hands requires utmost attention and accuracy. The slightest mistakes often result in a loose fit of the canvas to the doorframe and drafts in the room. Or vice versa, slow closing of the sash and increased heat loss. You shouldn’t hope that everything will be resolved just by adjusting the door closer - this is not always possible.
It is for this reason that the installation stage of the device is the most critical part of the work. Moreover, the service life of the canopies depends on this. If the mechanism is installed incorrectly, then in the near future the skew of the canvas is inevitable, with all that it implies.
You can determine how correctly the door closer was installed by the following signs:
- smooth opening/closing of the sash, without jerking or additional effort on the part of the user;
- absence of extraneous sounds (noise, creaking, grinding, etc.).
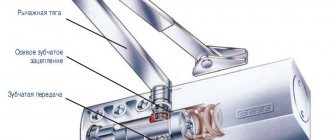
General information about the design of door closers
Inside, the door closer has an oil-filled spring mechanism that uses the potential energy of opening the door. The created impulse is accumulated in a spring, which, when straightened, ensures tight closure. During compression of the spring, oil flows into the resulting empty space. After the spring mechanism returns to its previous position, it flows to its original location.
The closer can operate on the basis of rack or cam principles of force transmission.
When exposed through the rail, the following occurs:
- during opening, the lever gear rotates, transmitting a translational movement of the rack to the piston. The latter, starting to move, compresses the spring;
- after opening the sash, the spring returns to its original position, pushes the piston, which causes the gear to rotate, transmitting the created force to the levers;
- Inside the body there are communicating cavities filled with oil, the movement of which makes it possible to adjust the speed of automatic closing of the sash.
Devices with a heart-shaped cam work on the same principle. It is supported on both sides by rollers. When the door opens, the cam mechanism with its protruding side compresses the spring. The latter, when returning to the initial position, turns the cam, as a result of which the sash is tightly adjacent to the jamb.
There is a third type of internal design of closers - spring, but this technology is considered outdated, since the mechanism does not take into account the change in torque when opening.
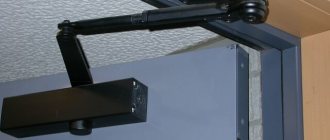
According to the traction design, closers are:
- based on lever traction. They are easy to distinguish - levers are visible perpendicular to the canvas, the force is transmitted when they are folded. They are durable and reliable, but not protected from vandalism, and you will have to use a lot of force to open the door;
- with a sliding channel. The lever is placed parallel to the door leaf, and the force is transmitted using a sliding gear when the free end of the mechanism moves along the sliding channel. Such products look more attractive, are protected from mechanical damage, and when the sash is opened a third, further movement becomes much easier.
Purpose
Any door closers ensure tight automatic closing of door leaves in silent mode. By installing such a block, it is possible to reduce the degree of wear of various elements of the door structure:
- loops;
- seals;
- the sash itself.
A properly selected door closer helps to minimize heat loss by ensuring a tight fit of the doors to the jamb. Such devices are suitable for different entrance groups installed at the entrance to the building and indoors.
Classification
When choosing a door closer for different entrance doors, the width and weight of the leaf are taken into account. According to the classification standards of the EN 1154 system, all blocks are divided into seven classes according to the force they create. The classification is marked as EN1, EN2, EN3 and further up to EN7. Each type corresponds to the maximum weight of the sash and the maximum force that it can create. You should carefully read the annotation in the classification.
When determining the class of a mechanism, the inertia of the blade is taken into account, which is determined by its mass and width:
- EN1 – up to 20 kg, up to 75 cm;
- EN2 – 21-40 kg, 76-85 cm;
- EN3 – 41-60 kg, 86-95 cm;
- EN4 – 61-80 kg, 96-110 cm;
- EN5 – 81-100 kg, 111-125 cm;
- EN6 – 101-120 kg, 126-140 cm;
- EN7 – 121-160 kg, 141-160 cm.
If the door structure's standard size data corresponds to different types of classification, then you need to choose a block of a higher class. It will last longer. For example, if the width of the canvas is 80 cm and the weight is 70 kg, then a fourth class mechanism is installed, since the weaker one will not cope with the increased weight load.
Models are available for sale that operate in the same range of generated force. Such products are marked accordingly, for example, EN4. And there are also those whose closing force is regulated within limits belonging to several classes. They are designated indicating all groups, for example, EN4-5. They are convenient to install on external doors and adjust the speed of change in the position of the leaf depending on weather conditions. Such mechanisms are more expensive than conventional ones.
Closers for interior doors are also selected according to the location of their installation. They are divided into:
- floor;
- invoices;
- hidden.
The choice of block depends on the material of the door leaf, the requirements for interiors, the side of door opening, their width and weight. On ordinary doors, overhead models with a lever are installed. For glass ones, floor blocks are used to protect them from impacts and cracks.
Installation of the closer and its adjustment
How to install the door closer correctly? Each device comes with detailed instructions that describe step-by-step guidance for installing and configuring door hardware.
Installation of closer
Installation of an overhead closer on a gate or door is carried out according to the following scheme:
- marking the installation area of the closer. Currently, almost every device comes with a template that facilitates the marking process. The location of the fasteners is marked on the template. In order for the marking to be as correct as possible, the template is fixed to the door leaf with tape or other means, and the upper part of the template should be located strictly along the edge of the door leaf, and the vertical part of the sheet should be parallel to the axis of the door hinges;
Determining the location of mounting bolts using a template
- drilling holes. After determining the location of the bolts (4 pieces for the closer and 2 pieces for the guide), it is necessary to drill holes. The diameter of the drill is selected according to the corresponding parameter of the fasteners;
Preparing holes for fixing the device
- We carry out the final installation of the guides with the closer, that is, fixing the individual elements of the device on the door;
Fixing the closer on the door
For convenience, installers recommend attaching the guide part first, and then the closer body.
- at the last stage, the guide (rod) is connected to the main part of the device.
Connecting individual elements into a finished device
- checking functionality and making adjustments if necessary.
Depending on the type of device, the installation diagram may differ slightly from that presented above. However, the basic installation steps are the same.
Adjusting the closer
After installing the closer on the door, the final adjustment of the device is made. During the adjustment process you can configure:
- door closing speed, which ranges from 180º (full opening) to 15º (limiter);
- final slamming speed, which occurs from 15º until the door leaf is completely closed.
To adjust, you will need a hex wrench, which is usually supplied with the closer.
The adjusting screws are located on the side of the main unit of the device.
Bolts for adjusting the speed of the closer
Adjustment is made by rotating the corresponding screws:
- clockwise. At the same time, the closing speed increases;
- counterclock-wise. The door closing speed is reduced.
Closer adjustment diagram
The optimal setting for the device is one in which the door closes completely in 5–6 seconds.
How to install the door closer with your own hands and make final adjustments to the closing speed of the device, watch the video.
If you choose the right door closer and install it according to the instructions supplied with the device, then the door hardware, designed for smooth closing, will serve for a long time without breakdowns or failures.
general information
Door closers are available in different designs. The technology of their fastening and the method of regulation have some peculiarities. How are the products different?
According to the specifics of installation
- Hidden devices. The mechanism body is placed in the frame or door leaf. Installation of door closers of this type requires a professional approach (practical experience, special tools). They are mounted only on doors whose leaves are at least 40 mm thick.
- Floor models. Their installation is carried out during the process of arranging the floors, since the “body” of the device is placed under the flooring. In the private sector, products of this group are used extremely rarely.
- Invoices. The most common options in everyday life. Installing such a door closer with your own hands is quite simple. Even if you have no experience, it will take no more than half an hour.
By mechanism type
- Rack and pinion + hydraulics. The “working” element in closers of this group is a spring.
- Cam models. Such products are installed in homes much less frequently.
By traction force
This characteristic is called differently - closing force, door closer size, EN class. When choosing a mechanism, the determining factors are the parameters of the door leaf: its weight (kg) and width (mm). This is taken into account when determining the installation option for the device.
Types of closers and installation methods
Installing a mechanical device that smoothly closes the door reduces the load on the fittings and protects the hinges and the structure itself from premature wear. You can equip it with an entrance door, an interior door, and a door between the house and the bathhouse extension or garage.
Differences in the installation method determined the classification of closers, which are divided into:
- overhead mechanisms installed on box beams or on the canvas, or in door hinges instead of the rod;
- floor structures, the laying of which is carried out during the installation of the floor covering and is usually designed in advance;
- hidden devices located either in the box if its power is sufficient, or in the canvas. To equip this type of mechanism, cavities must be milled, which should not be undertaken without experience.
The simplest and most accessible for an inexperienced performer would be the overhead installation of a door closer, the process of which in most cases is described in detail by the manufacturer. Caring manufacturers now include with their products not only a detailed description, but also a template that accurately follows the contour of the mechanism with clearly marked points for fastening. Almost all actions are carried out according to the standard algorithm, but there are nuances that should not be forgotten.
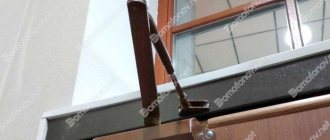
Construction installation options
Mechanisms with levers or sliding channels can be mounted both on the inside and outside of the interior door structure. It is undesirable to install the device only on the outside of entrance doors due to the negative influence of characteristic changes in atmospheric temperature.
The fact is that the smooth movement of the spring controlling the lever ensures the variable flow of machine oil from one cavity to another. And in cold weather it becomes more viscous and thick, and in hot weather it becomes more liquid. Therefore, due to temperature fluctuations, the operation of the device will have to be adjusted more often than specified by the manufacturer, which ultimately reduces the operating life of the system.
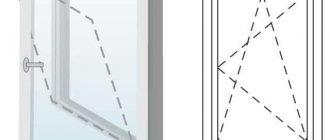
You can choose one of three common installation schemes:
- The standard installation predetermines the fixation of the main working body on the canvas. With this arrangement, the lever is attached to the lintel of the door frame.
- The upper diagram dictates the fastening of the mechanism to the ceiling - the upper box beam, and the lever shoe is screwed to the door leaf.
- The parallel arrangement is similar to the standard version, but the lever is not attached perpendicularly, but in parallel using a mounting bracket.
The installation diagram of the door closer depends on the location of the hinges. That is, from the direction of movement of the canvas when opening/closing. If the door is opened “pull”, then the device is mounted as standard on the door leaf, and the lever is attached to the box beam. The “on your own” option obviously involves top mounting of the device to the lintel with fixation of the lever on the canvas.
There are also non-standard cases, such as, for example, insufficient door clearance. But cunning developers found a way out of structurally difficult situations by offering mounting angles and plates to home and professional craftsmen.
The installation of a door closer in such cases is carried out in a parallel scheme in two ways:
- the lever is secured in parallel, placing its shoe on the mounting angle fixed on the box;
- The main body of the closer is attached to the box beam using a mounting plate.
Briefly about door closers with sliding rod
Sliding rod devices are attractive due to their optimized design, which practically does not interfere with the interior decor. Among the advantages is the ability to upgrade the device with an electromagnetic clamp or fire alarm. Such closers operate with great force, and there is no way to control their operation, but equipping them with an elastic limiter insert will allow you to set the required opening angle of the sash. Most modifications are installed according to schemes similar to the perpendicular option described above. But universal models with a sliding channel rod can be mounted on both sides.
Attention. Installation of duct (slider) closers on the side opposite the location of the door hinges dictates that the device be equipped with a door leaf opening angle limiter. It can be replaced by a specialized stopper built into the slider.
It can be replaced by a specialized stopper built into the slider.
Division into types
There are many types of devices, differing in certain characteristics. If we understand them according to the installation principle, we get:
- Devices that are applied to the door leaf (overhead). They are usually placed at the top and connected to either the box or the wall.
- If the product is placed at the bottom of the door and connected to the floor, then it is called floor-standing.
- There are also products that are placed inside the canvas or in a floor-standing device. They are not visible, so they are called hidden. It is almost impossible to install such a mechanism yourself.
Related article: Why the plastic balcony door does not close
They are also distinguished according to their operating principle:
- lever This is one of the simplest devices. Consists of a spring and a hydraulic system;
- slide. It works due to the generation of friction force, which reduces the speed of closing the canvas.
Based on the structure of the internal mechanism, closers are divided into cam and gear. The gradual movement of the blade is ensured by a feather-type mechanism, so it is preferably installed on slide closers. The gear type is rougher in design, so it is installed on heavy metal sheets.
Door closer installation
Let's consider installing the top closer. Because this is the most popular option, and actually the easiest to install yourself.
Installation is performed in the following sequence:
- Preparatory work. Before installing the door closer on a metal door, you must carefully read the installation instructions that come with the product. You should also take care of the necessary tools and fasteners.
- Marking. Usually a template is included with the product. It should be attached with tape to the door structure. After this, you need to mark the holes required to mount the device. For these purposes, a core is used. The template needs to be glued closer to the top loops. The lever is mounted on the frame, and the mechanism itself is mounted on the canvas.
- Drilling holes. Taking into account the template markings, holes are made. To correlate the sharpening of the drill and the diameter of the resulting holes, it is better to first drill them on an unnecessary piece of metal. After all, if the holes are larger in diameter, then there will be no reliable fixation.
- Installation of closer. The product body is mounted so that the valves for speed control are directed towards the door hinges. The lever is divided into two parts, the foot is fixed on the box. After fastening, check the operation of the closer.
If necessary, you need to adjust the operation of the mechanism. Also, after installing the door closer, you need to hide all traces and defects that might appear on the canvas.
Briefly about the main thing
The installation of door closers is carried out in several stages: choosing an installation scheme, working with a template, directly installing the elements of the device and its final configuration.
The specificity of the installation lies in the variability of its execution. The design can be mounted in a hidden version, when the device is not visible to the eye, and in a surface-mounted version, where the lever and body of the device are located directly on the doors.
The standard method of installation is considered the most common, but it may be necessary to carry out complex installation of the structure, where additional elements such as plates and angles are used.