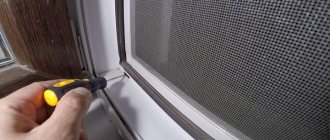
The next stage of preparation is checking the vestibule and looking for leaks (usually they are found in the corners). To do this, you just need to run the flame of a lighter or a wet hand along the perimeter of the sash - this way you will feel a draft even in relatively warm weather. It is necessary to strengthen the pressure only in those areas where there is a leak.
If the apartment is constantly stuffy, but you do not want to install supply valves, you can ensure air flow using fittings by loosening the pressure at the top of the valves.
Setup
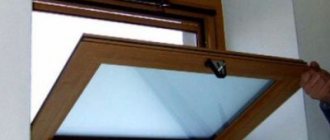
Further, adjusting the plastic windows yourself for the winter will be much easier. The algorithm of actions depends on the brand and specific series of the mechanism, but usually to change the clamping force you need to rotate the eccentric pins (there are at least two of them on each leaf, usually four) - for this you will need a 4 or 6 mm hex key. Sometimes there are “+” and “-” signs on the trunnion, then rotation towards “+” increases the pressure. Having turned the key about 10 degrees, as shown in the photo below, you need to check the tightness of the ledge again, and so on until the window closes tightly enough. If you immediately turn the trunnion 45-90 degrees, then when you try to lock the sash, you can damage the mechanism.
Photo: Vladimir Grigoriev
Trunnion positions: 1 - weak pressure (summer), 2 - medium pressure (universal position), 3 - strong pressure (winter).
ShutterStock
Some older models of fittings require adjustment not of trunnions, but of counter strips or hooks on the box, which are also moved using eccentrics. Unfortunately, in this case the process may fail, especially if the window is already more than 10 years old.
Why regulate?
Different modes are needed for one simple reason - the change of seasons. Accordingly, there is a periodic drop or rise in temperature. The ability to close windows more tightly (or, conversely, less tightly) increases the access of fresh air into the room in the summer and reduces the outflow of heat outside in the winter.
If the window is constantly used in “winter” mode, this will lead to rapid wear of the seal due to the constantly high clamping pressure on it. If you leave the summer mode for the cold period, then there will be drafts and significant heat loss in the room. As a rule, during installation, windows are set in a neutral mode (spring/autumn), and when the season changes (that is, 2 times a year), it is recommended to make the appropriate adjustments.
Ventilation valves as a special tool for air exchange
The operating principle of the devices and their advantages
If you don’t want to face problems like “the window is jammed” or “it’s blowing from the open opening,” then instead of traditional ventilation you can install a special ventilation valve:
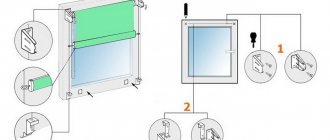
Sectional view of the valve and its operating principle
- A window ventilation valve is a device that is usually mounted at the top of the frame and closes the through hole.
- Inside the valve there is a mechanism that regulates the intensity of air flow into the room.
- The simplest designs are equipped with mechanical adjustment: if we need it, we open the valve, if not, we close it, completely or almost completely blocking the air exchange.
- More complex valves operate using a hygroscopic sensor: the higher the air humidity in the room, the more intense the ventilation.
All valves of this type provide only fresh air. For their normal functioning, it is very important that the hood works normally in the room - natural or forced.
Such devices have several obvious advantages:
- You can set the ventilation intensity once, and adjust it only when weather conditions change.
- When ventilating, the window remains closed, so the level of protection against unauthorized entry is not reduced.
The air enters the warmest zone - under the ceiling
- Air enters the room gradually, and in small volumes. In addition, the ventilation hole is located at the top of the room. Therefore, cold air masses mix with warm air under the ceiling (pure physics!) and the apartment does not cool down as much as with normal ventilation.
The most important disadvantage is the price of the devices . So, the VENTAIR THERMO valve will cost us about 1800 rubles, and the simplest model from AERECO (with humidity regulation) will cost 2 – 2.5 thousand rubles.
How to install a valve on a window
The ventilation valves themselves are expensive, but in addition to purchasing the device, we will also have to spend money on its installation. However, if you have the skill, you can easily do it yourself.
Many manufacturers also produce colored versions of the valves - so that they look good on laminated windows
I install supply valves according to the following scheme:
- The sash is removed from its hinges and installed vertically on a flat surface.
- I remove the fittings from the top of the sash - they will interfere with the work.
Equipment (from left to right): the valve itself, an external visor with an insect screen, a mounting plate
- I apply the mounting strip - the part that is used to secure the valve - to the protrusion of the sash from the outside, after which I use a marker to mark the size and position of the ventilation holes.
- Using a drill, I drill 4-5 holes according to the markings. Then I use a thin saw or jigsaw to connect the holes, forming a long groove or two grooves separated by a thin partition.
Drilling a groove
- I fix the mounting strip on the sash with self-tapping screws. I seal the joint between the plank and the sash using moisture-resistant silicone.
To prevent the air from whistling during intensive ventilation, I also cover the opened chambers in the window profile with silicone.
- I repeat the operations on the frame, but instead of the mounting strip, I install a visor on the outside. The design of the canopy can be very different, ranging from a simple canopy to a complex system with an acoustic curtain that reduces the volume of passing sound.
- I return the dismantled fittings to their place and hang the sash on its hinges.
Installing the mounting plate with self-tapping screws
- I snap the valve itself onto the fastenings of the mounting plate so that the ventilation hole is directed at an upward angle.
- Using the slider or handle, I adjust the ventilation intensity, choosing the optimal mode.
Installation diagram on mounting film
This instruction is for informational purposes only, since the installation technology for different valves may differ (for example, there are models that are mounted without a mounting strip, directly on the window). But in any case, following it, you can install a device to provide fresh ventilation through a plastic window.
Leak test
You need to prepare plastic windows for winter before the first frost. It is necessary to carry out a preventive inspection and check the tightness in the following ways:
- In the closed position, move your hand along the entire perimeter of the sash. In cold weather and the presence of cracks, you can already feel a draft.
- Carefully draw a lit match or lighter along the line where the window joins. Flame deflection will indicate the presence of cracks.
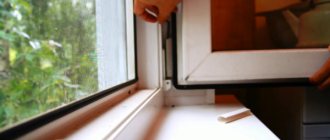
- Place a sheet of paper between the sash and the frame and close the window tightly. Then try to pull it out - if this is successful, the fit is loose and the window needs adjustment. It is important to check in this way every area of contact between the canvas and the frame.
Adjusting plastic windows for winter mode
Switching windows from one mode to another is simple, but you will have to pay attention to each stage. Some people are completely afraid to perform this procedure, so they use the services of a company that installs windows. If there is a lot of pressure, the rubber quickly becomes unusable, and you can unknowingly ruin an expensive double-glazed window. But if you approach the process thoughtfully, there will be no problems.
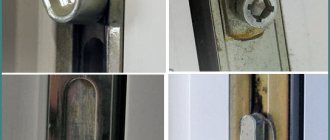
Adjusting trunnions on metal-plastic windows: step-by-step instructions
Step one: first you need to find where the trunnions are located. Usually their number depends on the dimensions of the structure. However, most often there are three of them on one side (where the handle is located) and one on the other side.
In case of mode change, each trunnion must be adjusted
Step two: Next, you need to pay attention to cleaning the window and fittings so that dirt does not get into the trunnions.
The window must be clean
Step three: now you need to wipe the lubricant elements with a cloth, and then apply it to the surface
Machine oil can be used for lubrication
Step four: now you should examine the condition of the trunnions, find marks on them and turn them to the desired position.
For such purposes, use a hexagon or pliers.
Step five: upon completion of installation, you need to check the tightness again using a paper sheet, as we described above.
Even with increased impact, the paper sheet must remain between the frame and the sash
Note! Some companies make windows with recessed trunnions, so you will need to pull them out with the same pliers before making adjustments. Otherwise, this procedure resembles changing a clock.
If necessary, you can loosen the eccentrics in the same way, which means switching the windows to summer or standard mode. It is enough to do this procedure several times, and you will definitely not confuse the modes.
Prices for plastic windows
Plastic windows
Video – Adjusting windows by mode
Types of adjustment mechanisms
The degree of pressing of the sash to the frame is adjusted using locking mechanisms (trunnions) located on the side and upper ends of the sash. The appearance, quantity and location of these devices may vary depending on the manufacturer and price category of the double-glazed window.
The most common ones include:
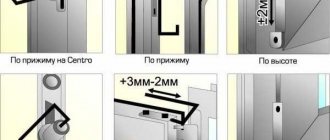
- Round. Such trunnions have some kind of mark (dash, mark, dot, asterisk). If it is directed towards the room, then the window is set to “winter” mode, to the street – “summer”, upward – “neutral”.
- Oval. The vertical position is “summer”, the horizontal position is “winter”, the diagonal position is the standard “neutral”.
- Turnkey eccentrics. The shift into the room is “winter” mode, outward is “summer”, strictly in the middle is “neutral”.
Three modes that no one knows about
Ease of operation, presentable and neat appearance, easy care of surfaces - these are the main advantages of any plastic window. But you need to understand that they will not be durable and will not serve faithfully for many years without proper care and attention. Periodic correct adjustment of the operating mechanisms of a plastic window is the key not only to long-term uninterrupted operation of the sashes, but also to comfortable living in the house. So, if the window is not adjusted correctly, it will leak through and close poorly , and the apartment will be cold, which is unacceptable for any residential building in general and a house where children live in particular.
Plastic windows for winter
Attention! If plastic windows are not adjusted and configured correctly, then all the seals and mechanisms in them are destroyed very quickly due to exposure to negative factors (humidity, water, wind, ultraviolet radiation, etc.).
No matter how high-quality the profile was chosen when making your windows, drafts will appear after some time
There are three main modes of plastic windows. In summer, winter and spring they need to be configured differently.
Table. Plastic window modes.
| Mode | Information |
| Summer | With this setting, the doors are loosely attached to the frame, so the apartment is better ventilated - there is a free exchange of air between the street and the home. This creates a kind of micro-ventilation. |
| Winter | The doors set to winter mode fit more tightly to the frame when closed. Thanks to this, it is possible to maintain warmth in the home and avoid drafts. |
| Standard | Typically, a window set to this mode functions the same in both cold and warm seasons, that is, the window sashes are pressed optimally, but not too tightly and do not leave large gaps. |
On a note! There is an opinion among some craftsmen that plastic windows do not have a so-called “winter” mode. However, the majority still holds the opposite opinion.
Self-adjustment of windows for winter
Unfortunately, many users are not even aware that it is possible to adjust these structures. The reason is usually that window manufacturers and installers do not even communicate all the capabilities of window systems. In fact, the window has so-called trunnions, which allow you to set the current mode at a given time. The trunnion, also called the eccentric, is a small element that is responsible for adjusting the sash mode. It is located on the end side of the sashes. If it is oval shaped or marked with a key icon, it is adjustable.
Features of adjusting plastic doors
Find out how to adjust a plastic balcony door with your own hands in a special article on our portal.
Adjustment depending on brand
Manufacturers of double-glazed windows complete their products with different types of fittings from different brands, the adjustment of which may have some distinctive features:
- "Maso." The trunnions of this brand are quite large and oval-shaped, which allows adjustment with ordinary pliers or a wrench.
- "Torx". Produces the most reliable and durable locking fittings. Adjustment is carried out using a hex wrench or slotted screwdriver.
- "Roto". The locking mechanisms of this company have round heads. To turn them you need a special key of the appropriate shape.
The plastic window does not close
Situations where plastic windows do not close tightly are rare. This usually occurs after prolonged use of the product. The reason is a decrease in the quality of the locking system.
The locking system stops working correctly for three reasons:
- Window fittings are worn out.
- The geometry of the inserted glass unit is broken.
- The height of the sash was adjusted incorrectly - the trunnions were raised to the maximum, so they simply did not go beyond the strikers.
The last reason must be dealt with in this way. First of all, determine which trunnion does not extend beyond the bar. To do this, use your hands at each eccentric to pull the plastic window sash towards you. There is no need to pull hard. If the sash moves slightly away from the frame, it means there is no engagement.
The problem can be solved simply - using the adjusting screw on the strike plates you need to raise them. If the shift is large and the screw does not help, you will have to remove the bar and reinstall it higher. Unscrew the screws, move the bar higher and secure it in a new place with the same fasteners.
There may be another reason behind this defect. In this case, the trunnions and strikers are located in the required positions. It’s just that a gap is formed between these two elements due to the concavity of the sash profile. Therefore, no engagement occurs. The easiest way to correct the situation is to raise the counter bars:
- they are removed after unscrewing the screws;
- plastic linings 2-4 mm thick are installed under them;
- The slats are set in place and secured to the window frame.
Sometimes this method doesn't help. Then the whole point is the loss of the geometry of the glass unit, so the window does not close well. This can happen for various reasons, but the basis of the defect is the straightening gaskets, with the help of which a gap is formed between the double-glazed window and the profiles. These gaskets, after deformation of the plastic window profile, do not maintain the required gap. It needs to be restored by adding additional gaskets.
This is done like this:
- The glazing bead is removed near the profile that has become deformed.
- The amount of profile deformation is measured. You can use a long ruler for this.
- The gap is measured.
- Gaskets are selected based on its size.
- Using a plastic spatula (not metal), the glass unit is pressed away from the profile.
- Prepared gaskets are installed in the resulting space. Sometimes one is enough.
- The spatula is removed.
- The bead is installed in place.
How to switch modes
The number of adjusting pins may vary, but each one needs to be adjusted.
On the round pin, depending on the manufacturer, there is a dot or mark indicating what position it is in.
Switching to winter mode:
- Turn the eccentrics clockwise until the risks (or other types of trunnions move) turn towards the room.
- Check the degree of pressure by holding a regular sheet of paper between the sash and the frame - it should hold tightly if the adjustment is made correctly. Otherwise, you need to make additional adjustments to the clamp.
- Transfer to the “summer” position is performed in the same way. The mark (mark) must face the street.
Also, watch the detailed video instructions if you have any questions:
Sequence of actions when changing mode
Before switching plastic windows to summer mode, it is necessary to establish how many eccentrics you will have to deal with, their location and control option. There are window models that, in addition to the three standard eccentrics located at the end of the sash, have additional trunnions located on the upper, lower or opposite ends (or on all sides at the same time). Changing the mode will require reconfiguring all these hardware elements individually.
A set of necessary tools
Having taken care of how to switch the windows to summer mode, you should stock up on the following tools:
- hex wrench No. 4 or No. 6, screwdriver or asterisk to adjust round eccentrics;
- pliers to adjust oval hardware.
Other adjustment methods
If, after setting the “winter” position, cold air still enters the room, then the problem may be due to incorrect sash geometry. Typically, sagging or distortion occurs on long-installed double-glazed windows. This can often be noticed visually or by a characteristic sound.
Adjustment of the position of modern windows can be carried out in several planes - the main thing is to know where the corresponding adjustment screws are located.
The tools you will need are a hex wrench and possibly a flathead screwdriver. First you need to remove the covers covering the hinges - it is convenient to do this when the sash is open in the “ventilation” mode.
Remove the plug from the bottom hinge
Most double-glazed windows have the following adjustments:
- Vertically. This is done by rotating the top screw of the bottom hinge. To raise the sash up, turn it clockwise, to lower it - counterclockwise.
Raises or lowers - Horizontally. Adjustable with a bottom end screw on the bottom hinge. Turning clockwise tightens the frame to the hinges at the top or bottom, respectively. It is often difficult to access due to its close proximity to the slope. In this case, you need to open the frame and make adjustments from the inside of the sash - this screw is double-sided.
- Adjustment of the fit of the lower corner. The bottom screw of the bottom hinge is responsible for this setting. It is not available on all double-glazed windows! Do not confuse it with the lower side horizontal adjustment screw!
If it blows from the direction of the loop itself - Adjustment of the fit of the upper corner. You need to gain access to the eccentric in the upper scissors. To do this, the sash must be simultaneously open in two positions: rotary and tilting. First open the window to the side, then turn the handle up and tilt the frame. The maximum pressure is set when the mark (mark) is facing towards the sash, the minimum - vice versa.
- Adjustment of strikers. These parts may become loose during use. They need to be inspected visually and, if necessary, lowered or raised.
It is recommended to check the position of the sash after every two turns of the screw so as not to overtighten it in the opposite direction, especially if you do not have similar experience in adjusting the pressure and position of the window. When raising and lowering, periodically open and close the sash in the “ventilation” mode and make sure that it does not catch the frame. When making left-right adjustments, open and close the frame in a rotating mode and watch how it fits into the frame.
Replacing seals
If after adjusting the hinges and locking mechanism the tightness does not improve, most likely the problem lies in worn seals. It is difficult to replace them yourself, without the tools and skills, and new gaskets are sold mainly in specialized stores, of which there are very few even in large cities. Therefore, it is easier to order the service. Its price is still the same 1,500-3,000 rubles. for a master’s visit plus from 150 rubles. for each meter of compaction.
When replacing, the seals are easily damaged. Therefore, if you decide to take on the task yourself, buy gaskets with a reserve.
In conclusion, we suggest watching a video about adjusting plastic windows yourself for the winter, where instructions and tips are given.
The plastic window does not open
There are different situations when a plastic window does not open. And their reasons are also different:
- The handle is stuck or it rotates freely.
- The sash is sagging or deformed.
When the handle jams, you don’t need to do anything yourself. The problem is due to the fact that the strapping mechanism or one of its parts has failed. The blocker may have been triggered. To eliminate the defect, you need to remove the glass unit. An unprofessional approach can ruin everything.
If the handle rotates freely, there are two scenarios:
- Rotates in different directions. There is only one way to solve the problem - replace the handle with a new one. After which the plastic window will open without problems.
- The handle is in good condition, but the command from it does not reach the trunnions. The reason is that the transmission mechanism, also known as the gearbox, is faulty. There is no need to change it yourself. This is a complex operation.
If the sash is sagging or deformed, then this is due to the adjustment, which involves the hinges of the plastic window.