To eliminate malfunctions, you need to adjust the plastic windows. To do this, you can call specialists, or you can do everything yourself, following the instructions.
A prerequisite for the effective performance of the functions of a plastic window is correct adjustment. It maintains the tightness of the rebate, the necessary tightness, and the smooth movement of the sash without distortions or touching the frame. The initial adjustment of plastic windows is carried out by installers during their installation. After this, they should work without defects or irregularities. However, over time, small gaps appear and the sashes begin to sag a little. In the future, these deviations intensify, which interferes with the normal operation of the structure.
What is adjustment of plastic windows
Each window or door product has factory specifications. Over time they change, not for the better. Adjusting windows and doors returns the structure to its original state, which extends its service life.
Adjustment of plastic windows and doors is carried out in the following cases:
- creaking when opening or closing the sash;
- the handle gets stuck;
- it also stops fixing the movable element of the window - the sash;
- the sash must be lifted when it needs to be closed;
- draft through the gap between the frame and the window sash;
- traces of wear on the plastic.
Types of adjustment of plastic windows
There are several functionalities of PVC windows, where different mechanisms are used. They must be adjusted from time to time.
But there is a type called seasonal adjustment, which must be carried out when the seasons change - before the onset of cold weather and warming . That’s what it’s called – adjustment for winter or summer. Regulatory processes are carried out in autumn and spring.
Seasonal adjustment
This is a simple setup option. It is based on changing the gap between the sash and the frame of the plastic window. The bottom line is that in winter and at low temperatures, rubber decreases in size, which causes a gap to appear through which cold air will freely penetrate into the room. Therefore, the gap is kept minimal or closed tightly.
In the warm season, on the contrary, the rubber expands. Therefore, the pressure is made weaker. At the same time, the tightness of the window remains maximum.
Find out how to install a supply ventilation valve on a plastic window.
Adjusting the folding mechanism
This device is necessary for ventilation. That is, the sash does not open completely, but leaves a small gap for air to penetrate from the street. This is an additional feature.
The window itself opens and closes using standard technology:
- if the handle is down, it means the window is closed;
- if it is turned to the side, it is open.
To ventilate, the handle must be turned 180º from the “closed” position.
Adjusting the pressure of a plastic window is that the pressure often weakens, and it must be brought to normal. Therefore, using an asterisk or hexagon, turn the screw located in the corner of the window structure. As a result, the sash either rises or falls.
Adjusting fittings
The word “hardware” includes several elements: a plastic window handle, pins, scissors, strikers and locking strips, a micro-ventilation system, a lock. As for the settings, three positions are taken into account:
- repair;
- replacing them with new ones;
- adjustment of fittings.
How to replace seals
To change the seal, you must remove the window sash.
Windows are blown out not only due to poor pressing of the vents, but also due to wear of the rubber bands. Not all manufacturers supply high-quality seals, so the gaskets deteriorate due to the negative effects of heat and low temperatures.
Operating rules:
- Remove the sash . Without this, you can change the rubber band only in a window with a tilt-and-turn system, but this is also difficult. You cannot leave part of the gasket behind the hinge, because it has become thinner due to use, and it will blow in the corner.
- Both contours are changed , while the rubber is glued together when joined. You cannot connect without glue, because the seal will “run away” over time, and an unprotected area will appear at the joint.
It is not recommended to compact rubber if it is longer. This will lead to the formation of an “accordion”, the waves of which will allow air to pass through.
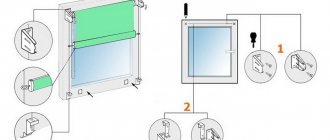
Main adjustment points for PVC windows
There are three points through which adjustment is made:
- Bottom loop. Here you can raise the sash or lower it, or move it horizontally. The displacement usually does not exceed 2 mm.
- Top loop. Here you can only achieve movement in the horizontal direction.
- Trunnions, also known as eccentrics, located on the side of the plastic window sash. With their help, the pressure is adjusted. Their number varies from 4 to 8, respectively, and there may be several adjustment points.
What tools will you need?
To adjust plastic windows yourself, you will need a fairly simple kit, including:
- Hex wrench No. 4;
- Pliers;
- Phillips and flat screwdrivers;
- A screwdriver with a set of bits of different shapes.
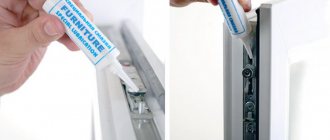
The tools from this set are usually always available at home. An exception may be a hexagon, without which the work cannot be completed - this is the main regulatory tool. If you don’t know what key is needed to adjust plastic windows and where you can find it, then contact any furniture hardware store. 4 mm hexagons are used when assembling any modern cabinet furniture, so finding such a key will not be a problem.
A screwdriver and screwdrivers will be needed to work with the screw connections with which the hardware elements are attached to the profile. Pliers are needed as an auxiliary tool.
It is recommended to additionally prepare silicone grease for the fittings. You can also use WD-40 or other similar spray lubricants.
How to adjust a plastic window for winter and summer
It is easy to correctly adjust a plastic window for winter and summer. In window structures, the trunnions are factory installed in a neutral position. This is not the “winter” or “summer” pressure mode. But you need to understand that there is a certain variety of window fittings models. Accordingly, trunnions come in different types in shape:
- Oval.
- Round with a mark (groove) or a dot on the front plane. Another option is when there is no mark. But there are different thicknesses of the eccentric wall. Less thickness is considered a mark.
- Round with rotating head.
- Round with eccentric roller. A convenient option because adjustment is made without tools - manually.
- Static, refer to models with the index “E”.
For the winter
If there is a mark on the pin of a plastic window, then in the “winter” mode it should be located towards the room, otherwise – towards the rubber seal of the sash. Therefore, you need to take a hexagon, insert it into the hole in the trunnion and turn it so that the point or groove is in the right place.
If the eccentric has an oval shape, then the rotation is made using pliers. The neutral position of the trunnion is at an angle.
To transfer to winter, you need to install the element horizontally.
For summer
Here it's the other way around:
- The round pins with a mark are rotated so that the mark is on the outside - facing the street.
- Oval ones are placed vertically.
There are several pins on the plastic window that serve as clamping bolts. That is, opposite them, pressure strips are always installed on the frame, they are also reciprocal. Before you start making adjustments, you need to count the slats. Their number corresponds to the number of eccentrics. And each of the latter must be adjusted to the correct position.
If at least one is not adjusted, then the geometry of the clamp will be disrupted, which will entail a distortion with gaps between the frame and the sash.
Negative aspects of changing the mode of a plastic window
Strong pressure in winter mode has a negative effect on the seals. They are subjected to heavy loads because they are compressed under the action of the axles inserted behind the strikers. And although the rubber is ready for such loads, it is only on an ongoing basis.
If you increase or decrease the load, the rubber will lose its properties. Here we must also add different temperature and humidity conditions, which change in accordance with the beginning and end of a particular season.
It is optimal for seals to be in one of the modes constantly. If you change the latter, the service life of rubber products is reduced. They will have to be changed more often. But on the other hand, when changing the pressure mode, living comfort improves, plus heat loss in winter is reduced, which is an important factor today.
How to adjust PVC windows by height, clamp and handle
Most types of double-glazed windows existing on the market are equipped with voluminous and high-quality fittings. It guarantees a long service life of the product and its reliability.
Note! The design requires timely maintenance in case of malfunctions. It is possible to eliminate them yourself if you have the right tools.
List of handy tools:
- classic Phillips screwdriver;
- pliers;
- machine oil;
- 4 mm hex key;
- star-shaped screwdriver bits marked TX or T.
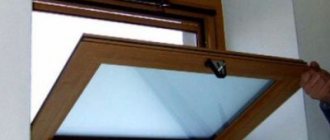
The main tool for debugging the mechanism is an “L” shaped key, which is called a hexagon.
Photo: window adjustment with a hex wrench
Star-shaped attachments are used when the window has special fittings, but not often. However, it is recommended to have them on hand. Bolts are used when the window structure has sagged and requires new fixation.
In simple cases of adjusting the frame, you can only get by with a set of ordinary screwdrivers. Often, repair comes down to correctly setting the distance between the rollers on which the sash is attached.
Plastic window handle repair
The handle has only one function - to fix the sash when it is necessary to close the window. Conversely, when opening, stop committing. Purely functionally it goes like this:
- turned the handle down;
- the trunnions move along the locking bars;
- They go behind the counter bars, where they stop.
The strike plates are a kind of retainer.
It is impossible to adjust the plastic window using the handle. That's not what it's intended for. And it itself cannot be regulated either - there is no point. It can only be repaired if:
- it's broken;
- it was jammed;
- it's hard to turn it;
- there was a backlash.
Replacing the handle
This must be done when the handle is broken. Process step by step:
- under the handle there is a rectangular bar that must be pulled towards you and turned 90º in any direction;
- there are two screws under it that can be unscrewed with a Phillips screwdriver;
- Removed the screws and pulled the handle towards you.
In reverse order, you need to install new fittings.
The handle is loose
The backlash is the easiest to remove. For this:
- the decorative strip rotates;
- tighten the screws with a screwdriver if they are loose.
Difficult to turn
There are two reasons:
- Lack of lubrication and contamination of the mechanism. To do this, you need to carry out operations, as with replacement. – pull out the handle, clean it of dirt and lubricate it.
- Strong pressure. This is sometimes reflected at the end of a turn when closing the plastic window. It is necessary to loosen the trunnions - move them slightly to the “summer” position.
The handle is jammed
This happens when the sash is opened without fully tightening the handle. But at the same time the plastic window opened. It's all about the blocker. This element is installed specifically so that the locking mechanism does not break.
The location of the blocker is usually under the handle on the end side of the sash. It is he who blocks the movement of the eccentrics. This blocking part has a different shape from different manufacturers and can be located in different places. For example, under the upper or lower eccentric.
To unlock, you need to press the locking latch, pressing it against the surface of the end of the plastic window sash. And at the same time you need to immediately turn the handle. In some models of plastic windows, the blocker must be returned to the vertical position.
Replacement of accessories
If there is a child in the house, it is recommended to remove the simple handle and change it to a model with a built-in limiter. Children will not be able to open the window on their own or break it while playing. If the handle is cracked or unusable, dismantling looks like this:
- pull the protective pad towards you;
- place it in a horizontal position;
- Unscrew the screws located in the handle with a screwdriver;
- remove the mechanism;
- install new fittings;
- install the protective cover.
Adjusting the micro-ventilation system
The design of a modern PVC window has a number of additional convenient functions. One of them is the window function. This is when the top of the sash moves away from the frame, creating a gap.
This function has two possible options:
- Ventilation. The window sash extends a considerable distance from the frame so that a large volume of air masses can be admitted into the room.
- Micro-ventilation. The gap is small, which allows you to leave the plastic window in this position for a long time.
To use this function, you must use the handle of the plastic window. It can have four positions, as shown in the photo below:
- Located at the bottom - the window is closed.
- Installation in a horizontal plane - open.
- Rises up vertically - ventilation.
- Rotate 45º – micro-ventilation.
With micro-ventilation, adjustments can be made by increasing or decreasing the gap. The design of the plastic window has a micro-ventilation system mechanism; it is sliding and resembles scissors. That's what the masters call him.
One of the elements of the scissors is the adjusting screw. It can be used to make two types of adjustments:
- clamp;
- the angle of inclination of the sash during micro-ventilation.
How to change the pressure
First you need to open the window. Further:
- the handle is turned up for ventilation;
- the adjusting screw is turned 180º clockwise using a hexagon;
- the handle is moved to a horizontal position - open;
- the window is closed;
- the handle is lowered down.
This sequence of operations allows you to increase the pressure and reduce the gap. To check the work, you can use a burning match, simply by bringing it to the junction of the frame and the sash. If the flame does not deviate towards the plastic window, then the pressure is maximum. If it deviates, then all the above operations must be carried out again in the same sequence.
Angle adjustment
The operations here are the same as when adjusting the pressure. If the screw is tightened clockwise all the way, the angle of inclination decreases within a few millimeters. If you unscrew the screw, the angle increases to 2 cm.
If the mechanism is jammed
If the part is moved too much to the lower position, it may jam. This case is not considered a malfunction - the handle was blocked to prevent breakage of the entire window structure. The situation is easy to correct without contacting a specialist. Focus on the part markings that are indicated on the surface of the locking mechanism. For example, if the combination “AUBI” is there, look for a small plate with a spring on the surface, press it against the seal and press on the fittings. The sash should not be tilted, because this is how the block works and it will not be possible to turn the fittings. The optimal position is vertical.
If other letters are indicated, in order to turn the mechanism, you need to find a small tongue located at the bottom of the system. When you press on it, the position changes and it becomes parallel to the seal. Often temperature changes lead to deformation of the structure, so the tongue simply does not reach the required point. You will have to unscrew the fasteners with a screwdriver or contact a service center. Remember to place a small object (such as a bolt) between the block and the frame. This ensures adhesion of the response elements, which facilitates the rotation of the fittings.
The plastic window does not close
Situations where plastic windows do not close tightly are rare. This usually occurs after prolonged use of the product. The reason is a decrease in the quality of the locking system.
The locking system stops working correctly for three reasons:
- Window fittings are worn out.
- The geometry of the inserted glass unit is broken.
- The height of the sash was adjusted incorrectly - the trunnions were raised to the maximum, so they simply did not go beyond the strikers.
The last reason must be dealt with in this way. First of all, determine which trunnion does not extend beyond the bar. To do this, use your hands at each eccentric to pull the plastic window sash towards you. There is no need to pull hard. If the sash moves slightly away from the frame, it means there is no engagement.
The problem can be solved simply - using the adjusting screw on the strike plates you need to raise them. If the shift is large and the screw does not help, you will have to remove the bar and reinstall it higher. Unscrew the screws, move the bar higher and secure it in a new place with the same fasteners.
There may be another reason behind this defect. In this case, the trunnions and strikers are located in the required positions. It’s just that a gap is formed between these two elements due to the concavity of the sash profile. Therefore, no engagement occurs. The easiest way to correct the situation is to raise the counter bars:
- they are removed after unscrewing the screws;
- plastic linings 2-4 mm thick are installed under them;
- The slats are set in place and secured to the window frame.
Sometimes this method doesn't help. Then the whole point is the loss of the geometry of the glass unit, so the window does not close well. This can happen for various reasons, but the basis of the defect is the straightening gaskets, with the help of which a gap is formed between the double-glazed window and the profiles. These gaskets, after deformation of the plastic window profile, do not maintain the required gap. It needs to be restored by adding additional gaskets.
This is done like this:
- The glazing bead is removed near the profile that has become deformed.
- The amount of profile deformation is measured. You can use a long ruler for this.
- The gap is measured.
- Gaskets are selected based on its size.
- Using a plastic spatula (not metal), the glass unit is pressed away from the profile.
- Prepared gaskets are installed in the resulting space. Sometimes one is enough.
- The spatula is removed.
- The bead is installed in place.
The plastic window does not open
There are different situations when a plastic window does not open. And their reasons are also different:
- The handle is stuck or it rotates freely.
- The sash is sagging or deformed.
When the handle jams, you don’t need to do anything yourself. The problem is due to the fact that the strapping mechanism or one of its parts has failed. The blocker may have been triggered. To eliminate the defect, you need to remove the glass unit. An unprofessional approach can ruin everything.
If the handle rotates freely, there are two scenarios:
- Rotates in different directions. There is only one way to solve the problem - replace the handle with a new one. After which the plastic window will open without problems.
- The handle is in good condition, but the command from it does not reach the trunnions. The reason is that the transmission mechanism, also known as the gearbox, is faulty. There is no need to change it yourself. This is a complex operation.
If the sash is sagging or deformed, then this is due to the adjustment, which involves the hinges of the plastic window.
How to adjust a plastic window so it doesn't blow
Usually, it starts to blow from the side of a plastic window if its sash sag or sag (gaps form between it and the frame). Sometimes a gap appears between the loops, through which it begins to blow.
If it's sagging
When open, the weight of the profiles and double-glazed windows puts a large load on the hinges. In this case, the upper one is loaded more, causing the metal profile to bend towards the room. In the lower loop, on the contrary, the metal is pressed in. It turns out that the upper corner on the side of the handle sags. Hence the problems with ventilation.
The problem is solved like this:
- it is necessary to remove the decorative protective strips from the hinges;
- open the window;
- tighten the sash to the frame using the adjusting screw of the upper hinge;
- lift the sash using the screw on the bottom hinge.
All screws rotate clockwise. Each 180º turn must be accompanied by a check - the window must be closed and the gap checked.
If you sat down
The situation is this: the sash is located vertically, but has moved away from the frame. The hinges were subject to the same loads, so the same deformation of the profiles occurred at these points.
How to adjust the plastic structure in this case:
- the decorative strip is removed from the bottom loop;
- the upper screw, which rotates clockwise, lifts the sash;
- the bar is installed in place.
Drafts around loops
Everything here is also simple. Simply adjustment is made using horizontal screws on each hinge. In this case, the displacement can be carried out within a few millimeters, depending on the model and manufacturer. It is necessary to make half a turn of each screw and check for the presence or absence of a draft.
How to check the tightness
The fact that a PVC window has become difficult to close and allow air to pass through can be understood by a number of signs. The main ones:
- creaks and crunches when closing a double-glazed window;
- there is a cold draft from the window;
- whistling when closed;
- the sash is difficult to open and close;
- the appearance of a draft in the room.
Signs of a window unit not being tightly closed in winter, in windy autumn weather, are especially noticeable.
To check the tight fit of the sash to the frame, you need to do a simple test. You should bring a thin sheet of paper to the closed glass unit. If it sways, it means that the structural elements in this area are not connected well. You can also run the back of your hand around the perimeter of the frame. In areas of loose fit, air movement will be felt. If you wet your palm first, the sensitivity will increase.
Adjusting the vertical and horizontal position of the window
When adjusting a plastic window with your own hands, you need to do everything gradually. For example, it is recommended to shift it by 1 mm, check it and, if necessary, further adjust it.
Each hinge has two screws: one located in the top end, the second on the side. The first adjustment is made vertically, the second horizontally. A hexagon is used for this. The upper regulators are usually closed with plugs.
To adjust the plastic window vertically, you need to rotate the screws clockwise, during which the sash will begin to rise. Conversely, counterclockwise rotation results in lowering.
Horizontal adjustment is carried out with the window open. To do this, rotation is done clockwise. In this case, the sash will move towards the frame. By rotating the screw in the opposite direction, movement is achieved from the frame.
Distorted geometry and methods for correcting it
The defect appears almost immediately after installation work. On the face, the sash clings to the bottom of the frame or fittings, i.e. sagging. Mostly this distortion is a consequence of poor delivery of the finished plastic window. Errors during transportation, loading/unloading disrupt the mechanism.
When the sagging is precisely due to geometry violations, it is possible to correct the matter using a glass block of the sash itself. You will need to bring the sash into the correct position. This work is not the easiest and is recommended to be performed by a master.
Possession of information about the structure of the window and the correct manipulations that are performed to adjust the position of the sash will help you solve the problem yourself.
Self-correction of geometry
Four beads must be removed. Activities are carried out from the long sides of the window, moving along the perimeter. The correction is made with a knife with an impressive oval-shaped blade. It is necessary to extend the glazing bead - into the area between the glazing bead and the frame, drive the knife in and turn it.
Attention: here you should carefully hold the glass unit and monitor its position so that the glass does not fall out of the frame.
It is also important to work delicately with glass packaging. A plastic spatula will help prevent chipping. There must be a vacuum between the glasses. Otherwise, the tightness will be lost and the performance properties will be impaired.
The substrates on which the glass unit will be installed should be prepared. It is required that the substrates be laid tightly on the sides or on top. When the glass unit “lies” in the frame significantly tightly, the glazing beads return to their original position.
The beads are installed in the reverse order - first short, then longer. It is better to drive the glazing bead with a special hammer with a rubber surface.
With such little preparation, the owner of the premises can handle the regulation process with his own hands, because inviting a professional implies additional costs.
General adjustment instructions
| Malfunction, problem | Causes | How to fix |
| The window does not open | Handle malfunction The sash is sagging | Replacement Adjusting the sash vertically and horizontally using adjusting screws on the hinges |
| The window does not close | Handle malfunction Loss of sash geometry Incorrect height adjustment | Replacement Place a pad under the strikers of the closing mechanism Adjust the position of the sash correctly |
| The handle doesn't work | It's broken, jammed, difficult to turn | Replacement Disconnect the lock Reduce the pressure and clean the handle |
| Micro-ventilation is impaired | Small gap | To adjust the gap and increase it, use a screw located on the scissors. When it rotates clockwise, the gap increases |
| Blowing through the window | The sash sagged and sagged | Raise the sash structure by rotating the top screws on the hinges Rotating the side screws |
| Transfer to winter-summer modes | Installing the trunnions in the winter or summer positions by rotating them to the required position |
Possible errors and difficulties
The process of adjusting the POM window is not complicated; all home craftsmen can do it, if they have the necessary tools and consumables.
However, in practice, performers often make mistakes that can have very negative consequences, which can disrupt the overall setup of the fittings, as a result of which the window sash will not open.
The most common mistakes when performing regulatory measures include:
- Wrong choice of setting area, start balancing from the bottom of the tilt and turn mechanism, and it is necessary - from the top.
- The preset cleaning of the mechanism from dust and dirt and lubrication for smooth operation of the elements have not been carried out.
- Strong extension of the aluminum sash strip.
- The process of general adjustment of the operation of the fittings in the adjustment field has not been completed.
Lubrication of PVC window mechanisms
Every self-respecting manufacturer of plastic windows offers its own lubricants. At the same time, there are separate lubricants for the mechanical part, and different ones for the rubber seals. They are not always available, so any silicone-based lubricants will do. Do not use water-based lubricants or those containing aggressive substances.
The best option for the physical state of the lubricant is a spray. It easily penetrates into any place under pressure.
Lubrication points:
- loops;
- pen;
- trunnions and strikers;
- scissors.
Lubricating the fittings is easy. There are technological holes in the end sides of the sash element, where the window closing mechanism is located. Lubricant is added to them. Moving and rotating elements located on top are lubricated in the usual way - on top of the contact planes.
Possible consequences of incorrect settings
The biggest trouble with incorrect adjustment is wide gaps through which it will leak. In the cold season, this is fraught with heat loss, which should not be allowed.
A distortion of the structure will lead to incorrect operation of the hinges, which, in turn, leads to their failure. This can also lead to damage to the window sill - traces of the affected profile will remain on it.
But you should not treat the adjustment as an operation with simple manipulations. Any movement can change the settings. And although the process itself is simple, it must be approached with great care.
Did you know that plastic windows can be adjusted this way? Perhaps you have already encountered such a process? Tell us in the comments. Save the article to bookmarks and share it on social networks.