How to install plastic trim on windows: varieties, finishing, do-it-yourself installation.
Plastic windows, or rather their finishing, are regulated by certain standards. If you look at the preliminary work, pay attention to GOST 30971. So you can see with your own eyes how to properly finish the window perimeter, in which places you should use anchor plates and why you need to use a vapor barrier membrane.
If you adhere to these standards, you have a guarantee that the structure will not succumb to the force of the wind, the mounting foam will not crumble, and the frame will not be left without support. By the way, most of the controversy arises precisely on the topic of fastening, not finishing. If we talk about finishing work, then everything is almost the same.
What are platbands, their features
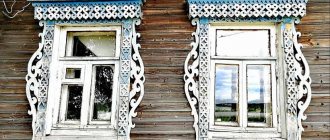
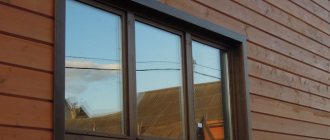
Few people do not know that platbands are small decorative elements that are installed around windows both outside and inside any building. By the way, they not only give the windows a finished and neat look. Platbands are also needed to protect the seam between the wall and the window, usually filled with polyurethane foam, from the influence of a number of external factors, such as light, water, wind, etc. Also, the purpose of using platbands is to increase the protection of the house from drafts .
Plastic trim for windows
Visually, the platbands look like small rectangular strips. They can have different colors, and among them there are also beautiful decorative models (carved, patterned, etc.).
Putting trim on your windows yourself is the easiest and cheapest way to give your home a personal touch.
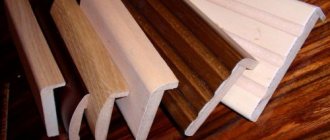
Previously, most often, platbands were made of wood, but now, when the world has been taken over by plastic, it is from this that they are mainly made. This is due to the ease of manufacture of products, durability and low cost of the material. The advantages of plastic platbands are as follows.
- They're cheap . For wooden platbands, which, by the way, can change their size and dry out over time, you will have to pay much more money.
- Plastic is a reliable material. Of course, a lot depends directly on the raw materials and quality of production, but in general, such platbands can serve for a long time without collapsing under the influence of a number of factors.
Plastic windows - Plastic trim looks beautiful and neat . They do not need to be painted - they can initially be painted in the desired colors at production. Although, most often, ordinary white or brown, wood-like elements are installed.
- Caring for plastic is much easier than caring for wood . It is enough to wipe the dust off it, and the platbands look like new. The same cannot be said about wood - not only is it more difficult to clean it of dirt, but over time it also needs to be painted regularly.
- Mold does not live on plastic, and wood borers do not eat it . This means that this also increases the service life of plastic products. Also, the plastic does not rot or dry out.
- Easy to install . Yes, anyone who wishes can install plastic trims - there is no special science in their installation.
Plastic panels for window slopes
On a note! Previously, it was believed that plastic platbands are installed only in combination with plastic windows, but this is a mistaken opinion. They can completely replace the decor of wooden windows. It’s just that in this case it is better to choose the option that will imitate wood in appearance.
Also, plastic platbands go well with siding and are in harmony with other materials intended for facade finishing. You can simply choose elements that perfectly match the color, or choose a contrasting color option.
Functions of platband on plastic windows
Advantages and disadvantages
Advantages:
- Modern design.
- Plasticity of the material.
- Biological stability.
- Low weight of finished products.
- Independence from weather conditions.
- Resistant to temperature changes.
- Variety of colors.
- Absolutely waterproof.
- Ease of installation.
- Easy to care for.
- Retains color during use.
- Resistant to rot and mold.
- Durability.
Flaws:
- Low environmental friendliness.
- During the combustion process, the material quickly melts, releasing toxic substances.
- Deforms under the influence of mechanical loads.
Types of plastic platbands
Plastic platbands can be divided into several types depending on the production method, appearance, method of fastening, etc. Based on appearance, they are distinguished into embossed and smooth. Here they do not have any special differences in quality, the only difference is that some are perfectly smooth, others have a certain relief (for example, they imitate the structure of wood). By the way, embossed ones are a little more difficult to keep clean - dust can get caught in the grooves of the relief, which is quite difficult to remove from there.
Exterior window trim
Important! When choosing platbands, you should take into account not only their appearance, but also the method of fastening, manufacturer, cost, etc.
Table. Types of plastic platbands depending on manufacturing technology.
| View | Description |
| Made from sheet plastic | Material such as sheet plastic is used to create ordinary flat trim. In some cases, the product has a monolithic structure, and sometimes it can be heterogeneous inside. The stretch coefficient of the material is quite low, so such a casing will not deform under the influence of temperature. Therefore, large thermal gaps, which are necessary when installing these elements, will not be needed here. This is the simplest version of plastic platbands. They are usually installed outside the house. The main thing is that the façade of the building and the plane of the window coincide. |
| PVC trims | Such platbands can be embossed or cast. Suitable for installation both outside and inside the house, because they are not afraid of exposure to temperatures or ultraviolet radiation. Thanks to the use of materials such as polyvinyl chloride for the manufacture of products, it was possible to significantly expand and diversify the types of platbands. This is one of the most commonly used types of elements. |
External window slopes made of plastic
Also distinguished are overhead and telescopic platbands . The latter, unlike standard invoices, are a kind of construction kit that is assembled into a single system using special locking connections. Often, such platbands also come with additional accessories. The cross-section of the telescopic casing is L or T-shaped. The overlay platband is simply applied and fixed in the right place using decorative nails or self-tapping screws; it can also simply be glued to adhesive or mastic.
Prices for plastic window frames
Window trims
Cashing windows in a wooden house
Window casing in a wooden house requires a special approach, since the walls are made of solid wood. On the one hand, this makes the task easier, since it is much easier to mount it to wood; on the other hand, it will complicate the choice of material, as it limits it. The house must be designed in a single style, which is why only natural materials for cashing should be used.
Installation features. Preparing the window opening
Oddly enough, the finishing of plastic windows must be carried out strictly according to a certain standard, which is regulated by GOST 30971 . If you follow all the requirements and norms of the document, then the window will not be affected by winds, and the foam used for installation will not crumble or collapse over time, the windows will serve for many years without complaints. In general, finishing a plastic window, or any window, consists of installing elements such as trim, slopes and window sills.
Plastic window sills
First, of course, the window frame is installed. However, this design looks unfinished and sloppy. As a rule, layers of polyurethane foam are clearly visible between the wall and the window, which, even with the protruding parts cut off, looks unpresentable. To begin with, it is important to cover it with a membrane vapor barrier - it will ensure the outflow of moisture, which can penetrate even the slightest cracks. The presence of a vapor barrier will help keep insulating materials dry.
We connect the vapor barrier of the window and the wall
Important! You should not replace the vapor barrier with ordinary polyethylene. It is not as good as specialized material. It is important to understand that moisture can penetrate from everywhere, and not just from the outside, so the insulation separated by polyethylene will still get wet - as soon as the temperature outside the window drops, condensation will appear. The vapor barrier will help remove it, but the film will not allow it to leave, which is why the materials will still become damp and this will not end well.
The use of cash, its functional qualities
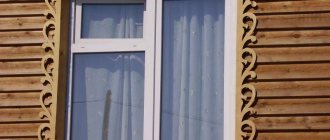
Cashing out plastic windows in a wooden house , as in any other building, has practical problems. Firstly, it can hide window imperfections, for example, unsightly seams connecting the wall and frame, and secondly, it protects the seams from wind, moisture and other weather conditions. Accordingly, thanks to this the room becomes warmer. You can place insulation under the casing: this will help make the house not only warmer, but also quieter.
In addition, this element has a decorative function. It is able to decorate a window, give the facade style, and determine the general direction of home design. Cashing is considered traditional specifically for wooden buildings, with which it looks most harmonious.
Ready-made cashing of a plastic window in a wooden house
Installation of platbands
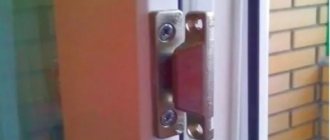
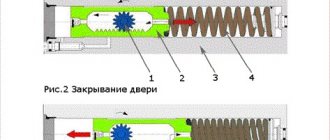
Installation of platbands can be done in various ways. Most often they are attached to the wall or directly to the window frame using special mounting elements - for example, latches. That is, having installed such elements on the frame, the platbands can simply be snapped onto them. The main thing is that all latches are intact and not deformed.
Installation diagram
You can also attach the trim using double-sided tape. The most important thing is to choose good and high-quality material. But in any case, it is worth understanding that the method is not highly reliable. In severe frosts and winds, the tape may not cope with its task, and the platbands will simply fall off. So this method is not recommended if you want to do everything efficiently.
Platbands are always a home decoration
The joints of two platbands must be cut at an angle of 45 degrees. The easiest way to do this is to use a mounting angle with the required markings. Also, cuts can be made at right angles. In this case, they should be on horizontal trims on both sides.
Advantages
Platbands made from various polymer materials have a number of advantages compared to wooden parts.
First of all this:
- Lack of rotting and the impossibility of the appearance of wood-boring bugs.
- The planks do not dry out over time and do not swell under the influence of atmospheric moisture.
- Plastic products do not require periodic painting.
- The cost of plastic parts is much lower than wooden products.
From the point of view of consumer properties, the advantages of plastic window accessories include:
- High reliability , which is guaranteed by the structural strength of polymer materials.
- A variety of colors , shapes and textures that allow you to harmoniously fit the plastic part into the window structure without disturbing the façade design of the building.
- Practicality in operation - caring for plastic products is not difficult, they are resistant to stains and are not afraid of household cleaning agents.
Installation of platbands using the adhesive method
Step 1. When the window frame has already been installed and other preparation measures have been completed, you need to make markings on the outside of the wall that will facilitate the installation of the casing. The easiest way to do this is to use a coated thread stretched from one edge of the window to the other. It is also necessary to add the width of the platband on one side and the other to the extreme points. The markings must be applied both below and above the window opening.
External markings
Coated thread is used for marking
Step 2. Now you need to attach the trim to one of the edges of the windows (the one to which it will be attached) and then make a mark on it with a pencil, drawing a line from the corner of the window at an angle of 45 degrees.
A line is drawn along the platband
A mark is made on the platband
Step 3. Now the excess parts of the platbands need to be cut off or sawed off, using special devices for cutting even corners (such as a miter box).
Cutting the platband
Step 4. After this, you need to prepare a special adhesive solution or buy a ready-made one. The composition must be prepared in accordance with the instructions.
Adhesive composition
Step 5. The adhesive composition must be applied to the back side of the casing, and also be sure to be applied to the wall where it will be mounted, in accordance with the markings.
Applying glue to the platband
Applying glue to the wall
Step 6. The next stage is gluing the platband. It needs to be pressed well against the wall.
The casing is pressed against the wall
Step 7. It is important to connect the vertical and horizontal trims securely and without gaps.
The junction of two platbands
Step 8. Remains of the adhesive around the perimeter of the platbands, as well as in the places where they join, must be removed.
Removing glue residue
Step 9. The lower casing needs to be bolted. To do this, you need to make 3-4 holes of the required depth in it and the wall of the house.
The lower casing must be bolted
Step 10. You need to pour a little glue or sealant into each of the holes.
The holes are filled with sealant
Prices for polyurethane sealant
Polyurethane sealant
Step 11. Next, you need to screw long bolts into the holes.
Screwing in bolts
Step 12. All joints between the platband and the wall of the house must be coated with sealant. The holes into which the bolts were screwed are also filled with sealant.
Joints are treated with sealant
Video - Installation of platbands
How to choose material for work?
First of all, you need to choose high-quality materials, because no one is interested in carrying out restoration work every year. In addition, you will need to pay attention to the following:
- Gamma of colors. Many manufacturers offer a large selection of colors and shades; in addition, if the structural elements are made of wood, you can paint them yourself. You need to pay attention to the shades: the color of the platbands should not match the color of the walls, otherwise they will merge. Choose a pleasant combination of shades that will highlight the platbands, but they will not look like an alien element. For example, if the wall has light colors, you can order a darker one, closer to brown.
- When processing the outer layer of parts, you need to pay attention to the varnish. It must be of high quality, applied to a dry surface, wood or paint. You should read the instructions for the varnish carefully. It should be specifically for wood, for outdoor use.
- The trim for windows in a wooden house must be of the right size: it should not be too voluminous, as a result of which the window will be lost, and it should not be too invisible, in which case the desired decorative effect will not be achieved.
- The thickness of the decorative element also plays a role: it should not be less than 3-4 cm.
- If the work takes place indoors, the elements are usually made flat or rounded; outside, you can give a flight of fancy, using both the simplest flat structures and richly ornamented carved elements. A more interesting solution is one in which the external design differs significantly from the internal one.
Ready-made internal window trim in a wooden house
Installation of window slopes
The window will not be finished if you do not frame it with slopes from the inside of the house and install a window sill. Let's look at how this type of work is performed.
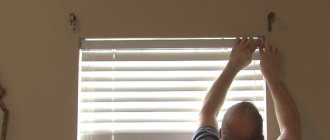
Step 1. In order to install a standard slope system, consisting of platbands, starting profiles, corner covers, latches and slopes, you will need a pencil, tape measure, square, masking tape for measurements, drill, screwdriver, screws and dowels, and an angle grinder.
To get started, prepare everything you need
Step 2. First you need to measure the width of the slope panels in the lower and upper parts on each side, as well as the height of the starting profile. You need to attach the rule to the wall and measure the distances to the rule using a tape measure.
All necessary measurements are taken
Step 3. The heights of the slope panel are also measured in the area where it adjoins the window and from the outer edge.
The heights of the slope panel are measured
Step 4. All values obtained as a result of taking measurements must be transferred to the slope panels. It is best to apply them to the back of the panel. The edge with which the panel faces the room has a special lock. It is important to take this into account. The platband snaps onto such a lock.
The results of taking measurements are transferred
Special lock on the panel
Step 5. The excess panel must be cut off using a grinder or other tool.
Excess panel trimmed
Step 6. On the side of the panel that will be facing the window, you need to put on the starting profile. This will make it easier to trim it to the desired length.
The starting profile is put on
Step 7. Before final installation and fastening of the slope panel, it is important to simply attach it to the window and see how well it fits, whether it still needs to be trimmed, and how well it adheres to the window sill.
The panel is applied to the wall
Step 8. Now it is important to correctly attach the panel along the entire height of the frame. First, the starting profile is fixed on the wall. You can attach it either with double-sided tape or with self-tapping screws. Starting profiles are attached immediately to the right, left and top of the window.
Fixing the starting profile
Step 9. Next, you need to prepare the upper horizontal panel and then begin installation from there. In the same way, you need to take all measurements and transfer it to the panel, and then adjust it to size.
Installation starts from the top horizontal panel
Step 10: Snapping the panels into the starter profiles is easy. They need to be inserted into the profile at an angle of 45 degrees, and then press on them and snap into place, installing them in the desired position. The side panels are also attached.
The panel is inserted into the profile
Panel snaps into place
Step 11. Pieces of foam plastic can be placed between the panels and the wall as seals. This measure will allow you to get rid of gaps that may form between the slopes during the installation process.
The gaps are filled with foam plastic
Step 12. If necessary, the gap between the wall and the slope can be insulated using polyurethane foam.
The gap is filled with foam
Is it possible to do the work yourself?
Thinking about how to cash out windows in a wooden house, you will easily come to the conclusion that this procedure is not too complicated and can be accessible to a non-professional craftsman. This means that you don’t have to spend money on hired workers: you can decorate your windows yourself quickly and with pleasure. Cash can be purchased in wood or plastic.
If you have carpentry skills, you can try cutting the wood pieces yourself.
You can decorate your windows beautifully by installing plastic corners on the windows. Read about the benefits of such decorative corners
Video description
An interesting way of making carved parts using wood crowns is shown in the video:
- It is easier to make an overlay decor by cutting out various geometric shapes, curls or flowers from wood along the outer contour and fixing them on the surface of a flat plank. The result is a three-dimensional pattern, the convexity of which can be emphasized by painting the substrate and decorative overlays in different colors.
Note! When renewing the paint coating, it will be more difficult to accurately apply contrasting paint than at the installation stage, when all the parts can first be processed and then connected.
Which wood species to choose
If the decision was made to make wooden platbands, then what species are best to use?
Typically the window casing is made from the same wood that you built your home from. Ease of processing, texture or strength must also be considered.
To make your own trims with elaborate shapes, it is easier to choose soft woods: alder, linden, aspen. They are easy to cut and finish. However, such wood must be carefully treated to protect it from moisture.
Types of wood such as pine or birch have excellent properties. Their processing is somewhat more difficult, but they are more durable and resistant to weather changes.
Oak or beech has the strongest and most durable properties, but it is quite difficult to make carved frames of complex shapes without special equipment.
Also, to make additional decorative cashing elements that can be placed on top, fruit wood species are used - sweet cherry or cherry.
The main rule when using any of the listed types of material is the need for mandatory additional protection from moisture. A simple paint coating will greatly extend the life of wooden trims .
Plasterboard structures
You can finish window slopes with plasterboard even if you have no construction skills. The sheets can be attached to a metal frame, polyurethane foam or putty. An important aspect is that the drywall must be marked with GKLV. Main advantages of the material:
- affordable price;
- possibility of subsequent processing with any material;
- durability;
- using plasterboard you can cover arched openings;
- environmental friendliness;
- After installing the sheets, a durable and perfectly flat surface is obtained.
Before applying any building material, preparatory work is required. Drywall is no exception:
- First, the remaining polyurethane foam is removed from the windows.
- Then measurements of future products are taken.
- After this, parts of the required sizes are manufactured.
- Next, base defects are repaired and the surface is leveled.
- At the final stage, the primer is applied.
Using construction foam, you can finish the inside of window slopes without having experience in carrying out such work. It must be remembered that drywall is a fragile material, which is why all manipulations are performed carefully and without unnecessary effort.
To ensure smooth edges after cutting the products, it is recommended to lay a ruler along the marking line and then make cuts with a sharp construction knife. You should cut the top layer of paper and only slightly the inner one. After this, you need to tap a little along the cut so that the material breaks along the intended line.
If the fixation is carried out using polyurethane foam, it must be applied to the wall and plasterboard structure. Then the product needs to be briefly applied and removed until the foam expands again, then fix the fragment in place. In this way, all parts are fastened, then the slopes are left to dry completely, having first secured the structure with masking tape. The latter must be removed after a day and the joints must be puttied. At the last stage, the decorative corner is fixed.
Approximate prices
The cost of the platband depends on the material, type of profile and manufacturing technology. The most affordable are flat products made from sheet PVC - you can purchase such products for an average of 20 rubles per linear meter. More expensive and functional, platbands with space for laying communications. A set with a front profile that imitates common types of wood will cost about 40 rubles per meter.
The most expensive products are made of high-quality polyurethane using the extrusion method. Such platbands imitate relief carvings and are intended for facade and architectural decoration. The price starts from 1,500 rubles for a one and a half meter element with a maximum width of 200 mm.
Cost indicators
The cost of accessories for decorative window decoration and sealing cracks depends on the following factors:
- Manufacturing material.
- Trade brand.
- Plate sizes.
- Functional purpose.
- Decorative design (color, texture, presence of artistic carvings and similar artistic excesses).
The cost can be determined by the price per 1 linear meter or per measured product (for example, 2.2 meters) as a whole.
Let's compare the prices of several products:
- Vinyl trim "Holzplast Premium" (Germany) 3.66 meters long, golden oak color, semicircular section costs 605 rubles.
- A similar product made of polyvinyl chloride , 2.2 meters long, produced in Moscow Region, will cost the buyer 150 rubles.
In order not to get confused by prices, which today are sometimes simply logically inexplicable, you can adhere to the following guidelines:
- Russian parts made of polyvinyl chloride , 2.2 meters long, plain or “wood” colored, cost about 60, 0-140 rubles.
- Functionally similar products with a cable channel will cost the buyer at least 140 rubles.
- If the plastic profile is made in Germany , then the minimum price is 220-250 rubles per 3.66 meters.
- A semicircular flat strip for sealing cracks and without any decorative frills costs 55-70 rubles per linear meter.
- A self-adhesive polyurethane casing in a single color will cost at least 75 rubles.
A separate category of products intended for decorative external cladding of window openings consists of sets that include two horizontal and two vertical strips of various artistic designs and 4 corner overlays for masking the joints of these strips.
Their sizes are standard and correspond to the size of a plastic window. The minimum price for a set is 450 rubles. The advantage of these kits (despite the relatively high price) is the needlessness of preparatory work (sawing planks, adjusting sizes) - the individual parts of the kit are simply assembled onto the window opening.
Varieties
Plastic trims vary depending on the design, material, manufacturing technology, installation method and location. In addition, there is a difference between products for different types of windows: what is suitable for PVC glazing will not always be in harmony with a wooden window or door.
For plastic windows
Typically, these are plain products of white or dark brown color, made of sheet plastic. The main requirement for such cashing is compliance with the appearance of the building and covering the installation joints.
For wooden windows
For window blocks, special frames are produced from wood that fully imitate the most common types of wood. In addition to the external similarity, such products have the appropriate texture, which makes the platband material visually practically indistinguishable from the imitated original.
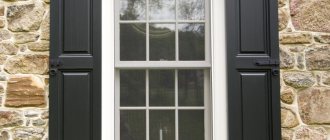
External and internal
More durable and massive products are installed on the street side of the building than on the inside. An important quality is the resistance of the coating to ultraviolet radiation and other atmospheric influences. Both from the outside and from the inside, the platband must completely cover the installation seam, correspond to the design of the slopes, the interior of the room and the overall design of the building.
Types of structures
There are two types - flat (overhead) and L-shaped (telescopic).
Depending on the mounting method
The platband is fixed using nails or self-tapping screws provided by the latch design; it is also possible to attach it with glue.
Depending on production technology
Nowadays, the most common products are made from sheet plastic and manufactured by casting or extrusion.
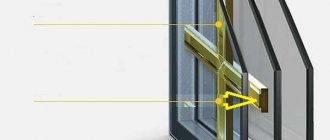
- Sheet plastic. As a rule, these are flat products, without any relief. The internal structure of such platbands is either monolithic or has voids separated by partitions (if viewed from the end, it looks like PVC lining).
The design and material of the profile minimize thermal deformation of the product, which allows it to be mounted without noticeable compensating gaps, virtually side by side. A platband made of sheet plastic is considered the most affordable and easy-to-install option. Due to low temperature deformation, it is most often used to cover joints from the street, but installation indoors is also possible. - Casting, extrusion. Such technologies make it possible to produce relief products of various shapes (not just straight strips, as is the case with sheet plastic). For casting, polyurethane is most often used, less often polyvinyl chloride (PVC).
The resulting products have high strength characteristics, are not subject to rotting, temperature deformation, and are resistant to ultraviolet radiation and other atmospheric phenomena. Platbands made using the above-mentioned technologies can be painted in any of the colors of the RAL palette or covered with a textured film; in addition, it is possible to produce curved parts for framing blocks with complex geometries.
Appearance
Thanks to the properties of the material and modern production technologies, the colors and textures of plastic trim can be very diverse. However, in modern construction conditions, ordinary white trim or products that imitate wood are most in demand. In the first case, the popularity is due to the availability and practicality of white PVC structures. Imitation wood is relatively less common - mainly for finishing certain types of windows or in buildings whose design does not allow the use of other solutions.
Qunell slope system
Installation example of the Kühnel window system: