The easiest and most convenient way to mount a universal-type ceiling cornice for curtains to the ceiling is on vertical support stands and a transverse horizontal rod. In practice, the last thing you have to think about is how to more conveniently hang a cornice on the ceiling; most often you have to choose a cornice structure for hanging curtains, while simultaneously focusing on the design style of the window opening and the interior of the room.
Modern plastic cornice
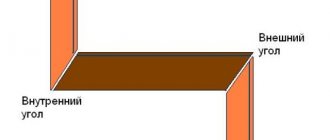
Design and dimensions of ceiling cornices
Traditionally, curtain retention systems have always been installed on the wall above the window opening. Only relatively recently, with the advent of large plastic windows, ceiling structures began to be used as more convenient and technologically advanced. For those who like the idea of attaching a ceiling cornice for curtains to the ceiling, several successful schemes with baguettes have been invented:
- A universal rack-mount cornice on holders or vertical transverse posts, the length of such a structure can reach 4 m, it can only be installed if intermediate supports are used;
- Wide ceiling cornice made of plastic or aluminum profile. The dimensions of this type of structure are not limited in any way; if you correctly follow the ceiling mounting technology, it is quite possible to assemble several ceiling slats combined into one system of curtains and tulle.
- Broken cornices, two-row and three-row slatted structures with round ends.
In this case, rounded ceiling cornices provide safe, convenient and very comfortable movement of curtains into the side space of the window opening. Curtains or drapes end up hidden on the sides of the window sill, which seriously affects the durability of both the hanger itself and the fabric material of the curtains.
Ceiling three-row model, distance from the wall up to 30 cm
Width of ceiling curtain rod
One of the problems that one has to face in the process of selecting the optimal cornice structure is the size of the indentation of the supporting rod or profiled rail from the vertical surface of the window opening and window sill. For wall cornices this is indeed a difficult task. A rod, string or profiled box must ensure that the curtain fabric is removed at least 2-3 cm from the edge of the window sill.
String hanger for light curtains
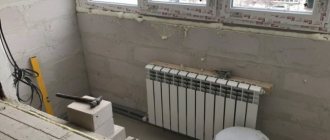
If you attach the cornice box directly to the ceiling, then the amount of indentation can be made unlimitedly large. Most often, the plane of the curtains is chosen based on the capabilities of the ceiling, so that the bracket for the ceiling cornice does not run over the baseboard or ceiling molding. In some cases, the amount of indentation has to be increased artificially. For example, if you install a profile that is too wide on a PVC ceiling, you will need to use an embedded element and increase the distance from the wall to 20-25 cm.
Fastening elements for installing a ceiling cornice
To install cornice structures on the ceiling, three types of fastening are used:
- Ceiling stand-holder for rod models of cornices;
- Wall bracket for slatted ceiling cornices;
- Direct mounting through holes in the housing.
The ceiling holder for the curtain rod is usually designed to install a double rod system. A very simple and reliable design, easy to install on the ceiling even without experience. The only condition is good quality of the ceiling surface.
Rod model on vertical stands
Important! The ceiling curtain rod holder must not be installed directly onto drywall, plastic, vinyl or fabric ceiling cladding.
Corner brackets allow you to attach the ceiling cornice to the wall so that the body is almost under the ceiling without touching it. That is, a clearly wall-mounted cornice structure is used as a ceiling version, although the installation of brackets is essentially no different.
Direct mounting of the housing to the ceiling is considered the most difficult to implement. The installation problem lies in the need to accurately secure the body, without deforming the guides for hanging curtains. This not only spoils the appearance, but can also cause the runners to jam when moving the curtains. An example of how you can install a ceiling curtain rod is shown in the video:
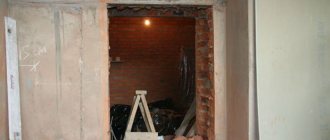
Dropped ceilings
Attaching curtains to a suspended ceiling
In the case of a suspended ceiling, you can get out. But to do this, you need to plan at the stage of installing the ceiling where the curtain will be placed. If the installation was carried out before your appearance, it will be necessary to increase the reliability of the fastening by increasing the number of drilling points and reducing the distance between them. At the marking stage, you will have to mark them every 20-25 centimeters.
How to assemble a ceiling cornice
The simplest, fairly popular design for the ceiling is a prefabricated product of three parts - a central plastic box with two guides for hanging curtains and side caps with turns. In addition, the kit should include self-tapping screws with plastic plugs, plugs and hangers.
The first step is to make sure that the purchased version of the curtain rod holder is suitable in length for the given room. Before this, it is enough to attach the central profile above the window and make sure that there is at least another 25 cm of free space on the sides. If the central part turns out to be too long, then you will need to carefully cut the excess with a hacksaw to the required size.
Assembling a cornice body for a ceiling turns out to be no more difficult than a children's construction set.
Initially, we install a decorative facade tape on the body. We sequentially insert the flexible plastic strip onto the guides and carefully, slowly, stretch the tape along the entire length of the body.
After which you can install the side parts; they are simply inserted into the grooves and snapped into place. In principle, the baguette is ready for installation on the ceiling.
The sidewall also needs to be put into the tape
If you plan to install a rod or rack cornice, then this design does not require preliminary assembly and preparation.
At what distance from the wall to mount
The question that arises immediately when you start installing the cornice above the window is at what distance from the corner it should be attached. Close? Stepping back 10 cm? 20 cm?
The curtain rod should be placed so that it hangs freely without touching the window sill or heating radiators.
Yandex.RTB RA-1479455-2
In fact, the distance can be from 8 to 25 cm. It is determined depending on the location of the heating radiators or window sill. The cornice must be placed so that the tulle and curtains hang freely, without touching either one or the other. Firstly, this way the drapery lies perfectly, secondly, it is better for the fabrics, and thirdly, there is better air circulation, which is important during the heating season.
How to attach a ceiling cornice - common methods
Typically, the included instructions suggest installation using the screws and plugs included with the cornice. It is not necessary to do this; each master decides independently how and on what fasteners to install the ceiling curtain rod.
How to screw a ceiling cornice through the holes
For all structures installed directly on the ceiling, the housing must have holes for self-tapping screws. It is enough just to transfer the location of the holes with markings to the ceiling and perform the fastening as is done for any suspended structures.
Attaching the ceiling cornice to the wall using brackets
Mounting the case on wall brackets is somewhat more complicated, since, in addition to ensuring the strength of the fasteners, it is necessary to maintain the horizontal alignment of the cornice relative to the window or ceiling. In this case, they resort to a little trick.
Ceiling model with adjustable bracket shelf reach
One of the brackets is placed on a horizontal rod and fixed using a screw built into the shelf, the second is mounted in advance on the wall. The entire structure is lifted to the ceiling, connected to the installed support and the optimal location on the ceiling is found. Then all that remains is to transfer the points through the bracket to the wall.
Next is a matter of technique, the holes are drilled, the remaining bracket is hammered in and attached to the wall. The cornice is returned to the installed support, the horizontal position is checked again with a building level and fixed with screws on the supports.
How to attach a cornice to the ceiling with glue
The use of adhesive compositions could be considered the most convenient and simplest option for installing a curtain rod body on the ceiling. But, despite all the temptingness of the idea, the scheme is not popular, since the strength of fastening to the ceiling with glue is inferior to fastening with self-tapping screws.
This is largely due to the low quality of the glue and non-compliance with the technology for gluing the body to the ceiling. If you have good glue and know exactly how to use it, then you can glue it, but if you only have “Liquid Nails” or “Moment” on hand, it’s better not to risk it.
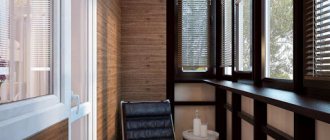
Installation Tips
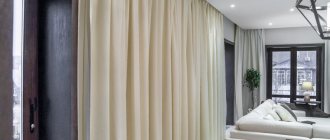
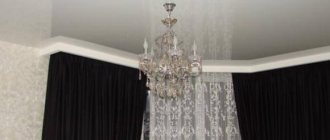
Ceiling curtain
If the room is spacious enough and the window occupies a smaller part of it, then it is better to choose curtains 40-60 cm longer than the width of the window. This will give the room some monumentality and expressiveness. If the room is narrow and the window is a fundamental element of the composition, then you can use a trick. Measure the curtains and attach them to the ceiling in such a way that it creates the feeling of a full curtain of curtains along the entire wall. Thus, small square meters will visually expand.
If the window is of complex shape, located in an arch or bay window, then for installation you will need, in addition to the curtain profile itself, also rotating corners of 45 or 90 degrees. It would be a good idea to immediately purchase plugs so that the hooks do not extend beyond the profile. Sometimes decorative edging is also attached to curtains using adhesive tape.
How to hang a ceiling cornice correctly
Before you begin installing the curtain rod housing on the ceiling, you must make sure of the following:
- The body and all parts of the cornice are assembled in accordance with the instructions. The sides are seated in the grooves until they stop and click;
- The surface on the ceiling is prepared for installation.
You also need to check the availability of all the required tools, fasteners, hangers, plastic plugs and screws, in general, everything that will be needed to install a plastic housing on the ceiling with minimal effort and without wasting time searching for the necessary materials.
Tools for fixing ceiling cornice
For installation you will need a minimum set of tools and accessories:
- Hammer drill or impact drill with carbide drill bit;
- Several plastic plugs with self-tapping screws, they are usually included with the cornice, so you don’t need to look for anything;
- Painting cord, pencil, tape measure;
- Phillips screwdriver or screwdriver with appropriate bit.
Sometimes you have to use a laser level to install very complex multi-tiered curtain rods on the ceiling. If you need to install a rod curtain rod on the ceiling on homemade rack holders, then without a cord or a laser level it is almost impossible to place the mount correctly and evenly on the ceiling. How exactly to fasten and how to check the position of the rack on the ceiling, each master decides independently; in this case, you can get by with a regular marking cord.
Preparing the base for installing a ceiling cornice
Before installing the assembled cornice body, it would be correct to additionally check how well the ceiling surface corresponds to the horizon level. If the apartment or house was built in good faith, then there are no problems. But it often happens that the ceiling slabs are laid with a slope. Therefore, a simple installation on the ceiling will look crooked relative to the window.
In this case, you will need to measure the deviation of the horizon ceiling plane and make several shim washers that can be used to align the plastic body with the window opening.
Marking the places where the cornice is attached to the ceiling
Initially, you need to pull the marking cord along the conditional installation line on the ceiling, always exactly parallel to the plane of the window. Since the housing is placed directly on the ceiling, and not on the wall above the window opening, it is difficult to guess how level and parallel the structure will be relative to the window and window sill. You will have to navigate exactly by the cord.
Punching holes for plugs
Next, we simply place the assembled cornice on the ceiling and align it with the stretched guide. Using a regular pencil, we transfer the markings to the ceiling surface through the holes in the body.
How to install a ceiling cornice
For fastening, you will need to drill holes in the ceiling according to the markings. You can use a hammer drill or impact drill; the depth for the plugs should be at least 35 mm. Next, blow out the dust, remaining plaster or concrete, soak the plugs in glue and hammer them into the holes.
The best mounting option
Carefully cut off the part of the plastic protruding above the ceiling surface with a knife. If the plugs fit tightly, then you don’t have to wait for the glue to dry, but immediately lay the cornice and wrap the screws in plastic bushings. After that, all that remains is to install decorative plugs on the heads of the screws and the end roundings of the body, and lay the curtain hangers.
Varieties
Ceiling cornices are distinguished according to several principles:
- according to form;
- by appearance;
- by number of rows;
- by type of endurance;
- according to the material of manufacture.
- They are distinguished by shape:
- Angular. Used for ordinary windows and windows with a bay window.
- Rounded. Suitable for interiors with niches and windows with rounded ends. Curtains are hung on them in a circle.
- With rounded corners. Used for a tight fit of the material to the wall. They create additional noise and heat insulation.
- Direct. They can be hidden under the ceiling or covered with a lambrequin.
- According to their appearance, cornices are divided into:
- Decorative. A decorative strip or lambrequin, selected to match the interior design, is installed on the outside. It hides the hooks and rings on which the curtains are attached.
- Hidden. They are located under the ceiling.
- By number of rows:
- Single row. Used to attach one thing: tulle or curtains. It is often found in everyday use in the kitchen.
- Double row. Tulle and curtains are hung on double-row cornices.
- Three-row. Used for using several rows of curtains: tulle, lambrequin, blackout curtains or other decorative elements.
- By type of endurance:
- Strings. Designed for light curtains.
- For medium weight curtains.
- For heavy fabrics.
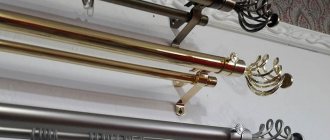
- By type of material:
- Metal. The metal used is brass, copper or bronze. Designed for classic, hi-tech, loft, techno and retro styles. Advantages: durable and resistant to changes in temperature and humidity, retains its original appearance, can withstand any weight.
- Aluminum. Use in rooms with high humidity. There is one drawback - they can become corroded, so they need to be wiped with a damp cloth once a week.
- Plastic. Their advantages: ease of installation and design, use on stretch ceilings (how to make a stretch ceiling?). Disadvantages: short lifespan, lack of ability to withstand heavy fabrics. Plastic curtain rods fit plastic windows.
- Wooden. They are made from pine, walnut, larch, and cherry. Designed for classic, country, Provence, modern styles. Cornices are hung in bedrooms and children's rooms, as wood is an environmentally friendly material and safe for health.
Instructions for assembling a cornice with your own hands (16 photos)
The most common arrangement of curtains is two parallel rows of curtains - made of light, usually translucent, fabric and a denser material. This explains the higher demand for double-row cornices - devices for placing such a combination of fabrics.
Examples of cornice devices
Let's look at the assembly and installation of double-row baguettes for curtains using the most common designs as an example.