Most often, the question of how to hang a cornice on a suspended ceiling arises in force majeure situations, when they forgot about it at the stage of installing the film. Nothing wrong with that. If everything is done correctly, you can secure the baguette at any time. And if your budget is very limited, this installation method will allow you to save time and save up for good curtains. But you need to take into account certain nuances. Therefore, we will consider different installation options.
- Apartment
If your neighbors are flooded: how to drain water from a suspended ceiling yourself
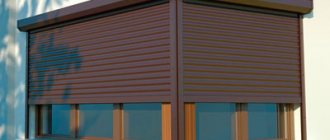
Stretch ceiling and curtain rod
A cornice under a suspended ceiling can carry not only an aesthetic, but also a functional load. So, for example, if you don’t go into too much detail, you can say that cornices allow you to visually increase the height of the room, secure curtains and arrange lighting. Not bad, right?
The cornice with a suspended ceiling is almost no different from conventional solutions. It is a flat bus mounted directly on the ceiling. A ceiling cornice for suspended ceilings allows you to visually limit a certain side of the ceiling and give it some completeness. And of course, in addition to its design purposes, it serves as a reliable fastening for curtains. The ceiling cornice requires a thoughtful approach, since after installing the canvas, no objects can be placed on its surface.
The cornice behind the suspended ceiling can have two different designs:
- Curtain rod
. The purpose of its use is quite clear. The peculiarity in this case is that it is not easy to attach the cornice to the ceiling. Wall-mounted curtain rods must create conditions in which the curtain clip or ring will not touch the thin PVC film. It is worth taking into account the fact that fabric sheets are much stronger, so they are not afraid of such damage. - Cornice for hidden lighting
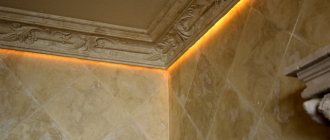
. Products of this type are a polystyrene profile that is attached to the wall with ordinary glue. The tape is fixed directly to the inner surface of the cornice or to the wall. Such a cornice and suspended ceiling are designed to hide light sources from the observer.
Cabinet inserts
If a wardrobe is built in after the ceiling has been stretched, it is necessary to provide for the installation of a molding under the molding and the top track of the built-in furniture. Usually a 50x100 mm wooden beam is used. You can make a box from LSDP with dimensions of 100x100 mm. It is not recommended to increase the height of the structure, because It will be difficult to insert sliding doors into the opening.
Installation is carried out as follows:
- Mark a line on the ceiling for the mortgage, first stepping back from the wall at a distance equal to the depth of the cabinet. Usually it is 600 mm.
- The supporting beam or box is fixed to the ceiling.
- Mount the baguette for the tension structure on the side surface of the beam, and the guides for the cabinet doors on the bottom.
- Stretch the film and insert the doors.
- If necessary, the gap is closed with a decorative strip.
Scheme for installing a sliding wardrobe: on the left without a decorative strip, on the right - with a strip.
Sometimes the embedded part is placed under the surface of the film or canvas and the upper track for the doors is mounted on top of the covering.
If the furniture is already built in before the ceiling is made, the baguette is fixed to the upper false panel of the cabinet.
You can install the embedded beam close to the cabinet, attach a mounting rail to it and mount a suspended ceiling.
Types of cornices for suspended ceilings
Depending on the material used for the production of ceiling cornices, they are divided into:
- aluminum - fairly light and durable cornices;
- wooden - expensive and massive products that are distinguished by their high cost and excellent appearance;
- steel - used for fastening heavy curtains. Such cornices are often decorated with overhead elements made of wood or plastic;
- plastic - the most common cornices for suspended ceilings. They are highly durable, provide very easy movement of curtains, and are also low cost (pro
Installation of wall curtain rods
Installation of wall cornices is more preferable if the PVC film ceiling is already stretched, but the cornice itself has not yet been installed. But often this option is chosen from the very beginning.
There are several reasons for this:
- Despite the fact that the simplest cornice for a suspended ceiling has a low cost, its installation can increase the total cost of work by approximately 2,000 rubles. If you install a wall cornice, you can avoid such costs.
- Some customers simply do not want to damage the integrity of the ceiling film in order to ensure the waterproofness of the coating. Also, in the future, the apartment owner may want to install blinds instead of curtains (for more details: “Attaching blinds to the ceiling: installation without a specialist”).
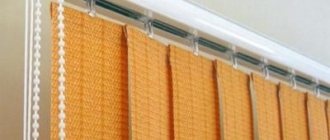
There are many different types of wall cornices available on the building materials market. The simplest ones are stick cornices, which are designed for traditional ceilings and are no different from those for suspended ceilings. The cornice is installed on the wall, and the curtain is hung on rings that are put on a stick. That is, everything is the same as during normal installation. But it is worth paying attention to the distance of the cornice to the ceiling. Thus, the rings should under no circumstances touch the surface of the canvas.
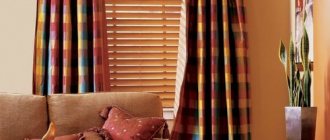
The situation is similar with profile cornices for suspended ceilings - they are no different from traditional ones. The advantage of this solution is that the design of the cornice itself does not allow the hooks to damage the thin PVC film. The danger to the ceiling only exists when the cornice is installed. There is no need to worry about fabric ceilings at all.
Briefly about the main thing
When installing a stretch ceiling, you cannot do without arranging the mounting location for the cornice. To do this, create a niche that will allow you to effectively secure the curtains, save on purchasing a cornice to match the style of your interior, and arrange decorative lighting.
The dimensions of the eaves niche are calculated before the start of repair work. Its dimensions are influenced by the model of the cornice, as well as the width of the radiator or window sill, the pomp of the curtains and some adjustments.
Several methods are used to create a niche. It is popular to use an aluminum profile with a bend, a plasterboard box, a floating ceiling, or bending a PVC sheet (or fabric) to the ceiling.
Installation of cornice for LED lighting
In order to install an LED strip on a ceiling cornice, you will need the following materials and tools:
- universal glue (titanium, acrylic putty or liquid nails);
- sharp knife;
- miter box;
- Matchbox;
- putty.
First, you need to glue foil tape to the base of the cornice (from the inside). If you had special tape included with the ceiling cornice, then use it to glue the joints and corners. After this, the LED strip is prepared. It can be assembled from individual sections that are joined together by soldering. But in this case there is a risk of short circuits through the foil tape. Therefore, in places of soldering, the protective paper is removed from the adhesive tape. It must be removed carefully, being careful not to damage the adhesive base.
A patch is glued to the contacts. This method will protect the tape from short circuits. The procedure is carried out along the entire length of the tape, so it is better to do this before installing it on the cornice.
Installation of a cornice in a suspended ceiling is carried out according to the following principle. The best option is to stick the cornice before wallpapering, that is, directly onto the plaster. The wall is pre-primed. In order to cut the cornice at an angle, a miter box is used. An alternative way to give the surfaces the required shape is to use special decorative corners.
Each element of the cornice is glued not only to the wall, but also to the previously installed mortgage strip. To impart rigidity to the resulting connection, it is recommended to use dowels made from matches. The cornice will be at a distance of 7-10 cm from the ceiling. In this case, the effect of hiding the light sources to a person who is in the opposite corner of the room should be achieved.
The installation of the tape itself is carried out in the following sequence:
- remove the protective layer of paper;
- stick the tape on the cornice;
- Special attention must be paid to the joints of two separate sections of the LED strip.
Many people consider the last stage of installation too petty and tedious, so they skip it. But as a result, the lighting system can very quickly become unusable due to a short circuit. The resulting joints of two adjacent pieces of tape should be as short as possible. Ideally, it should be equal to the distance between two adjacent LEDs. After the tape is installed on the cornice, you can proceed to connecting the power wires.
In order to create reliable cable contact, the resulting connection must be crimped with special pliers. This way the connection will be reliable even in hard-to-reach and small places. After this, the installation of the cornice on the suspended ceiling ends with the installation of LED amplifiers, power supplies and controllers. This power supply scheme can be conveniently changed or reconnected at any time.
LED lighting allows you to use several colors at the same time. Therefore, the use of this feature helps to emphasize the design of the room and apartment.
Features of fastening ceiling cornices
Installing a cornice on a suspended ceiling differs from the methods used when installing it on plasterboard or concrete. The master who combines curtain rods and suspended ceilings must solve a difficult problem, which at first glance seems completely unsolvable. The tension fabric is not at all intended for installing large, heavy elements on it, as this can easily damage the surface itself.
But there is a solution in this case. Ceiling cornices must be attached not to the surface of the canvas itself, but to pre-mounted mortgages. For this purpose, timber made of durable wood is used. Mortgages are installed until the tension fabric is secured (read: “How to attach a ceiling cornice to the ceiling”).
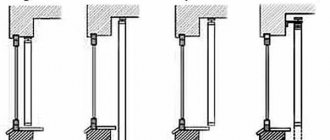
There are two ways to install cornices for suspended ceilings:
- visible cornices that are fixed to hidden supports under the ceiling;
- hidden cornices, which are installed on the main ceiling, and the tension fabric is fixed in front of the cornice.
The first method is much simpler and more common, but the second allows you to achieve greater aesthetics of the resulting cornices. Visible eaves are no different from those installed in most modern homes. Hidden in their essence remain the same cornices, but simply hidden in a special niche (more details: “A niche for a cornice in a suspended ceiling”). This option allows you to create the impression that the curtains are hanging directly from the ceiling.
Let's figure out what to do in this or that case in order to get a reliable cornice.
Varieties
The following curtains exist:
- aluminum;
- made of plastic;
- wooden
- steel
The most expensive option is wooden curtains. Also, they are the most massive compared to the others. An economical solution is aluminum products. Steel structures are installed only if you plan to hang a heavy composition of curtains consisting of several layers. The most practical option is plastic products. They are inexpensive, have a long service life and excellent performance characteristics.
Now, in specialized stores there is a huge selection of designs that differ in price and color. Also, they can consist of a different number of rows. Before making a purchase, you should check the contents of the product. You need to make sure that the kit contains the elements necessary for fastening: plugs, decorative tape (sometimes provided for some models).
Open installation of ceiling cornice
The most used method of installing a ceiling cornice is open installation with embedded beams.
Work is carried out in the following order:
- Before installing the ceiling cornice, the point at which the cornice will be attached to the suspended ceiling is determined at the installation height of the canvas. Here the appropriate markings are applied, after which the entire room is marked. A fixing profile for a stretch ceiling is attached to the walls.
- Now it is necessary to carry out the most important procedure - the embedded beam is fixed along the marked marking line. At the same time, it is important not to forget to pre-treat the wood with antiseptics, as well as dry it (applying a hydrophobic primer is allowed). This is due to the fact that the space between the main and suspended ceilings is ventilated, and this leads to rotting of untreated wooden structures. The timber is secured with dowels, which are driven into drilled holes in the ceiling.
The thickness of the timber should be chosen correctly. It is necessary that its lower part adjoins almost closely to the ceiling canvas. To adjust this parameter, mounting wedges are driven in certain places between the ceiling and the mortgage.
After securing such a beam, you can proceed to the installation of the canvas. The cornices are attached through the film with self-tapping screws, while trying to cause minimal damage to the surface. It is customary to reinforce the points where self-tapping screws pass through the canvas with polymer rings, and the holes themselves are not cut, but burned. If everything is done correctly, then the embedded beam, which is the main link that unites the suspended ceiling and the curtain rod, will be almost invisible.
Types of curtain rods, detailed video:
Basic mistakes
Before you get started, consider the following tips to help you avoid common installation mistakes.
Accurate calculations. “Measure twice, cut once” - this rule is appropriate in this case. Before drilling holes for fasteners, check the markings several times using a ruler and level. Calculate the correct distance from the wall. This must be done before purchasing curtains and cornices. It is necessary to take into account how much the window sill protrudes from the wall and the depth of the folds of the curtains
Also take into account the length of the curtain.
By following all the tips and instructions described above, you can easily hang any curtain and decorate the window with it.
Installing a ceiling cornice in a hidden niche
This installation method is significantly different from the previous one. This approach is more complex to implement, but the result is a cornice hidden from view, which is one of the most effective design techniques. The effect of curtains falling straight from the ceiling can be seen in the photos in the sections of our website. If you want just such a cornice, then strictly follow the technology for its installation.
Work must begin with the purchase of the cornice itself. This is done even before measuring the tension fabric. The fact is that the dimensions of the cornice directly affect the width of the niche, which accordingly affects the width of the canvas as a whole (for more details: “A niche for a plasterboard cornice”). That is why it is so important to adhere to this sequence of work, since otherwise there will be leftover fabric. That is, you will simply overpay.
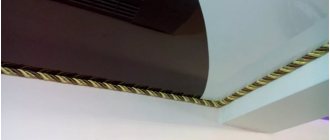
The cornice is installed directly on the main ceiling. For fastening, dowels with a plastic or metal sleeve are used. At a distance of a few millimeters from the cornice, a ceiling beam is attached, onto which the fixing baguettes of the stretch ceiling will be installed. In this case, the wood also needs to be treated with antiseptics and water-repellent impregnations.
The profiles are attached from the side of the cornice so that when pulled, the material covers the block and makes it almost invisible. This design looks especially effective with glossy ceilings (