How the cornice works
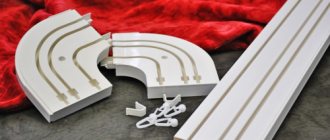
Before you begin installing the cornice, you need to familiarize yourself with its structure. Usually it consists of a plastic, less often a metal tire with grooves for hooks. The ends of the tire are covered with plugs that prevent the hooks from jumping out of the tire. Some curtain rods are equipped with decorative trim that is glued or snapped onto the rail. If the tire is different from a rectangular shape, then it is assembled from the elements included in the kit. Some models of cornices are equipped with powerful steel or aluminum corners, which allow you to attach the cornice not to the ceiling, but to the wall.
When planning to install a ceiling cornice, you must first determine its length, maximum weight and number of curtains. The permissible weight of curtains and their quantity are indicated on the packaging of the curtain rod, as well as in the installation instructions or product passport. The length of the cornice depends on the type of curtains, because curtains moved to the edges should completely open the window.
Curtain fabrics
The texture of the curtain fabric determines their placement. To ensure good daylight, thin translucent curtains are hung.
In order to muffle very bright sunlight in bedrooms, children's rooms, and offices, thick cotton, velvet or velor curtains are hung.
Natural fabrics are suitable for classic-style rooms, while easy-to-care synthetic fabrics are suitable for modern design.
There are even more ideas for decorating curtains in a modern interior on the website https://shtora.guru.
We must remember that curtains made from natural fabrics cannot be combined with synthetic curtains.
Advantages
- Whatever the light source, nothing interferes with the natural convection of heated air in its vicinity. Air access is not limited.
- The light source is hidden from the eyes of the room's inhabitants. If so, less attention can be paid to the decorative finishing of the lamp.
- The light in this case will be truly diffuse: we see a strip of light reflected from the ceiling without visible sources.
- Unlike any suspended ceiling, ceiling cornices do not affect the height of the room: they are located near the walls, where the space is not used. They do not affect the visual assessment of the height of the room.
But the switched-on lighting makes the ceiling visually higher, so we have an excellent solution for apartments in late Soviet-built houses.
Lighting makes the ceiling visually higher.
If the ceiling covering itself does not need serious repairs, installing the cornice along with the lighting system will take half a day for one person. Moreover, most of the time will be spent drying the glue securing the cornice to the wall.
How to hang curtain rods correctly and at what height?
Do you want to transform your home or have just recently moved into a new home and need to install or replace cornices, then this article is for you.
A curtain rod is an amazing solution that allows you not only to hang curtains, but also to conveniently move them along vertical and horizontal lines, thereby opening or closing the window.
In addition, this is a good addition to the interior of the room.
How to hang curtain rods correctly
Hanging a curtain rod generally takes fifteen minutes, but this is only if a master is working. But if a person has never done this, difficulties may arise. There are two types of cornices of this format: wall and ceiling. There are almost no differences in installation, except that wall-mounted ones are hung on the wall, ceiling ones are hung on the ceiling.
After purchasing everything you need, the question arises: at what height can you hang the curtain rod?
The height can be changed, but it is best to attach it so that it is as close to the ceiling as possible, then the curtains will look much more beautiful.
The most optimal distance from the ceiling to the cornice is 5-10 cm
You definitely need to pay attention to how the curtains will be attached
Which is better: cornices on the ceiling or on the walls?
When choosing a design, you need to consider not only the type of curtains, but also your personal taste
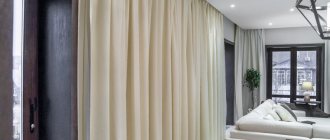
It is important to consider the place where it will be installed. The installation height of the cornice above the window should be taken into account taking into account the aesthetic component. In this case, ceiling products look nicer in appearance than wall products, and all because when mounted to the ceiling, the curtains completely cover the window opening and all the way to the floor
In this case, ceiling products look nicer in appearance than wall products, and all because when mounted to the ceiling, the curtains completely cover the window opening and all the way to the floor.
The good thing is that the ceiling cornice well hides the entire curtain fastening system, which cannot be said about the wall-mounted version.
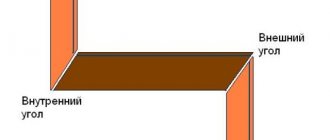
Three options for mounting the cornice to the ceiling
At what height can you hang a curtain rod? There are three design solutions:
- option - this method will visually shorten the room and reduce the window. Typically, it is used to brightly decorate trim around windows. Decorative and rich windows should always be on show, which means hanging curtains at the borders of the window so that the architectural features of the window opening are visible.
- This option allows you to properly hang a curtain rod over a window in a traditional style without adding visual interest to the room. This type is the most popular and practical.
- Option - installing a cornice in this form will make the window visually larger and taller, creating a feeling of freshness and modernity. That’s right, the walls visually appear higher, making the room look larger. In small spaces this option works very well.
How to calculate the length of the cornice?
The cornice must be chosen such a length that completely open curtains open the entire window opening. Visually it will be like this: the width of the window opening needs to be increased by one meter, i.e. half a meter on each side for assembled curtains.
Are you wondering how to properly hang a curtain rod over a window? Then imagine that on average the length of the structure reaches two meters, then for installation you can use only two fasteners. If ideally the length is longer, then an additional bracket should be made in the middle.
The length and dimensions of the brackets should also be taken into account. Curtains should not lie on window sills or heating radiators, because they usually protrude far beyond the wall.
We have already found out the distance at which the cornice is attached from the ceiling; now it remains to determine how the cornices should be installed from the walls. Usually the brackets are located no closer than 15-20 cm from the walls.
In order for the cornice to hang evenly, you should measure an equal number of centimeters from the ceiling on both sides of the brackets. This can be done using a special horizontal level.
Important: walls are not always level, so be sure to visually ensure that you don’t get into trouble.
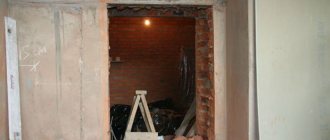
The process of attaching the cornice
You can also secure the curtain rod with your own hands. First, you need to drill out the required socket for the bracket using a hammer drill. A dowel is initially inserted into it; it should not protrude beyond the plane of the wall. Next, you need to attach a special fastening element and secure it with screws, wrapping them in a plastic dowel.
After the supporting elements are secured, you should begin installing the cornice, according to the instructions for the cornice.
Sliding electric curtain rods
Electrically controlled ones are usually chosen by people who keep pace with progress. This model will be indispensable if you have large panoramic windows; it is especially relevant for windows that are difficult to access or have complex shapes. It should be noted that a product equipped with an electric motor is suitable for heavy curtains, light curtains or tulle. By operating the remote control or pressing the switch button, you can easily control the movement of the curtains.
Video on the topic:
To install such an electric curtain rod without making mistakes, it will be better if the installation is carried out by a professional specialist. The electric motor is hidden behind a curtain. It works silently and smoothly. Pairs perfectly with any apartment interior style.
To make the decor of your window ideal, you need to pay special attention to create a kind of foundation - choose the right design for the sliding cornice. It is important to consider the various options, taking into account all the pros and cons. Pay attention not only to the decor, but also to the materials from which the profile is made. Perhaps even seek advice from a designer. If you take the matter seriously and take into account all the recommendations, the selected models of sliding telescopic products will certainly become the pearl of your window design and will suit the overall interior of the room.
Features of the installation process
There are many ways to attach a ceiling cornice, but what they all have in common is that the structure must be attached to a solid base. Such a basis is the ceiling, timber, frame, wall.
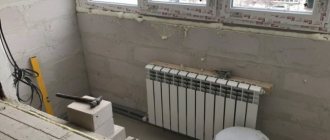
Installation on a concrete ceiling or wall
The installation principles are similar in both cases. Here's how to attach a cornice to a concrete ceiling step by step:
- Assemble the product, prepare fastening accessories. Calculate the segments between the points for installation, guided by which curtains need to be hung. If they are heavy, then it is recommended to reduce the distance (step) between the fasteners to 20-30 cm; if the curtains are light, 60-70 cm is enough.
- Holes are drilled in the product for future fastening.
- The structure is joined to the ceiling and markings are made on the ceiling through the holes.
- Using a hammer drill, recesses are drilled at the marked points, into which dowels are hammered and self-tapping screws are screwed in, attaching the holder. Then plugs, decor, hooks or rings are put on the product.
There are circumstances when it is impossible to install a model on the ceiling. Then they act differently, choosing to mount the cornice to the wall. For this you will need:
- metal corners with bend stiffening ribs, brackets;
- bolts, nuts.
Instructions for fixing the ceiling cornice to the wall:
- Prepare the fasteners, following the same rule as when installing on a concrete ceiling (points 1, 2).
- Calculate the optimal distance of the structure from the wall and select the corners according to size.
- Holes are drilled in the corners. There are configurations that include special strips for attaching to the corners.
- The structure with corners is fastened with nuts.
- Compare it to the wall and ceiling end-to-end, mark and prepare mounting holes.
- The holder is mounted on the wall on the installed brackets using anchor elements.
- Upon completion of installation, plugs, rings, hooks, and decor are put on.
Recommendations for installing a cornice to a plasterboard ceiling
It is possible to attach a ceiling cornice to a plasterboard ceiling, but the load-bearing capacity of plasterboard is limited. In this regard, the curtains and the bar itself should be light. In order not to take these limitations into account, you need to strengthen the ceiling by installing a block of wood in the area where the holder will be fixed.
|
To secure heavy curtains, select a block measuring 50x100 mm. The installation is done like this:
- A cornice is attached to a plasterboard ceiling with a block using self-tapping screws.
- The structure is installed on an unreinforced ceiling using anchor fasteners.
Methods for installing cornices with suspended ceilings
A stretch ceiling does not involve securing any elements to the stretched fabric, so the installation of the curtain holder is carried out in a special way:
- Before installing the tension fabric on the ceiling, install the embedded parts. Marks are placed at the bookmark location. Thermal rings are attached to the canvas (where the fasteners will be screwed in) so that the canvas does not tear.
- You can mount it in another way - in the form of a niche near the window. The beam is attached to the ceiling. The tension fabric is mounted to it, without reaching the wall. The structure is installed in the resulting niche.
Attaching the cornice with glue
A very simple way of fastening is with glue. It is used when it is necessary to attach a holder for light curtains to smooth surfaces, for example, to a suspended ceiling. It is necessary to choose the right glue; it should be suitable for:
- composition of the ceiling cornice tire;
- finishing of the ceiling surface.
Fastening is carried out as follows:
- The structure is assembled completely to size, after which it is applied to the ceiling, checking the quality of the joint in order to avoid the formation of cracks and gaps in the future.
- Places where glue is applied are pre-degreased.
- The curtain holder is leaned against the ceiling for marking.
- The glue is applied along the entire length of the structure, applied exactly along the markings to the ceiling and pressed for 3-5 minutes.
- After the glue has completely dried (according to the instructions, usually in a day or two), you can use the product for its intended purpose - hanging curtains.
- It happens that it is not possible to completely glue the fasteners. Then, first of all, the transition plate is glued, and after the glue has completely dried, the main parts are glued.
In order for the installed cornice to hold tightly and reliably, you need to choose the appropriate installation method and perform all installation steps step by step. Be sure to take into account the type of ceiling, since it is impossible to attach a cornice to some types of suspended ceilings without prior preparation.
Installation to a concrete ceiling or gypsum board
Ceiling decoration these days is as varied as the systems for fastening cornices. This can be a concrete ceiling made of plasterboard or suspended ceiling. Profile or metal cornices already have special holes for fastening. And you can install the cornice yourself without much difficulty. Detailed instructions on how to secure the curtain are described below.
The required piece of cornice is cut off. Brackets are attached to it, which often have holes for mounting to the ceiling, or are drilled to size. At the ends of the cut section, fasteners for curtains are put on, which are included in the package. Decorative caps are placed at the ends of the section. Having previously attached the cornice to the ceiling, you need to mark where the holes will be made in the ceiling. The marked places are drilled and special screws are inserted. The same holes are made along the entire length of the crossbar.
The structure prepared for installation is applied to the surface, and a dowel is inserted into the hole to temporarily fix it. The profile is aligned with the window and secured with the remaining screws. When everything is ready, you can start fixing the tulle itself. Attaching the cornice to the wall is practically no different from the process described above, the only thing is that the structure is attached horizontally.
Combination of cornice with suspended ceiling
Types of cornice structures
Despite the seemingly extremely simple design, there is plenty to choose from. There are plenty of options and a lot to consider.
Note!
- Austrian curtains: TOP-170 photos + video of design options for Austrian curtains. Design features of curtains, their types, fabrics and colors
- Double curtains - TOP 120 photos and videos of double curtain design options. Types of installations, designs and materials of double curtains
- Greek curtains: features of the design and installation of Greek curtains. Selection of fabric in the Greek style, variety of colors and textures (photo + video)
How to properly install a ceiling cornice
The ceiling cornice kit, as a rule, includes all the necessary fasteners - dowels and screws. The cornice is fastened to the ceiling along the edges using brackets or ceiling fasteners. If the length of the ceiling cornice exceeds 2 m, then an additional bracket (ceiling fastener) must be installed in the middle. Increasing the number of fastening elements for the cornice is important when using several rows of curtains, with a large mass of curtains and the massiveness of the cornice itself
Marking and fastening the cornice
Before marking the ceiling for the cornice, you should make sure that it will not obstruct the opening of the window or door to the balcony. It should also be far enough away from the walls and window sill so that the curtains do not cling to flowers or heating radiators standing on it. It is recommended to mark the installation site in such a way that the curtains hanging on it are located at a distance of at least 40 mm relative to the window sill and radiators.
To attach the ceiling cornice with your own hands, you need to prepare the following tools:
- electric drill;
- hacksaw;
- roulette;
- screwdrivers;
- building level;
- ruler;
- pencil;
- screws and dowels.
The dowels and screws that will be used when installing the ceiling cornice must match the material from which the ceiling is constructed. If the ceiling is made of plasterboard, then you need to attach it to the guides. Drywall will not support the weight of the cornice.
First, you should mark the places where the brackets are attached to the wall or ceiling mounts.
After marking is completed, holes for the dowels are drilled at the fastening points using a hammer drill and the dowels are driven into them. Next, depending on the installation method, either brackets for the cornices are mounted, or the cornice is placed against the ceiling and screwed directly to the surface. If its length is more than 200 cm, then the cornice must be additionally fixed in the middle so that it does not bend under its own weight and the weight of the curtains.
Hanging curtains on the cornice
You can attach curtains to the ceiling cornice using the following fasteners:
- Hooks and rings. They can come complete with a cornice or separately. In this case, hooks can be used as independent fasteners or in conjunction with rings. The use of this method of attaching curtains requires the presence of loops in them that will be put on hooks. This mount is great for light curtains.
- "Crocodiles." According to the principle of their operation, they are similar to ordinary clothespins, only because they have teeth, the fixation of curtains is more reliable.
- Kulisok. During the manufacture of curtains, a special pocket is sewn into which the cornice is inserted. This creates the effect of its absence.
- Clip. According to the principle of fastening, clips are similar to “crocodiles”, only they do not have teeth, so it is better to hang light curtains and tulle on them.
- Eyelets. Such fasteners are metal rings that are inserted directly into the curtains. With their help you can easily gather fabric into folds. Grommets can only be used with tubular curtain rods.
- Fabric loops. This fastener has a beautiful and natural look and goes well with round cornices.
To achieve folds on the curtains, it is necessary to attach the rings at the same distance, equal to approximately 100 mm. If they are mounted on clamps, they can be alternated with round rings. This will help create a better mount.
To create many small folds evenly spaced along the entire length of the curtain, there are special tapes. This method is most often used for constantly drawn light curtains. The ribbons are sewn along the top edge and pulled to the desired length.
When hanging curtains, a very important parameter is the distance from the floor to the curtains, because this value plays a decisive role in shaping the style of the entire interior of the room. The most common option is curtains, the ends of which are at a certain distance from the floor. In most cases, this distance is about 3-6 cm. When sewing, you need to know exactly their length. The slightest error will lead to the fact that the processed edges will have to be embroidered and remade.
For the kitchen and nursery, we recommend short curtains that barely cover the window sill, or arched ones. But in rooms with low ceilings, this option will not look the best, because it will visually lower the room even more.
By choosing a suitable ceiling cornice, beautiful curtains and fastenings for them, you can create a magnificent visual effect that can transform your room, making it stylish and elegant.
Models with manual, cord control
For easy control of curtains, sliding devices for hanging are equipped with rope cord mechanisms. For better glide, the tubes are usually coated with a layer of Teflon coating. A separate mechanism is installed for each row. Suitable for home use in small spaces.
The use of a design with a cord mechanism allows you to secure several curtains, tulle, and lambrequin. When controlled, the shape and elegance of the design lines of your windows are preserved for a long time. After all, curtains and tulle do not need to be pulled and adjusted with your hands to return them to their place.
These models have a strong, reliable, stable design. Indeed, often the weight of curtains reaches several kilograms. Easy to control; moving heavy curtains is as simple as pulling the string. A harmonious appearance, suitable for any interior style, ease of installation and use, makes sliding devices with cord control one of the first in the most popular category.
How to install a plastic ceiling cornice: step by step
A plastic cornice looks amazing in a room with the current interior.
The cornices are fixed to the ceiling so that they are virtually invisible behind the fabric.
Ceiling cornice components
Curtains, therefore, are, as they say, in the foreground.
The work of fastening such a cornice is not so difficult, and, at the same time, such fastening is extremely reliable.
Cornices are single-row, double-row, three-row and four-row.
Equipment:
- Rotating corners. There are 45° and 90°, therefore, you can design a variety of cornices and curtains.
- Plugs. They are specially designed and prevent the hook from slipping out of the groove.
- Decorative elements. For example, self-adhesive tape.
Having prepared a drill, an alloy hacksaw, dowels, a screwdriver or screwdriver, a pencil or a marker, you can start working.
Installation, step by step:
Having decided on the place where the cornice will be located, it is necessary to outline some approximate diagram in order to determine the length of the cornice, and also take into account the distance from the wall, if there are rotating elements; If the cornice is attached directly along the window strip, then the profile of the required length should be cut using a hacksaw. If the curtains are hung in the middle of the room, and there are different turns, then we model a diagram according to which the elements are cut and attached separately. In order to attach the cornice to the ceiling, it is necessary to drill holes in the profile so that the screws can support the profile and the curtains together. The approximate distance between the screws is half a meter. Having attached the profile with drilled holes to the installation site, we mark the ceiling, outlining the locations of future holes on it. We drill holes and install dowels. Having attached the profile, aligning the profile holes with the holes on the walls, we fasten the profile by screwing in the screws. The rotating elements are attached in the same way. We insert the hooks into the grooves, installing both plugs and stops if necessary. Glue on decorative tape. When hanging the curtains, we make sure that everything was done correctly.
Be careful when working at height!
Fastening cornices with glue
Modern technologies make it possible to attach cornices to the ceiling with liquid nails, which can withstand loads of up to 80 kg/cm². First, preliminary preparation is carried out - the base is cleaned.
For this:
- Old paint, whitewash or other finishing coating is removed.
- The surface is carefully leveled and primed.
- The base is checked, which must be fat-free, dry and durable.
- Liquid nails are applied in a snake onto the cornice, which is pressed tightly against the ceiling.
- If it is necessary to adjust the cornice, it must be moved in a certain direction without lifting it from the ceiling.
- The glue will begin to set in about 20 minutes, and the composition will dry completely after 3 days.
Correctly selected fastening of the curtain to the ceiling allows you to emphasize and complement the interior of the room. At the same time, a not very successful option will be very noticeable and ruin the overall impression. To correct a mistake in choosing a cornice, you can use lambrequins or decorative strips that hide an unsuccessfully chosen curtain mount.
Installation of curtains on a suspended ceiling
Any type of curtains for suspended ceilings is suitable. There is no difference in this regard between ordinary and suspended ceilings. When purchasing, you should make sure that the curtain kit includes hooks and plugs, as well as, if necessary, decorative tape. There are two ways to install it.
Traditional installation method
In this case, when installing ceiling curtains for suspended ceilings, a mortgage (a special platform made of plastic, wooden beams or plywood) is attached to their future locations. After this, the fabric is stretched, and through it the fabric itself is attached to the embed for the stretch ceiling.
In order for the suspended ceiling and curtains to look harmonious, the installation must be approached responsibly.
You should buy it before installing the stretch ceiling, since the number of inserts and their size are selected to match the curtain itself - there are no standard curtains. They can have different lengths, widths, and have one, two or three rails. For this reason, mortgages are prepared after the dimensions of the curtains become known.
Curtains for suspended ceilings can be made of plastic or metal. The latter are better, since they are more rigid, and their installation requires fewer mortgages and fasteners.
After the curtain for the suspended ceiling has been selected, mark its future location. The location is chosen in such a way that, after fastening, the curtains do not lie on the radiators and window sill.
Next, they begin to manufacture and install mortgages. To do this, select a wooden beam that corresponds to the length of the curtain, and align it with the level of the stretch ceiling, using wedges, small glazing beads, etc. To ensure that the curtain on the stretch ceiling is installed evenly, the installation level of the embed is adjusted using ordinary construction thread attached to different sides of the baguette using a wedge or dowel.
The timber used for it is attached to the base of the ceiling, having previously treated its corners and edges with sandpaper. After this, you can install the tension fabric.
When the ceiling structure is installed, the fastening points are marked on the curtain - for this, the cornice is tried on, and the places where the curtain is attached to the suspended ceiling are marked with a marker so that they coincide with the location of the embedded parts. Curtains for suspended ceilings are attached to the mortgage through the canvas using self-tapping screws. To prevent the fastening elements from causing tears and other damage to the fabric, it is worth gluing pieces of plastic or reinforcing tape in the places where it will break through.
Installation of a niche under the curtain, watch the video:
Second installation method
A ceiling curtain can be attached to a suspended ceiling in another way. To do this, during installation of the canvas, a small section of the rough surface near the window is left uncoated. In this case, the curtain on the suspended ceiling will look more interesting.
Read How to drain water from a suspended ceiling
It is in this niche that a hidden curtain is installed on the suspended ceiling. As a result, it will look as if the curtains are falling straight from the ceiling. At the same time, they will cover the section of the rough ceiling that remains unformed with a stretch fabric. In this niche you can install any type of ceiling cornice. The installation of the ceiling itself is carried out using a special baguette.
The second method is easier compared to the first. In addition, in this case there is no possibility of damage to the tension fabric while attaching the curtain. The only drawback of this option is that if you have to remove the curtain for some time, an empty section of the rough ceiling will be noticeable.
Installing curtains on a suspended ceiling is not difficult. This work does not take much time. The main thing is to be extremely careful and careful not to damage the expensive stretch fabric.
Criteria for choosing a cornice
Tip: Curtains should be chosen so that they fit into the overall concept of the room. A simple plastic structure would be inappropriate in an antique-style room with a massive chandelier and imitation wooden beams: in this case, it is better to choose a dark-colored wooden structure.
Before fastening, you should choose the right product in accordance with the design, material and dimensions of the structure.
Original look
For this:
- A large number of bright colors should be avoided so that the room does not look motley and tasteless. Optimal options:
- curtains in white and black;
White curtain
- ceiling color;
Color combination
- wall color.
- The construction material is selected depending on the type of ceiling. Wherein:
- for a surface made of reinforced concrete, there are no restrictions on the material;
- For a suspended ceiling, there are restrictions on the weight of the structure.
Fastening the baguette
Preference should be given to lightweight plastic construction.
- In a large room with one or several windows in a long wall, it is better to choose curtains wider than the window opening by about 40 centimeters, which will prevent oblique sunlight from penetrating into the room.
Installing a cornice across the entire wall
- For a narrow room, a slightly smaller width is optimal.
Curtain in a narrow room
This will make the room visually wider.
Popular glue brands
Depending on the properties of the adhesive composition, its adhesion changes, as well as the time for adjustment. Popular brands of adhesive mixtures for polyurethane:
- NMC Adefix P5 is a product from Belgium, designed for fixing polyurethane or polystyrene to a porous plane.
- Moment DecoStyle is universal – suitable for a wide range of applications, elastic and waterproof. Can be used in bathrooms.
- TITANIUM Wild – sets quickly, is resistant to moisture, and easily tolerates low temperatures. Used on concrete, wood, drywall.
- Europlast Mounting - has a paste-like consistency, fixes polyurethane well on a porous base.
- Docking Orac Decor - made on a polyurethane base, sets in 30 minutes.
- Joining DECOMASTER – forms a transparent seam, sets in half an hour.
It is better to choose compositions based on polyurethane - they fix joints well, or based on acrylic - they firmly attach products to the wall with any base.
What is a ceiling cornice for a suspended ceiling?
The cornice for a suspended ceiling differs primarily in its design - it is a profile curtain, which is a flat plate (tire) with a different number of tracks for hooks. Such models are available both with and without a baguette. A baguette is a decorative strip that forms a box that hides hooks.
Types of structures:
- Flexible. Allows you to create any trajectory of movement of curtains. Well suited for designing window openings of complex configuration.
- String. A simple model consisting of a string-wire with a set of hooks. Lightweight design designed specifically for minimalist style.
- Profile. This design is most often made of plastic or metal-plastic. It can be multi-row (up to four tracks), straight or rounded.
Ceiling structures differ in the way they control the movement of curtains. According to this parameter, they are divided into mechanical and automatic.
Ceiling curtains can be quite spacious - models are available that can accommodate from one to four curtain sets. Also, cornices are divided into single- and multi-tiered. The latter allow you to hang sets of curtains at different heights, which creates a “waterfall” effect.
Installation of a ceiling cornice under a tension fabric differs significantly from the method of attachment to a permanent concrete slab. This process is more complex, but if you follow all the rules, you can install the curtain yourself, without resorting to the services of specialists.
Benefits of use
Any owner of a ceiling model will find many advantages of using it compared to the wall version.
The main advantages include:
- aesthetics of the design;
- independence from the wall material (plasterboard partitions exclude the possibility of installing wall models);
- invisibility of fasteners and hinges;
- volume;
- reliability and durability (you can hang even heavy curtains);
- visual increase in ceiling height;
- the possibility of various combinations of lighting with the cornice, including the use of lighting for hidden structures.
A large assortment of models, simple and more complex, multi-stage, with a large number of details and elements, allows you to choose a cornice that will ideally match the interior of the room and the taste preferences of the home owners.
Dimensions
Choosing the right size of cornice is not difficult - there are various options available for sale for any ceiling. The maximum length of aluminum and plastic models without a joint is four meters. It is possible to purchase a cornice made from several components.
The width depends on the number of fastening rows and can reach nine centimeters. The standard outer strip, which hides the fastening structure, can be from 5 to 10 cm wide, and the extended version can be up to 30 cm.
Wooden models are most often made to order according to individual sizes, but you can also purchase ready-made ones - the length of such a product is usually two meters. The width of a baguette in a wooden product can be any; there are no standard sizes.
What materials are rail curtain rods made of?
If for ordinary cornices materials such as wood, metal and plastic are mainly used, then in the case of profile cornices wood is not included in the list of suitable materials for making models. In most cases, plastic models are presented on the modern market, since they are lighter and less expensive, but despite their rather low cost, they are of quite good quality.
In the interior, harmony, combination and balance are important, so the choice of aluminum cornice should be approached thoroughly.
Whether plastic or aluminum, both materials are considered reliable enough for use in creating cornices, and therefore models made from them can be found in any store that sells equipment for renovating apartments and houses.
The guide profile can be straight or curly. The required bending shape is determined when ordering the product.
How to attach a curtain to the ceiling
Preparatory work
A huge assortment of various products (plastic, metal, wood) is divided into three large groups:
- with mounting on hangers;
- with brackets provided for fastening;
- with mounting holes.
The last option is justifiably considered the most difficult for self-repair; we will study its stages in detail. In other cases, work follows the same scenario.
Only cut with a hacksaw with sharp teeth: a dull tool will damage the surface.
Let's prepare the tools. You will need a few of them:
- hacksaw for metal;
- perforator;
- screws, dowels;
- drill.
Now let's adjust the sizes. First decide on the location and size of the structure. The curtains will flow smoothly if the curtain is 15-20 centimeters from the wall. It’s easy to calculate the length of the strip: if there is a single window, add 40 centimeters to the width of the frame; with two windows located next to each other, a 30-centimeter allowance is enough. Saw off the excess ends with a sharp hacksaw.
Main part
You have three main tasks: make neat holes, correctly mark the location of the cornice and mount it securely. Let's look at how to attach a ceiling cornice to a concrete ceiling, a hard-to-work surface.
Drilling holes
Mark the middle of the crossbar and form the first hole. Don’t be lazy and take note of the trick of repair specialists: arm yourself with a double drill or use two drills. With the first, wide tool, we form a circle on the front side of the structure. Match the diameter of the screw - the hole should be equal to it or slightly larger in size. Work slowly: as soon as the depth is sufficient for the dowel head to “sink,” change the drill to a thin one and complete the job.
Curtains made of heavy materials will not sag if the holes on the cornice are frequent and uniform
In the same way, inspiredly create holes along the entire length of the curtain. Their number depends not on your desire to work, but on the width of the cornice and the type of curtains. Dense heavy fabric requires frequent holes - every 15-20 centimeters, light tulle flutters beautifully on the crossbar with sparse fasteners - about half a meter. If the curtain strip is massive or very wide, it is advisable to make two rows of circles.
Before attaching the cornice to the ceiling, you need to mark the location for the dowels. To do this, we first temporarily adjust our structure. Find the center point for the future support and align it with the center of the crossbar. Using a drill with a diameter of 5-6 mm and a hammer drill, make a hole. Its depth is equal to the length of the dowel on which you will briefly attach the cornice.
Now your eyes should be sharper than ever, and your movements should be confident and correct. Draw marks on the ceiling through the holes you made on the plank. Remove the cornice and use a puncher to deepen your artwork so that the dowel-nails are completely included in them - fixing the structure will be the last stage of the work.
In order for the cornice to lie flat on the surface, ensure that the holes are completely aligned with the markings on the ceiling
Cornice with pipe
This type of cornice is the most familiar and understandable. Rings are used to attach curtains. The curtains themselves can be either specially selected and have round holes, or attached with hooks.
Keep in mind that this cornice greatly limits its use and is not suitable for windows close to the ceiling.
Classification and advantages of ceiling products
Why use ceiling curtain rods? First of all, they provide the opportunity to secure curtains under the ceiling. This allows you to visually increase the size of small rooms with low ceilings.
According to the material of manufacture:
Wooden – made of wood, they fit organically into a classic interior.
Metal, with increased strength, ideally emphasizing the modern style of the premises.
Plastic. Their main advantages are lightness and low cost.
Advantages
The most important point when using rail devices for hanging curtains is the ability to fasten them directly to the floor plane without any gaps. This will make the room appear taller and the curtains longer.
Most rail models allow you to hang not one, but several rows of curtains, which makes such products more versatile. In addition, the design can withstand quite an impressive weight, which will allow you to hang even the heaviest curtains.
Another important circumstance is the low cost of the device. There are, of course, very expensive models, but it is among rail curtain rods that you can find the most inexpensive devices. At the same time, their functionality will not suffer at all, but only the appearance and a little “carrying capacity” will change.
Rail devices also include flexible modifications made of metal or plastic that can be bent into any shape. This is their main advantage over hard options. The method of fixing the runners in such models is external - the rollers move outside the guide rail and have a special shape.
The last significant factor will be the ability to choose the external decorative design of the product. There are simpler models, white and without any decorations - they are the cheapest, and there are models with baguette design, which cost significantly more. However, more expensive devices look much more attractive.