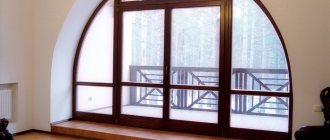
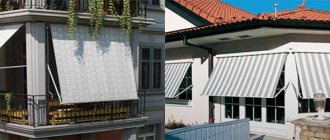
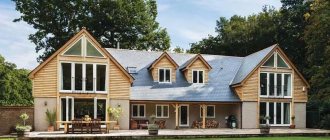
Windows with spraters look good in country houses, on balconies or loggias, as well as in rooms stylized as medieval buildings. Most layouts imitates glass separation into identical quadrangular fragments and makes the windows look like antique hand-assembled structures. This design looks very impressive on large windows, and gives small structures a special coziness and charm.
What is window layout
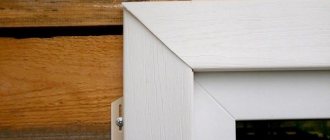
Layouts (shpros) are one of the types of window decoration. The profile is glued to the glass or mounted inside the double-glazed window structure. This creates the illusion of a binding in the form of a lattice, arch and other geometric elements. All types of window layouts are divided into two main groups depending on the design: frames and false frames.
Layout location inside the glass unit:
The layout can be of any shade. Popular: “gold”, “wood”, white, black
The thickness of the layout strip can be different: 8, 16, 26 mm
Decorating layouts allow you to transform the look of a window structure, giving it a modern twist, decorating it in a unique vintage style, or emphasizing non-standard details.
In addition to decorative functions, false frames also have a practical role - they make windows more durable.
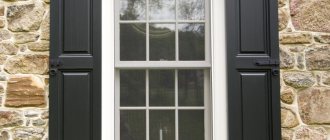
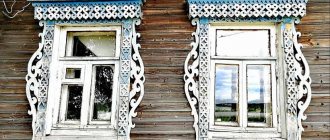
Wooden window shutters
After installing the shutters, the room becomes additionally protected from cold and atmospheric conditions. Wooden shutters for windows, photos of which can be seen at the end of the page, are made external or internal, and in structure - single- or double-sided, panel or panel. Anyone can make such shutters themselves.
Window shutter design option
What is needed to make shutters
To make window shutters from wood, you will need boards 100-200 mm wide and more than 20 mm thick. Veneered boards made from hardwood trees are considered the most suitable, but smooth fugue is also quite suitable.
In addition, you will need to take care of the availability of tools for woodworking: a hacksaw, drill, screwdriver, plane, chisel, etc. You will also need measuring tools: a level, a tape measure and a carpenter's corner. For the final stage of work, you need to purchase drying oil, brushes and paint, as well as an antiseptic.
Assembling shutters for windows
Making simple shutters
How to make ordinary shutters from boards
- Measure the existing opening on the outside and inside, then draw up a plan for cutting the boards and cut them.
- To prepare the boards for the end connection, they are welded together. Smooth jointed boards can be installed with glue, but in addition you need to strengthen it with a batten so that it covers the resulting gaps.
- It is easier to join the shutter fabric together using the locking method: select a groove in the end part, and provide a tenon on the opposite side. Experienced craftsmen recommend buying ready-made tongue and groove boards, which are used for flooring.
- After rallying, the canvas must be additionally strengthened with transverse jibs and overhead ties.
- Hidden bonding of the shields is carried out using threaded rods. To do this, use a thin drill to drill holes in the end sides of the boards, and then drill them out until the diameter of the stud is reached. After this, the boards are strung on studs and tightened with bolts, and their ends are generously coated with wood glue so that there are no gaps left.
Manufacturing of panel shutters
- A panel is a thin board inserted into a frame frame. Such shutters not only look beautiful, but are also very durable. Construction stores sell ready-made panels and profiled beams with optional grooves, but you can order the necessary parts directly from carpenters.
- The panels can be made smooth or decorated at your discretion. They may have layouts made of tongue-and-groove timber or selected moldings. Panels can also be floating, figurine and can have a frame decorated with carvings. If desired, you can also make wooden window frames. Carved templates, photos of which can be seen a little lower, allow you to decorate a window very beautifully.
- The tightening frame is made of strapping bars, which should be 5 mm thicker than the panels. The bars are planed and polished, and then connected using tenons with eyes.
- When the frame is assembled, the panels are coated with glue and inserted into it. The sashes should be fixed on the plane until completely dry.
- On the sides of the shutters and platbands, it is necessary to hollow out sockets for mounting hinges with a chisel. After inserting the locking elements, you can attach the shutters to the slopes. The sashes are leveled and then secured in the hinge sockets using screws.
- The final stage of work is impregnation of wooden structures with drying oil or another agent that prevents rotting, and then covering them with varnish or paint.
Options for wooden windows Installing a window frame in a house made of timber Assembling a window frame with your own hands Making a box for a window Tools for work that will be needed Attaching wooden shutters to windows Wooden windows for a house Assembling shutters for windows Design option for window shutters How to make ordinary shutters from boards
Interesting on the topic
Advantages and disadvantages of sprats
pros
stylish and modern look of the window - the craftsmen will select a design that will harmonize with the facade and create decorative elements that are beneficial in a particular case
Separators, although they do not protect glass from mechanical damage, do save from distortions and sudden temperature changes
the double-glazed window becomes more reliable - part of the load from it is transferred to the slats, and this speaks in favor of the strength of the main structure
Minuses
the cost of the finished product inevitably increases, because more consumables have to be used
the window block becomes heavier, which is not always desirable in balcony glazing
the thermal insulation properties of the window may deteriorate - heat escapes from the room through the places where the glass is connected to the profile
there remains a possibility that the glass unit will depressurize in those places where the parts are connected
windows with a layout inside should be made by a highly qualified specialist, but sometimes amateurs get down to business - it’s not always possible to predict the result
How to choose?
The design aspect prevails in the choice, so first we will indicate recommendations on it:
- It is better to install the same grille on white windows so as not to create dissonance. But there are solutions with different colors that are very harmonious, for example, a dark brown wood frame and thin gold bars, this is a classic.
- It is not advisable to overload the opening with patterns, as they will prevent the penetration of sunlight. There is a rule for window layout: laconicism, small thickness and clarity of lines, minimally blocking the view and interfering with light as little as possible.
- Thin strips (8 mm) with some cells may look too lacy (stringy), but with others it is quite appropriate. The same applies to wide elements (18 mm): if they are incorrectly chosen to match the geometry of the pattern, they may seem cluttered. There is also a golden mean - 12 mm.
- While a standard cross-shaped design may look a bit bland, a more unique geometry will add variety to your home decor.
Important ! It is necessary to correctly combine the height of the protrusion of the external beams. For swing doors this is of little significance, but with a sliding, transom design, too large slats can interfere with their movement and touch the slopes.
In the pictures below, the user wanted to improve the schemes (on the right), to make them less standard, on the right is what the wizard suggested:
Examples of solutions:
Where to buy plastic windows with layout in Moscow?
| "Moscow Windows" | 5/5 |
| "Windows of Comfort" | 3.5/5 |
| "Window Plastic" | 3/5 |
Windows with square layout
The same window - with larger squares
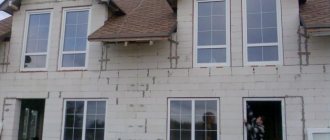
Technical limitations for the manufacture of plastic windows
70 photos of options for the best landscape design for the courtyard of a private house: trying to repeat it!
Often there is a desire to install a panoramic blind or opening window that is not divided by an impost. It is not always possible to make it, since there are technical limitations for the sizes of plastic windows, as well as for the sizes of blind parts and opening sashes. Restrictions also apply to extremely small windows.
Main technical restrictions according to GOST 30674-99
- Maximum sash weight: 80 kg for white, 60 kg for colored products.
- Maximum profile length in a plastic window: 4 m for white, 2.5 m for colored.
- Maximum area of a plastic window: 6 m2.
- Maximum opening area: 2.5 m2.
Main technical restrictions on production equipment and fittings
- The minimum side of a blind window is 200 mm.
- The minimum side of the sash is 450 mm.
- The maximum length of a plastic window is 3.2 m.
- Maximum sash height 2.3 m.
If the window dimensions exceed the maximum, then it is necessary to divide the structure into several frames and join them together. If the dimensions of the sashes exceed the permissible limits, we recommend changing the glazing by adding blind or opening sashes.
Related article: Double-chamber window, how many glasses
Installation options and methods
For the decorative design of PVC windows, internal bars made of metal or plastic, as well as glass linings on the outside, are most often used.
The placement of the crossbars inside the glass unit is carried out at the production stage, so it will not be possible to remove or change them in the finished product. External overhead design elements are mainly used in country houses with wooden windows, and plastic structures are equipped with them much less often.
Shprosy inside the window
The products are made from aluminum or polymer profiles, which are placed between the window panes. To secure them, special connectors are used at opposite ends of the frame. The diameter of the fastening does not exceed 3 mm.
The design not only decorates the glass without requiring special care, but also serves as additional support, especially relevant for large panoramic windows. Rigid bars protect products from damage and prevent foreign objects from entering the room.
False binding
These are the names of decorative overlays (strips) made of plastic or polyvinyl chloride, which have an adhesive base and are attached to the outer part of the glass. Due to the fact that the height of the profiles coincides with the height of the frame, the illusion of binding is created.
The advantage is that you can attach them at any time (order ready-made windows or install them after installation). The first option is preferable - it turns out much neater.
Overlays can be narrow, wide, with smooth edges, tightly fitting to the base, or milled, reminiscent of partitions on wooden window sashes.
Advice: it is better to repeat the layout pattern on the inside of the glass - you will get the complete illusion of a decorative binding.
Decorative elements do not in any way affect the operational properties of the double-glazed window - there are no cold bridges, and they are affordable. Plus the opportunity to implement any design solutions - break the glass sheet into identical fragments, create an imitation of an arch or decorate it with monograms.
False bindings are also used if it is necessary to divide large glass into symmetrical fragments to give greater rigidity to the structure - this is cheaper than installing stationary imposts.
Color – any (from classic white to imitation wooden surface). Various dyeing and lamination technologies are used in production.
One of the disadvantages is the difficulty in caring for double-glazed windows. Over time, dust accumulates at the places where the profiles are attached. Therefore, cleaning will take much more time. Well, the service life is relatively short. Over time, the linings may fade and crack.
Tip: small pads can be removed to make cleaning easier, but without fanaticism, since the adhesive layer is destroyed. When repeatedly re-glued, the decorative design looks sloppy.
Do-it-yourself budget false frame for windows.
Not much today, but very interesting.
I make false sash for windows with my own hands, a very budget option, and I’ll tell you how it can be done.
Here is a plastic window consisting of 4 parts. The overall dimensions of the window are approximately 2000 mm by 1500.
The cost of the material, including the necessary strips for separation, is 375 rubles. The total length is 30 meters, I took it with a reserve, since it is necessary to make several more windows. And the required length is 24 meters. Ridiculous price, compared to original false bindings which cost 300 rubles per meter)).
- We will need acetone to degrease the surface of the glass and the bindings themselves, since they do not have double-sided tape.
- Accordingly, double-sided tape.
- And the cable channel, yes, you didn’t hear the cable channel measuring 20 by 10. Choose a good one that closes tightly and is soft and slightly blue, such a cable channel will not turn yellow.
- Well, a good sharp knife with side cutters.
We take the cable channel, measure it along the glass and cut it with side cutters. And at the end we close the lid and only then cut it in place with a knife. The more carefully you do this, the less visible the joints will be. I managed to practically not see them.
The result is obvious. Stylish, beautiful and neat. And most importantly it's cheap.
If you have any questions, don’t hesitate to write. There is one caveat, I haven’t looked at it from the street side yet))), well, I think if the floor is high, then in principle it won’t be bad.
Added one more method from our Reader Valeria, look below
And this is what Valeria writes:
“Hi, I’m talking about false binding. In short, I used 3m automotive tape, on which deflectors and Ekoplast 20*10 cable channels are attached; the manufacturer assures that they contain the same “non-fading pigments” as in the double-glazed window profile. The summer was very sunny, nothing turned yellow yet. At the intersection of the cable channels, I also glued tape, in general, the result was a kind of overhead grille that adheres quite firmly to the window profile, but does not touch the glass and therefore does not spoil it, the entire structure can be quickly dismantled, and nothing can be washed off from traces tape I degreased everything with white spirit and finished with phenyl for each compound. I'm sending a photo))) "
I thank her for the new experience)).
Good luck everyone and don't be afraid to experiment.