Before you decide what kind of plastic window you need, you need to understand what a window transom is and whether you need it. This term refers to the part of the structure located on top; it is necessarily separated by a horizontal strip and can be placed on the window separately or be part of it. The transom can be opening or blind.
Window Adjustment Tools
Hex key
In almost all cases you will need a 4mm hex key . Usually the rod is curved in the shape of the letter G so that it is convenient to hold it in the event of applying force.
Other tools:
- Screwdriver bit with a star-shaped section (designation T, TX). This device is not always used; the nozzle is used only in some types of fittings.
- Crosshead screwdriver. You will need a size four or three. The tool is needed to adjust the mounting bolts on the window frame. You cannot do without a screwdriver when adjusting or replacing the handle, coordinating roller carriages (sliding opening).
- Pliers or pliers. The tool holds the parts in the desired position and makes it convenient to remove the seal.
When replacing a double-glazed window, you will need a vacuum glass gripper . With its help, products of significant mass are transported, and there are no difficulties with use. You will need a construction knife with a removable blade to cut the seal to the size of the opening or transom.
Vacuum gripper for glass
Application area
Transoms can be found in windows, entrance or interior doors in all types and types of buildings (residential buildings, utility rooms, garages, hospitals, kindergartens, schools, etc.). They are installed in windows with large window opening dimensions or panoramic glazing - the surface of the glass unit is reduced.
In entrance doors for an exclusive doorway design. In interior spaces - for lighting corridors and original wall decoration. There is also an unusual function - to control the presence or absence of light in hospital rooms at night.
In public spaces with large crowds of people (schools, kindergartens, medical institutions, etc.), transoms are installed to remove smoke in case of fire - there is time to get people out of the building before everything is covered in a smoke screen.
For information: in accordance with the law, Art. 56 FZ-123, it is required when designing and constructing buildings to provide forced and natural ventilation to remove toxic combustion products. These can be smoke hatches, skylights, windows, fire-fighting smoke exhaust transoms.
How to set winter and summer mode
When installing a window, workers set the mode of use to neutral . In this position, the mechanism can operate successfully in winter and summer for about three to four years. At the same time, the sashes are pressed well, the seal retains cold flows. In the first years of successful work, changing the settings of mechanisms is sometimes harmful.
They coordinate the pressure with pins at the end , and each type has its own rules:
- On round varieties there is a mark in the form of a dash or dot. The neutral position is set if the mark is oriented upward. Summer setting - the direction changes towards the street, winter - the line looks inside the room.
- Oval trunnions do not have marks, but adjust the pressure by the position of the ellipse. The vertical position is used for summer settings, horizontally aligned when switching to winter mode, and diagonally for neutral use.
Another type is a turnkey trunnion . Adjust using an offset from the center position. The element is moved inside the room - winter setting, outward from the center - summer mode, in the center - neutral option.
Instructions for adjusting the sashes
Transoms can be constantly in the open position, so the fittings become loose under their weight. Some balcony mechanisms are equipped with a lock to prevent sudden slamming. If there is no such device, backlash in the hinges is inevitable.
Methods for eliminating problems with opening moving parts:
- The top of the sash rubs against the frame. Corrected by lowering the structure by adjusting the bottom hinge using a bolt. A hexagon is inserted into the hole and smoothly turned counterclockwise.
- The opening transom touches the bottom of the box near the handle. You need to lift it using the same lower canopy. The hexagon is turned clockwise.
. The structure needs to be moved towards the hinges. Place a hex key in the hole in the top hinge and turn it clockwise until the result is achieved.
The sash catches the frame in the handle area- The window stops closing. The locking device in the handle needs to be adjusted. There are plates or tongues in different types. When pressing on these elements, the mechanism block is removed.
Valera
The voice of the construction guru
Ask a Question
If the window still does not close, with the transom open, find a mechanism for hooking the tongue, unscrew it, and place a thin plate inside to move the device closer to the sash. The contact area will increase, the moving part will close.
We adjust plastic windows without involving specialists
The advantages of plastic windows compared to traditional ones today do not require additional proof. Such structures are installed in both old houses and new buildings, residential and office premises.
The name of new window designs focuses on the material, but in fact their main advantage is that they provide gas density to the enclosing structures and prevent heat loss. In order for these important qualities to be preserved throughout the entire period of use, it is necessary to follow the operating rules. In particular, you should periodically check the functionality of the fittings that provide the functions of opening and closing the valves, their tightness and the required tightness (Fig. 1). To extend the service life, plastic windows are also adjusted.
What tools should you stock up on to adjust windows?
Most often, such deviations in the position of the window structure from the original one, ensured with proper installation, are found:
- The transom touches the frame at some point along the perimeter.
- The tight fit of the transom to the frame is not achieved.
- The locking strips have lost their original appearance.
- The handle is loose, does not turn well, and does not fit well to the frame.
- The handle is blocked.
No special tools are needed to service windows.
Almost every home has everything necessary for such work:
- plumbing tools - pliers and screwdrivers,
- a set of keys,
- cutting tools,
- container for oil.
Principles for debugging the correct position of PVC windows
The degree of compression of the seal around the entire perimeter should be the same. To achieve this, adjust the pressure.
The proposed recommendations can serve as the basis for guiding action for any design of a fittings system.
Adjusting fittings
The setting method depends on the type of fittings, which differ in structure from different manufacturers. There are types that are adjusted with screwdrivers, others are adjusted with hexagons. To increase the tightness of the fit, the bar is shifted towards the street.
The hinges have retractable elements to coordinate the pressure. A smaller protrusion gives a loose fit, a larger protrusion will provide a tight seal.
Operating rules:
- fittings need to be coordinated at least once a year;
- strong pressure will damage the devices due to constant tension;
- the slot in the eccentric can be used for a flat-head or Phillips screwdriver, depending on which tool is chosen;
- to rotate the eccentric, it must be moved away from the plane; the extended element can be rotated manually or with pliers;
- check the location of the eccentric; if the problem persists, change the position of the mating part on the box or frame holes.
Valera
The voice of the construction guru
Ask a Question
To adjust the top of the transom, a “scissors” mechanism is found, which serves to fix it for ventilation. It is held in the open position, the locking lever is found at the end and pressed on it. The handle is placed vertically (for ventilation), while the sash comes out of the frame and rests only on the lower canopy. This way you can get to the clamp adjustment bolt from the bottom of the fixing device.
Pen
If the handle wobbles, just tighten the bolts.
The rotary handle should be movable, but sometimes it wobbles and does not perform its functions. In a simple case, it is enough to tighten the bolts that are located under the plug. To remove the part, lift it up, turn it 90°, and tighten the exposed screws with a screwdriver.
Other problems with the handle:
- does not open completely and jams;
- the handle jams;
- need replacement.
If the handle jams, you need to lubricate it.
In the first case, first clean and lubricate the mechanism ; if this does not help, loosen the pressure on the sash. Lubricate with an oil can with a nozzle, and use brushes for cleaning.
If the handle does not move , then you need to manually change the position of the lock , which prevents you from changing the position of the transom when it is open (lifting it up). The lever is moved manually; it is located at the end.
They change the handle to a new one when it is mechanically damaged, has lost its appearance, and adjustment does not help. It is better to order the part from where the window was made and all the elements were installed. The old structure is dismantled and a new one is installed.
Folding mechanism
The modes of plastic windows provide different opening options, for which they use a tilt-and-turn or simply a tilting mechanism. In the first case, the sash swings open on the side canopies, or only its upper part opens.
Adjustment procedure:
- the sash is opened as usual;
- the handle is placed in the ventilation position, part of the scissors will open;
- the bolt is tightened to raise or lower the sash.
The pressing of the lower corner of the transom is adjusted with a screw on the lower hinge, for which you need to remove the plug from it. Raise or lower the sash to operate in tilt mode with a bolt on the top hinge when the window is open. The pressing force is coordinated by eccentrics on the side of the transom.
If the upper corner of the sash is not covered , it is this that is moved. The window is opened 90°, the side screw is tightened in the upper hinge on the sash, but so that there is a gap between the transom and the canopy (it is needed for the tilt-and-turn device to fit in there).
Other points
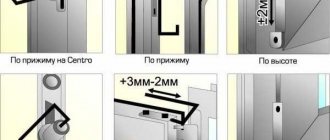
Sometimes the transom warps so that even after maximum shift the result is not satisfactory. In this case, they find an adjustment on the striker plate and try to coordinate it. They work with a hexagon, rotating it clockwise to extend the sash.
If a couple of millimeters are missing sideways, and not in depth, 2 pads are placed under the answer:
- cut out of plastic (thickness 3 - 4 mm), preferably white;
- remove the stops by screwing the bolts;
- one part is placed on the side, the second at the bottom;
- attach the stops back, they move inward by 3 mm;
- if the plastic protrudes, cut it off with a sharp knife.
To organize micro-ventilation, a flow valve . There are different designs that involve unregulated ventilation or operate in automatic mode. Their installation is simple, but the comfort of the microclimate is significantly increased.
When repair or replacement is required
The handle is most often replaced, but the replacement also applies to other mechanisms. Quality window fixtures last a long time and require only minor adjustments or repairs.
Situations requiring replacement:
- plant savings on swing, tilt, sliding or tilt-and-turn mechanisms - the appearance does not change, but adjustment of low-quality devices is impossible;
- violation of the assembly technology of window frames or sashes - sagging per year is 2 - 3 mm, while the coordination of fittings cannot change the weight of the transoms or their design;
- development of mechanisms that have lost their working qualities due to the end of the warranty period.
To replace the handle, you need to remove the decorative trim by prying it off with a thin tool. This will reveal two screws that need to be removed. After this, they remove the old part, put a new one in its place, screw it on, and put on the bar.
We install wooden ceiling curtain rods ourselves
It is impossible to imagine an apartment in which there are no curtains and curtains on the windows. For them, a wooden ceiling or wall cornice is often installed. Now, of course, there are both metal and plastic cornices, but wood always remains popular - it fits well into any interior and gives the room a special coziness.
Ceiling cornice design
Previously, there were only the simplest models of cornices without any decorations. Now you can choose different types of wood and patterns. There are cornices that have figured tips, and there are baguette and figured ones. Carved wooden cornices with fancy patterns look very elegant and elegant; they fit perfectly into an interior in a classic Russian style and are combined with antique furniture. They are a real work of art.
Wooden baguette cornices for curtains are wide and with intricate carved patterns and also look luxurious. Carved and baguette ones are more expensive than regular cornices, but they themselves can transform a room.
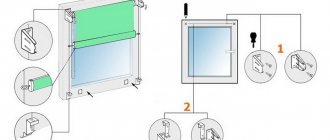
Preparing to install the cornice
You should start by determining the height at which wooden curtain rods will be located - they should be at the same level in all rooms. Their design must be selected based on the interior. After determining the height of the cornice, you need to use a building level to draw a line for installing the brackets - for this you need to make marks with a pencil in the places where they will be located. If it is not long enough to draw a line from one edge to the other, it is worth marking an intermediate point.
The brackets are attached with two dowels, so they must be placed vertically, with its center passing through the line marked with the level. Having attached the bracket to the wall, you should mark the places for fastening. The cornices can be long enough to be installed, for example, above a balcony. In this case, an intermediate bracket is attached, which must be installed in the middle between the extreme points.
When you buy wooden ceiling curtain rods, they come with plastic screws and dowels for installation, but they are often not able to support the weight of curtains and curtains. It is recommended to install ceiling cornices on dowels with a diameter of 6-8 millimeters. As for the difference in the diameters of the dowel and screw, it should not be more than 2 millimeters, otherwise they will fall out of the walls.
Installation of cornice
The hardest part is drilling the holes to install the brackets. For this work, you need to take a hammer drill and a drill with a diamond or pobedite bit, since there is a concrete lintel above the window that cannot be drilled with a simple drill. You can also use a tool with a hammer drill function.
To drill holes well, the process should begin by setting the hammer drill to the “drill” mode. After making a hole from which the drill will not pop out when pressed, the tool should be switched to the “drill-hammer” mode.
Then you can start screwing the brackets: the intermediate one needs to be screwed only after it is threaded into the eaves lintel, since otherwise it will not be possible to insert it due to the lack of free space. After the jumper has been inserted at one end, it is worth putting on the rings intended for fastening the curtains, and then tuck it into the other bracket. When the wooden wall curtain rods are installed, it is necessary to secure the ends of the brackets with special rings so that the curtains are always in the right place.
Features of installation of some ceiling cornices
All cornices are attached almost identically, there are only small nuances. For example, a double-row wooden curtain rod has two slats - for hanging curtains and curtains. A curtain jumper is usually made of metal and looks like a groove for hangers that will hold the fabric. This strip is quite thin and does not catch the eye - the wooden part will be visible. In such designs, the brackets are collapsible, therefore, if there is an intermediate fastening, three holders are installed at once, and then the main element is inserted into them. It will be convenient to fasten curtains and curtains with rings during installation, and only then insert the structure into the brackets, and not do it suspended, standing on a chair.
The double-row wooden cornice today remains one of the most popular for ceiling curtains. It looks interesting and is convenient in bedrooms and children's rooms - after all, in these rooms you may want to close the window with a curtain so that the sun does not shine in your eyes, but during the day you want to let in light, and at the same time feel protected from prying eyes.
A wooden baguette cornice looks completely different than a regular one, but their installation technologies are completely the same. Despite its massive appearance, it is just as easy to install.
It is worth noting that ceiling cornice and plinth are completely different things, but many people still confuse them. Curtains and drapes are hung on cornices, and baseboards have only decorative value.
Today, the most popular are wooden round curtain rods, due to their appearance and low price. Wood has always been widely used for home decoration - it is durable, beautiful and durable. In any interior there is a place for wood objects, be it furniture, flooring or something else. A room with wooden elements looks warm and cozy, so this material cannot be replaced by modern inventions. Of course, everyone can choose what to buy for their home, but plastic and metal curtain rods cannot decorate the house as well as wooden ones.
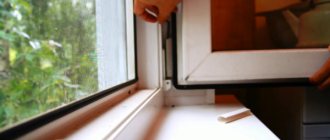
How to replace seals
To change the seal, you must remove the window sash.
Windows are blown out not only due to poor pressing of the vents, but also due to wear of the rubber bands. Not all manufacturers supply high-quality seals, so the gaskets deteriorate due to the negative effects of heat and low temperatures.
Operating rules:
- Remove the sash . Without this, you can change the rubber band only in a window with a tilt-and-turn system, but this is also difficult. You cannot leave part of the gasket behind the hinge, because it has become thinner due to use, and it will blow in the corner.
- Both contours are changed , while the rubber is glued together when joined. You cannot connect without glue, because the seal will “run away” over time, and an unprotected area will appear at the joint.
It is not recommended to compact rubber if it is longer. This will lead to the formation of an “accordion”, the waves of which will allow air to pass through.
Acceptable transom dimensions
The minimum size of the transom sash is 400 mm. When planning sections, you should take into account the recommended aspect ratio, which should not be more than 3:1. Important:
- Glass in wide but low sashes, with aspect ratios greater than 3:1, experiences high surface stress, and therefore the likelihood that the glass will crack without any serious impact on it is higher;
- If you order narrow sashes, a safety film must be glued to the glass unit, which reduces the risk of cracks in the glass.
Tips for installing and operating plastic windows
Specialists must install window units in the opening. Many companies provide a warranty period for their work, during which they correct defects and adjust fittings free of charge. If the finished window is installed by third parties, there is no guarantee; the adjustment is carried out independently or they invite craftsmen for money.
Care instructions:
- Windows are washed regularly, from twice a year;
- the fittings are lubricated at the same frequency; resin-based products are not used;
- Rubber gaskets are washed with conventional means, then wiped with glycerin;
- Hard-to-reach areas are cleaned with cotton swabs.
Do not use abrasive products for maintenance, and you should not use alcohol, acetone, or gasoline.
Double-glazed windows are washed with store-bought glass cleaning products. Regularly remove dirt from flow channels for condensate removal and ventilation. Mosquito nets are removed and washed with soapy water.