A plastic window, even the highest quality and correctly installed, requires periodic maintenance. It can last for several years without any problems, but over time it may feel friction when opening or closing. The second problem is that there is air blowing from under the seal, and the third is that the handle turns with force. All these breakdowns are not complicated and can be easily fixed, and it is not at all necessary to call a specialist: adjusting plastic windows yourself is a matter of minutes. All you need to do is tighten or loosen a few screws. The main thing is to know where and how. More on this in photo and video format.
Adjustment points for plastic windows
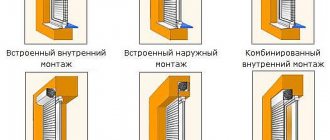
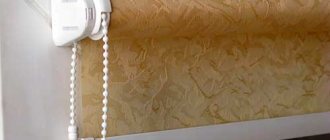
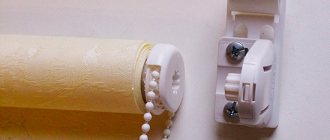
Winter-summer adjustment
The fittings of a plastic window are responsible for opening/closing the window sash.
What are winter and summer modes in window fittings?
Summer and winter mode in a plastic window is responsible for pressing the active sash against the window frame. Which in turn affects the ventilation of the window. How tightly the sash is pressed along its perimeter, the window will blow through. Winter mode is a tight pressure, and summer mode is, on the contrary, a weak pressure.
To adjust window fittings for winter or summer mode, determine which manufacturer’s fittings are installed on the window: Roto, Maco, Siegenia, VHS, Axor, Wink House Haus). Finding out what fittings are on your window is quite easy - you just need to look from the end of the active sash to see what name or logo is engraved on the fittings:
It depends on the manufacturer of the fittings what shape the pins are installed on your window, namely, on a metal frame around the active sash (band fittings): mushroom-shaped, cylindrical, oval or even octagonal.
Mako
Roto
Ziegenia
Aksor
VHS
Winkhouse
Once you have determined the fittings and trunnions, proceed to adjust the window using the necessary keys - a hex key, an asterisk key, a wrench or a universal tool - pliers.
Attention, the following statements are true for windows in the closed position.
If the axle is mushroom-shaped, cylindrical or octagonal, then on its surface you will see a notch in the form of a dot or mark. The weakest pressure on the window will be if the notch is closer to the street. If the trunnion is oval-shaped, weak pressure in a vertical position. Another exception is the trunnion of the Mako fittings - there the trunnion is mushroom-shaped without serifs with an offset center, as in the figure below.
As you probably already guessed, the strongest pressure will be the position of the trunnion when the notch is directed inside the room in the closed position of the window, with an oval trunnion - the horizontal position will be considered the tightest. Accordingly, the adjustment of summer and winter modes occurs based on the position of the risk.
If you switch the windows to winter or summer mode yourself, adjust the trunnions, or, as they are also called, pressure points, along the entire perimeter of the window sash, i.e. in most cases, the trunnions are located at the top, bottom, and sides.
We also do not recommend that you switch your windows to winter mode when the notch on the trunnion is completely directed towards the room. Why? Everything is simple, in fact, the regime that the installers of the window company left behind for you is enough for you - they are professionals, if, of course, you ordered windows from a window company with a guarantee. And one more argument in favor of this statement is that the rubber seals on the window will wear out faster.
Situations can be different, let’s say that 5 years have passed since your window was installed and you wanted to adjust it yourself. What to do in this case? Place the trunnions in such a position that they are directed towards the room at an angle of approximately 45 degrees. Be careful, the position of the marks on the trunnion is inside the room, because the active leaf can be left or right.
Working with fittings
To achieve the desired result, when adjusting window structures, the owner of a living space should familiarize himself with some of the nuances of this process :
- Adjustment should be carried out only after diagnosing the operability of the window structure and identifying all violations.
- Each element of the hardware is responsible for a specific function - before you start turning the screw, you should accurately identify its purpose so as not to aggravate the situation.
- When adjusting, you need to use only hand screwdrivers and wrenches, since the fittings are a highly sensitive mechanism, and even a slight turn of the screw can cause misalignment.
- After each adjustment, all moving metal parts must be serviced and lubricated.
When making adjustments, you should also monitor the performance of the mechanism step by step. It is not allowed to adjust the position of the fittings immediately with a large amplitude, as this will lead to a violation of the geometry, touching metal elements and the formation of uneven gaps.
To close tightly - why the weak pressure?
Firstly
, but how should the sash generally close, how tightly? Let's check it at home. Take a sheet of A4 paper and press it between the window sash and the frame so that one end of the sheet sticks out outside, the other inside.
Next, pull the sheet of paper towards you, if it is easily pulled out, it means that the sash does not close tightly and adjustment for the pressure is required, but if it is difficult or does not pull out at all, then everything is in order, adjustment is not needed (if the window is a tilt-and-turn window, then check the entire perimeter of the window).
Secondly
, identify the reason why the clamp is poor. It is not difficult to make sure that it is clamped tightly. There may be several reasons: winter-summer adjustment is required, the trunnions do not reach the counter strips, the rubber seals are worn out. You already know about the winter-summer adjustment
The trunnions do not reach the strikers - adjust the window yourself
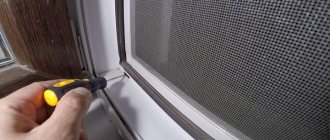
Look at the photo below to see what a strike plate is.
Let's figure out how the internal mechanism or window fittings work. When closing the sash, i.e. when you turn the window handle down, the trunnions go behind the striker (as in the picture below).
Due to this, the sash is pressed against the window frame. Consequently, if, when closing the sash, the trunnion does not go beyond the striker plate, then there is no clamping.
How can you tell whether the trunnion reaches the strike plate or not? 2 ways:
1 way.
Open the sash, then press the “tilt lock” on the sash and turn the handle down, while the sash is open, now you can release the lock.
It remains to check whether the pin reaches the strike plate or not. Use a ruler or tape measure to connect two points - the striker and the trunnion. They must be on the same level, i.e. the ruler assumes a horizontal position. If it turns out that the counter plate is located above the trunnion, this is not a normal position. The solution is the following: you need to unscrew the strike plate and install it in its normal position:
- install it lower by a few millimeters if it is on the handle side
– higher – if located on the hinge side
- left or right - if the striker is on top or bottom of the window ledge
Right
Wrong
Method 2.
Not for women's hands, and/or not for hands intended for manicure.
Visually determine the pressure points on the window, i.e., where the strikers are located. In the closed position of the window, in the places of the pressure points, use pulling movements on the edge of the window sash to feel whether the sash is tightly seated. If you feel that the sash is noticeably moving away from the narthex, it means that the striker is out of place and it needs to be reinstalled depending on its location along the perimeter of the window.
The rubber seals are worn out
This problem is also quite common. Very rarely, window owners take care of their seals, and to be honest, managers of window companies do not tell clients that they need to take care of their windows - not out of malice, but simple forgetfulness. Seals in particular tend to dry out and break down after long use, and they are of less and less use every year. Sealing rubber bands play a very important role in maintaining heat in the house. To avoid complications with thermal insulation, you should lubricate them with a special product or silicone grease 2 times a year. It’s even better to purchase window care kits, which include products for caring for plastic, fittings and seals.
It also happens that the seals fly out of the grooves, but the owner of the window happily does not pay any attention to this, and as a result, we have blowing in the winter and call a technician for repairs. Do not neglect this, correct defects in a timely manner or call our window company for advice.
It should not be!
And this is also not possible!
If the seals cannot be restored, they can be replaced. There is nothing supernatural about this either, and anyone can do it. Sealing rubber bands can be purchased at our company showroom or at any other store. Remove the old seals on your window and install new ones.
Most common problems
- When closing or opening, the window sash touches the profile or fittings;
- An invigorating breeze blows from the “tightly” closed window;
- The handle has become loose or, on the contrary, has become uncomfortably tight;
- After opening the window, the handle suddenly jammed.
There are others, but these are typical.
I will say right away that there are problems that arose due to a violation of the basic technology during the manufacture or installation of the profile. Are the windows adjustable in such cases? Not always. One positive point is that these problems usually appear immediately, and for a “fresh issue” you can always call the seller’s representative (installer). Some “experienced” reason for repairs is improper operation.
“Everything was fine...” - how to make sure it doesn’t touch the window frame?
This begs the conclusion and confirmation of an obvious fact - in such cases, adjustment of the sash vertically and horizontally is required. The reasons why the sash touches the window frame (narthex) are logical - window fittings, like any mechanism, tend to wear out and become loose. How many hundreds, or even thousands of openings/closings do the hinges on the window have to endure... The second reason is that the diagonals of the sash are broken or the sash profile is bent. When temperatures change, it either contracts or expands - this also affects the fittings.
There can be two solutions to the problem: adjusting the fittings on the hinge side, wedging the sash, or setting the diagonals.
Adjusting the fittings of a plastic window from the hinge side yourself
First, determine where the window is hitting.
If the bottom edge of the frame is the horizontal adjustment of the sash. To do this you will need a hex wrench. On the lower hinge of the window, if you stand facing the sash, you will see hexagon holes on the sides - they are responsible for the horizontal displacement of the lower part of the sash. Insert the key and turn it, constantly checking, until the sash no longer touches the frame.
If it touches the bottom of the frame, adjust it vertically or vertically. Remove the plastic decorative trim from the bottom hinge; if you look at the hinge from above, you will see a hole, insert the key and start twisting. That's how easy it is to learn how to adjust windows.
If the window touches from above, adjust the scissors of the upper hinge vertically.
The picture above shows the top hinge adjustment screw. Take the hexagon, approach the screw in a way convenient for you and twist it, periodically checking whether the sash touches or not.
If none of these methods help, we move on to wedging the sash.
Wedging or aligning the sash diagonals
There are 2 reasons why the window sash needs to be wedged:
— The diagonals of the sash do not match. Check the diagonals by measuring them with a tape measure. If the diagonals do not match, then wedging is required. — The width of the sash is not the same everywhere. Take the width of the sash from top to bottom at several points - it should be the same everywhere, otherwise wedging is required.
Wedging a sash is not an easy task; it requires special tools and skill. Therefore, before you take on this matter yourself, think over your actions. To do this, I will list the main steps of what to do.
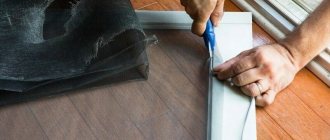
Here's what you'll need for this operation: a plastic spatula for double-glazed windows, plastic pads for double-glazed windows, a rubber hammer, a knife, and the skill of unpacking double-glazed windows.
1. Using a knife and a plastic hammer, remove the glazing beads on the sash without removing the sash itself. Remember where and which glazing bead is installed, or better yet, mark “bottom”, “top”, “left”, “right”. Do not remove the glass unit. Throughout the entire operation, hold the glass unit so that it does not fall!!!
2. Using a plastic spatula, pry up the glass unit and insert the pads around the perimeter of the window into place, as shown in the figure. The location of plastic support and spacer pads in accordance with GOST 30674-99 Window blocks made of polyvinyl chloride profiles should be as shown in the figure. Support pads differ from spacer pads in that they take on the entire load of the glass unit. Roughly speaking, according to the drawing, in places where black rectangles are drawn, the linings should be thicker.
In some places it is necessary to lift the sash to insert the support pad. If you did everything correctly, the sash should not touch.
3. Insert the beads back: first the short ones, then the long ones. Install long glazing beads like this: insert the glazing bead at both ends and gradually hammer it in from both ends, moving towards the center
If nothing works out, don’t worry - everything can be fixed. Contact us and help will not keep you waiting.
Required Tools
Adjusting modern fittings is a simple job that does not require the involvement of professionals. To perform this procedure, you will need a minimum set of tools that are available in the arsenal of every home craftsman:
A chisel or construction knife for easy dismantling of decorative overlays on hinges.- Pliers for removing plugs that provide access to adjusting screws. This tool also helps to adjust the trunnions if there are no screws on them.
- A screwdriver with a set of bits and an extension cable, if necessary, to dismantle some of the fittings of certain brands in hard-to-reach places.
- A slotted or Phillips screwdriver, an internal hexagon or an asterisk wrench for adjusting the rotary screws on the fittings.
- Oil can with lubricant - after adjusting each design, metal parts must be treated with machine oil to ensure flawless operation of the moving elements of the mechanism.
All tools must exactly fit the dimensions of the hardware and adjusting screws so as not to damage other elements of the window structure.
More information on the tools here.
The handle doesn't go all the way down
1.
In 90% of cases, the handle does not lower due to the fact that the trunnions rest against the counter bars. That is, when you turn the window handle down to the closing position, one or more trunnions, moving in a certain direction, rest against the center of the striker.
How to make sure that this is exactly your case? Open the window, press the sash tilt lock without releasing the lock, turn the handle down to the closed position. If the handle goes all the way down, congratulations, this is a very simple problem that can be easily fixed.
And this problem is solved by shifting the strikers to another place, by removing and twisting them up/down or left/right a few millimeters.
How can you tell which striker is out of place? The answer is overkill. From many years of practice it is known that the most common problem area is on the hinge side. Unscrew the slats on the narthex from the hinge side and try to close the window if the handle drops all the way, as they say: “Woo-a-la!” - you have found the problem area. Now you can screw the striker with a slight shift up or down, try it. 2.
If, however, the handle in the open position does not go all the way down, then everything is serious. At home, I would not advise you to do anything to solve it yourself. It is better to turn to professionals, including our company.
I'll explain in a nutshell what the problem is. There are hidden elements in window fittings that are responsible for the movement, in the literal sense of the word, of the axles. This is a metal toothed plate that fits into a groove of another plate, like a “male-male” type. These teeth, in very rare cases, tend to jump from one place to another. And because of this, the axles are displaced and their movement is disrupted. Therefore, the handle cannot be lowered all the way, the pin cannot move further, because it has a limitation.
3.
And the last reason why the window handle does not lower completely is that the trunnions are in winter mode and are pressed so tightly that it is impossible to lower the handle. Solution, adjust to summer mode or install the trunnions so that the risk is at the 12 o'clock position.
Which parts of the windows need to be customized?
Modern windows in the higher price category are equipped with premium fittings, for example, Roto or Maco. These mechanisms can be adjusted and adjusted in almost any area:
- Handles and locking mechanisms.
- Trunnions and strikers.
- Loop hangers.
- Scissors for flap mechanisms.
- When operating sliding structures - runners and rollers.
Each of the listed elements is responsible for a specific function - the geometry of the sash, the density of the rebate, the pressing force when closing and other functions of the window structure.
Possible consequences of incorrect settings
The biggest trouble with incorrect adjustment is wide gaps through which it will leak. In the cold season, this is fraught with heat loss, which should not be allowed.
A distortion of the structure will lead to incorrect operation of the hinges, which, in turn, leads to their failure. This can also lead to damage to the window sill - traces of the affected profile will remain on it.
But you should not treat the adjustment as an operation with simple manipulations. Any movement can change the settings. And although the process itself is simple, it must be approached with great care.
Did you know that plastic windows can be adjusted this way? Perhaps you have already encountered such a process? Tell us in the comments. Save the article to bookmarks and share it on social networks.
Rules for drawing up estimates
When drawing up an estimate for PVC windows, it is necessary to take into account some nuances that will allow for comprehensive maintenance of the fittings:
Diagnostics and visual inspection of each element and mechanism.- Procedure for complex adjustment of fittings.
- Replacement of worn parts, hardware and other elements.
- Carry out repairs if a defect is detected.
- Lubrication of metal parts
- Performance monitoring upon completion of work.
The estimate indicates the prices for each type of operation, after which the total amount is displayed. As a rule, many companies offer comprehensive services for window structures and make significant discounts, but the volume is large.
What determines the price of services?
The cost of services for adjusting PVC window fittings depends on several important parameters :
- Number of window structures to be adjusted.
- Difficulty in carrying out the work.
- Degree of wear of mechanisms.
- Year of manufacture and type of fittings design.
- The presence of defects and the need for repairs.
- Urgency of work.
As a rule, the best prices are offered by the same company that previously installed the elements for filling the openings, as part of a periodic maintenance agreement. Often this form of cooperation is necessary to maintain a multi-year warranty.
Average prices for different settings
There are many competing companies on the market offering service, repair and adjustment of PVC window fittings. As a rule, the prices of each of them differ little from each other due to the large number of proposals :
- Standard service, without the need to dismantle the sash - from 300 rubles. per unit
- Complex work involving the removal of the moving part of the window, as a rule, for old-style elements - from 800 - 1000 rubles.
- Adjustment of one of the mechanisms - trunnions, handles, scissors or hinges - from 150 rubles. per unit
- Lubricating fittings after adjustment – from 100 – 150 rubles. behind the sash.
Prices may vary depending on the market situation and the internal policy of the installation organization.