Call, Miscellaneous
In the age of modern technology, more and more new gadgets are appearing to make our lives more comfortable and simplify our work. One such device is the wireless doorbell, which has replaced its outdated counterparts. This simple, compact device can have many functions, and its installation is so simple that it does not require special skills or any special tools.
Wireless doorbell
Recently, such devices have become increasingly popular. So what is the secret of such demand? The answer lies in the way the bell operates.
What is the difference between indoor and outdoor wireless calls?
The range of such designs is wide, and in order to extend their service life, you need to choose the right model, taking into account the conditions in which the device will operate. Wireless doorbells in the map have a simpler design. They do not have additional external elements. If a comparison is made with street analogues, the presence of a protective visor is first noted.
There are other differences as well. For example, the degree of protection. Devices for outdoor installation must be better isolated from the environment. The wireless outdoor bell provides protection from dust, moisture, sunlight, temperature changes and even frost. In terms of external characteristics, both versions of the devices differ little.
Radio control system from Chinese radio bell
In electrical goods stores you can purchase a radio-controlled doorbell. The device is manufactured in China and consists of two modules powered from autonomous sources. One of the modules is a wireless bell button, and the second is the bell itself, which plays a piece of music when you press the wireless button. There are many different models and brands of such devices.
Here is one of them, ZAMELST919. The diagram of this device is shown in Figures 1 and 2. The website radiochipi.ru provides a diagram of the wireless button. The circuit is very similar to But unlike them, it transmits only one command, or rather not even a command, but an identification code, which in the circuit of the receiving node (Fig. 2) is used as a command. When the SW1 button is pressed, power is supplied to the button circuit. The CIR2262BM chip is an encoder for transmitting two commands and an identification code.
The identification code is set by a system of jumpers connected to pins one through eight. And for commands, pins 10 and 11 are used, which are not used in this circuit. Therefore, when SW1 is pressed, the transmitter transmits only the identification code, the data of which is transmitted through a low-power transmitter using transistors Q1 and Q2. operating at a frequency of 433.92 MHz. The receiver circuit is shown in Figure 2. The signal is received by a super-regenerative receiving path on Q1Q4 transistors and goes to a decoder on the CIR2267GM chip.
This chip is designed to receive an identification code and decode two commands. The identification code with which the IC compares the received one is set by jumpers on its pins from the first to the eighth. At pin 15, a one appears if the comparison result is positive, and 10 is used for command outputs. These pins are pleasant in this identification code, since the specified jumper circuit is not used. As an output, it uses pin 15 (identification), the unit from which, when receiving a signal from its wireless button, is supplied to the TR6210A sound module, which reproduces a musical fragment.
In principle, the circuit contains almost everything to make a two-command radio control system from a radio call. To do this, you need to make changes to the transmitter (wireless button) circuit, add two buttons SW2 and SW3 as shown in the diagram in Figure 3. The buttons are connected between pins 10. 11 and the power bus of the microcircuit. Now, in order to transmit a command, you need to turn on the power using the previously existing SW1 button, and at the same time, press the SW2 or SW3 button to transmit the command.
Button SW1 can be replaced with a switch that supplies power while working with the radio control system. Changes also need to be made to the receiver circuit. In particular, it is necessary to connect pins 11 and 10 of the CIR2267GM chip to some kind of actuator, for example, to two transistor switches, as shown in Fig. 4.
When a command is received, the corresponding transistor switch will open. In the collector circuits of transistor switches, you can include windings of low-power electromagnetic relays, optocoupler LEDs, or simply resistors to match the logical levels of a given circuit with an external digital circuit that receives a control signal, for example, a circuit of a security device or other equipment. If you don’t need sound when receiving commands, you can simply turn off the ringer speaker or remove it from the circuit altogether.
Read also: 12 Volts from 220 without a transformer
What should you pay attention to when choosing?
In order for the device to be used over a long period, the following criteria must be taken into account:
- The front doorbell is selected according to the degree of protection. For example, for installation inside a house, a model with IP20 is sufficient. Such structures are poorly protected from negative external factors (moisture, dust), but in an enclosed space, if there is no nearby source of water, there is no need to install an impenetrable device. For outdoor use, models with IP40 or more are considered.
- Equipment. When choosing a wireless call, pay attention to the number of boxes with buttons/transmitters and speakers with receivers. There are models with 1 speaker and 2 buttons and, conversely, with 2 speakers and 1 button. The choice should be made taking into account your own preferences and operating conditions. For example, for a house with 2 entrances it is better to purchase the first option.
- The choice of the type of power source for the subscriber unit, depending on personal preferences, is made in favor of a battery, batteries or a combined option. At the same time, do not forget that you need to take into account the possibility of connecting the indoor unit to the network, since this part of the device can be powered by a voltage of 220 V.
- Additional functions: surveillance camera, video intercom, motion sensor. Thanks to this, the level of security of the facility increases. You can choose a multifunctional model or an option with a camera or 1 motion sensor. This will affect the cost of the device. In expensive devices, the speaker has a higher sound quality, and the choice of melodies is wider.
- Mounting method. The most common models are those with double-sided adhesive tape on the back of the case. To protect against vandals, it is recommended to use fasteners in the form of self-tapping screws.
- The possibility of increasing the distance between the transmitter and the receiver, which is realized by installing a repeater. This option should be considered if you plan to locate these 2 blocks at the maximum distance from each other.
- The presence or absence of a visor. For a private home, this design element is necessary. However, before purchasing, you should make sure that the visor does not create an additional barrier to the passage of radio waves.
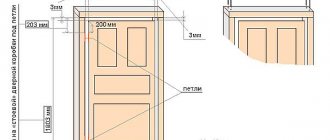
Before purchasing a device, you need to determine which wall it will be installed on: metal, wood, concrete or brick. In most cases, such devices are attached directly to the door, trim near the door leaf or a gate (option for private houses).
Electrical circuit diagram
Once assembled without errors, it starts working immediately. Power supply is possible from a 12 volt DC source (then diodes D1-D4 and capacitor C4 are excluded). The ringing pulses of an alternating current telephone exchange are 110 volts 25 hertz - in this case, the capacitance of capacitor C4 should be 1 microfarad per 400 volts.
AC voltage 220 volts 50 hertz, when used as an apartment bell (in this case, the capacitance of capacitor C4 should be 0.5 microfarads at 400 volts). The device was assembled using pieces of foil getinax, which were cut on a machine (Skillful hands) with a small circular cutter. I used one board as a conductor for drilling holes, but it can also be assembled using wall-mounted installation.
Installation of wireless calls
The indoor unit is located in any convenient place, especially if the device parameters (range) allow this. The most commonly used option is screw mounting. This is due to the fact that the indoor unit is large in size and weight. If you install it with Velcro, the housing will fall off.
The external unit can be mounted in different ways:
- on double-sided tape;
- through self-tapping screws.
Considering that manufacturers include Velcro in the kit, it is often necessary to improve the design by adding holes for fastening. You can install a wireless bell for your front door according to the instructions:
- prepare the base: cut out chipboard along the contour of the external block;
- you need to disassemble the case with the button, remove the microcircuit and battery;
- 2 holes are drilled in the bottom cover (top and bottom), markings are made at these points on the chipboard parts;
- first fasten the base using self-tapping screws and dowels;
- then fix the bottom bell cover on the chipboard panel;
- return the microcircuit or battery to its place;
- install the top cover with the button.
Check the design for functionality. This method allows you to reliably record the call, it does not affect functionality.
RADIO CALL
Recently, many cheap, but interesting and useful electronic devices have appeared on the markets. One of them is a radio doorbell. It is a set of a single transistor transmitter operating at a frequency of about 430 MHz, a modulated quartz oscillator of 32768 Hz and a super-regenerative receiver. Using this 433 MHz CHINESE RADIO CALL, you can control any home appliance.
For example, lamps on the ceiling, or it will be a radio channel from one of the alarm sensors, or a lift on the gate in the garage. I even saw on the Internet the use of a radio call for a radio synchronizer for a photo flash. And such a call costs only $5!
Here is the call diagram, the receiver is a regular super-regenerator (I don’t recommend twisting or adjusting anything - it will only get worse), in extreme cases, you can slightly shift the circuit frequency so as not to exclude the accidental influence of other similar devices operating nearby. You can further increase the noise immunity from other radio calls by replacing the clock quartz with others, for example 40 kHz.
The transmitting part can be powered, after the original miniature 12-volt battery runs out, from a regular 9-volt “crown”, the durability will increase by 2 times, and the price of the battery will decrease accordingly. If necessary, we power the receiving part from the network, using a circuit similar to that in the article “powering a multivibrator from 220V.”
We ask questions about the radio call in the FORUM
Share useful information with your friends:
DIY installation
When installing a call yourself, you must remember that you should be careful when working with wired devices. It would also be good to have some experience with such installation.
Connection diagram of main components
Preparation
At this stage, you need to decide what type of call will be installed (wired or wireless). In order to make a wired call, you must first calculate the amount of cable that will be needed for the connection and think through all the details of the installation work.
The photo below shows a call with an intercom.
The device is placed at a distance of 160-170 cm from the ground
It should be noted that the wire used can be laid in the wall or in a special box. For a standard door version, a two-core cable with a copper cross-section will be sufficient. It is also worth deciding on the location of the button and warning equipment.
Installation process
To install wired equipment, you should make holes in the wall to accommodate the wire using a hammer drill. When the renovation of the room is completed, it is necessary to attach a plastic box into which the wire will be laid in the future. This is done in order not to damage the integrity of the walls. After these manipulations, the button and the warning system itself are installed.
When installing, it is important to follow the assembly instructions
To choose a lock for a gate, see the link.
Connecting a wired call
Initially, you must turn off the electrical power supply to the room. Then connect the wire to the button, then to the bell, and lastly to the electrical power center.
Connection diagram with 2 buttons
This must be done strictly with reference to the connection diagram of the specific bell model.
After installation work, you need to ring the bell to check its operation.
Wireless bell installation
It is much easier to install such a bell than with the previous type. That is, you simply need to secure the button and the device body itself using screws or tape. Now all that remains is to insert the batteries and thereby complete the installation process of the wireless call.
Variety of wireless models
Popular models
The choice of wireless call models is wide enough to choose the appropriate option.
For an apartment, private house or cottage
Popular models for cottages, private houses or apartments include:
- "Cosmos", KOC_AG512С. The package includes a calling unit and a unit with a speaker. The button is secured using glue screws or double-sided tape. Additional features are noise immunity, 32 melodies, and a range of 150 meters.
- Elektrostandard. The model includes a receiver, button, battery and instructions. The average service life is at least three years when working up to 5 times a day. There are several modes (with light and sound). Features: volume control, light indication, range of 80 m, two batteries.
- "Kosmos Premium", KOC_689. A more modern model with 25 polyphonic melodies, volume control (three positions) and IP protection level. Range of 100 m.
For a summer house with a waterproof button
In this series, the best wireless calls include:
- Rexant "RX-6". The kit includes a power supply, call button and speaker. The latter is powered by 220 V, which must be taken into account when choosing. Features: 36 melodies, waterproof button, range of 80 m. The button is powered by a 23 A battery.
- Proline 2T-298 is a wireless call with a waterproof touch button, night light options and a range of 100 m. The user is offered 48 melodies to choose from. The call key is powered by a 12-volt battery, and the speaker is powered by a 220 V network. The operating volume is from 50 to 80 dB. Signal transmission power - up to 10 mW, frequency - 433 MHz. The kit includes a call button, speaker and battery.
For an apartment with Wi-Fi
One of the most popular models is Cleverdog. This is a standalone wireless Wi-Fi call that provides up to 90 days of operation. After installing it, you can view information from your mobile phone and enlarge the image (up to three times). Camera viewing angle is 85 percent.
Cleverdog Wireless Call Features:
- Receiving messages from visitors. If the owner does not answer within 15 seconds, the system goes into voice notification mode.
- Possibility of visual contact with the visitor.
- Long validity period - up to three months.
- Outputting video to the screen.
- No wires and easy to install. To get started, you need to install the application, connect the device and secure it with screws.
- Degree of protection IP 65.
- Operating temperature from -10 to +60 degrees Celsius.
With two buttons
If there are two inputs (for example, in a country house or in a private house), you can use wireless calls with two buttons. Popular models:
- Proline 2B-289. It has 48 melodies and a range of up to 100 meters. Operating frequency - 433 MHz. The kit includes a pair of buttons and one speaker. The button is powered by a battery, and the sound source is from a 220 V network. The sound volume ranges from 50 to 80 dB. The device can be used in a store, office space, country house or other places. During operation, it is recommended to use alkaline batteries, which have a long service life. It is prohibited to disassemble or repair the equipment yourself.
- QUSUN D035K2 DC. This is a popular wireless call with two buttons and 36 ringtones to choose from. The radius of application is up to 150 meters. The button is powered by a 23-amp power supply, and the speaker is powered by simple AA batteries. Operating frequency - 315 MHz. The scope of application is different - installation in the country, in a store, in an office and other points. The kit includes two call buttons, a speaker and a 23 A battery (two pieces).
- Also supplies wireless calls with two buttons.
Wireless call with two speakers
Buying a wireless doorbell with two speakers is useful for large rooms. In addition, an additional sound source can be installed in the backyard or second floor. Popular models:
- Proline B-288-2 is a wireless call with one call button and two speakers. The button is protected from water. There are 48 melodies to choose from. The working distance is up to 100 meters. The call key is powered by a 23-amp power supply. Features - presence of a night light function, power supply to the speaker from 220 V, presence of an LED indicator on the sound source. Volume - from 65 to 75 dB (four levels of adjustment).
- Proline A-298-2 is a wireless call equipped with two speakers and one waterproof call button. The user is offered 48 polyphonic melodies to choose from. The call key is powered by a 23-amp source, and the speaker is powered by 22 volts. Working distance - up to 100 meters. A night light function is provided. Volume from 50 to 80 dB.
No batteries
Some devices operate without batteries. Popular models with an alternative type of power supply include:
- Wireless call Proline HT-W4U02. The product is powered by a constant voltage of 5 V. Operating frequency is 433 Hz. The operating range is up to 80 m. The user is offered up to 389 melodies with the ability to set one of three volume levels. The special feature of Proline HT-W4U02 is the conversion of kinetic energy. The moment the button is pressed, mechanical pressure is converted into energy. Next, a special module sends the signal to a distance of up to 80 m before the call. The latter is connected to 5V power via a USB port. Immediately after this, the selected melody sounds.
- Proline HT-W4U01 is an equally popular wireless call that works on the same principle. Its range is limited to 80 meters, and the number of melodies is 38 (three volume levels). Operating frequency - 433 MHz.
The absence of a power source on the button eliminates the need for batteries and saves money on their purchase. Moreover, wireless devices without batteries are more reliable. They are unpretentious to different weather conditions and are not afraid of contact oxidation.
Replacing the device
Sometimes it becomes necessary to replace certain parts of equipment. In the event that work is carried out with a wireless type of device, then often there are simply no difficulties. You just need to remove the unusable button and install a new one in its place.
A small number of components and the absence of wires make it easy to identify a failed device
There are practically no difficulties in connection with the repair of wired calls. Especially if the replacement is made with a similar model. Thus, you need to dismantle the button and the main bell unit, disconnect them from each other and, of course, disconnect them from the power supply. Then connect the new device as described above.
Repairs on such models involve replacing batteries.
There are times when a breakdown occurs due to damage to the wire. In order to restore the operation of the device, it is necessary to remove the worn wiring and place a new one in its place. If at this moment the mechanical bell is going to be changed to an electronic model, then some problems may occur during the installation process.
The absence of a signal from a wired device means ringing of the supply wires
The fact is that for the first type, power is supplied from the network, but the second type is powered from built-in or external devices. And therefore, to change such equipment it will be necessary to carry out additional construction work. But you can go another way:
- First, you need to remove the originally installed bell, and in its place install a new device, which should include a transformer and a voltage rectifier.
- A new electronic bell is connected to the rectifier contacts. In this case, the installed transformer must provide a voltage of 10–12 V. This additional device must be placed in a special box and the necessary circuits must be connected using pre-insulated wires.
During periodic maintenance, it is useful to check the integrity of the wire contacts
How to install an electric lock on a gate, see the link.