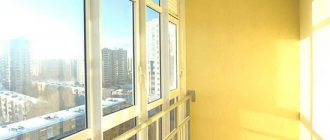
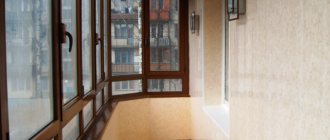
If previously, the balcony was used for the purpose of storing unnecessary things, today, the issue of using this area for housing is relevant. Balconies allow you to increase the living space of a room, which is especially important for one-room or small apartments.
But before you turn your balcony into a useful living space, you will need to take care of its insulation. How to insulate a balcony with polystyrene foam is an important question for those who are planning to turn their balcony into a living space and want to do it right.
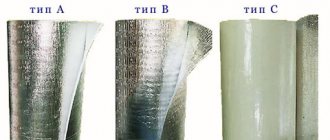
The difference between polystyrene foam and polystyrene foam
Polystyrene foam is less dense than expanded polystyrene.
The materials are similar to each other in that expanded polystyrene and polystyrene foam have a polystyrene foam base and are made from polystyrene, but using different technologies.
To make polystyrene foam, polystyrene is steamed under water steam in special molds, and the polystyrene granules are baked to each other, increasing in size. Polystyrene foam has a lower density than polystyrene foam and tends to crumble when the bond between the granules weakens.
Expanded polystyrene is made by extruding polystyrene, it is melted, a foaming composition (soft, hard freon or a freon-free hydrogen-based composition) is introduced into it under pressure, and passed through an extrusion machine.
The output is strong polystyrene foam, consisting of dense cells filled with air. Available with a smooth and stepped edge with a regular and foil surface.
The most environmentally friendly are hydrogen-based foaming compounds without the addition of freon, which tends to destroy the ozone layer.
Summary
The answer to the question “how to insulate the floor on a balcony?” depends, first of all, on two points: obtaining the required elevation and the desire to carry out the insulation yourself.
However, if you have other thermal insulation materials left over from previous renovation work, it would be right to choose them for equipping your balcony.
And finally, if you are the happy owner of a covered terrace of 20 - 30 square meters. m., it is better to invite a team specializing in insulating structures and premises using sprayed materials.
Video on the topic:
Advantages of expanded polystyrene
Extruded polystyrene foam is the best option for insulating a balcony and has a number of advantages:
- durable, sufficiently resistant to mechanical stress material;
- has a solid structure and does not crumble;
- does not collapse due to temperature changes, can be used in the range from -50 to + 75 degrees;
- ecologically pure;
- does not lose its qualities when exposed to high humidity;
- the material is not subject to rotting processes;
- has high thermal insulation and sound insulation properties;
- It is light in weight, which is important when insulating a balcony;
- durability 50 years;
- quite low cost.
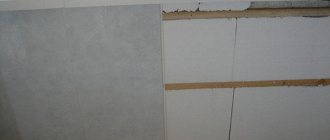
Installation of vapor barrier
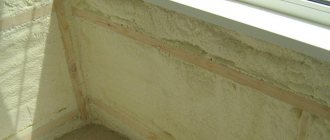
Vapor barrier serves to eliminate the occurrence of condensation and ensure optimal parameters for the moisture content of the insulation. For these purposes, foil film is used, the thickness of which is 200 microns. It is glued with the reflective side to the polystyrene foam board. Foil tape is glued along the joints.
Balcony insulation with extruded polystyrene foam
Flaws
Expanded polystyrene is a flammable material.
The disadvantages are flammability, but with the property of self-extinguishing (the material can catch fire, but does not support combustion).
The surface of expanded polystyrene is destroyed when exposed to ultraviolet radiation, contact with coal resin, paint thinners, and polyvinyl chloride.
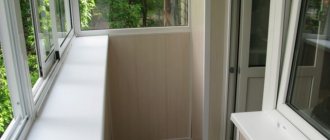
When insulating a balcony or loggia with polystyrene foam, it is necessary to cover it on top with finishing material: clapboard, MDF panels, etc. We use glue suitable for working with this material.
conclusions
Insulating your balcony yourself has its advantages. One of them is that the owner can determine the desired method of insulation independently. In addition, installation work can be done at any time, whenever it is convenient, without waiting for the technicians to arrive and complete the installation. When using polystyrene foam, no special skills are required. Even a non-professional can cope with its installation. The main thing is to strictly follow the instructions, according to which everything is done very easily, and not give up.
What to look for when choosing a material
The heat-saving characteristics are affected by the density of the material. The thicker the sheet we choose, the more area it will take up. With a sheet density of 25 kg per cubic meter, a sheet 80 mm thick will be sufficient.
If the density of the extruded material is higher, then a sheet with a thickness of 50 mm can be used.
When choosing a material, pay attention to:
- all slabs are of the same thickness, width, length;
- granules of the same size, evenly distributed;
- no foreign odor;
- packages are marked;
When using polyurethane foam, we take into account that toluene, which is sometimes included in its composition, dissolves polystyrene foam.
Possible mistakes
Problems can be caused by poor glazing. If there are gaps in it, no amount of insulation will protect sufficiently. And also misses are:
- using gypsum putty on the seams instead of polyurethane foam (putty contributes to the appearance of cold bridges and condensation);
- refusal to use vapor barriers;
- insulation of only external surfaces while ignoring internal walls;
- insulation work without permission and drawing up adjusted plans;
- performing work in winter (only very few top-level professionals can do this correctly);
- excessive thinning of the insulating layer;
- removal of the battery.
Methods for insulating a balcony
Insulation is carried out using the adhesive and frame method.
Glue method
Even an inexperienced craftsman can glue polystyrene foam.
Even a person without construction skills can cope with such work. We treat the surface with adhesive suitable for working with polystyrene foam, glue the insulation, and additionally fix it with self-tapping screws.
A fiberglass reinforcing mesh is attached to the glue on top, then plastered or covered with the selected finishing material.
Frame method
Installation is more complex than insulation using the adhesive method. Preliminary installation of a frame made of wooden beams or metal profiles is required.
The insulation is fixed between the frame so that there is no space left between the frame elements and the polystyrene foam.
We choose insulation of the same thickness as that of the frame slats.
Preparatory work
Do-it-yourself insulation of a balcony with polystyrene foam begins with preparatory work. At the same time, they differ slightly from each other depending on whether the insulation is carried out from the outside or from the inside, whether or not the balcony parapet is laid with bricks or blocks, or whether the walls or ceiling are insulated.
Insulation of walls outside
You can attach foam plastic to the walls of the balcony from the outside if the fence is made of reinforced concrete, brick or blocks. In this case, the following work is performed:
- climbing equipment is installed;
- old finishing (paint, panels, metal profiles) is removed from the fences;
- cracks, potholes and chips are sealed with repair mortar. You can see how to do this work correctly in the material “How to prepare walls for wallpapering”;
- A metal profile is attached to the bottom of the balcony using dowels and self-tapping screws, the only task of which is to hold the foam sheets in a static position until the glue has completely set;
- the wall surface is cleaned of dust and dirt with a wire brush and a damp cloth;
- The wall is primed with a primer diluted 30-40%. In this case, the first layer is applied until the concrete or brick “drinks” water;
- After the first layer of primer has completely dried, the second is applied. If the walls could be treated with a roller the first time, then when applied again, the primer should be rubbed into the wall material, and this can only be done with a brush or brush.
Insulation of walls from the inside
When insulating walls from the inside, the first thing you should pay attention to is: the fencing (parapet) of a balcony or loggia is solid or made of metal rods. If the rods are not laid, there are two options for preparing the base for attaching the insulation.
- 1. OSB sheathing is attached to the rods using binding wire.
- 2. The sheathing is installed. The frame strapping is attached to the floor and wall of the building below, and at the top to metal heels welded to the fence. The vertical and horizontal slats are fastened inside the frame using metal corners and self-tapping screws.
Let us remind you that before installing the frame or installing the sheathing, the rods are first cleaned with a wire brush, then treated with a rust remover. The dried metal is coated with an anti-corrosion compound.
Further work is performed in the following sequence:
- everything unnecessary is removed from the balcony area: the air conditioner is moved to another wall, fasteners for clotheslines are removed, etc.;
- the existing gaps between the wall of the house and the balcony fence are sealed. Small gaps with polyurethane foam, large gaps with pieces of foam rubber or polystyrene foam;
- In the loggia, trim is removed from the side walls. In most cases this is decorative plaster or paint;
- the surface is cleaned of dust, dirt and grease stains;
- the wall is primed twice, using the same technology as outside.
Ceiling insulation
In several series of multi-storey buildings, the balcony slab of the upper neighbor has a complex geometry (made for the beauty of the ceiling). In this case, the balcony floor is sheathed with plywood or OSB sheets.
If the surface is flat, then the whitewash or paint is removed, a double primer is applied, then electrical wiring is laid if overhead lighting is planned. Ditching is strictly prohibited. Therefore, the wiring is placed in special corrugated pipes and attached to the ceiling with clamps. During the insulation process, channels are cut out in the foam for pipes: the thickness of the insulation is sufficient.
Materials and tools for insulating a balcony
Before starting work on insulating the ceiling and walls, it is necessary to prepare tools and prepare materials. We calculate the area of the room, purchase the material with a reserve of 10-20%.
You will need:
- Extruded polystyrene foam, preferably with a stepped edge, so that the sheets fit better together;
- Vapor barrier material (foiled polyethylene foam penofol or dense polyethylene film);
- Special adhesive for polystyrene foam;
- Polyurethane foam that does not contain toluene;
- Wood beams or metal profiles for installation of sheathing;
- Plastic dowels with disc head;
- Scotch;
- Construction level, stationery knife;
- Drill, hammer drill, screwdriver, stapler, electric jigsaw, grinder.
How to properly install polystyrene foam boards
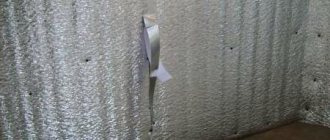
To secure the slabs, special dowels with wide heads are used. But it’s better not just to fix them, but also to glue them. This way you will eliminate the possibility of penetration and accumulation of moisture between the wall and the insulation. The slabs themselves must be laid as tightly as possible, without gaps, starting from the corner. Each subsequent row must be shifted so that the joints of the slabs do not coincide. The outer slabs can and should be trimmed so that they exactly fit the space allocated for them. If there are no cracks at the junction of the plates, it can be strengthened by gluing ordinary tape, and if there are, then they must be foamed.
If you use polystyrene foam as insulation, choose polyurethane foam that does not contain toluene. This substance has a destructive effect on this type of insulation. And for gluing polystyrene foam boards to the base or waterproofing material, polyurethane glue is perfect for them.
For additional protection from moisture, a foil film based on polyethylene is glued to the insulation. Note that if you decide to place the insulation not only inside, but also outside the balcony, then it also needs to be carefully waterproofed.
Do-it-yourself insulation of a balcony with polystyrene foam
Insulation of a loggia or balcony with polystyrene foam can be easily done with your own hands. Before starting work on insulating the loggia, we install the balcony frame and prepare the surfaces that will be insulated.
Surface preparation
Adhesive for expanded polystyrene
Before insulating a balcony or loggia with expanded polystyrene, it is necessary to repair and prepare all surfaces. Only after this should we begin insulating the loggia with polystyrene foam.
Preparation stages:
- We carefully inspect all surfaces for smudges and yellow-brown spots.
- We remove the swollen, peeling layer of building materials.
- We treat the surface with an antifungal compound and prime it to increase its strength.
- If the balcony is leaking, we find even the most microscopic cracks and fill them with polyurethane sealant.
- If the cracks are large, we widen them with a grinder, look at the condition of the reinforcement, remove rust from it, and cover it with an anti-corrosion compound. We wet the cracks (for better adhesion with foam), fill them with polyurethane foam, when the foam dries, cover them with sealant.
- If desired, you can align the walls and ceiling. If the surface is not leveled, the finishing will hide all defects.
For insulation, you can use types of polystyrene foam:
- Styrofoam;
- penoplex;
- foil polystyrene foam.
Sheathing the ceiling
We begin insulation work from the ceiling. The optimal thickness of the insulation sheet for finishing with clapboard or plastic is 50 mm with a density of 15 kg per square centimeter. Under the putty, insulation with a density of 25 kg per square centimeter is used. On the top floor, you can perform external insulation of the top slab and insert insulation under the roofing material.
Stages of indoor work:
- We mark the locations of the fasteners, install hangers for fastening metal profiles (when installing wooden sheathing, mark the installation locations of the sheathing).
- We treat the surface with a special glue, in a dotted manner, and apply a strip of glue along the edges of the sheet. We glue the insulation, pressing it tightly, hold it for several minutes, and strengthen it with self-tapping screws.
- If plaster is to be applied on top, after the glue has hardened under the polystyrene foam, glue the reinforcing mesh onto it.
- If the finishing is done with wooden lining, plastic or MDF panels, we attach a vapor barrier layer to the foam plastic.
Materials with a foil surface have good quality characteristics; they simultaneously have thermal insulation and vapor barrier properties, and are attached with the foil side facing out.
Wall insulation
Following the ceiling, we insulate the walls. The internal wall that adjoins the room does not need to be insulated. But if you insulate, then the room will be warmer, and if you do not insulate, then the heat from the radiator in the room will pass to the balcony, and it will be warmer on the balcony. For more information about insulating walls with polystyrene foam, see this video:
We insulate the walls according to the same scheme as the ceiling; we begin to attach the sheets from the bottom level. These works are performed easier and faster due to the fact that the work is not done at height.
We lay the insulation tightly to each other; if a gap has formed between the sheets, blow it out with foam. We cut the outer slabs to the required size with a stationery knife. If the sheets do not fit together in the corners, fill the gap with foam. The last step is to insulate the window slope.
The best option for a vapor barrier material is penofol on an adhesive base, with a top foil layer. The edges of the penofol are glued end to end and insulated with foil tape. If penofol does not have an adhesive base, it is secured with special glue.
We attach the outer trim at a distance of 20 mm from the foam foam to form an air gap between the materials. This distance is optimal for the foil layer to reflect heat into the room.
Floor insulation
We lay expanded polystyrene on a concrete screed or between wooden joists, polystyrene foam only between wooden joists. Before insulation, it is necessary to repair the balcony slab; it can be preventive or major, depending on the degree of its destruction. For more information about floor insulation, watch this useful video:
The floor of the balcony should be either at the same level as the floor of the room, or lower.
Stages of work:
- We remove the old covering from the floor, remove all loose, swollen building materials, and remove dust using a vacuum cleaner.
- We inspect the slab. After treating all the cracks (with cement mortar, tile adhesive, sealant), we prime the surface to increase its strength and proceed to insulation.
Insulation using concrete screed
We level the floor using a screed, wait until the screed is completely dry, this can take up to several weeks, depending on the temperature and humidity in the room. On the screed that has dried to the ground, we cover it with a waterproofing layer, lay polystyrene foam on top of it, and a vapor barrier layer.
Then fill the thin screed with a self-leveling mixture or lay an OSB board. We lay the finishing coating on top. This can be laminate (you need to lay a backing underneath), linoleum, parquet, ceramic tiles. For more information about concrete screed, watch this video:
Floor insulation using joists
Wooden logs are attached strictly level to the prepared surface of the slab, and polystyrene foam is laid between them so that there is no gap left at the edges.
All gaps between the floor elements are filled with foam, without toluene in the composition, vapor barrier material, OSB board, floor covering are laid: floorboard, laminate, parquet, linoleum.
Using wooden joists you can raise the floor to the required height.
By insulating the floor, ceiling and walls on the balcony, you can turn it into a full-fledged living space and get a cozy corner for relaxation.
Installation of insulation
- Expanded polystyrene is cut according to the dimensions of the balcony walls and floors on which it will be laid. It can be easily cut with an ordinary stationery knife. The work is carried out in this order.
- Treat the walls spot-by-point with the adhesive solution, retreating 5-7 mm from the edges.
- Press the polystyrene foam insulation boards against the wall of the loggia and wait for several minutes until they are completely glued.
- Apply glue to the surface of the insulation with a layer thickness of 2-3 mm.
- Additionally strengthen the material with plastic dowels - “mushrooms” at the rate of 6-7 pcs. per 1 m².
- Apply a reinforcing mesh with a cell frequency of 5 mm on top, without sinking it into the adhesive solution, and let the glue dry.
What brands of penoplex are there?
Some brands of penoplex have two names - old and new, to make it more convenient for the buyer to determine which penoplex he needs. Example: even a beginner in renovation will understand where they use “Penoplex Roofing” (in the old way - Penoplex 31).
Penoplex Comfort (Penoplex 31 c) is frost-resistant, well suited for complete thermal insulation of houses, apartments, as well as loggias and balconies. It is also used to insulate the foundations of various structures, swimming pools, and even underground networks.
Penoplex Wall (Penoplex 31) has the lowest thermal conductivity coefficient of all penoplex brands. If the balcony is +25 degrees (+ – 5), it lets only 0.03% of heat out and cold in! Therefore, it is more often used to insulate walls and bases - where the wind constantly blows.
Penoplex Roofing (Penoplex 35) is used for insulating roofs of any type, including roofs and ceilings on balconies. It has higher fire resistance than other brands. It belongs to normally flammable substances (G3), while others are generally highly flammable.
Penoplex Foundation is used for insulation of floors and foundations. It has the highest compressive strength - 1 square centimeter can support up to 27 kilograms of weight! There may never be such heavy loads on balconies, but you will be proud of such insulation.
Penoplex 45 has the highest density. One m3 can withstand 35-47 kilograms (Penoplex 31 has 25-32 kg/m3). Therefore, it is not surprising that they are used to insulate building foundations, railways and runways in cold regions. The ground under the penoplex does not thaw even in the warm season, and buildings and roads do not sag.
These brands were created for different needs. But no one bothers to insulate the balcony from top to bottom, for example, with Penoplex Roofing or Penoplex 45. After all, the qualities that are really useful on the balcony are almost the same for all brands.
Characteristics of penoplex
Penoplex is extruded polystyrene foam, which is produced in the form of slabs. The thickness of individual elements is from 20 mm. The high degree of efficiency is confirmed by the use of this material for insulating oil pipeline networks, covering airfields and roads. The use of penoplex is widespread even in extremely low temperatures.
The price varies from $10-45 per package. The cost of finishing the construction team is 5-10 $/sq. m (average prices in Moscow).
Main advantages:
- Due to the structure of many closed cells with air, this insulation has low thermal conductivity (mineral wool and polystyrene foam are less stable);
- The level of efficiency and optimal dimensions of the tiles allow you to economically use the balcony area while creating a reliable structure. This effect is of particular importance in small apartments;
- Eco-friendly composition (safer than alternative insulation options);
- The structural features ensure maximum moisture resistance - about 100%. This condition explains the absence of rotting and long service life (50 years or more). The material is successfully used in areas with high humidity;
- Low weight with high strength. The slabs are able to withstand significant compressive loads without deforming;
- Possibility of self-installation. The slabs are easy to work with during preparation (cutting) and installation;
Fire safety is one of the important indicators that you need to pay attention to when purchasing. The marking must contain the letter C
This designation indicates the presence of fire retardants that resist fire.
Flaws:
- The material is not resistant to sunlight, so penoplex is not used to insulate the outer part of the balcony;
- When interacting with petroleum products and solvents, the slabs are destroyed. Carefully study the components of construction foam and installation adhesive before purchasing;
- The cost of penoplex is higher than traditional insulation. You can save money by installing it yourself.
Important points:
- The slabs are installed along the entire perimeter of the room, including the walls, ceiling and floor surfaces. If you lay the material only on the walls, then the costs will be ineffective - the room will remain cold. This circumstance plays a big role when combining the balcony part with the apartment;
- To install penoplex, you do not need to build a sheathing frame. This design promotes heat loss through cold bridges in the structure.
Pouring the floor screed
Before pouring the screed, it is recommended to cover the polystyrene foam with a layer of foil insulating material - penofol, with the metallized side up. Usually 3 mm of penofol is sufficient.
For better adhesion of the concrete screed to the surface. To prevent insulation from cracking during operation, reinforcing plastic or metal mesh can be laid on top of Penofol.
The thickness of the screed should be 20-40 mm. The balcony slab is not designed for heavy loads; you should not overload it with a heavy concrete screed when installing the floor.
After laying penofol, the perimeter of the balcony is covered with damper tape 100 mm wide to compensate for temperature expansion during the cold season.
The damper tape is glued to the construction mastic. Some brands have an adhesive layer on one side, protected by wax paper, which must be peeled off.
They start pouring the screed from the far corners of the balcony, gradually moving towards the balcony door. The uncured solution must be rolled with a needle roller. It simultaneously levels the screed layer and removes air bubbles that, after the solution has set, can form shells on the surface of the screed.
The curing time of the screed can vary from 6 to 24 hours depending on the type. For cement-sand mixtures it is greater, for self-leveling polymer mixtures it is less. After the screed has completely hardened, you can carry out work on flooring: linoleum, laminate, ceramic tiles.
The screed finally gains strength 2-4 weeks after pouring. At this time, you should not place heavy furniture or household appliances on it.
Laying a heated floor system
In some cases, simultaneously with insulating the balcony floors with polystyrene foam, it is possible to install electric heating. Under the screed, a “warm floor” cable system is usually used. If the screed is not poured over polystyrene foam, then an infrared heating film is used, on which any type of floor covering can be laid.
In order not to damage the integrity of the Penofol reflective coating, the cable is secured after installation with foil construction tape. There is no need to secure the infrared film additionally.
Sheathing with plasterboard or plastering
The finishing stage, which completes the insulation of the loggia with polystyrene foam, may include both leveling the walls with plaster and covering them with plasterboard (also called “dry plaster”). In the first case, a fiberglass reinforcing mesh with 5 mm cells is attached to the top of the film with a 10 cm overlap on plastic dowels and a metal profile (in the corners). Apply plaster or a 2 mm leveling layer of glue on top.
Often, insulation materials are sheathed with plasterboard. To do this, using a rule and a water level, mark and install a sheathing of wooden blocks on the insulation. The contact points between wood and extruded polystyrene foam are treated with polyurethane foam. The bars are attached almost horizontally to the floor and ceiling in 2-4 rows using screws and dowels. Then sheets of moisture-resistant plasterboard are installed on the sheathing, the joints between which are sealed with putty.