- What is the difference between a balcony and a loggia
- Is it possible to combine a loggia with a kitchen?
- In which houses is it possible to combine a balcony with a kitchen?
- How to combine a balcony or loggia with a kitchen correctly
- What documents are needed to combine a balcony with a kitchen?
- How to make a balcony comfortable
- What are the dangers of uncoordinated redevelopment?
- Who can help in coordinating the combination of a kitchen or loggia with a balcony?
Today, a balcony or loggia in an apartment is not only a place to store things, but also additional space that can become part of the interior. Combining them with the kitchen is one of the most popular redevelopments. In this article we will tell you how to combine a balcony or loggia with a kitchen safely, beautifully and, most importantly, legally.
Source - APM-1 page on houzz.ru
What is the difference between a balcony and a loggia
Balcony and loggia are different building structures, although their purpose is similar. By going out onto a loggia or balcony, residents of city apartments gain access to fresh air.
The balcony protrudes from the building, hangs over the wall, and the loggia is built into the building and has walls on the right and left, which the balcony does not have. If the balcony protrudes from the facade of the building, then the loggia is located inside the house.
Apartments in new buildings most often have loggias, and housing in old buildings have balconies.
Merging stages
Having dealt with the question of whether it is possible to combine a loggia with a kitchen, and how this is documented, we move on to carrying out repair work, observing the sequence.
Dismantling the balcony block
It consists of removing windows and doors - they are completely cut out, removed and taken out of the apartment. During dismantling, the design features of the room are taken into account. For example, if the house is of a frame type and the partition is demolished, then there will be no problems.
To dismantle the load-bearing wall, only the block will have to be removed, leaving space for the window sill. In the kitchen it can be easily used under a table, work area, or used in other ways.
After dismantling, welding work is carried out to help add some space. To do this, the balcony is moved along the window sill, that is, the glazing will be outward, and the internal space will expand slightly. Once the windows are installed, welding work will no longer be possible.
Glazing and insulation
A mandatory step for connecting the kitchen with a loggia or balcony. Double-glazed windows must be of high quality, at least double. There is no need to waste money on your profile - trust proven brands.
If possible, a panoramic balcony with floor-to-ceiling glass is built, but you need to carefully take care of the heat. With this solution, a heated floor system is often installed.
Comfort in the kitchen in winter depends on the insulation of the balcony part. In general, any method is suitable, but there are 2 main ones:
- partial - only the walls and floors in the balcony part are insulated using foamed polystyrene and other modern materials. Warm floors are often installed, after which the room will always be warm, regardless of the time of year. With this option, you can decorate the space as a dining area or take out equipment;
- complete - the walls and floor are insulated, an additional radiator is installed for heating.
The choice depends on the owner’s capabilities, needs and architectural features of the house. It is not always possible to place the batteries on the balcony, but electric convectors are used as an alternative.
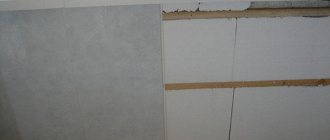
Finishing
The final stage of reconstruction is finishing work. For the kitchen, it is best to use wooden and PVC panels, tiles, and moisture-resistant plasterboard sheets.
If the merger is carried out without renovating the kitchen, then you just need to choose wallpaper or other materials to decorate the new area so that it is in harmony with the rest of the space.
You can learn more about the repair process and the alignment in the video:
Is it possible to combine a loggia with a kitchen?
A balcony and loggia are not only a place to store things that do not fit in the apartment, although they are often used that way. With the help of a loggia, you can visually expand the space of the apartment by arranging a separate office, relaxation area and even a children's room. Just 10 years ago, combining a balcony with a kitchen was not difficult, but from the end of 2022 this event is prohibited in the capital.
Moscow redevelopment rules directly prohibit combining balconies and loggias with any interior spaces of apartments - be it a kitchen or a bedroom. The restriction on this type of redevelopment applies to all series of houses: both in the old housing stock and in new buildings.
clause 10.18 of the Appendix to the resolution of the Moscow Government No. 508
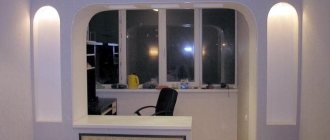
It is still possible to combine a balcony with a kitchen - by installing a French window. The rules do not prohibit this. Between the kitchen and the loggia, the window sill block is dismantled and a French window is installed. Dismantling is allowed only in those houses where, in principle, it is possible to remove the window sill block - it depends on the design of the house and the rules of the author-designer. Sometimes you can remove not only the window sill block, but also the threshold between the room and the loggia, and even part of the outer wall.
See how you can and cannot combine balconies with a kitchen. Today, the only legal option to visually combine your kitchen and balcony is to install a French window
A French window is a panoramic window-door. Essentially, this is a transparent partition separating the room and the loggia. It simultaneously supports part of the wall or ceiling from above, divides the space and retains heat inside the apartment and transmits light. A French window can be sliding or hinged, but not an accordion. To install a French window, it is necessary to obtain consent from the Moscow Housing Inspectorate, and the redevelopment itself must be approved by the supervisory authorities.
When combining a balcony with a kitchen in this way, the load on the heating system of the house will not change - the radiator in the kitchen will heat the same area. Accordingly, it is possible to obtain permission for such redevelopment.
Where to begin?
If you have obtained permission to transform the balcony and room into a single room, you need to start work from the loggia. If it is necessary to remove an exterior wall, ensure that the entire wall must be removed. Sometimes the partition can be left untouched, but only the windows and doorway removed. In this case, the wall is included in the interior composition and becomes an element that visually divides the room into different zones.
In which houses is it possible to combine a balcony with a kitchen?
Combining a balcony or loggia with a kitchen will not work in all homes. Here's when it's allowed:
- In monolithic houses.
- In panel, block and brick houses, if the wall between the balcony and the kitchen is not load-bearing.
There are nuances that are important to consider:
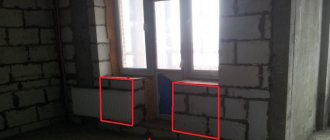
- In panel houses, you cannot remove the threshold at the exit to the balcony - the lower part of the wall that separates the balcony and the kitchen. This element plays the role of a supporting structure, holds the balcony slab and performs a heat-insulating function.
- In houses built after 2007 according to the MNIITEP project, window sill blocks cannot be dismantled and replaced with French windows. The author of the house project will not approve of such a redevelopment.
- The width of the side partition should be at least 1.2 meters, and the partition between the two exits to the loggia should be at least 1.6 meters. This is due to fire safety requirements for exiting the loggia, which is considered an emergency exit.
Since the kitchen is a warm room, and a balcony or loggia is a cold room, there is a ban on moving central heating batteries to balconies. This is enshrined in clause 10.7 of Moscow Government Resolution No. 508. This violates the integrity of the thermal circuit of not only the apartment, but the entire house. In addition, central heating batteries are simply not designed to heat balconies. When remodeling an apartment, the radiator is usually moved to the wall to the right or left of the window sill block.
Redevelopment of an apartment where the kitchen and balcony were combined. APM-1 specialists made all the calculations, prepared the project, and later carried out installation work: they dismantled the non-load-bearing window sill block, moved the existing heating radiator without increasing the load on the heating system, and also insulated and glazed the balcony, installed double-glazed windows. The full redevelopment project can be viewed here
Expert advice in a convenient format
- 157 publications
- 7,221 subscribers
Go to Instagram
Joining the common area
Is it possible to attach a loggia to a kitchen or room?
It is carried out in accordance with the requirements of Articles 25 and 26 of the Housing Code of the Russian Federation, and the change in the loggia is carried out in accordance with Resolution 508 of the Moscow Government.
The balcony can be considered both in the context of the overall project and as a separate element.
You can attach a balcony to a living room (with reservations). To the kitchen - with significant restrictions.
Find out on our website how to coordinate such renovation work on a balcony, kitchen or bathroom.
How to combine a balcony or loggia with a kitchen correctly
A competent approach to redevelopment is a preliminary analysis of future work with design specialists and coordination of work with the Moscow Housing Inspectorate.
Despite the fact that the option of combining a balcony with a kitchen completely depends on the type of house, in any case you need to obtain permission for redevelopment even before you begin the renovation. Especially if you plan to dismantle the window sill block. The permit is issued by the Moscow Housing Inspectorate.
The complexity of the repair in terms of labor costs and scale directly depends on the series of the house. In a monolithic one, it is enough to dismantle the window sill block and install a “French” window. In other houses, it is necessary to take into account the presence of a threshold; in 99% of cases, its dismantling is prohibited.
It is worth remembering that only a design company with SRO approval should develop all project documentation and then carry out repairs. Architectural and design workshop No. 1 has such a document (Permit No. 1891 issued by SRO “MezhRegionProekt”). This guarantees the safety of the work and approval by the Moscow Housing Inspectorate.
Loggia insulation process
Now it’s time to talk about how to properly insulate a loggia. For those who decide to do everything themselves, step-by-step instructions are the key to success. Therefore, I will continue to try, based on my own experience, to describe everything to the smallest detail.
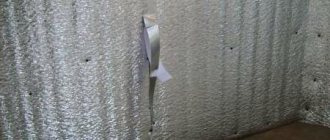
The loggia is completely covered with Penoplex.
Glazing of the loggia
Previously, in such places, as a rule, lightweight homemade wooden frames with one glass were installed. At that moment there was simply nothing else. But it was very difficult to get a standard wooden frame with two glasses, plus it did not fit in dimensions. This miracle of Soviet design stood on my loggia.
Equipping any kind of insulation with such frames is a stupid and useless task. Therefore, wondering where to start, I decided to dismantle the old frame and put in its place a modern plastic version with double-glazed windows.
I had no problems dismantling the old frames, but I want to warn you: if you have such frames on your loggia, then first remove the glass from them. And only after that you can remove the frames themselves. Otherwise, glass falling from the top floor can cause a lot of trouble.
After calling the surveyor, do not hesitate to pester him with questions and ask him to explain his actions to you. The fact is that at one time I relied on the person’s professionalism and as a result they delivered frames 200 mm shorter than the window opening.
Aerated concrete parapet.
There is one caveat here. As the guys who came to install the windows told me, the width of the support must be at least 50 mm and such a platform is installed strictly horizontally.
In my case there was an ordinary, still Soviet parapet made of thin rolled metal. Plus, this parapet was skewed, the camber at six meters was about 100 mm. As a result, I had to pay extra for people to install the fiftieth corner.
Although if the parapet is concrete or brick, then consider yourself lucky. It is much easier to install frames on such capital structures. But in any case, you need to consult with those who will install.
Loggia trimmed with clapboard.
Again, based on my own experience, I want to give one more piece of advice. If the loggia is long and the apartment is on a high floor, it is better to divide the entire structure into several sections. I had 2 sections of 3 meters each and it took about three hours to lift these windows to the seventh floor. It’s good that the time of delivery was agreed upon in advance, otherwise we would have had to pay for that as well.
Parapet installation
As I already said, the ideal option is when your project initially provides for a capital parapet. I had to “fence” almost everything all over again. The first thought was to cut the grille down to the supporting corner for the window frames and lay out the parapet from aerated concrete or facing bricks.
Lathing on a brick parapet.
Facing brick is, of course, beautiful, but to lay it, you need to be a mason; you can’t do it haphazardly here. With aerated concrete, everything is much simpler, since it has clear shapes, and most importantly, it is mounted not on a cement-sand mortar, but on construction adhesive.
But here another problem emerged. It turns out that aerated concrete needs to be properly plastered on the outside, otherwise it will become saturated with moisture and begin to actively deteriorate. Plus, its insulating qualities will disappear completely.
To be honest, I didn’t dare to plaster aerated concrete while hanging over the parapet with my own hands from the outside, and on the seventh floor. It’s not that I don’t know how to plaster, it’s just that working at heights is dangerous.
A variant of a clinker panel fixed to the wall.
As a result, I settled on clinker panels without insulation; I really liked the look of the beautiful brickwork. A clinker panel is a sheet trimmed with clinker tiles; in my case it was brickwork. Asbestos cement or waterproof OSB is used as the base. You can, of course, take a panel with insulation, where polyurethane foam is used as the basis, but it costs almost half as much.
Metal parapet grating.
Since the supporting corner under the window frame was extended slightly beyond the lattice metal parapet, I horizontally secured 4 rows of wooden blocks on the outer and inner sides of the lattice. They then became the supporting frame for exterior decoration and interior insulation.
There was a 30 mm thick block on the outside, and a 50 mm thick block was installed on the inside. Plus, from the inside, between the horizontal bars, in increments of about a meter, I mounted vertical guides. This entire structure was pulled together and secured with long self-tapping screws and metal clamps. Vertical and horizontal bars were fixed to each other with corners.
Clinker panels are assembled like a designer's puzzle, the façade part is solid. I screwed the panels themselves to the wooden sheathing with self-tapping screws and a press washer. Plus, to be sure, each panel was fixed at 3-4 points to the old metal lattice parapet.
Insulation with polyurethane foam.
To do this, I used U-shaped iron clamps with a removable jumper. The screws and clamps on the outside were later covered with grout. This is quite simple and it is not visible between the clinker tiles.
Scheme of fastening the clinker panel to the parapet grating using a U-shaped clamp.
At the end, I filled all the cracks from the inside with polyurethane foam. As a result, I ended up with a continuous façade in the form of perfect brickwork. By the way, manufacturers of such external panels provide a guarantee of 30 years on their products.
If you don’t want to bother with the parapet, you can do without the parapet at all. In this case, the fence is cut off completely and, roughly speaking, a large plastic window frame is installed instead. This is done by the same companies that deal with windows and this design is called “French Balcony”, but the price for such a pleasure is substantial.
A few words about choosing insulation
The question of how best to insulate a loggia is quite controversial. In general, there are several main contenders, but it all depends on the size of the budget and the desire to work independently.
Polystyrene foam on the balcony.
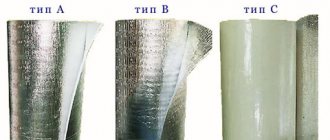
- The classic and still most beloved material by the people is polystyrene foam with a density of 25 kg/m³ . It is lightweight, not afraid of water, quite easy to install, and what attracts most of all, naturally, is the low price of polystyrene foam. In my opinion, the only drawback of polystyrene foam is its flammability, but to tell the truth, most insulation materials used in such structures suffer from this drawback;
Laying basalt wool.
- Mineral wool is also relatively cheap . Previously, glass wool was used, but this is a bad choice, it is afraid of water and quickly cakes. Plus, to install it you need to wear gloves and a respirator. Otherwise, the glass will go into the skin and you will itch for a long time. It is much easier to install soft mineral wool mats; such hard protection is no longer needed;
- But if you buy, it is best to opt for dense basalt slabs ; this material can even be plastered if necessary. Although remember, any cotton wool does not burn, but is afraid of moisture;
Extruded polystyrene foam with joint grooves.
- The most fashionable material today is extruded polystyrene foam or Penoplex , as we usually call it. In essence, this is the same foam, only made using a different technology. But if polystyrene foam is considered a partially vapor-permeable material, then its extruded counterpart is an absolute waterproofer. Its thermal conductivity is one third lower, which means that where foam plastic 50 mm thick is installed, extruded polystyrene foam 30 mm thick can be used. But personally, I like Penoplex for its high mechanical strength. This material is used to insulate the road surface, so it can easily be laid in a dry or wet floor screed;
Spraying polyurethane foam.
- At the moment, the most expensive insulation on the market is polyurethane foam . This is a liquid insulation that can be sprayed onto a surface of any geometry. As a result, you get a continuous insulating shell, without any gaps or cold bridges. This coating has excellent sound insulation. In terms of its characteristics, polyurethane foam is somewhat reminiscent of extruded polystyrene foam. The problem is that, in addition to its high cost, polyurethane foam can only be applied using special compressors; you cannot do it yourself;
Penoizol in sheathing.
Uninformed people are often offered to insulate the loggia with penoizol instead of polyurethane foam; it is sprayed in the same way as polyurethane foam. So I don’t advise you to do this. Behind the obscure, tricky name hides ordinary polystyrene foam, the only difference being that it is sprayed in liquid form, and accordingly they will ask for quite a bit of money for it. Why pay more if you can buy sheets of foam plastic and do practically the same thing, only at least 3 times cheaper.
Expanded clay in floor sheathing.
- For reasons of economy, people sometimes insulate the floor on the loggia with expanded clay granules . Expanded clay is porous, foamed and fired clay. The thing is good in principle, but expanded clay is a free-flowing material and is only suitable for floors. In addition, he is afraid of moisture, and the worst thing is that the thickness of such an embankment starts from 150 - 200 mm. Accordingly, it can only be used in apartments with high ceilings;
Penofol structure.
- There is also such a “smart” insulation as penofol . This is a sheet of foamed polyethylene, covered on one or both sides with foil. In its structure, penofol partly resembles foam rubber. But the thickness of this material is only 10 - 15 mm. Therefore, in our case, it can only be used as auxiliary, additional insulation.
In general, I believe that insulation should be comprehensive, only then will it be reliable and effective. That is, you cannot rely on only one type of insulation; it needs to be supplemented with something.
Insulation of facade parapet and load-bearing walls
For reasons of economy, I used 50 mm thick foam boards for the walls and ceiling. Of course, it would be better to install extruded polystyrene foam, but it is about 2–3 times more expensive.
And the easiest way out was to call specialists, pay and let them fill everything with polyurethane foam, but I didn’t have that much money at that time, all the reserves were “eaten up” by apartment renovations.
Polystyrene foam on the parapet of the loggia.
As you remember, we have already installed a frame made of wooden beams 50 mm thick. Now all that remains is to cut the sheets of foam plastic exactly according to the size of the finished niches and insert them there as tightly as possible, and fill the remaining small gaps with polyurethane foam.
But the thermal conductivity coefficient of wood is several times higher than that of foam plastic, so the wooden frame will act as a kind of cold bridge.
By and large, one could ignore this, but we are doing it for ourselves, so the next layer I secured foil penofol over the entire inner surface of the parapet, as a continuous sheet. Moreover, penofol needs to be secured with foil inside the room, so the reflection of heat rays will be an order of magnitude higher.
I chose wooden lining as the finishing cladding. Accordingly, I needed guides for it. To do this, I secured another block with a cross-section of 30x40 mm on top of the foam foam directly onto the horizontal frame wooden beams.
Laying polystyrene foam in the niches of the wooden sheathing.
The fact is that the minimum thickness of load-bearing bars for wooden sheathing is 25 mm; if you take thinner ones, they may crack when you hammer in nails or screw in self-tapping screws.
In addition to wooden lining, plastic or MDF panels can be mounted on such a sheathing. In general, anything you like, even drywall for plastering if desired.
If instead of polystyrene foam you choose basalt wool slabs, then the sequence will be slightly different. As I already said, any cotton wool is afraid of moisture, so before installing it you will need to secure a layer of waterproofing.
In general, it is recommended to install a vapor barrier membrane, but I think that in this case it is a waste of money.
After all, we have a clinker panel on the outside, and foil penofol on the inside. Both of these materials are vapor-tight. Accordingly, instead of expensive vapor barrier, you can safely install cheap technical polyethylene. The rest of the insulating pie will be the same.
Blank for installation of the finishing coating.
As for the walls, they are also covered with wooden beams 50x50 mm. After that, sheets of polystyrene foam are inserted, penofol is applied, the load-bearing sheathing under the lining is attached, and then the lining itself comes. Naturally, you will have to additionally lay polyethylene under the cotton wool.
Ceiling insulation
The ceiling can be insulated in two ways. In essence, I have already told you about one thing. It is done in the same way as we insulated the side walls.
Only wooden blocks are attached to the ceiling with anchors, and foam plastic is not just inserted into the niches, but is also additionally glued to the ceiling. Then everything is as usual, we apply penofol, fix it with counter lathing under the clapboard and sew up the ceiling with clapboard.
Gluing Penoplex to the ceiling.
But I decided to take a simpler route: in this option, wooden sheathing is not provided at all. The foam sheets here are simply glued to the reinforced concrete ceiling slab. These slabs are absolutely flat, so problems with fixation, as a rule, do not arise.
Polystyrene foam can be glued to Liquid Nails, polyurethane foam or Ceresit CT83 construction adhesive. But in all these cases, it is advisable to cover the concrete slab with soil a couple of times.
Insulation of the ceiling under the sheathing.
- Liquid Nails glue is sold in tubes adapted to fit a construction gun. This glue must first be spread on a sheet of insulation, attach this sheet to the ceiling and immediately tear it off. Then the glue should dry a little for 5 - 7 minutes. After this, the sheet can be finally glued;
- Polyurethane foam is applied to the insulation in a random pattern and immediately applied to the ceiling. But this sheet will have to be pressed to the ceiling several times at intervals of 10–15 minutes. It is well known that foam expands and until this process ends, the sheet will move away from the ceiling;
- My favorite is Ceresit CT83. This is a dry mixture that is diluted with water, instructions are on the package. It was originally created for gluing Penoplex, but since these materials have the same base, this mixture is also well suited for foam. It is applied with a notched trowel with a comb depth of up to 10 mm.
Construction adhesive Ceresit CT83.
After I glued the foam to the ceiling in a continuous layer, filled the gaps with foam and the glue finally set, I decided to plaster my ceiling over the foam. This is not difficult to do, the sequence of work is something like this:
Scheme for plastering the ceiling using polystyrene foam.
- Initially, on top of the foam, using the same comb spatula, I applied a layer of Ceresit CT83 glue. You can use starting putty, but underneath it you will need to apply primer to the foam;
- Before the glue hardened, I carefully sunk the serpyanka (reinforcing fiberglass mesh) into it with a spatula;
- After this, holes 30 - 40 mm deep are made through the insulation with a hammer drill in the reinforced concrete slab. For each sheet there are approximately 4 - 5 pieces;
- Plastic umbrella dowels are inserted into these holes and fixed tightly in them. This dowel consists of a plastic body with an umbrella and a central rod. So, first, the dowel body itself is inserted all the way, and then the central rod is hammered in;
Umbrella mounting diagram.
- At the last stage, a layer of finishing plaster is applied.
If you have a problem with plastering and are too lazy to attach the wooden sheathing under the lining, then you can do it even easier. In this case, the foil foam sheet is simply glued to the foam.
If you decide to glue penofol to polystyrene foam, choose the glue carefully. The instructions should indicate that it is suitable for these materials. Otherwise, penofol or polystyrene foam may corrode the solvent contained in the adhesive.
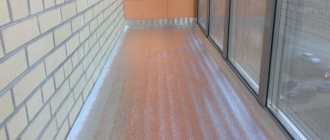
Floor insulation
Finally we got to the arrangement of the floors. This stage is considered one of the main ones. The easiest way out is to install a wooden sheathing, put insulation in the cavity and cover it all with a floorboard. But such a “pie” will take at least 70 mm.
Traditional floor insulation under the sheathing.
I wanted to make the floor as thin as possible, plus install an electrical “Warm Floor” system underneath it. Therefore, I decided to do without lathing, and used high-strength extruded polystyrene foam as the main insulation.
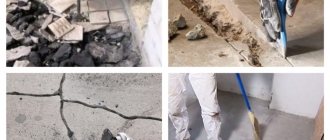
Previously, I had linoleum on my balcony, so removing it and cleaning the concrete slab to perfect condition was not very difficult. In my case, the slab turned out to be level; if the situation with your floors is different, you will have to fill in a small screed. Penoplex is laid only on a perfectly flat surface.
If you do not have proper experience in leveling screeds, then it is better to buy self-leveling compounds. They, of course, will cost more than a cement-sand mortar, but you are not pouring a hall, but just a loggia; you don’t need much material for it.
Scheme of dry floor insulation with installation of the “Warm Floor” film system.
Before any insulation, the reinforced concrete floor of the loggia must be waterproofed. I used technical polyethylene as waterproofing. It is covered with a solid ball extending onto adjacent walls, just above the level of the finishing coating. Then the excess is cut off.
Now it's time to install the penoplex. There is nothing complicated here. The foam sheets are equipped with joining grooves on the sides, resulting in a smooth and beautiful flooring.
Water heated floor according to Penoplex.
Warm floors can be equipped in different ways. If you have official permission for redevelopment and the loggia is being equipped as a living space, then it would be best to lay a water-heated floor and power it from the radiator outlet, which you will remove when you demolish the cabinet under the window unit.
Electric heated floors come in two types: film and those that use a heating cable. Mats with a heating cable, as well as water system pipes, should be laid in a screed. I didn’t want to carry dirt and fill the screed, so I chose a film floor.
Film floors are quite easy to install. A foil material called izolon is laid on the previously laid extruded polystyrene foam. As far as I understand, this is one of the penofol derivatives.
Sealing isolon joints.
Next, the heating elements themselves and the temperature sensor are laid on top of the isolon. The control panel is mounted on a wall nearby. Everything is covered with plastic film on top and you can begin installing the laminate.
The good news is that such a system comes with all the material, down to the smallest detail. I even had a CD with video instructions. How to install such a system yourself is shown in the video in this article.
According to the rules, laminate planks must be installed along the loggia. But no matter how hard I tried, the locks did not fit together well and kept coming apart. As a result, I left this hopeless task alone and installed the laminate across the loggia. Fortunately, the planks fit just right, they even had to be trimmed a little.
Film heated floor on the loggia.
What documents are needed to combine a balcony with a kitchen?
The sequence of actions when combining a balcony with a kitchen is clearly indicated - first a permit is obtained, then the work and all dismantling are carried out. The list of documents for approval of redevelopment includes:
- redevelopment project with thermal engineering calculations;
- technical report on the condition of the house and building structures;
- a technical passport or a separate floor plan with an explanation - are requested from the BTI - if the technical passport is issued in the Moscow City BTI, the Moscow Housing Inspectorate will request it independently;
- title documents and permission for redevelopment from all apartment owners.
In some cases, the list of documents may be more extensive depending on your situation.
A package of documents for approval of redevelopment is submitted for review to the Moscow Housing Inspectorate online in the form of scanned copies through your personal account on the mos.ru portal. As a rule, the processing time for an application is up to 30 days, sometimes faster. Only after obtaining permission can repairs begin.
An example of a permit for redevelopment of an apartment issued by the Moscow Housing Inspectorate. The approval was carried out by APM-1 specialists
After all the work has been carried out, it is necessary to obtain a certificate of completed reconstruction. With it, you must contact the BTI again, only now to draw up a new apartment plan, taking into account the demolished window sill block.
on WhatsApp
Is it possible to combine a kitchen with a balcony?
Combining a balcony with a room without demolishing the window sill wall - is it possible? Is the balcony connected to the room? How much does it cost to combine a balcony with a room? Hello!