Useful tips for installing a door without a threshold
A fundamental indicator of correct door installation is the immobility of the door leaf in any of the open positions (from slightly open to completely wide open). In other words, no matter what position the doors are left in, spontaneous opening or closing of them is not allowed in any way. This will be the result of correct installation of the door frame.
Diagram of a door without a threshold.
Despite the fact that at first glance, installing a door without a threshold may seem like something that does not require special attention, do not be deceived. When installing a door, you need to follow the exact advice so that the installation process takes place without any special incidents and so that the doors then serve for a long time and firmly.
Preparatory work
To install doors in any type of building - be it a new building or an old building - you must first prepare the doorway. Below are the main stages of installing interior doors.
Removing old doors and door frames
First, the door leaf is removed from the hinges, after which the trim and frame are dismantled. If it is difficult to remove the door from its hinges when the trims are not removed, the work changes sequentially - first the trims are dismantled, then the door panel is removed from the hinges. In some cases, it is not possible to remove the door even with the trim removed. This happens if, after installing the door, finishing or repair work was carried out on adjacent surfaces so that the free space became limited.
Cleaning the opening to a durable and hard surface
This is especially important when working in old buildings, when sealing with alabaster (gypsum) or other materials was performed to level the ends of the wall (opening) or change its size. If the wall is not strong enough, it needs to be reinforced with metal structures so that the support can withstand the weight of the door frame and door. If the quality of the wall materials is insufficient (for example, crumbling concrete, brick or blocks), reinforcement should also be done in a new building, as shown in the illustration. For metal structures, metal angle and strip (rolled) and welded joints are used. When hanging an armored door or a product made of heavy wood, it is necessary to reinforce the opening in standard walls.
In the case when an opening is cut out in a main wall (the shape changes, expansion is made), reinforcement with metal is not done for the purpose of strengthening the material directly for hanging the door, but to strengthen the structure as a whole.
In such situations, in addition to the opening itself, the wall above it and/or next to it is reinforced.
Important: in apartment buildings, the creation of new openings in load-bearing walls or the removal of load-bearing structures must be agreed upon with regulatory authorities.
Changing the size of the opening
The technology for installing an interior door largely depends on the size of the opening. Its exact measurements can be made only after complete dismantling. The largest and smallest height, opening width and wall thickness are measured at several points.
Non-standard geometry can be compensated by shifting the elements reinforcing the opening. In this case, the space between the existing walls and the resulting arch (portal) is filled with a cement-sand mixture with filler until a high-quality solid surface is obtained.
You can also adjust the dimensions using bricks, blocks or other similar materials.
You can change the size of the opening (reduce it) using drywall. To do this, the main wall is “built up” in the desired direction using a metal mounting profile and sheathed with plasterboard sheets.
Important! Despite the significant strength of the profile, a door frame can only be attached to it for relatively light doors. Otherwise, distortions of the already installed product, poor closing/opening, and structural destruction are possible.
Complex door shapes (arched, curly) also require adjustment of the recess. Depending on the geometry of the future door frame, the opening is modeled in accordance with one of the popular types of products or an individual project.
Filling the voids is carried out in the same way; if the opening is reduced, the walls are trimmed according to the markings. The simplest and most convenient way to change the geometry is to use plasterboard structures.
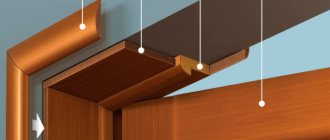
Box assembly
The door frame is assembled from three beams - the top (lintel or frame) and the side (jambs). The beam to which the door hinges are attached is called a hinge beam, the opposite beam is called a vestibule.
Assembly is carried out using self-tapping screws or nails after pre-treatment of the surfaces to be joined. Mandatory check of perpendicularity of the top beam to the side beams and parallelism of the side beams. The dimensions of the box are defined as the dimensions of the door leaf plus small gaps for free opening.
For a more durable connection of the beams, you can make cuts (a “lock” connection) or simply connect them at the ends.
A diagonal connection is also used (the bars are cut at an angle of 45 degrees).
Ready-made door frames are sold already prepared for installation, in the form of elements requiring assembly, or (less often) fully assembled.
Metal products are also sold assembled, for example, crimp boxes (shown in section in the illustration)
Sliding, folding and rotary doors have their own frame features. Details of their assembly and installation should be obtained from the manufacturer. The assembly kit usually comes with instructions.
For ease of work, the hinges are attached to the hinge beam BEFORE the final assembly of the box. Guides for a sliding or rotating mechanism can also be attached.
After attaching the opening mechanism, be sure to check the position of the door leaf in the closed and open states.
Necessary tool
In order to assemble the door frame with your own hands quickly, you need to prepare in advance the tools that will be needed during the work process. In addition to the components of the box, the following accessories are needed:
- a simple pencil, tape measure, square and level;
- electric jigsaw or circular saw;
- perforator;
- drill or bit;
- screwdriver;
- hacksaw;
- screws, mounting foam, fastenings;
- necessary accessories.
Box installation
You can install an interior door frame either in a fully prepared or only a rough opening.
Taking into account the fact that both wooden and metal (metal-plastic) structures can be used, installation methods differ. It is mandatory to check using the horizontal level of the top bar (frame) and the verticality of the side posts.
For wooden (veneered or laminated MDF) models, fastening is done with nails (anchors, dowels - depending on the type of wall) through special holders. In this case, a compensation gap must be created between the upper strip of the box and the plane of the opening.
In panel and brick, monolithic buildings, the gap is minimal - 3...5 mm, in wooden and frame buildings it reaches 10...12 mm. It is better to fasten the box beams in a wooden house using wedges or spacers made of the same wood: this will reduce the likelihood of the structure being distorted due to uneven swelling or drying of the material.
Below is a diagram of the location of the fastening for the door frame.
To fix the box it is convenient to use so-called drywall hangers.
It is possible to fasten with self-tapping screws or other fasteners directly through the frame bars.
Important: when installing a frame of interior doors “from scratch”, the correct position of the beams is checked with the door leaf hung! Only in this case is the correct gap between the door and the frame ensured.
At the time of final installation, the box is installed vertically in the doorway and fixed in it using wooden inserts (bars). It can be difficult to install an interior door yourself while simultaneously checking its correct position, so it’s best to work together.
An additional beam can be inserted at the bottom between the ends of the side beams if a threshold is not provided. This fixation will help avoid deformation when attaching the box. Holes for fastening with self-tapping screws through the beams are made on the sides (at least three per side). The top beam usually does not need to be secured. After completing the fastening, the voids between the frame and the opening are filled with mounting foam or other sealant. Once the foam has cured, the spacers can be removed or left in place.
The finally hardened foam is trimmed so that it does not extend beyond the gap between the box and the opening.
Formation of a slope with finishing material
Finishing the front door with stone or other decorative material is a modern and popular way to decorate slopes. Priming and leveling are carried out similarly to the method described above, and then the selected finishing panels are fixed on the door slopes with a special glue or solution.
To check the uniform distribution of the solution during leveling, it is recommended to screw level screws into the door jambs. The material will subsequently rely on them. The remaining voids are then filled with mortar, leaving the screws protruding slightly.
The filler is a standard cement mixture, the same as in the option of preparing slopes for plastering. To obtain a stronger adhesion, a layer of adhesive is applied to the dried solution so that the remaining small space up to the screw heads is filled with it. Glue is also applied to the back side of the selected material.
Stone finishing
Next, the decorative panels are applied to the slopes and pressed until they meet the screw heads. Before the glue has time to harden, you must check the correctness of their location and, if necessary, correct it. Sometimes, if there were errors during alignment, gaps may form in places after the glue dries. In this case, they can be covered with sealing compounds and hidden under the door trim.
Extensions and platbands
Extensions are wide planks that cover the ends of the doorway where the width of the frame is not enough for this. Platband - a strip that covers the door frame from the side of the room (on both sides of the opening). The installation of platbands completes the finishing of the doorway; by this time, the walls near it must be completely ready (wallpapering, decorative plaster, painting, and so on).
Depending on where the door opens - inward or outward - the frame is mounted along the inner or outer edge of the opening. Accordingly, the extensions on the interior door are installed on the opposite side. Its width is chosen so that, together with the box beams, it completely covers the end of the opening. The width of the platbands is selected taking into account the width of the frame beams and possible defects along the edge of the opening. Instead of the usual narrow trims, you can install wide ones with decorative trim.
Installation of interior doors and trims is often carried out using a tongue-and-groove system (the so-called “telescopic extensions”). Concealed mounting options are also available. The illustration shows a sectional view of a doorway finishing system with telescopic trims and extensions.
Features of assembling boxes for wooden baths
Wood is an excellent building material, differing from others in its ability to settle after construction, which is not very pleasing to its owners. Openings in bathhouses and houses made of logs or timber should not be equipped at all in the next couple of years after the construction of the crowns. Moreover, it is imperative to find out how to properly install a door frame in a timber or log opening.
There are 2 options here:
- If the width of the opening formed during the construction process corresponds to the design solution, a groove is cut out in the end right in the middle and then a beam is hammered into it. It is to this beam that the box can be nailed, but not directly to the walls, because even after shrinking they continue to “settle” a little.
- If the opening is not formed, you need to cut a hole for the passage with a width less than the design by two thicknesses of a kind of ridge. In such cases, the box beam is made with a groove.
In both options, the elements of the box also serve as a connector for the crowns. A gap is always left above the opening to protect against deformation during shrinkage.
It is up to the owner to decide which method of collecting the box to use. A lot depends on the specifics of use and the properties of the building material. We tried to introduce you to the most significant moments and subtleties that you should not forget about.
Sources
- https://dvernoiguru.ru/mezhkomnatnye/vidy-i-razmery-dvernyh-korobok/
- https://dvernoiguru.ru/ustanovka/kak-sobrat-dvernuyu-korobku-svoimi-rukami/
- https://o-dveryah.ru/mezhkomnatnye/ustanovka-korobki/
- https://gorodverey.ru/kak-pravilno-sobrat-dvernuyu-korobku-s-porogom.html
- https://o-dveryah.ru/mezhkomnatnye/kak-sobrat-korobku/
- https://ODveryah.ru/montazh/ustanovka-korobki-mezhkomnatnoj-dveri
- https://roomester.ru/dekor/dveri/kak-sobrat-dvernuyu-korobku.html
- https://www.ivd.ru/stroitelstvo-i-remont/dveri-i-peregorodki/kak-sobrat-korobku-dlya-mezhkomnatnoj-dveri-58051
[collapse]
Interior door threshold
This design element is not considered mandatory. The advantages of installation include:
- reducing the risk of drafts, the ability to make the room almost airtight;
- reduction of noise level (with suitable door frame design and door leaf material);
- aesthetic and functional design of joints between different floor coverings (more details about joining different floor coverings can be found in the article “Joint between laminate and tiles without threshold”).
There are also disadvantages: there is a high risk of injury, and it is inconvenient for people with limited mobility to move around. In addition, if there is no difference in covering in the rooms between which the door is located, it is not rational to install a threshold. It is easier to maintain a smooth surface, which makes cleaning much easier.
There are different types of interior thresholds:
- formed as a floor ledge (masonry of stone, brick or blocks, monolith, drywall);
- made as a separately installed element;
- being part of the door.
In the first case, the ledge requires cladding, and the box is usually equipped with an additional lower beam, which covers the threshold.
In the second, a plank made of durable, wear-resistant material is mounted on a smooth, leveled floor. Typically, such thresholds are made of wood or metal; thresholds made of PVC or other plastic are less commonly used.
The third option is an interesting solution for installation directly into the door leaf. This threshold is called a “guillotine”. In the closed position, it ensures tight contact of the door with the floor; in the open position, it does not interfere with its movement and free movement of residents.
In any installation option, the installation of the threshold is carried out before the final assembly and installation of interior doors.
Door block elements
The door block includes a leaf, a door frame or frame and other components and elements.
Sash - or door leaf. It can be a single fragment - a panel sheet; may consist of several elements: frame, panel, filler. When installing an interior door, its design does not matter.
a frame for swing doors, rotary doors, and sometimes for folding doors. The frame is made of wooden beams, it includes vertical posts and a horizontal crossbar. In some cases, this also includes a threshold.
Other nodes:
- Platband – frame of the doorway. The planks cover the junction of the frame and the wall. Platbands also play a decorative role and are often decorated with carvings, milled flutes, and applied decorative elements.
- Hinges are a mandatory device for swing doors. Thanks to them, it rotates and is held in an upright position. The design of the hinges is determined by the load: the weight of the door leaf, the intensity of use, and operating conditions. Usually door hinges are hidden entirely or partially. However, there are also decorative versions: chrome-plated, gilded, imitating antique bronze products.
- Locking mechanisms are any device for restricting access. Models for the toilet and bathroom are equipped with simple mechanical locks by default. The lock can be installed as desired. Typically these are simple, lightweight mechanisms that serve solely as an access restrictor.
- Door handles are devices that make opening easier. Present everywhere. In sliding systems, their function is often performed by a profile. In other models, the handle is an important design element. There are hundreds of thousands of options for every taste and from any material.
- Seals are a mandatory element for sliding and folding structures; in others they may be absent. The seal ensures the adhesion of the sash, muffles noise, and retains heat. Often he also removes dust from the guides.
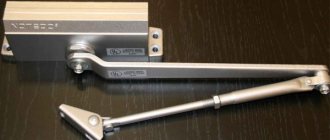
Additional elements: telescopic and simple extensions, limiters, shockproof mechanisms, closers.
Finishing work
This stage includes installing handles and installing a lock on the interior door. Door handles and locks are very diverse, and the methods of inserting them into the door leaf and frame vary greatly. Here is just one of the popular options - a rotary latch handle with a simple lock (the so-called “halve mechanism”).
Depending on the design, to lock the door, only a latch on the outside (inside) side or an additional hole for the key may be provided.
Installation is carried out separately for the locking mechanism and handles, and the hole for the mechanism is drilled from the end of the door, for the handles - from the front and back sides of the door leaf. The receiving strip for the latch tongue (and the hole for it) are located on the recessed beam of the door frame.
The installation process is discussed in detail in the training video.
How to change the canvas?
Often during repairs, only replacement of the door leaf is required. The procedure is much simpler than installing an interior door from scratch.
- The old fabric is removed from the hinges. Awnings usually consist of two detachable halves. To remove the interior sash, it is enough to pry it open from below with a pry bar. If the axial rod is inserted from above in the hinges, the canvas will not be removed. First, a screwdriver is inserted under the head of the rod, then it is knocked out of the socket with hammer blows. Dismantling begins from the bottom loop. After removing the rods, the sash can be easily removed.
- Two canvases are compared in size, laid on top of each other. If the new fold is larger than the old one, mark the boundaries with a pencil. Excess sections are cut off with a hand-held circular saw. The cuts are adjusted with a plane and processed with a grinder.
- The door leaf, adjusted to size, is equipped with hinges, a lock, and a handle.
- Hanging on the hinges occurs in the reverse order.
If the new canvas has been adjusted, the cut points need to be masked. The paint material is selected to be similar in color or the entire canvas is completely repainted.
Why jambs bend: all the reasons
You know that door frames are made of wood. And, as you know, wood perfectly absorbs moisture. Of course, the outside of the jambs is varnished. And this, in theory, should protect the material from water. But the fact is that the varnish perfectly allows moisture to pass through.
The result is the following diagram. By absorbing moisture, the tree increases in size. And when it gives it away, its size decreases. The process is natural - but unpleasant.
Since wood has a non-uniform structure, it both increases and decreases non-uniformly. As a result, the jambs bend.
This is the main, only and main cause of the problem. How to solve it? Yes Easy! The jambs should be properly secured. Then they will remain in their place in any case, even when exposed to external factors.