Sooner or later, the time comes to make changes to the interior; perhaps there is a need to replace the doors if they are absolutely not suitable for the chosen new style. And then the question arises of how to install an interior door yourself in order to save a round sum on calling a specialist. Carrying out this event is quite accessible to anyone who knows how to work with construction tools, has carpentry skills and knows step-by-step instructions for carrying out the work.
How to install an interior door yourself
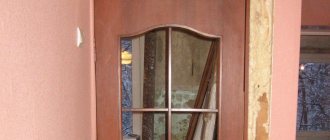
No residential building can do without interior doors. If the wooden frame in which the old door is installed is in good condition, then only the door leaf and facing panels (platbands) can be replaced. This process is much easier to complete than completely replacing the door frame along with the leaf. However, such a large-scale alteration, with the replacement of the box, is quite doable.
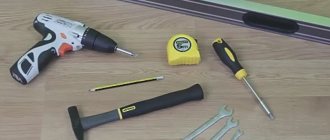
Tools for work
To carry out any carpentry work, you must have the following tools on hand:
- Planer for leveling end surfaces. You may need a manual one, for small, delicate work, or an electric one, if the fit is extensive enough.
- Carpenter's square - the longer, the more accurate the markings will be.
- Construction level, plumb.
- Screwdriver with a set of attachments (bits).
- An extended screwdriver - you may need both a straight blade and a curved one, so it’s better to have a set.
- One type of saw can be a hand saw or an electric circular saw.
- Tape measure, pencil.
- A miter box for correct cutting of corners when fitting wooden parts.
Miter box with hacksaw - necessary for precise fitting of wooden parts
- Construction knife.
- Hammer.
- Chisel, chisel for removing layers of wood when making grooves for hinges and locks.
A chisel or chisel will be needed to cut out grooves for hinges and locks
- Hole saw for cutting large diameter round holes.
“Crowns” or hole saws - for cutting straight, large diameter holes
- Electric drill.
In addition to tools, you will need auxiliary materials and consumables:
- Wooden wedges for door frame spacers.
- Stain and varnish, primer and paint.
- Self-tapping screws, dowels and anchor fasteners.
- Polyurethane foam.
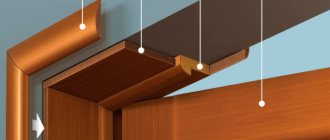
Door drawing
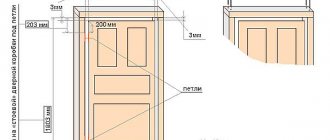
It is recommended that before starting work, draw up a drawing on which you must accurately indicate all the dimensions taken from the opening, the door frame and the door leaf. This scheme will help you quickly complete work without being distracted by measuring each part during the installation process.
Scheme-drawing of a door with its elements. It is advisable to immediately indicate all dimensions on the drawing
Expert opinion: Masalsky A.V.
Editor of the “construction” category on the Stroyday.ru portal. Specialist in engineering systems and drainage.
To obtain an accurate picture, it is necessary to measure the height and width of the installed old door, and the thickness of interior doors is usually standard and is 40 mm. Modern doors are sometimes slightly different from older models, and in this case it will be necessary to adjust the door leaf or change the entire door block.
Whatever decision is made - to replace the entire block or just the door leaf, you still need to start by removing the old door from its hinges.
Replacement of door leaf only
Removing the door leaf
Hinges installed on an interior door can have different designs, which means the door can be removed in different ways. However, all methods are not difficult.
As you know, door hinges consist of two parts, one of which is attached to the door, and the second to the door jamb. In some models, the axial rod is permanently fixed inside the element, which is mounted on the vertical post of the jamb, and in another part, installed on the door leaf, there is a hole where the rod should go. When removing a door hung on such hinges, you need to install a pry bar under its lower edge and apply a little force to lift the door. It is best if there is a second worker who will support the door in an upright position and then help remove it completely.
Knocking out the axle rod from the loop
Another type of canopy in which the axle rod is inserted from the top and passes through both parts of the hinge. In order to dismantle a door hung on such hinges, it is enough to pull out the rods installed in them, which have a kind of mushroom-shaped cap on top. Place a reliable wide screwdriver under it, and, tapping its handle, pull the pin out of the loop. You need to start the process from the bottom hinge to avoid the door tipping over, which with its weight can easily tear out part of the hinge installed on the jamb, damaging its surface. This is especially undesirable if the door frame is in good condition and will be used for a new door.
After dismantling the door from the opening, it is necessary to remove the hinges, handles, and locks.
Fitting a new door
If only the door leaf is replaced, the new door will have to be adjusted to fit the existing opening, based on the dimensions of the old one. You need to take the exact dimensions from it and transfer them to a new canvas.
It is very important to accurately fit the new canvas to the old opening.
You can do it differently - the new door is laid on a flat surface, and the old dismantled door is placed on top of it. The canvases are aligned along the top and along the vertical edge of the door on the side where the handle will be installed. If the new canvas is larger in size than the old one, it will need to be adjusted. Using a pencil, lines are drawn on it, along which an excess fragment is sawed off from the new canvas.
To make adjustments, you can use an old canvas as a sample.
It must be remembered that for an interior door there is a gap of 5 mm between the leaf and the jamb on all sides, and at the bottom you can leave a slightly larger distance - 10 ÷ 12 mm.
Next, the excess part is cut off from the new canvas. The cut must be perfectly even and smooth, and this can only be done with a sharp and precise tool, which can be a hand-held circular saw. The cut is made using a special ruler, which is designed for use with just such a cutting tool.
Cutting a new canvas along the intended lines using a metal guide
The saw is set to the required cutting height (usually with a cut of 45 mm) and the door is sawed off exactly according to the markings. If there is no special guide ruler, then you can carefully cut it with a circular saw without it, leaving an allowance of approximately 1 ÷ 2 mm - this will be necessary in order to then fine-tune the blade with an electric planer.
Installing hinges
When the new door is adjusted to size, you need to mark the places where the hinges will be attached. To carry out this process accurately, you need to put the old door on the new leaf and very accurately align them with each other. At the end of the new door, mark the areas where the hinges will be installed, focusing on the old door leaf.
Relocating the location of door hinges
In this case, marking the location of the loops is first done with a pencil, and then with a construction knife. The lines from the knife are clear, and you can easily make a selection along them when cutting out the recesses necessary for installing the hinges.
Making recesses for metal plates of door hinges
Next, the door leaf is placed on its end, so that the side on which the hinges will be inserted is on top. Using a chisel (chisel), mark the depth of the future groove. The tool is placed on the lines marked with a knife, and it is hit from above with a hammer, observing the depth to which the cutting edge goes into the wood - it should go deeper by 2 ÷ 4 mm, depending on the thickness of the metal of the hinges (this can be measured in advance with a ruler or caliper) .
It is recommended to split the area designated for sampling into several fragments for ease of wood extraction. Next, the chisel is installed at a slight angle to the end of the door, with the beveled part down. and, hitting it with a hammer, the extra layer of wood is knocked out, forming the necessary recess.
Fixing hinges with self-tapping screws
The next step is to install hinges in the prepared recesses. They must be installed so that the plane of the metal plate is flush with the surface of the door end. If the metal of the hinge rises above the surface, then the recess needs to be deepened a little. If by chance the recess turns out to be somewhat larger than necessary, then a piece of thick cardboard can be placed under the loop.
When it is achieved that the loop fits into the recess intended for it, like a “glove”, sockets are drilled directly through its holes with a thin drill, into which it will be convenient to screw self-tapping screws. Next, the hinges are tightly screwed to the door, and then the canvas is fitted into the door frame opening. This fitting will show the presence of gaps and their size, as well as how accurately, without distortions, the canvas fits into the doorway.
If you have a hand router at your disposal, you can very carefully select the grooves for the hinges (and even for the lock) using it.
Video: inserting hinges onto a door leaf using a router
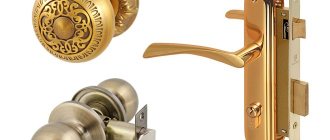
Installing a Lock or Door Latch
- When the hinges fit well, you can move on to making holes for installing the lock and handle.
- The location of the castle is also marked by the old door. It is very important to measure the exact distance from the edge of the door to drill the hole. If it is not done accurately, and because of this it has to be moved, then the appearance of the door may be hopelessly spoiled.
- If a new lock is installed, its kit often includes a special stencil through which the size and exact relative position of all holes are transferred, but for control it is still necessary to take measurements.
- If an old lock is used for a new door, then all parameters can be taken from the old door.
- On the end side of the door, where the latch will come out, a hole is drilled using a chisel drill (“feather”), and on the main plane of the door this is usually done with a hole saw of the appropriate diameter.
Cutting grooves and holes for installing a door lock
- After drilling the holes, the door leaf, if necessary, is decorated in the chosen method - this can be painting or staining followed by varnishing.
- When the paint (varnish) has dried and the place for installing the lock elements is ready, first the internal mechanism with the latch is installed and screwed, and then the handles are mounted and secured.
Video: example of inserting a lock into an interior door
Installing the door in its original place
To make it easier to install the new door in place, you need to lift it from the floor to the required height and install a board (or several boards) of the appropriate thickness under it.
Hanging a new door on its hinges. It’s more convenient if you have an assistant
- Then, the loops must be carefully aligned with each other and the lubricated rods must be carefully inserted into them, first into the upper loop, then into the lower one. The rods can, if necessary, be lightly tapped from above with a hammer
- If a different type of hinge is used, the door will be hung slightly differently. It is best to do this together, since at the same time you need to get the rods of that part of the hinges that are installed on the frame into the holes located on the “reciprocal” halves screwed to the door leaf.
Find out how to make sliding doors on rollers with your own hands with step-by-step instructions from our new article.
Complete door replacement - including door frame
If during a major renovation of an apartment it turns out that it is necessary to replace not only the door, but also the door frame, then you need to start dismantling the old door set. This task can be even less difficult than replacing only the door leaf, since the purchased new door usually already fits perfectly into its frame.
How to install a door from scratch?
There are certain standards according to which interior doors, single or double leaf, are produced. True, no one has canceled the possibility of individually ordering doors for openings of a different size or shape.
| Standards for door leaf sizes and door opening sizes. | |||||||
| Door leaf size in mm. | Door opening size in mm. | ||||||
| Width | Height I | Height II | Height III | Width | Height I | Height II | Height III |
| 550 | 2000 | 2100 | 2200 | from 630 to 650 | from 2060 to 2090 | from 2160 to 2190 | from 2260 to 2290 |
| 600 | from 680 to 700 | ||||||
| 700 | from 780 to 800 | ||||||
| 800 | from 880 to 900 | ||||||
| 900 | from 980 to 1000 | ||||||
| 1200 (600+600) | from 1280 to 1300 | ||||||
| 1400 (600+800) | from 1480 to 1500 | ||||||
| 1500 (600+900) | from 1580 to 1600 | ||||||
Removing the old door and frame
Dismantling the old kit is carried out as follows:
The sequence of dismantling an interior door
- As in the first case, the door leaf is removed from the hinges.
- Next, the platbands are removed as carefully as possible.
- The last thing to dismantle is the box. To make it easier to remove the frame bars, a through cut is made approximately in the middle of one of the sides. In this case, the box structure loses tension, loses its specified dimensions, becomes deformed, and can be easily dismantled in parts.
- Provided that the box needs to be preserved in its entirety, using a chisel and a hammer, the installed wedges are knocked out of the gaps between the wall and the jamb. At the same time, the thrust stress is also weakened. If the jamb bars are secured to the wall with nails (anchors, etc.), then you should try to carefully pull them out, and if that doesn’t work, saw them with a hacksaw blade or in another way, thereby freeing the frame.
- The box is carefully loosened using a pry bar and removed from the opening.
- After dismantling the box, the opening must be cleaned of old mounting foam, if present, of dust and dirt accumulated during the operation of the door.
Manufacturing and installation of the box
When starting to assemble the box, you first need to install hinges on one of its sides; this process is carried out simultaneously with installing them on the door leaf. The hinges are attached in the same way as in the first case, which was described above. After this, they begin assembling the door frame.
Approximate installation diagram for a new door kit
The joints of the frame elements can have different connections - straight with one beam overlaying another, or butted at an angle of 45 degrees.
Door frame parts adjusted to 45 degree angles
The box is assembled according to the measurements taken, which can, for example, be taken from an old kit. Using a square to control the straightness of the corners, the elements of the box are set, marks are made if corners of 45 degrees will be cut. Then, using a miter box, the corners are sawed off, after which the box is laid out on the floor and knocked down with nails or fastened with self-tapping screws.
Arrangement of box parts “overlay”, at right angles
Prices for popular models of screwdrivers
Screwdrivers
If the elements of the box are connected to the lining at a right angle, then they can also be knocked down with nails or twisted with self-tapping screws.
In both the first and second cases, the connection must be made very carefully, since the nails may inadvertently come out in a completely undesirable place.
When the box is assembled, the hinges are screwed to it and to the door, and the lock is installed, you can go in two ways. So, you can put the door on its hinges right away, and then install it together with the frame in the doorway. Another option is to install the frame first and then hang the door.
Video: Door installation step by step, with all the details
- If the first option is chosen, then the door must be locked with a key so that it does not open. Then, carefully, without distortions, install the entire set into the opening, align it using a level both vertically in the longitudinal and transverse planes, and horizontally, carefully driving wooden wedges into the gaps between the wall and the frame for fixation.
Fixing the box in the desired position using wedges
Then, you need to fix the box to the wall using anchors, drilling through holes for them in several places, two on each side.
The holes are drilled countersunk so that the screw heads are recessed into the wood of the box. Then they can be disguised with special decorative covers, matching them to the color of the wood, or covered with a composition made from wood glue and sawdust.
The remaining cracks can be filled with polyurethane foam.
The resulting gaps must be filled with polyurethane foam, wait until the polyurethane foam expands and completely dries, after which the excess composition that protrudes from the gaps must be carefully cut off.
- In the second case, only a new box is fixed into the opening, it is also leveled, fastened with wedges and anchor elements, but at the same time it must be wedged with a wooden beam in the center - so that the vertical posts do not bend in an arc in one direction or another.
Then, the gaps are also filled with polyurethane foam and left until the composition has completely hardened. After this, the door is installed on the hinges on the frame.
Now all that remains is to carry out the final step - install the platbands.
All that remains is to carefully adjust and install the trims
The connection of the platbands at the corners of the door can also be of two types - end-to-end (used very rarely) or at an angle of 45 degrees. The correct angle on the facing panels is also cut out using a miter box, and they are precisely adjusted to each other.
Video: Several useful recommendations for installing interior doors
Prices for interior doors
Interior doors
It should be noted that you can save yourself from unnecessary problems with fitting the frame and the door to it by ordering the entire kit assembled, that is, with the hinges and lock already installed, as well as the leaf fixed in the door jamb. Before making a purchase, you need to take exact measurements from the old set, and using them you can make an individual order or purchase a ready-made model. The kit usually includes platbands of the required height and with correctly fitted connections.
Door trim
Find out an easy way to make compartment doors with your own hands from our new article.
You need to know that it is quite difficult to independently adjust all the elements of a door without proper experience, and a mistake made in this matter is sometimes very difficult to correct.
Select the size of the new canvas
This is necessary so that you don’t have to bother with narrowing or, conversely, widening the opening. Standard door sizes are 2 m high and 60, 70, 80 or 90 cm wide. Double doors are usually combined from two panels. For example, 120 cm is 60 + 60.
Since the leaf is installed in the door frame, and even with gaps for polyurethane foam, the opening should be a little larger. As a rule, 8–10 cm. This includes the thickness of the frame and all necessary clearances.
- Measure the width of the opening and choose a canvas 8–10 cm narrower.
- Measure the height of the opening from the finished floor and make sure that it is 6–9 cm greater than the height of the door.
- Take measurements in several places and take into account the smallest result. For example, if the width of the opening at the bottom is 89 cm, in the middle - 91 cm, and at the top - 90 cm, then the width should be considered equal to 89 cm.
How to Replace Doors Between Rooms in an Old House
In older homes, all structural elements, including the frame, may not be in very good condition. Therefore, when making a replacement, you need to change the entire structure. Here you no longer have to think about not damaging the wallpaper or taking into account other unimportant nuances. It is important that with a complete replacement of interior doors, including door frames, the atmosphere in the house will immediately improve significantly.
When removing a door frame in an old house, you can damage not only the wallpaper, but also the plaster. You will have to cover the walls yourself and glue the wallpaper, which is also an advantage, since the old room will gradually take on a new life.
Decide on the opening and hanging side
If the canvas is installed flush with the wall in the corridor, then it will open into the passage. If there is a wall in the room, then the door will open there. Think about what is more convenient and take this point into account.
To open to the right, the hinges must be hung on the right side, and to open to the left, on the left. To avoid mistakes, stand in front of the door and imagine that you are swinging it open towards you. If it has glass, then the matte side should face the corridor, and the glossy side should face the room.
Sliding doors
Sliding doors are a fashionable solution, the embodiment of a designer’s approach to creating a unique interior. They are ideal for small apartments, as when opened they do not take up much space. To install them you need a minimum of tools. Every owner can install a sliding door with his own hands.
The compartment doors do not have thresholds, which is an advantage, especially for older people. But if you install a coupe system, the sound insulation will not be as good as we would like. Also, the sliding door does not prevent the spread of odors. Therefore, it is not advisable to install them in the toilet and kitchen.
Hang the hinges
If you are installing a door for the first time, it is better to use butterfly hinges. They are universal and suitable for both right-hand and left-hand drives. But the most important thing is that they do not need to be cut into the box, which is very convenient for non-professionals.
- Place the door on its edge with the front side facing you, placing a piece of cardboard underneath.
- Measure 250 mm from the edge of the canvas and make a mark with a pencil - this will be the center of the loop.
- Place the closed loop on the canvas with the side where the holes in the small part are chamfered.
- To determine where to screw in the screws, mark the centers with an awl and carefully drill holes with a diameter of 2–2.5 mm.
- Screw in one of the screws. It will secure the loop and make marking easier.
- Mark all the holes in this way and screw in the screws.
- Remember: the small part of the hinge is attached to the door leaf, and the large part is attached to the door frame.
- Repeat the same procedure for the second loop.
Swing
Hinged doors are a movable console. The main feature by which they are classified is single-leaf or double-leaf structures. Everyone is well aware of single-leaf swing doors. This is a simple type that involves the use of one door leaf, which is installed on 2 hinges. The swing door only opens in one direction.
If the interior door consists of 2 door leaves, then there will be 4 hinges - two on each side.
Based on the material from which the doors are made, they are divided into wood, metal, glass, and composite. Metal is rarely used in production. Wood or composite materials - MDF, veneer - are more often used. Glass doors are also rarely used, except to visually increase the living space.
There are also doors with a pendulum mechanism that allows you to open it in any direction. Most often, pendulum systems are used in shops and offices, but not in apartments and houses. Although, you can do this if it is justified.
The main advantages are thermal insulation and sound insulation. But swing doors take up a lot of space. To open them, space is required, unlike compartment doors, which open in one plane.
Embed the lock
- Turn the canvas over so that the loops are on the floor, and the opposite side, where the lock will stand, is at the top.
- Position the lock correctly - in the center of the door. The square hole for the handle should be at the top, and the beveled part of the latch should be directed towards the closure. If necessary, the tongue can be easily turned over by simply pulling with your fingers.
- Measure the length and width of the lock mounting plate, as well as the thickness of the door. Make a mark and place the bar strictly in the center of the canvas.
- Turn the lock around and apply it to the door. Mark the center of the location of the mounting holes, drill, and screw in the screws.
- Trace the plank along the contour with a pencil and carefully cut the film with a sharp knife to clearly mark the boundaries of the selection for installation and not damage the edge.
- Remove the lock and separate the cut film from the canvas with a chisel.
- Attach the mechanism to the door, aligning it with the planned location, and mark the width of the body. Measure the thickness of the lock at its widest point and mark it on the canvas.
- Draw boundary lines 2 mm from the edges of the groove on both sides.
- Using a drill with a diameter of 6–7 mm, make holes along the contour of the hole for the lock mechanism. To use the maximum area, arrange the holes in a checkerboard pattern. Act carefully and do not protrude beyond the boundaries of the markings.
- Slowly cut off the drilled wood with a chisel and trim the edges of the groove so that the lock fits freely, but does not dangle.
- Use a chisel to remove the wood little by little until the mounting strip is flush with the wood. Check by applying the lock with the back side rather than pushing it into place - otherwise it will be difficult to remove.
- Place the lock on the side and use a pencil to mark a square hole for the pen shaft. Make a mark on both sides and remember that this figure should be on top and not below when the door is installed.
- Insert a piece of wood inside the groove as a support and use a drill with a diameter of 20 mm to make a hole on one side and then on the other.
- Place the lock in place and secure it with screws, having previously drilled holes for them.
Assemble the door frame
- Place the side posts of the door frame along the edges of the door to avoid confusion. They should be facing a quarter towards the door hinge. That is, you should see the seals.
- Calculate the height of the post for proper trimming. It consists of the size of the leaf (2,000 mm), the gap between the frame and the door (3 mm), the thickness of the frame itself (22–25 mm) and the gap between the leaf and the floor (8–22 mm). The lower threshold is made only in bathrooms; in other cases, a gap is left for carpets and other coverings.
- Calculate the width of the door frame crossbar. To do this, add 6 mm to the width of the door leaf, so that you end up with a gap of 3 mm on each side.
- Carefully cut all planks to size. It's better to use a miter saw, but you can also use a fine-tooth hacksaw.
- Remove the quarters on the side posts to mate with the top rail. To do this, move the seals to the side, make cuts with a saw, and then chop off the interfering pieces with a chisel. Use scraps of the box as a template for greater accuracy.
- Trim the rubber seals on the side posts at a 45-degree angle to avoid an unsightly gap after assembly.
- Place the frame strips together, align the edges and fasten with screws. Pre-drill holes for screws and screw two into each rack. Use box scraps for precise markings.
How to choose the right burglary-resistant design
In order for a door to meet the requirements for ensuring the safety of residents in an apartment, it must have an increased level of protection against burglary. This property is ensured upon reaching class M1, which is characterized by the implementation of the following design solutions by the manufacturer:
- The sheet steel from which the door covering is made, as well as the wall thickness of all frame profiles and stiffeners must be 1 mm or more.
- Mutually perpendicular locking bolts must be installed in the body of the door structure, which are driven by turning the locking mechanism, providing anti-removal protection for the door on all 4 sides.
- The door must have at least 3 locks with secrets - a rotary lock, a lever lock and an internal night bolt. This condition provides increased security, since an attacker who managed to pick up master keys for a lock of one type may not have time to do the same for a locking element of a different design, and, if the door is locked from the inside, it is simply impossible to break it.
- The total thickness of the sash, taking into account the frame profiles, sheet cladding and internal filling, must be at least 85 mm.
Rice. 7. Product class M1
It should be noted that a manufacturer who produces products with an increased protection class of M1, before sending the products for sale to retail outlets, must conduct bench tests of their doors and obtain the appropriate certificate guaranteeing safety during long-term operation.
Hang the canvas on the door frame
- Place the door frame on the floor and carefully place the panel in it. Place 3mm thick fiberboard pieces around the perimeter to form an equal gap.
- Mark the top of each hinge on the frame with a pencil.
- Remove the screws from the side post and “open” it up on its hinges. To prevent the canvas from falling, place the cuttings of the box underneath it on top and bottom.
- Align the top of the hinge with the mark on the frame and use an awl to mark the centers of the screw holes. Screw in the screws, having previously drilled holes for the fasteners.
- Repeat the procedure for the second loop and fasten it.
- “Close” the box and reassemble it, attaching it to the top bar with screws.
Place the box with the canvas in the opening
- Lift the hinged door and insert it into the opening. Align the canvas with the wall using wedges as spacers. You can buy them or cut them yourself. Insert one wedge into small gaps, two wedges into large ones, turning them towards each other. This is necessary for accuracy of adjustment.
- Align the post with the hinges first, then the rest. Apply a level and recess or pull out the door to achieve a strictly vertical position. If the wall is blocked, the canvas still needs to be leveled so that it can be easily closed and opened.
- Using pieces of fiberboard or other templates, create 3 mm gaps around the perimeter between the leaf and the door frame. Place them opposite each other. This will avoid deformation of the frame while the polyurethane foam hardens.
- Place a level on the edge of the door or two pieces of fiberboard and make sure the door is perfectly vertical.
- Fill the gaps between the door frame and the wall with foam, starting at the bottom and moving up. Use high-quality foam with a low expansion coefficient so that it does not deform the box as it hardens and increases in volume.
- If the gap is large, for example, above the top bar, then fill the space gradually, moving the gun up and down with a snake. Do not fill the foam flush with the wall - it is better to leave a small gap, the composition will fill it after hardening.
Summarizing
Now you know how to change interior doors in an apartment or private house, with or without replacing the frame, with your own hands or with the help of builders. The service does not cost much compared to the effort that can be spent if there is no experience. And it will take a lot of time. Therefore, before carrying out repair work yourself, it is better to think again and imagine that everything can be done much faster if you turn to professionals for help. ]Good Repair[/anchor] operates in many regions of Russia. To find out if there is a representative office in your city, follow this link.
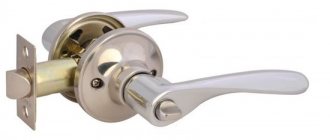
Mount the handles and strike plate of the lock
- Using the supplied hexagon, loosen the locking screws at the bottom of both handles and insert the square rod into them until it stops. Attach the assembled structure to the door. The distance between the handles should be less than the thickness of the blade. If it is larger, shorten the rod slightly with a hacksaw or grinder.
- Remove the decorative rosettes from the handles by unscrewing them counterclockwise along the threads. Insert the handles into their places so that the locking screw is at the bottom, and mark the locations for fastening with a pencil. Drill holes and screw in screws. Replace the decorative rosettes.
- Close the door and mark the top and bottom of the latch on the frame with a pencil. Measure the distance from the edge of the canvas to the outside of the tongue. Mark this measurement on the frame and draw a line to the latch boundary marks.
- Turn the striker over and align it with the center of the tongue mark. Drill holes and screw in screws to secure the strip to the frame. Trace the contours with a pencil and cut the film with a sharp knife, as you did with the lock.
- Remove the bar and use a small drill to make holes along the contour of the future groove for the latch, and use a chisel to make a hole. It’s okay if the sample slightly protrudes beyond the boundaries of the marks; after installing the bar, all the gaps will close.
- Using a chisel, carefully remove the film along the outer contour of the striker to make it flush with the door frame. Secure the strip in place with screws. Check: if everything is done correctly, the closed door does not hang loose.
Install additional strips
They are mounted from the side of the room when the width of the door frame pillars does not allow covering the entire thickness of the opening. Additional strips are inserted into the frame and attached to the wall with foam, and later trims are nailed onto them.
If your frame thickness matches the dimensions of the doorway, proceed immediately to the next step.
- Use a chisel to cut off the pieces protruding from the sides of the frame and use a chisel to keep them out of the way. Remove any remaining foam around the perimeter of the door frame.
- Measure the width of the opening and cut the top trim to the appropriate size. Attach it to the desired place and, if it protrudes beyond the boundaries of the opening, mark with a pencil and remove the excess part. Insert the trimmed board into the box, level it and secure it with wedges on the sides.
- In the same way, measure, cut and fit the side trim strips. Reinstall them and align them.
- Apply a continuous strip of foam at the junction of the door frame and the top and sides. At the outer edge of the additional strip, fill the joint with the wall with small strips. Do not fill the entire space with foam, otherwise it will expand and deform the extension.
Stuff the trim
- Using a sharp knife, cut off the foam protruding beyond the plane of the door frame.
- Attach the trim to the frame from the side of the hinges, close to them, and see what kind of gap there is to the inner edge of the box. The same distance must be maintained around the entire perimeter on other trims.
- The joints of the top and side trim strips can be made at an angle of 45 or 90 degrees. If you don’t have a miter saw at hand and you’re installing a door for the first time, it’s better to go with the second option. It's much simpler.
- Install the side strip, pressing it against the hinges, and nail it with nails in increments of 20–25 cm. Do not hammer them in completely and do not forget to first make a hole in the platband with a drill of a smaller diameter than the nail.
- Attach the second side strip and, having maintained the required gap, make a mark with a pencil and cut off the excess to the desired length. Nail the platband with nails as before.
- Try on the top bar, cut it to size and fasten it. Important! It should not lie on the sides, but be between them. In this case, the cut end of the upper casing will be hidden.
- Using the same principle, fill the trim on the other side of the door. If additional strips are installed, then align the edges of the platbands with them. If there are no additions, maintain the same gap around the perimeter of the door frame as on the opposite side.
Replacing doors yourself - is it justified or not?
It often happens that people overestimate their strength. At a time when they simply need to turn to a specialist for help, they try to carry out the work themselves, which leads to unexpected expenses. This is the most negative nuance if you do nothing more than change the interior doors yourself. You never know what exactly will go wrong. You need to be prepared for anything, so improvise and think for yourself. Assess the situation and your strengths.
If you are confident that you can handle replacing interior doors with your own hands, then proceed by adhering to the above recommendations. But if you have any doubts, then contact someone who has already changed different types of doors many times. ]Good Repair[/anchor] provides a full range of construction services, including replacement of interior doors.
Go to the website and see the projects that have been done. By implementing a design idea, even just by replacing the door, you can achieve an incredible effect. Therefore, if you need not only functionality, but also external indicators, order a free consultation using this link.