Interior doors are often installed independently, since this does not require much effort. The weight of the interior door is small, and no one wants to let strangers into the house again.
If you follow a strict sequence in the upcoming manipulations, it becomes possible to independently install interior doors of the chosen design. The slightest mistake can negatively affect the subsequent quality and service life of the structure. The main rule that should be followed when installing doors is an even horizontal and vertical position. This is the only way to ensure acceptable and unhindered closing and opening of doors.
Simple instructions for installing interior doors without a threshold will help you cope with the upcoming work. First of all, you should deal with the installation of the door frame itself.
Rules for installing interior doors
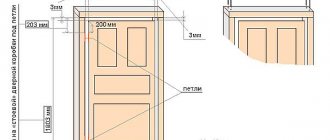
Particularly important characteristics include the presence of identical sized gaps around the door frame and the door itself. A gap of 2-3 mm along the entire length of the vestibule is considered to be an excellent indicator, provided that opening and closing the doors is not accompanied by creaking or clinging.
Recommended clearances between the door and the doorway
Much will also depend on the door reception itself and the quality of the preparatory and other work carried out. If there is a high vertical deviation of the wall with the opening, it will not be possible to install a quality door on your own, even if you have the appropriate experience in this matter. When installing interior doors, the master will orient himself along one of the verticals and align himself with the plane of the wall. And if the wall is not level, then the vertical will in any case go beyond the boundaries of the wall. Accordingly, during operation, the platband used will be tightly adjacent to the wall on one side, while on the other it will significantly move away from it. This will look unpresentable, and the structure will become dangerous.
To avoid accidents and poor-quality installation of doors, finishing work should first be carried out to level the wall.
The door frame is installed first, and after that the surface adjacent to the structure is leveled. During the repair work, the door is removed, and the box should be covered with mounting tape, which is based on the use of ordinary paper, which will not damage the coating. With its help you can even paste wallpaper, from which it can be easily removed afterwards.
Working with an opening
The vacated opening must be prepared for installation of the box. Surfaces located inside should be leveled if necessary. To install the door correctly, you need to take all measurements accurately. To do this, you need to estimate them using a certain formula: take the width of the door, add double the thickness of the timber to it, taking into account a gap of 2-3 cm. The height of the opening is calculated using the same method.
If the box exceeds the required dimensions, it should be reduced. There is no need to be afraid of this, since this work is much easier to do than by enlarging the opening, especially if the wall is made of concrete.
Reducing the opening
But when reducing the thickness of the side of the box, you shouldn’t get too carried away, since you can remove a maximum of 15 mm from the beam.
It is better to reduce the value from the piece of timber that will contain the lock strike plate. This is due to the fact that this part bears a small load during operation. When installing the box, it is necessary to maintain a gap of 10 to 20 mm in order to subsequently fill it with a special sealant.
Complete set of interior doors
Installation of interior structures should begin after leveling the walls and ceiling. At the time of installing the doors, the surface of the subfloor must be ready, level and completely clean. Skirting boards are attached after installing the doors. The basic package includes:
- Fully assembled unit. All components and additional elements must be correctly adjusted, after which all that remains is to install the structure in the doorway, adjust it to the level and fix it.
- The canvas and the box itself. Both elements must fit each other perfectly; you will need auxiliary lumber from which to make planks that will help assemble the structure together. When installing interior doors, additional additions may be necessary, but this point is thought out in advance.
- Canvas without lumber and boxes. In this case, you should buy everything separately. Lumber is selected and strips are made from them to match the size of the doorway. The corners are filed. When using a standard box, you should select a canvas of the same size. Before going to the construction market, you should take preliminary measurements to avoid additional modifications. This way the installation will not hit the family budget.
An example of a set of interior doors
Provided that a person knows how to install an interior door himself, any set will do. If you are working with such structures for the first time, then you should give preference to the first option, as the simplest. The last option is the most economical, but only specialists can work with it. It will not be possible to make additional adjustments to such structures.
Installation of extensions and platbands
If the thickness of the opening is significantly greater than the same size of the box, additional extensions are used. When the difference is from 2 to 3 cm, then telescopic platbands can be used. Such elements are made in the shape of a corner. Therefore, with their help it will be possible to close part of the opening. However, they are only used with a box that has special grooves for attaching them.
Installation of accessories
The top panel is always installed first. It is cut to the required length and set in place to determine its width. After trimming, the extension should be flush with the wall structure. It must be secured with wedges. The same actions are performed with the side elements.
At the next stage, polyurethane foam is applied between all the extensions and the wall. It must have a continuous layer at the junction of the additional elements and the frame. This will allow the parts to press tightly against each other. In other places, the foam is applied in small portions so that when it expands, the extensions do not bend.
Installation of platbands
The platbands are installed at right angles or their ends are connected at 45°. When implementing the second option, you need to use a miter saw or at least prepare a miter box. If these devices are missing, then it is better to install the platbands at 90°. The work is carried out as follows:
- The platband is applied to the stand close to the hinges. This will allow you to determine the gap between it and the edge of the box. It must be observed on each side of the structure.
- The length of the vertical casing is determined. This operation is performed by perpendicularly applying a trim of a similar part to it in the upper part. In this case, you must not forget about the gap between the edge of the box and the platband.
- The vertical casing is cut with a hacksaw with sharp small teeth.
- The cut part is installed in place. One hole is drilled in its upper part with a diameter that should be smaller than the similar size of decorative nails.
- The vertical casing is secured with one nail. The fasteners do not need to be driven in completely. After all, you may need to adjust the part.
- A second vertical platband is installed on the side of the latch or lock. To do this, follow the steps described above.
- The top casing is applied and its length is determined.
Finally, all parts cut to size are permanently fixed to the door frame. The top trim is secured with three nails, and each side element with five fasteners. In this case, you need to pre-drill holes for each fastener, and fix the vertical trims from top to bottom.
Dimensions of door frames
Each country has its own standards, which can vary greatly. Based on the standards established in Russia, the dimensions of swing doors are as follows:
- 90 cm;
- 80 cm;
- 70 cm;
- 60 cm.
Similar standards are applicable in Italy and Spain. The difference with the French will be 1 cm on the smaller side. The choice of standard to be applied will depend on the purchaser. The Russian manufacturer has a wider choice, which should be taken into account. When purchasing non-standard models, it will be difficult to install them later. Based on GOST, door leaves and doorways applicable in the configuration will depend on the type of room in which installation will be carried out:
- for residential premises, the height will be 200 cm and the opening width will be 60-120 cm;
- in bathrooms the width will be at least 60 cm, while the height is 190-200 cm;
- for kitchens, the width of the doorway will be 70 cm and the height 200 cm.
However, these are just standards, and in real life, the characteristics of the building itself should be taken into account. In some cases, it is better to use sliding door designs. You will need to measure the opening to determine the required dimensions of the canvas and box. Only after this can you begin to select a block. The size is selected a little smaller, which will make it possible to mount spacers and fasteners. The parameters are important and should be taken into account before installation work begins.
Below is a table of recommended panels for interior doors, based on the size of the openings:
| Blade size, mm | Opening size, mm | ||
| width | height | width | height |
| 550 | 2000 | from 630 to 650 | from 2060 to 2090 |
| 600 | from 680 to 700 | ||
| 700 | from 780 to 800 | ||
| 800 | from 880 to 900 | ||
| 900 | from 980 to 1000 | ||
| 1200 (600×600) | from 1280 to 1300 | ||
| 1400 (600×800) | from 1480 to 1500 | ||
| 1500 (600×900) | from 1580 to 1600 | ||
When taking measurements, you should carefully inspect the surface of the walls. Strengthening and repairs are carried out as necessary. This way it will be possible to secure the structure better. Particular attention is paid to the condition of the walls if it is planned to install a heavy structure. A wooden beam is attached to the wall, which is then plastered (if possible). This way you can carry out the installation without any complications. The thickness of the timber used will be 50 mm. After such manipulations, the installation of interior doors without a threshold will proceed without any difficulties.
Anyone who has previously understood the intricacies of the upcoming work and correctly calculated the dimensions of the structure being installed can carry out the installation. An important factor is depth. Based on GOST data, it will be 7-8 cm, but in modern houses this figure is significantly higher. A little trick is needed here. Installation of doors without a threshold in a room should be flush with the wall, however, provided that the opening and slopes will not be an obstacle to their subsequent opening.
The remaining section of the wall is finished and plastered, like the rest of the walls in the room. It is possible to use add-ons. You can install a strip that will not differ in color from the main canvas and the trim used. The assembly of the platbands is carried out according to the attached instructions.
Selection by type of material
Solid wood doors have many advantages, especially those made from valuable wood. This is, first of all, beauty. Aesthetically, they look very advantageous.
The advantages also include durability and good sound insulation. But the high price can be an obstacle, and you don’t often see these models on sale. Such products may be subject to changes in humidity.
Doors made of valuable wood with an individual design are made to order. They are quite heavy and require special care.
In addition to natural solid wood, laminated veneer lumber can be used in the manufacture of doors, and veneer can be used as finishing. Natural veneer is made by cutting a thin layer of natural wood.
Eco-veneer is made from a mixture of wood fibers and a polymer base using dyes. Modern European veneer covering is an artificial material made from a multilayer polymer that recreates the appearance of natural wood. It is resistant to fading from sunlight, non-toxic and does not burn.
MDF, from which different types of doors are made, is a fibreboard. Pressing occurs under high pressure without the use of synthetic binders.
In panel doors, chipboard can serve as fillers or stiffeners. Such structures are much heavier than those that use honeycomb filler or MDF or wooden blocks. Also, chipboard emits harmful substances and is undesirable to use indoors.
Triplex glass sliding doors fully meet all environmental requirements; despite their apparent fragility, they are durable and transmit light well
It should be borne in mind that glass doors require careful maintenance, as they quickly become dirty and have poor sound insulation.
You can also consider an economical option - plastic doors. They can also be in the form of a shield or composed of elements. Such doors are usually used for bathrooms where there is high humidity, on a limited budget, or as a temporary option.
The choice of one type of door or another depends on the size of the opening and the area of the room. The way they open is of great importance.
According to this principle they are:
- hinged with one or two doors;
- sliding roller single- and double-leaf;
- folding - accordions;
- folding books.
The most reliable and popular are swing doors. They can have one, one and a half, or two doors.
If there is no space, sliding doors are installed that roll parallel to the wall or into a specially made niche - pencil doors.
If there is no room for rollback, you can choose a folding door-book. In a large opening, such structures can be placed on both sides
Accordion doors differ from the previous version in that they consist of several narrow vertical panels connected to each other
The accordion design folds when opened. They take up little space in width, but reduce the opening.
What materials and tools will be needed
To carry out the work you will need:
- Hammer
- Screwdriver
- Building level
- Hammer or drill
- Hacksaw
- Stationery knife
- Construction tape
- Set of dowels with impact screws (length 12 cm, size 0.7 cm)
- Several pieces of blank cardboard and wooden wedges
The tight fit of the door frame to the opening is checked again and only then is it determined which way the door will open. The location of future loops is determined in order to drive in the wedges correctly. A couple of wood chips are prepared in advance, as they are placed under the pillars of the door frame. There will be no threshold, and the wood chips will help provide the necessary gap between the floor and the door. The gap is kept minimal, only in this way it will not be noticeable. So, the door frame will be able to breathe on its own.
Required Tools
To install the door block you need the following tools:
- drill, screwdriver or set of screwdrivers, hammer drill;
- hacksaw;
- level, meter, pencil;
- hammer, miter box;
- wooden blocks;
- polyurethane foam, masking adhesive tape.
Masking tape is not the main element. It will only be needed to protect the box when applying polyurethane foam in place of the bars.
If you don’t have a power tool, you can rent one or ask a neighbor or friend to borrow one.
How to install an interior door without a threshold - installation stages
- Collecting the box. Before you begin assembling the standing frame, you should trim it in accordance with the gap between the floor and the door. The gap for residential premises should be 1 cm. The parts are laid out according to the drawing on a clean and flat surface. The previously narrowed corners of the pillar bars are connected to the top bar of the box.
The corners are tightened using self-tapping screws. You can proceed with the subsequent installation of the box. - Installation of the door frame. The box is placed in a pre-prepared opening. The upper part is fixed with wedges. If the bottom threshold is missing, then a lower spacer is inserted and the box is fixed using wedges. Horizontal and vertical bars are leveled using a building level. A spacer bar is fixed in the lock area using wedges. The size will be measured simultaneously at several points, between vertically located bars in the area of the canvas rebate. The data obtained is taken from the width of the canvas + a gap of 0.5 cm.
- Installation of the canvas. The canvas is hung. The gaps are checked for uniformity between the frame and the door leaf. The door should close smoothly. There should be no spontaneous closing or opening in the slightly open position. The gaps are evenly foamed between the door frame and the wall. The wedges are cut only after the mounting foam has completely dried. The spacers are removed and excess foam is removed.
- Installation of additional element. The distance from the edge of the wall to the box is measured. The additional strip is filed, if necessary. A jigsaw or hacksaw is used for this. You should focus on the groove of the platband or additional element. Protruding elements are removed with a chisel. The additional element is placed in the groove, after which it is foamed in several places. The foam must dry. The connecting strip is used if the maximum width of the standard extension does not cover the width of the existing opening.
- Installation of platbands. The diameter of the casing is determined, which is sawed off with a hacksaw. To do this, use a miter saw or miter box (45° angle). The platband is inserted into the groove of the box and secured in several places at the same time using liquid nails. It may be necessary to saw off a 90° corner of the casing, but this depends on the configuration. Such nuances should be clarified with sellers. The upper part of the beak is retractable.
You can also check out the step-by-step photo instructions for installing an interior door:
Preparation for installation
Before installation begins, the old door must be removed. This must be done carefully, trying not to damage the opening too much. Then the installation of the front door will go quickly.
Some types of steel entrance doors
Removing the old door
First, remove the door leaf. If the model has removable hinges, the doors are opened, a crowbar is placed under the lower edge of the leaf, and the doors are lifted from the hinges. If the hinges are not removable, you will have to unscrew them. It's better to start from the bottom.
Afterwards, the slopes are dismantled, the wallpaper is removed, and the plaster or putty is beaten off. The task is to determine how the box was attached, to find the attachment points. If the door frame is metal, usually these are anchors or pieces of reinforcement. At the junctions they are cut with a grinder. When all the fasteners are cut off, the old box is squeezed out or knocked out. But with this procedure there is no need to make excessive efforts: you can destroy the box so much that it will need to be repaired.
When dismantling, it is necessary to cut off the old fasteners
If the frame of the old front door is wooden, everything is simpler. The side posts can be cut approximately in the middle, and then, prying them with a crowbar, they can be broken out of the opening. Once the side panels are removed, the lintel can be easily removed. The threshold can also be removed without any problems.
Adjusting interior doors
In order for the installation of interior doors without a threshold to go smoothly, adjustments should be made. The level is used to adjust the door opening on the side where the hinges are located. One of the ends of the plumb line is pressed against the upper corner, after which it falls down towards the floor.
Similar manipulations are carried out on the other side, in the place where the latch of the bar is located. Spacers and wedges will help adjust the gaps. If the gap is insufficient on the hinge side, you should dismantle them, place a lining under this place and install it in its original place. If the gap is large, then the sockets are slightly deepened with a chisel.
Deepening hinge grooves
By turning the vertical beam of the box, you can adjust the other side. The remaining space is blown out with foam. To avoid deformation of the box, manipulations are performed in several stages.
Final stage
When foaming the gaps, particles of the substance may get onto the door and stain the canvas. You can remove foam using a damp cloth, which should be soaked in a solvent or other liquid that contains alcohol.
It is impossible to remove foam that has already completely dried without damaging the surface. Therefore, try to work carefully. Once foaming has been completed, you need to wait a few hours and remove the spacers. Then all that remains is to cover the gaps treated with foam and part of the box with decorative trim. But before that, trim off the excess foam and saw off the protruding ends of the wedges. Secure the trims with small nails. First, install the upper part of the platband with the ends cut at 45 degrees, and then insert the lower strips.
The installation of an interior door can be seen step by step in this video:
Voted over 167 times, average rating 4.4
Comments
Unfortunately, there are no comments or reviews yet, but you can leave your...
Add a comment Cancel reply
We recommend reading
Miscellaneous Installation of a threshold for the front door in a private house: we select and do it ourselves The threshold under the front door prevents entry into the house...
Miscellaneous What to do if condensation appears on the front door? During the off-season or winter, owners of private houses face...
Miscellaneous How and with what to lubricate a metal entrance door if it creaks? A door that squeaks is a nuisance, especially if it...
Miscellaneous Varieties and manual installation of seals for interior doors No matter how good and expensive an interior door is, its ...
Fitting under the door and sawing off the top beam
The door is placed on the left side and top in the frame
After connecting the top and side beams of the frame with self-tapping screws, we lay the door tightly on these two beams, placing something under the free end of the door so that it lies flat.
We mark on the top beam the excess length that needs to be sawed off.
It is clear that from the right end of the door in the photo this cut will be no closer than 15 mm to the right with standard beams. Make a small margin of 10 mm for free opening of the door and the thickness of the hinges, i.e. saw off the top beam at a distance of 25 mm from the end of the door.
Now, for ease of work, we temporarily unscrew the screws that secured the top and side beams.
We saw off the extra length from the top beam and accurately measure the piece on the top beam that needs to be cut to join the remaining side beam and the top one end-to-end.
To do this, you can simply attach a piece that was cut earlier from the opposite end of the beam and outline it.
Please take your time. Double-check everything carefully before sawing off!
Shape and dimensions of the structure
The frame base must match the door parameters (width and height) in order to provide full coverage and support to the structure. An important nuance regarding the canvas is the purpose of the room for which it is intended. Because ventilation requirements will depend on this. In steam rooms and baths, doors must provide reliable thermal insulation, so the opening is sealed as tightly as possible.
The bathroom, on the contrary, needs to be well ventilated so that excess moisture does not accumulate and mold does not appear. Therefore, the gap between the frame and the door should be a little wider. Good ventilation is also required for rooms in which gas equipment is installed.
To ensure reliable protection against heat leakage, a rectangular frame is constructed from four bars, which will serve as a frame for the door. The vertical posts will become hinged and recessed elements, and the transverse ones will become the upper support and threshold.
For free movement of the door leaf, the gap between the door and the posts should be about 3 mm. In cases where air flow into the room is necessary, the box is assembled from three bars, and a gap of about 10–15 mm is made at the threshold site. A standard distance of 3 mm is left along the vertical posts and the lintel.
The box with the threshold assembly is slightly higher than without it. The difference is about 20 mm. It is important to take this nuance into account so that you do not have to shorten the door. Because it is possible to adjust the canvas only if it is made of wood.
The gap between the door frame and the opening must be at least 10 mm on each side so that the structure can be easily installed and fixed.
How to cut door hinges
First of all, it is worth noting that it is best to cut door hinges in a carpentry workshop. Then you can avoid many mistakes that are most often made in such cases. In any case, you need special tools and carpentry skills. The tools we need are a hammer, a well-sharpened chisel, a knife with a thin blade, preferably an electric screwdriver or drill, or at least a screwdriver.
We start by choosing a location for the loops. As a rule, for ordinary interior doors two hinges are needed, one on top (about 25 cm from the top of the door leaf) and the second from the bottom (respectively 25 cm from the bottom); for heavier doors (for example, solid oak, entrance doors, etc.) a third, additional one is required the hinge is also on the top (20 cm below the top), since the main load will fall on the top of the door frame.
Make sure that in the places (on the door and on the frame) where we will embed the hinges, there are no knots, cracks, chips, or clearly incorrect direction of the wood fibers. This can make it very difficult to insert the hinges and weaken these places, so in such cases you need to move the hinge a little up or down.
Well, now you can move directly to inserting the loops. We start with the door leaf, which is best placed on its edge, one side resting against something for stability, and you sort of sit on the door, holding it with your feet.
We attach to the door leaf the part of the hinge that will be put on (if the hinge is not detachable, the desired side) as shown in the figure - exactly along the edge, parallel to the leaf itself, and screw it with two screws. Then, using a knife with a thin blade, along the long side, along the grain, we cut the wood through the entire thickness of the loop itself, and only mark lines along the end sides.
Then we unscrew the screws and now on the front side of the door (this place will be, as it were, under the hinge), we also cut a line along the fibers with a knife, which should be located from the edge exactly to the thickness of the hinge.
We start by choosing a location for the loops
After this, we cut through the end lines with a chisel - again, to the thickness of the loops that we noted earlier. Thus, we have a contour along which we need to select a layer of wood. Which is what we do with a chisel and a hammer.
Important: as mentioned above, the length of the hinge must be strictly parallel to the entire door. The depth to which we recess the hinge must be such that the surface of the hinge itself is level (and always in the same plane) with the surface of the door end or 0.5 mm (half a millimeter) higher, but in no case deeper
Otherwise, the door will not close well; as they say, the door will “pull.”
When the place for the hinge is ready, screw it on completely, using all four screws. And we move on to the bottom loop, doing all the same operations, in the same sequence.
After the hinges are cut into the door leaf itself, we place the door in the door frame, set it so that there is an equal gap everywhere around the perimeter, and only then mark on the door frame the places where the second parts of the hinges need to be cut.
With the door frame we basically do the same thing, only here we cut in parts of the hinges on which the door will fit. When the hinges are cut into the frame, we put on the door leaf, check the gaps, the rebate, and so on. If necessary, we correct and customize something.
That's all. What can you add? Sometimes hinges have round corners. In this case, you can get a semicircular edge of the mortise using a drill with a drill with a feather sharpening - we drill in the corners, to the thickness of the loop. We also add that inserting hinges is a fairly precise job, on which the normal opening and closing of the door will depend. Therefore, as was said at the very beginning, it is better to purchase doors with already embedded hinges.
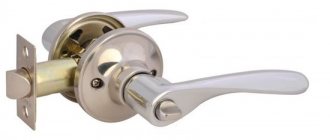
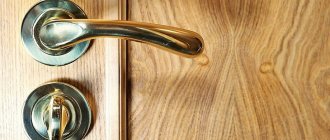
Installing handles, lock and latch
Usually the door handle is fixed in the middle of the door leaf. If a two-meter door is being installed, then it needs to be installed a meter from the floor. If there are small children, the installation height of such fittings can be reduced to 95 cm. Accordingly, the installation of a mortise lock is carried out in the same place.
Lock mortise
Installation of the locking mechanism in the door is carried out as follows:
- The front of the lock is applied to the end of the door leaf in the place where it will be inserted.
- The locking device is fixed using self-tapping screws to ensure its immobility.
- The front plate of the lock is outlined with the blade of a construction knife.
- The mechanism unscrews from the canvas.
- The cut top layer of door material is removed.
- The locking mechanism is applied with its side to the end of the canvas so that its front panel does not extend beyond the recess made. After this, the place where the interior of the lock will be installed is marked.
- The marked part of the door is drilled out using a drill or screwdriver and a drill with a diameter of 4-5 mm.
- Using a chisel, the material of the canvas is selected in accordance with the dimensions of the inside of the castle.
At the next stage, the location for installing the handle is marked. This operation is performed by applying the locking mechanism to the side of the canvas. In this case, you need to ensure that the plane of the front strip is flush with the end of the door. Then the location of the handle is marked with a pencil. Then the operation is repeated, but on the other side of the canvas.
The through hole for the handle shaft is made with a drill with a diameter of 10 mm. It is recommended to use a wood pen. Drilling cannot be done all the way through, as a large piece of material can be torn out from the back side. The process is carried out only until the empty space in the canvas, which has been prepared for the inside of the castle. It is recommended to insert a piece of plywood into the opening for the locking device. This will prevent the hole from breaking when the drill comes out.
Latch Installation
This job is easier than mortising a lock. First you need to make a hole with a diameter of 24 mm at the end of the blade, the depth of which corresponds to the length of the latch. To do this, it is recommended to use a wood pen. Then the latch is inserted into the hole, and its face plate is outlined with the blade of a construction knife. Then the mechanism is removed and the cut material is removed using a chisel. Finally, drill a hole for the handle in the same way as for the lock.
What you need
Installation of a door frame always begins with the master preparing his tools and materials. For quality work you need to get:
- electric drill. In addition to this power tool, you will also need a set of wood and stone drills.
- marker and tape measure. For taking measurements and markings.
- hacksaw and miter box. For cutting planks. Doors require final finishing with platbands and extensions.
- plumb line and building level. The door must be placed straight.
- cutter It is convenient to make samples with it. But it can be replaced with a hammer and chisel.
Regarding materials:
- wooden wedges of varying degrees of thickness;
- construction foam;
- self-tapping screws
It is very important to immediately decide in advance exactly how to install the door so that the fasteners are not noticeable. If hidden installation was chosen, then hangers will also be required. The boat can be attached with anchors. Hide the hats in the recesses, and then cover them with putty and paint.
How to assemble a box
Before cutting the box beam, the height and width of the doorway are correctly measured. It is recommended to measure each indicator in three places, for example, the height of the opening is measured at the highest, lowest and middle points.
The lowest indicator will be considered the main one, which allows you to install a door block that will easily fit into the opening. In addition, the thickness of the box (usually 2.5-3 cm) and the width of the canvas are subtracted from each main indicator. The gap on the interior doors is at least 4 cm, into which the polyurethane foam will be forced. How to do all the work yourself is clearly shown in the video, which you can see just below in the article.
After all the dimensions have been calculated, you can begin cutting the box strip. The plank is cut in two ways: at an angle of 45 or 90 degrees. The first method requires skill and a miter saw. Anyone can cut the box at a 90 degree angle using a hacksaw.
The stages of assembling the box begin with laying the prepared timber on the floor in the letter P and fixing it with threaded hardware using a screwdriver. This frame shape is suitable for installing an interior door without a threshold. If a threshold is needed, then another horizontal strip of the same size as the top one is cut. To reduce the likelihood of cracking of the timber, it is recommended to first drill a through hole in it with a drill, into which the hardware is then screwed.
The assembled box is inserted into the opening, the presence of gaps for the foam is checked, and then it is wedged and leveled using plumb lines. Ignoring this procedure leads to distortion and improper operation of the door, for example, opening occurs with difficulty, it is impossible to close the door tightly, etc.
If the box fixed with wedges or bars in the opening is level, that is, the vertical slats are strictly parallel to each other, and the horizontal slats are strictly parallel to the floor level, you can begin hanging the canvas and foaming.
For greater stability and reliability of a heavy door block, the frame is fixed to the walls using anchors or long self-tapping screws with dowels. Drilling a through hole with a drill of a slightly larger diameter than the hardware allows you to eliminate the possibility of cracking of the box beam. It is mandatory to drill holes for dowels in a concrete or brick wall.
For better adhesion of the foam and the end of the door, the opening is thoroughly cleaned of small debris and dust, and then lightly moistened with water from a spray bottle. The foam can be any type, since the work is carried out in a warm room. Both professional mounting foam, which works complete with a gun, and household foam, the container of which is equipped with a special thin tube, are suitable. The only difference is the amount of foam: usually in professional cylinders the volume of material is larger. On average, one door with a gap for foam uses up to 50 liters of the substance.
How to install interior doors yourself, see the video below.
Please note that the installation of door blocks for rooms is carried out on finished walls and floors; floor skirting boards are installed after the doors are installed. It is allowed to install doors in rooms with finely finished walls and unfinished floors with a mandatory gap at the bottom of the opening for the floor covering
Installing hinges
On the side beam where the door hinges will be installed, we take measurements 20 cm from the top and 180 cm. The hinges will be attached in this place. Moreover, the upper loop will be located below the first mark, and the lower one above. In other words, the hinges from the ends of the door will be at a distance of 20 cm.
To install hinges, you don’t have to prepare recesses to the thickness of the hinge, but you can prepare them. This is not difficult to do with a carpenter's knife.
We will mark the places for screwing in for the hinge screws and use a drill with a drill of a smaller diameter than the screws from the hinge set to prepare the holes.
This must be done because... The head of the screws is made of soft metal and when screwed in, a slot for a screwdriver is cut off. If the screw is difficult to screw in, it must be unscrewed and lubricated with grease, lithol or grease.
Preparing holes for screws
After screwing the hinges onto the frame beam, you can prepare holes for the screws for the hinges on the door. To do this, a beam with hinges must be placed on stools with books or boxes the width of the door leaf.
We place the door next to the hinges, moving it 5 mm from the place where the top crossbar will be screwed.
We mark the holes and use a drill to drill holes for the screws.
If you have an assistant, then you don’t have to prepare places for the screws for the hinges on the door at this stage of the work.
Final assembly of the door frame
That's it, now we connect the top beam of the frame with the side beams with self-tapping screws, put the door in the frame and accurately measure the width of the box along the top beam with a tape measure.
Additional temporary jumper in the box
We remove the door to the side, turn the box over to the other side and fasten it with any board, profile, beam with self-tapping screws so that between the sides of the box there is a distance approximately equal to the width of the upper beam.
It is impossible to do this exactly, and it is not necessary. When installing in a doorway, adjustment of the width is done using self-tapping screws.
We saw off the side beams a little longer than 2 meters, i.e. doors, because You must leave a small gap under the door to allow the door to open freely. 1.5 - 2 cm is enough if there is already a floor covering, or we can also add the height of the future floor covering.
All. The door frame with hinges is ready for installation in the doorway.
We proceed to INSTALLING THE DOOR FRAME in the doorway.
Click here to return to the list of work on installing the “Classic” door.
Manufacturing
Wood
If you need to replace a worn wooden threshold, you first need to dismantle the old one using ordinary tools - a hammer and a nail puller (if it was nailed) or a screwdriver (for cutters).
Dismantling
It will serve as a template for you to make or purchase.
Then you have to do the following:
Thoroughly clean the installation site from dust and dirt. If the concrete base is destroyed during dismantling, remove all loose screed elements and level with mortar, having previously primed the surface. The threshold can be installed only after the solution has completely dried. At the bottom of the side pillars of the door frame, make grooves to a height determined by you, measure the required length and cut the wooden blank along it
Insert it into place by carefully tapping it through the wooden spacer with a hammer. Installation
Installation
If you don’t know how to secure it, then drill it through with a thin drill in 2-3 places so that marks remain on the base. Remove, make holes in the concrete according to the marks and drive dowels into them. Reinstall the threshold in place and screw it with self-tapping screws, recessing the caps into the body of the tree
Fill the resulting holes with putty.
Made from concrete
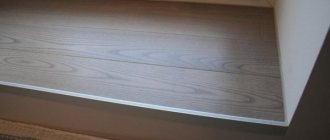
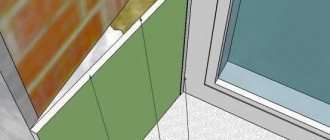
Often after installing new doors, no matter what - entrance, balcony (see Options for balcony doors: how to make the right choice) or doors to bathrooms - you see this picture. After installing the door
After installing the door
Naturally, the question arises: how to make it with your own hands so that they look good on both sides? The optimal solution would be to install a concrete threshold and then finish it.
In this case, you can repeat the configuration of the existing ledge, or you can make the threshold wider and more comfortable so that you can step on it with your entire foot when entering and exiting.
So:
- Cut off the polyurethane foam and clean the area to be filled, prime it and screw iron bolts into the floor to the height of the future threshold. They will act as reinforcement.
- Make formwork from boards or any durable sheet material according to size and height.
Place it in place and secure it firmly with spacers. Installation of formwork - In the picture above, the threshold was immediately decided to be tiled, so before pouring the concrete, it was cut and adjusted to size in order to lay it on a damp base, and not glue it later.
- If you decide to use other finishing materials, then lay plastic film over the wooden formwork so that concrete does not stick to it and the edges are smooth. And then pour the prepared solution into it, filling all the corners and controlling the level.
- Let the solution dry overnight, then carefully remove the formwork. Over the next few days, wet the concrete with water to prevent cracks from forming.
- When the threshold reaches good strength, finish it with any desired material - tiles, laminate, linoleum, etc.
Concrete, finished with porcelain stoneware and painted in the color of the walls
Types and device
Thresholds are of the following types:
- Entrance
– installed at the entrance to the house (apartment, building); - Interior
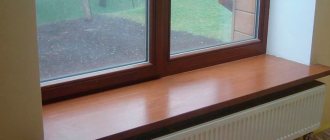
– mounted in the opening in the bathroom or shower room. Many people do not understand why a threshold is needed inside the apartment at the entrance to the bathroom. It's very simple: if a water breakthrough occurs in a given room, it will become a boundary that will not allow flow into the rest of the apartment. Some install this limiter in order to isolate the entire apartment from excess moisture coming from the bathroom. In addition, no one forbids installing a threshold in the hallway or near the doorway in the kitchen; - On the balcony
- this is a necessary element, as it retains heat in the apartment and prevents dust from getting inside. In this case, the threshold from the outside should be, first of all, functional, and from the inside – beautiful and matching in design with the overall design of the room.
Among the types of this design, there are models with an interesting and unusual name - guillotines. They are attached to the end of the door. When the door closes, they move down and completely tear off the gap between the floor and the door.
Some doors are already sold complete with a threshold. Which is very convenient, since you don’t need to waste time searching for the required copy. If such an element is not available at the door in finished form, it can be purchased separately and installed independently.
The range of construction stores is quite diverse. Finding the right product is not difficult. On sale you can see thresholds made from inexpensive materials as well as quite expensive ones. Thresholds are made from the following materials:
Wood is an inexpensive option. There are both interior and entrance wooden thresholds. Its quality depends on the type of wood. Oak, pine, and hornbeam are considered the strongest and most wear-resistant. A special feature of wooden models is the need for careful care and annual painting. Plus - wood is easier to install.
Metal is a durable material. Thresholds made from it come in a variety of shapes and types. They are particularly durable. Products made of steel and brass have the same feature. An aluminum threshold is used to secure the floor covering.
Plastic is a rather fragile material. Plastic thresholds are subject to deformation when exposed to the sun for a long time. This type of product is best used in conjunction with a plastic door.
Stone and concrete are used mainly for installation at the entrance from the street and onto the balcony. It is not recommended to install such products inside a room due to the weight of the structure itself and its volume. This type of threshold can be easily finished with laminate and other decorative elements.
Cork - it is used when it is necessary to hide the difference between the floor levels in different rooms. This material is very flexible and ductile compared to other options presented.