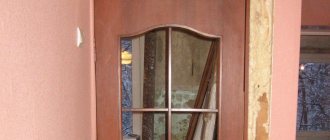
Installing a door leaf is a matter that requires accuracy, precision, and adherence to phasing of actions. However, without a lock, the door will not fully function. It will also be impossible to open it without a handle. That is why inserting a new lock into a wooden door will protect owners from unauthorized entry, make the interior more interesting and keep the interior warm during the cold season. Choosing the most suitable locking mechanism and its correct installation is the key to home security. But it is not always necessary to invite a specialist for this work; to save money and time, you can install the structure yourself.
A selection of locks for wooden doors
Buying a lock is an important step in ensuring the security of your home, but before you make a choice, you need to answer a few questions about it.
- Does the degree of protection against unauthorized entry into the premises matter?
- What shape should it have: mortise or overhead?
- What should the design look like: dimensions, colors, shape?
- How will it function from the inside?
The answers to the questions listed will help determine the lock model, since they differ in cost and function. It should also be taken into account that wood is a relatively soft material, it lends itself well to processing, but for inserting a locking mechanism, it is better if the master responsible for installation has experience working with wooden panels. It is necessary to take into account the wood species from which the door is made, its properties and performance characteristics.
There are several types of design:
- rack lock - the simplest model, has a primitive appearance, often breaks;
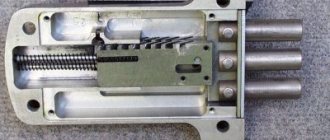
- cylinder - a structure consisting of several cylinders located at different levels. If these elements are not in place, it is impossible to open the lock. It has a long shelf life and easy replacement of components. Attackers usually drill out the body or knock out the core. But in good models, manufacturers add special alloys that are resistant to drilling, or special plates that block direct access to the cylinder;
- lever - a reliable lock that is almost impossible to break;
- coded – to open you must enter a certain code. Such structures are not mounted into a wooden door leaf. More suitable for iron entrance doors;
- electronic – differs in that the door can only be opened from the inside. In order to unlock from the outside, a signal must be given from the premises. Such locks are also rarely used on interior doors; these models can be found in factories or hospitals where access to unauthorized persons is prohibited.
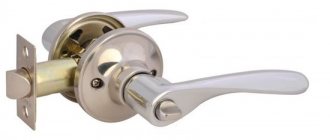
When purchasing a locking mechanism, it is important to consider the orientation of the door leaf - left or right. As a rule, the technical data sheet of the product indicates on which side it is designed for installation. Although there are also universal locks on sale that are suitable for both left-hand and right-hand positions.
Once the lock has been selected and purchased, you should prepare the necessary tools for the work of installing it in a wooden door. It is recommended to do this in advance so as not to interrupt your work later to find a hammer or drill of the required diameter.
What tools are needed
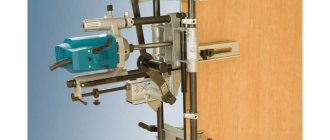
Installing a lock on a wooden door involves making a groove for the structure. Only after this can you begin installation. The following tapping tools are required:
- two screwdrivers - flat and Phillips;
- hammer;
- file (round);
- pencil or chalk, tape measure and ruler;
- electric drill;
- wood drill bits (10 mm);
- chisel for further processing of wood.
The tools listed above are necessary for installing a mortise structure.
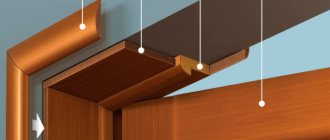
Making a groove for a lock
When inserting a lock, it is important to follow the correct sequence of actions. If the accepted algorithm is violated, the correct operation of the entire locking structure is not guaranteed.
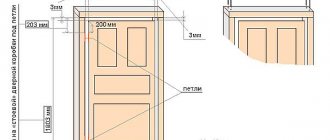
Initially, you should take measurements and mark the holes for cutting the groove. As a rule, the instructions included with the lock contain information about the height at which the handle should be located. This distance varies up to 100 cm, however, many workers determine it depending on the height of the people living in the house. In accordance with this, the taller a person is, the higher the castle is.
The process of making a groove is carried out in this order.
- For example, take a height of 95 cm, which is measured from the floor covering upwards.
- Next, you need to take the lock and place it with the side that is attached to the door leaf at the height of the mark. Using a simple pencil, trace the outline of the castle. The thickness of the case is noted here.
- Then you need to take a feather drill, the diameter of which coincides with the thickness of the lock, and cut holes along the marked lines. This can be done in two ways - immediately drill the required groove or, carefully moving the drill inside the blade, 20 mm to the mark. It is recommended to limit the distance on the drill with wire corresponding to the depth of the cutout. It is better to try to make the holes as tight as possible - as far as the drill allows. During the drilling process, you should try to keep the drill perpendicular to the surface being processed.
- The resulting hole should be 2 mm wider than the mechanism, since in this case the structure can be mounted without resorting to physical force.
- At this stage of work, a recess with uneven edges should form in the door leaf. Next, take a chisel and a hammer, and carefully align the edges of the hole. The excess tree is simply cut down until the outline of the recess takes the shape of a regular rectangle of the required dimensions. The chisel must be handled carefully, because if you are inexperienced, if it slips, you can seriously injure yourself.
- After this work, the lock is inserted into the groove.
- Then the lock bar is applied, and the holes in which it will be mounted are outlined with a pencil.
- By marking with a hammer and chisel, a notch is made. Its depth depends on the thickness of the bar and is equal to it.
After this, you need to carefully try on everything. If errors are found, they must be removed with a sharp knife. Otherwise, you will not be able to install a lock on a wooden door yourself.
If the hole is drilled with an electric drill, it should also be perpendicular. Otherwise, the groove will be uneven.
How to disassemble the door handle of a round type interior door
The method of dismantling round door handles for interior doors may differ depending on the design features of the fittings. The most convenient are products that have two tightening screws. In this case, it is easiest to dismantle it yourself. To do this, you need to unscrew the fixing elements and remove the mechanism.
However, there are situations that require great effort. Mechanisms that are more complex from a constructive point of view are dismantled in several stages. On modern interior doors, round parts equipped with a button and various decorative elements are quite often found. The function of such covers is to hide the mounting screws. How to remove the handle from the interior door in this case?
To remove the round handle, you must first remove the outer part of the device
In order to dismantle the handle with the button and decorative overlays, it is first necessary to remove the outer part of the mechanism, which is attached using a special button. Next, you need to eliminate the linings that hide the retaining elements.
Note! It is important to know that the buttons that help secure the outer part of the mechanism can also have a different design.
If the handle is damaged, it can be repaired. How to repair an interior door handle? First of all, you need to find out the nature of the damage. Based on this information, the necessary instructions are selected and the mechanism is rehabilitated. It is recommended that before dismantling the old handle, you determine its type and study the design features. To eliminate the round handle mechanism, experts advise reading the more detailed instructions.
Installing a lock and handle
You can install a lock and handle on a wooden door only after the groove is ready. Next, a ruler is taken, the locking structure is applied to the hole, and the location for the future well is marked.
Then you need to take a drill and make holes for the handle and cylinder. To work, you need to take a drill of the required diameter. This is an important condition for the structure to stand level and not dangle.
The hole made for the larva is adjusted to the required size using a chisel. After this, the edges are smoothed using a round file.
Installation of a locking mechanism without a router
To install the locking mechanism without this type of tool, you will need a measuring ruler and a pencil, as well as chisels of various widths and round files. The main working tool is an electric door and a set of 10-14 mm drills. Detailed instructions will help you take further actions:
- Mark the desired location of the handle on the canvas, 70-100 cm away from the floor. Place the locking mechanism sideways on the face of the canvas. Holes deep into the door, made with a drill, are made at a slight angle.
- Use a chisel to level the surface of the nest. Place the lock on the face of the door, mark the core, make two holes and line them up with a file. Carry out these actions on the opposite side of the canvas.
- The structure is inserted into the groove, and the rod for the handles is threaded through. The lock tongue must be exposed. Marks for it are placed on the door frame, along which a groove will be made for the mating part of the lock. The bar is attached when the locking mechanism is ready.
Adjusting and assembling the lock
At the final stage of work, it is necessary to make holes for the latch of the interior door, as well as to establish the functioning of the structure. All this is done in the following order.
- You need to insert the box and screw it with self-tapping screws. Insert the cylinder inside and secure with the bolt that comes with the kit. On the other side of the door leaf, a handle is installed. Then you need to check whether the design works well or not. To do this, you need to insert the key into the keyhole and try to turn it several times in both directions. The movement should be free, easy, without jamming or jamming. If everything is fine, the bar needs to be fixed.
- The end of the tongue of the structure is smeared with gouache paint or chalk in order to determine the location of the latch.
- Next, you need to close the door and turn the key several times. There should be a trace of paint on the slope of the canvas.
- In place of the mark, holes of the required depth are made with a chisel and hammer.
- Then you need to attach the second strip, trace it with a simple pencil and cut out a notch. The strip should be inserted into the jamb at the same level as the canvas.
- Finally, it is necessary to carefully fix the strip with bolts on the slope.
Thus, inserting a lock into a wooden door with your own hands is not difficult if you proceed step by step, following the instructions.
Making holes
The hole is drilled with a special nozzle.
A hole is drilled in the end. An interior door can consist of solid wood or be hollow. In any case, drilling is carried out to the depth of the locking mechanism.
To drill round holes on the canvas, an attachment - a crown - is installed on the drill. By placing a drill with a nozzle at the marked point, a hole is drilled on one side of the door leaf. The drilling depth is until the drill appears on the other side of the door. After that, in order to avoid chips on the canvas, you should stop and use a crown to drill a circle on the second side of the canvas.
As a result, we have a round through hole connected to a hole that has access to the end of the door.