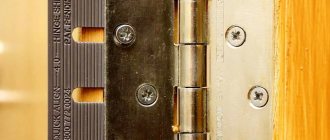
Inserting a lock into a wooden interior or entrance door is one of the most critical processes when installing this enclosing structure. The outdated technique of gouging out grooves with a chisel and hammer is a thing of the past. Today, professionals actively use special electrical appliances – milling cutters. To achieve the expected result, you need to know exactly which router to cut the lock into the door.
Mortise a lock using a hand router
Types of milling cutters
To insert locks into wooden door panels, hand-held milling cutters are used, which are fixed at the end of the structural element and the material is sampled strictly in the specified location. Milling cutters that are widely available are divided into the following basic types:
- Vertical, or submersible, is the most popular tool - the cutter is positioned strictly perpendicular to the plane being processed, the immersion depth is determined by the master by applying force to the spring mechanism on which the device is fixed.
Vertical router
- Edge, or edging - miniature cutters, as well as the high-precision movement of the device, allow you to perform filigree work on processing the edges of a wooden door leaf with an accuracy of tenths of a millimeter.
- Combined - one of the most popular devices among professionals - the design combines two types of milling cutters - vertical and edge, which allows for complex processing of the blade when inserting locks of any complexity.
- Special-purpose, dowel, lamellar - purely professional machines that are designed to perform any one technological operation.
Edge router
Residents should take into account that the purchase of milling cutters with a set of working parts does not guarantee high quality of blade processing and accuracy of inserting locks, since the master is required to comply with the technological map and have extensive experience working with the equipment.
Classification of cutters
When purchasing a router, you also need to additionally purchase cutting tools (cutters) with the required edge and design. These removable parts are divided into several categories:
- Grooved - designed for making grooves, gutters and other extended or deep recesses, they are classified into several types:
- Structural – classic cutouts allow you to make even cuts with orthogonal edges.
- Straight - perform straight cuts.
Slot cutters
- Fillet - used for making deep holes.
- Edge - ideal for cutting complex grooves for lock plates, or for forming artistic patterns on the canvas. Classification:
- Straight - allow you to process a straight edge on the canvas.
- Disc – designed for sampling and processing the rebate plane.
- Horizontal - an indispensable tool for finishing each edge before installing the lock in the resulting groove.
- Curved - a thin working body allows you to process any type of surface, regardless of its shape and dimensions.
Edge cutters
- Figurative - designed for finishing the edges or faces of a sample of the main volume of wood, suitable for any curved surface. Classification:
- Horizontal - supplied in the form of a disk, designed for finishing grooves of small depth.
- Vertical - have a small diameter and large depth, easily penetrate into the deepest grooves for finishing the edge.
- One-sided - allow you to process the plane only in the contact area.
- Double-sided - a universal tool with a cutting edge along the entire perimeter of the cutter.
Figurine cutters
Experts recommend purchasing cutters from well-known manufacturers, made of alloy steel with high-quality soldering and laser sharpening. All high-tech devices from reliable suppliers are supplied with a quality certificate indicating the warranty period for trouble-free operation.
How to choose the right tool
When purchasing a router for inserting a lock into wooden door leaves, you need to take into account a number of important nuances:
- The natural material is easy to process, which is why the master does not need a high-power machine. The average equipment performance is no more than 2.5 - 3.5 kW.
Household hand router
- To avoid complex manual reworking of the grooves after sampling the material with a milling cutter, it is necessary to purchase in advance a machine with the required stroke amplitude of the working head. Experts recommend choosing this parameter with a slight margin.
- The weight of the device should be such that the master can easily move the router with both hands.
- The standard electrical cord must be covered with elastic rubber insulation and be of sufficient length for comfortable use.
- The functionality and number of modes of the router must fully satisfy the operational requirements for it.
Operating modes of power tools
- The power tool must be equipped with a removable working head to allow quick replacement of cutters with different diameters and characteristics.
- The device must provide a complete, unobstructed view of the plane being processed.
One of the most important parameters for choosing a reliable car is the popularity of the brand, the year the company was founded, as well as the presence of positive reviews about the brand’s products on the Internet.
Briefly about the main thing
To cut a lock with a router or hang hinges on a door, you need to choose the right tool. It is best to use a simple submersible model, since the combined model is heavy. This will create certain inconveniences, especially if there is no experience in such wood processing.
Using a router to cut in fittings is easy. But the process is greatly simplified if there are special templates. Having placed the device in the desired place, all that remains is to set the required processing depth on the tool and install it on top.
When working, you need to carefully monitor the process in order to notice overload in time. It can occur if the wood structure is too hard. Then you just need to reduce the speed of the tool using a special switch on the body.
What auxiliary tools are needed to select grooves for locks?
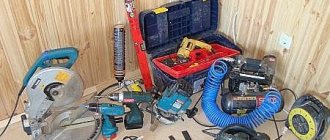
In addition to the router, the home craftsman will need a number of additional hand tools:
- To mark the door leaf:
- Laser or standard tape measure with steel blade.
- High precision carpentry corner.
- Construction metal ruler with a blade length of 1000 mm.
- A simple pencil or marker.
Markup Tools
- To fix the door leaf:
- Place a soft layer on the workbench or floor to prevent damage to the end of the door leaf during operation.
- A slipway for fixing the product in the desired position.
- Clamps for clamping the door leaf after installation on the slipway.
Clamps for fixing the canvas
- To select material for installing a lock:
- 2 or 3 replaceable heads with collets for the router.
- A set of cutters of all categories described above.
- To refine the sample after cutting with a router:
Set of cutters
- A chisel with a narrow cutting edge.
- A hammer with a hammer weight of up to 300 - 500 g.
- A file with a coarse abrasive.
- Sandpaper for finishing grooves.
- To fix the lock in the body of the canvas:
- Set of self-tapping screws.
- Drill with a thin drill bit for marking holes for self-tapping screws.
- Screwdriver with variable rotation speed and a set of bits.
- A hand-held slotted or Phillips screwdriver for tightening self-tapping screws.
Screwdriver with a set of bits
All tools must be of high quality, well sharpened, free of dirt and oil stains, and ready for work.
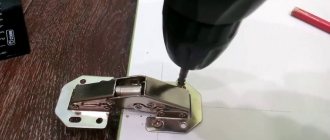
Furniture hinge insertion
To select a large-diameter blind hole with a hand router, you need to make a template yourself. It has a stop bar, thanks to which the tool can be easily positioned on the furniture door. It is done very simply.
Milling for a furniture hinge Source amazon.com
A rectangle with sides 280×140 mm is cut out of plywood 4-5 mm thick. Divide the width in half and draw a line. We retreat 70 mm from the corners along one of the sides along the length and also connect these points with a line. At the intersection we drill a hole with a diameter of 51 mm.
We select a wooden plank for support. Its length is 140 mm, and its cross-section is 5×30 mm. We place the stop at the very edge of the hole, stepping back from the edge of the rectangle by 15 mm. We attach the plank with glue and small nails. The template is ready.
The depth is set on the router to 11.5 mm. The template is applied to the furniture board, and the strip rests against its end. And in several passes the groove is selected. In this way, a blind hole is made for a standard furniture hinge with a 35 mm cup.
How to properly set up a router
Before you start working with the router, you need to prepare it for work by performing the following steps:
- The router is mounted on a frame, which is fixed to the plane of the door leaf using clamping clamps.
- The main pin, which is responsible for moving the device in the frame, is loosened manually.
Setting up the router
- The required cutter is inserted into the working head of the milling cutter, which is clamped on the collet.
- The cutter with the working head is carefully lowered to the required depth, depending on the type of plane being processed.
- On the scale responsible for the position of the cutter and the depth of the excavation, the position “0” is set.
- The bed clamping screw is firmly fixed together with the router in the selected position.
Router bed position
One of the most important preparatory stages for work is choosing the number of revolutions of rotation of the cutter. This parameter is determined individually, depending on the type of wood. For pine, 2 - 3 thousand revolutions per minute may be sufficient, and for oak or teak, the rotation speed must be doubled.
Templates
One-time work can be accurately completed without special complex templates, using only a parallel stop, which limits the displacement of the cutter beyond the markings to one side.
But for professional work with large volumes, special templates are often used. These can be either sets of templates for different configurations of fittings, or universal ones with adjustable sizes.
Both homemade and factory-made ready-made options are used.
An example of the design of one of the factory templates:
The device makes it possible to install and move the router in the position required for sampling exactly in place.
Example of homemade templates:
It makes sense to make such a device when there is a large amount of work to be done.
Preparing the door leaf
Before starting work, after debugging the router and installing the required working element, it is necessary to prepare the door leaf for work. To do this, you will need to perform a number of steps in accordance with the following algorithm:
- The canvas must be freed from old locks, handles and hinges.
- The best solution would be to install the product to be processed on the opposite end plane.
- Before starting milling, it is recommended to secure the door with clamps or in a vice.
Fixing the door leaf
- Considering that the router has a mass of 3 kg or more, before starting work it is recommended to install the end of the door to be processed so that the router is in a horizontal position and lowers partially under the influence of its own weight.
After fixing the door, it is recommended to apply force to it to check that the position remains unchanged. If the blade becomes skewed or falls during milling, the working element can cause irreparable damage to the wood.
Rules for working with a router
To cut a lock into a wooden door with a router yourself, you must follow all the steps in the following step-by-step instructions:
- The door leaf is fixed in the desired position, in a vice or with clamps.
- The plane to be processed should occupy a horizontal position and be located at a height of no more than 1 - 1.2 m from the floor.
Installing a router on a door leaf
- Before milling begins, the door leaf is marked using a ruler, tape measure, carpenter's corner and a simple pencil.
- To mark places for installing radius pads, it is recommended to use these steel parts as templates.
- The router is fixed above the plane being processed using its own clamps.
- The power tool is set to the required groove depth.
- The device is connected to the network, after which the master performs a sample in strict accordance with the pre-applied markings.
Marking the door before processing
- Upon completion of the work, the router is dismantled, and the master fits the lock into the resulting groove.
- If the dimensions do not match, the edge is refined with small cutters or a well-sharpened chisel with a narrow blade.
- A lock is fixed into the prepared hole, which is subsequently secured with self-tapping screws.
After inserting and installing the lock, you must immediately hang the door on the hinges, and then check the softness of movement and locking of the door panel; if any inconsistencies are detected, it is recommended to correct the position of the lock by additionally modifying the cut in the door with a router.
Possible errors when working with a router and ways to correct them
When inserting a lock into a wooden door using a router, a home craftsman may encounter a number of difficulties that will lead to negative consequences:
- When checking the functionality of the lock, the holes on the counter plate in the area where the door frame is located do not match - before selecting a groove in the frame, it is recommended to hang the door with the lock already installed and make the markings after the fact.
Cutting the counter plate
- When installing the lock in a pre-prepared groove, a slope is observed relative to the vertical axis - when installing the router on clamps, it is necessary to check that the orthogonal position of the working body is observed in relation to the plane being processed.
- When installing the lock, its free movement and play are observed - if the groove is larger than the dimensions of the bolt of the locking mechanism, it is necessary to install expansion linings of wood or plastic into the body of the sample.
Misalignment of the lock installed in the groove
- When you try to install the lock bolt, the difficulty of inserting it becomes apparent - under no circumstances should you hammer the lock with a hammer, since additional pushing forces can cause cracks to form in the wood. For normal installation, it is recommended to widen the hole with a hand chisel.
- If the cutter does not meet the required depth of the future cutting, it is necessary to prepare the necessary cutting element in advance, or carry out the work in 2 stages, with sequential adjustment of the settings of the manual router.
A finished door with a built-in locking device.
If you follow all the recommendations listed above, a door with a lock embedded in it will serve no less than the period stated by the manufacturer. Before starting milling, the home craftsman is recommended to familiarize himself with master classes from professionals and perform all work in strict accordance with the technological map
Assembly and adjustment
All that remains is to finally assemble the lock, adjust its operation if necessary, and finally secure all the fasteners. It’s worth noting right away that you don’t need to be too zealous with fasteners, especially in those locks where parts of the device are fastened together from different sides of the blade. Tightening the screws too hard can deform the housing, and the locking mechanism will be difficult to work, even jamming.
Since the latch is already in the right place, it is necessary to insert the handles. The first step is to install the handle with mounting screws, which must be unscrewed before installation. After this, the handle is inserted with its square axis into the hole in the lock and into its own hole in the blade until it stops.
The other handle in modern models is often fixed on a cylindrical body and has a removable decorative strip. First, the handle and decorative strip must be removed from the body by recessing the latches, and only then the body is installed in the corresponding hole in the canvas towards the square control axis from the opposite handle, and is pushed onto this axis until it stops. Then the mounting screws are inserted into the holes, and with them the two sides of the handles are fastened to each other.
Now all that remains is to return the decorative strip and handle to the body, recessing the latches on the body. They are threaded onto the body until the latches come out of the recess into the fastening grooves of these elements.
The installation of the locking device is complete, and you need to adjust the free play of the lock mechanism and its smooth operation. This can be checked by turning the knob. It should move easily and without gaps, and after being released it should immediately return to its place. In case of heavy movement or jamming, it is necessary to loosen the fastening screws a little. On the contrary, if there are extraneous sounds and play in the mechanism, then the fastening screws need to be tightened deeper.