You can install windows in a thermoprofile sandwich panel yourself if you have confidence and knowledge in the construction business. Unprofessional hands and lack of skills can nullify all efforts to create a comfortable environment.
At the same time, the installation and installation of window units in a house built from sandwich panels is simple compared to brick or concrete structures. Insulation of window slopes in a low-rise building with ready-made insulating materials can be done by anyone who has ever held a construction tool in their hands.
Select the node of interest from the quick menu:
1.1. Base design
1.2. Base design
1.3. Base design
1.4. Base design
2.1. Joint of panels, horizontal installation (on a metal stand and on a reinforced concrete column)
2.2. Joint of panels (on a reinforced concrete column through a half-timbered structure and with vertical installation)
2.3. Joint of panels (different thicknesses)
2.4. Panel joint (expansion joint)
3.1. Corner joint of panels (outer corner, horizontal installation)
3.2. Corner joint of panels (outer corner, vertical installation)
3.3. Corner joint of panels (outer corner, vertical installation)
3.4. Corner joint of panels (internal corner)
4. Panel frame
5.1. Window/door frame (upper section)
5.2. Window frame (lower section)
5.3. Window/door frame (side section)
6.1. Framing the gate opening (sectional doors)
6.2. Framing the gate opening (sectional doors)
6.3. Framing the gate opening (swing gates)
Assemblies of roofing sandwich panels.
7.1. Parapet (adjacent to wall sandwich panels)
7.2. Parapet (ridge connection of roofing sandwich panels to wall sandwich panels)
7.3. Parapet (end longitudinal connection of roofing sandwich panels to an existing wall)
7.4. Parapet (ridge connection of roofing sandwich panels to an existing wall)
8.1. Roof eaves, gutter.
8.2. Eaves roof overhang.
8.3. Joint of panels along the length (extension of panels).
9.1. Roof overhang (ridge of a pitched roof).
9.2. Roof overhang (ridge of a pitched roof).
9.3. End overhang of a roofing sandwich panel (wind strip).
9.4. The end overhang of a roofing sandwich panel (wind strip) with the overhang of the roofing panel.
9.5. End overhang of a roofing sandwich panel, expansion joint.
10. Roof ridge.
I hereby, acting freely, of my own free will and in my own interests, express my consent to the processing by the Limited Liability Company "TD SteelPanel" (website https://steelpan.ru/, INN 7722358616, OGRN 1167746283660, location: 111020, Moscow , Yuryevsky lane, house 11, office 45) my personal data: last name, first name, patronymic, place of residence (city, region), telephone numbers, email addresses (e-mail), other data received from me, including including electronic copies of documents.
TD SteelPanel LLC observes appropriate measures to protect confidential information received from persons who sent personal data on the website https://steelpan.ru/, regardless of the existence of a contractual relationship, does not send and does not intend to send advertising materials to such persons.
I am also informed that in addition to the usual precautions taken to protect confidential information, TD SteelPanel LLC, at the request of the applicant, is ready to take enhanced measures to protect confidential information.
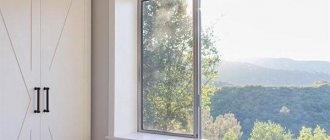
Window slope options
The traditional way of finishing is, of course, plaster. If such work is carried out by a qualified specialist, then you can forget about repairing slopes for many years. An important point when choosing this method is that there is no need to install a plastic corner at the border of the slopes and the wall.
The choice of this method is justified primarily if the wall in which the window is located is also leveled with plaster. But, given that when removing slopes, the layer of plaster reaches 5-7 cm or more, it is necessary to install a reinforcing mesh. Only a master can do this kind of work efficiently.
This option did not suit me because the wall framing the window was made of plasterboard and, in addition, a table top was already installed, which served as a window sill.
Three alternatives were considered. Finishing window slopes with plasterboard, followed by painting, plasterboard slopes with plastic glued to its surface and the use of sandwich panels.
Nowadays, the option of painting plasterboard slopes is used perhaps only for budget repairs of non-residential premises. Plastic glued to a plasterboard base is a variation of the same economical option.
Temperature changes, as well as high humidity, quickly destroy drywall. Carrying out restoration repairs every 2-3 years is not our method. Therefore, we chose PVC sandwich panels.
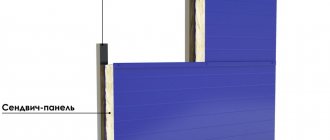
The sandwich panel is 10 mm. a sandwich consisting of two PVC sheets between which there is polystyrene foam insulation. The only inconvenience when purchasing is the need to purchase a whole sheet measuring 3000x1500 mm.
There are no difficulties in working with it - it can be easily cut with a grinder and even with an ordinary knife (if rough cutting into pieces is necessary for lifting into the apartment).
Scheme of connection to the base of the wall panel (vertical installation)
- Wall sandwich panel;
- Steel plinth transom (according to design);
- Sealing tape;
- Dowel + screw (600 mm pitch);
- Insulation (mineral wool or polyurethane foam);
- Sealing mass (mastic);
- Self-drilling screw (or rivet);
- Self-drilling screw;
- Waterproof polyurethane gasket;
- Waterproofing (according to project);
- Base;
- Sealant for external use;
- Insulation (expanded polystyrene M25F) with finishing;
- Polyurethane gasket 15 mm thick;
- Steel stand (as per project);
- Shaped element FETs-01;
- Shaped element FETs-02;
- Shaped element FETs-03;
- Shaped element FETs-04;
- Shaped element FETs-08.
Filling of openings (windows, doors, gates) in Yekaterinburg
Filling openings (windows, doors, gates)
The final stage in creating a warm contour is the installation of window, gate and door openings.
supplies the specified materials and installs them.
Window blocks, door blocks.
Before installing the window blocks, metal plates are first welded onto the support beam, in increments of 40-50cm. The window block is installed on a prepared support and attached inside along the perimeter with special plates to the window crossbars; during the installation process, the installation accuracy is checked horizontally and vertically, and the installation seams are evenly distributed. Next, the window sashes are installed, and the blind parts are glazed.
Once the frame is fixed, the gaps between the window and the wall railing are filled with foam.
Once the polyurethane foam has hardened, the tightness of the installed window is inspected and the future shaped element (window sill) is measured.
Installation of entrance groups is carried out by analogy, first the frame is attached to the provided doorway, the door frame is tightly fixed with anchors, the door is put on hinges and the necessary fittings (handles, locks) are installed.
Gates
In the field of our construction, we can distinguish two main types of gates used:
- Lifting sectional
- Swing
The appropriate option is determined by a number of factors: frequency of opening, thermal conditions, fire standards in the room and cost.
Swing gates are usually supplied with separate leaves and a gate frame. Installation begins with installing the frame in the prepared opening, after which the sashes are put on the hinges.
Sectional overhead doors are supplied completely disassembled.
Depending on the configuration, the list of supplied parts for sectional doors usually includes: sectional sandwich panel leaf with 40mm thick PIR filling, vertical and horizontal guides, auto-electric drive, door leaf balancing shaft, rollers and other related parts. Installation of sectional doors is carried out according to the manufacturer's instructions and most often consists of the following steps:
- installation of vertical and horizontal guides
- installation of rollers and sandwich panels, fastening panels together
- installation of torsion mechanism and auto-electric drive
- adjustment and final setting
As part of the construction of prefabricated buildings, our company also carries out the installation of window, door and gate openings. You can always contact us to calculate the cost of manufacturing and installing these structures.
Scheme of connection to the base of the wall panel (horizontal installation)
- Wall sandwich panel;
- Steel stand (as per project);
- Polyurethane gasket 8 mm thick;
- Polyurethane gasket 15 mm thick;
- Waterproof polyurethane gasket;
- Antiseptic wooden plank, (S – 18) mm X 30 mm;
- Steel sandwich panel support, thickness 3 mm;
- Waterproofing (according to project);
- Base;
- Basement transom (according to design);
- Base beam (according to design);
- Self-drilling screw;
- Self-drilling screw (or rivet);
- Dowel + screw (600 mm pitch);
- Sealing tape;
- Compacting mass;
- Shaped element FETs-05;
- Shaped element FETs-06;
- Shaped element FETs-07;
- Shaped element FETs-08;
- Shaped element FETs-09.
Connecting wall sandwich panels at the outer corner
Options for the corner connection of two wall sandwich panels with a thickness of up to 150 mm and with a thickness of the panels being connected more than 150 mm are considered. S – thickness of the wall sandwich panel in the drawing.
- Wall sandwich panel;
- Column (shown conditionally);
- Sealing tape;
- Shaped element FEU-01;
- Insulation (mineral wool or polyurethane foam);
- Silicone sealant;
- Self-drilling screw (or rivet);
- Self-drilling screw;
- Sealing mass (mastic).
Connecting wall sandwich panels at the inner corner
S – thickness of the wall sandwich panel in the drawing.
- Wall sandwich panel;
- Wall transom (shown conditionally);
- Sealing tape;
- Shaped element FEU-03;
- Insulation (mineral wool or polyurethane foam);
- Sealing mass (mastic);
- Self-drilling screw (or rivet);
- Self-drilling screw;
- Sealant for external use;
- Shaped element FEU-04.
Preparing the base
Sandwich panels are not an independent load-bearing material. Therefore, they must be mounted on a pre-assembled frame. Before starting work, you must make sure that the distances between the vertical posts and horizontal crossbars correspond to the dimensions of the panels used.
The width of the spans should provide the possibility of fastening the panels at a distance of at least 5 cm from the edges and provide places for their joints.
The surface of the base must be cleaned of dust and dirt and treated with anti-corrosion or antiseptic compounds.
Sandwich panels can be installed on the following types of substrates:
- Metal carcass . The panels are fastened using special self-drilling screws. To do this, holes of a slightly smaller diameter are made in the supporting elements, into which a screw is then screwed.
Framing a window block during the installation of buildings and structures made of sandwich panels
S – thickness of the wall sandwich panel in the drawing.
- Wall sandwich panel;
- Window block fastening element (according to the project);
- Sealant for external use;
- Self-drilling screw (or rivet);
- Self-drilling screw;
- Insulation (mineral wool or polyurethane foam);
- Shaped element FEO-01;
- Shaped element FEO-02;
- Shaped element FEO-03;
- Shaped element FEO-04;
- Shaped element FEO-05;
- Sealing mass (mastic);
- Wall transom (according to the project);
- Shaped element FEO-06;
- Shaped element FEO-07 (place under the metal cladding of the sandwich panel).
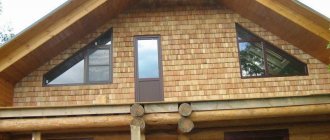
Thermoprofile or sip panels
They are also called by the English word “sandwich”. The panels are a multi-layer “pie”, the inside of which contains foam insulation, and on the outside there is plastic for rigidity inside and protection from external influences outside. Foam materials play the role of a heat insulator:
- polystyrene;
- polyisocyanurate;
- polyurethane;
- mineral wool;
- fiberglass.
The use of PVC as a covering material significantly reduces the price of thermal panels, but analogs are not suitable for installation on window slopes. The material ages quickly and ceases to perform protective functions.
Framing gates during the installation of buildings and structures made of sandwich panels
S is the thickness of the wall sandwich panel in the drawing, A is the outer size of the square steel pipe.
- Wall sandwich panel;
- Shaped element FEV-01;
- Shaped element FEV-02;
- Shaped element FEV-03;
- Self-drilling screw;
- Sealant for external use;
- Self-drilling screw (or rivet);
- Steel crossbar (steel pipe in the first option or hot-rolled channel in the second);
- Steel stand (steel pipe in the first option or hot-rolled channel in the second);
- Sealing tape;
- Gate leaf;
- Insulation (mineral wool board in polyethylene film or polystyrene foam M25);
- Gate leaf fastening element (according to design);
- Sealing mass (mastic);
- Shaped element FEV-04;
- Shaped element FEV-05;
- Shaped element FEV-06;
- Shaped element FEV-07;
- Shaped element FEV-08.
Features of the material
It is important to purchase high-quality material, as otherwise, when exposed to direct sunlight, the panels may lose their shape and turn yellow..
When working with this material, care should be taken when performing mechanical impacts on it, for example, cutting. The material is quite fragile and the sheet can be damaged if the effort is not calculated.
Working with sandwich panels should be carried out with care to avoid damage to the material
If there is not enough space between the window hinge and the wall, it will not be possible to install this material. It is important to consider that the window opening when using this material will decrease on both sides by the thickness of the panels.
Transporting products can be difficult since the sheets are large. However, in some stores they are cut into smaller pieces.
Installation of wall temperature/expansion joint
Expansion joints in wall structures are installed at the joints of panels when installed vertically, and along the length of the panels when installed horizontally. The heating temperature of the walls is determined by calculation (taking into account technological heat releases) according to the standards of building heating engineering and building climatology.
Expansion-shrinkage joints in wall structures are installed in buildings more than 40 m long at a distance of 20 m from each other, as well as in places where the heights of buildings differ or where they adjoin existing buildings.
- Wall sandwich panel;
- Wall transom (shown conditionally);
- Sealing tape;
- Shaped element FES-04;
- Insulation (mineral wool or polyurethane foam);
- Self-drilling screw (or rivet);
- Sealant for external use.
Installation technology
The process of installing slopes consists of several stages:
Main stages of installation
It should be noted that finishing the slopes of plastic windows with sandwich panels and wooden ones is done in the same way. Next I will tell you in detail. how work is carried out at each of these stages.
An example of leveling a window opening with wooden slats
Surface preparation
Before. How to install sandwich panels on windows, you must prepare the surface. This is done as follows:
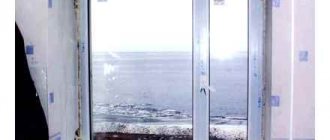
- First of all, level the window opening. To do this, remove old pieces of plaster and other irregularities. In some cases, to level the opening, wooden slats are installed around the perimeter using self-tapping screws or even dowel nails. When installing the slats, be sure to use a building level to ensure that the window opening is level ;
- you also need to trim the mounting foam between the double-glazed window and the window opening, which may interfere with further work;
- then the opening must be cleaned of dust. To do this, vacuum the surface or wipe with a damp cloth.
Now that the opening is prepared, you can proceed directly to installation.
Installation of the starting profile
Installing window slopes from sandwich panels involves installing a U-shaped profile around the perimeter of the window. This work is carried out in the following sequence:
- First of all, measure the window frame around the perimeter;
- then cut the profile into strips of the required length. To do this, you can use a mounting knife or special scissors;
- Now, using a building level, mark the location of the profile on the window frame . This is necessary so that the vertical guides are positioned strictly vertically, and the horizontal guides, respectively, horizontally;
Example of mounting a starting profile
- Now attach the guides to the window frame according to the markings using self-tapping screws. The latter should be located in increments of about 20 centimeters.
This completes the installation process of the guides.
Cutting
Cutting is a very important stage, so the work must be done carefully and carefully . The instructions look like this:
- First of all, measure the outer sides of the window opening;
- after that, measure the depth of the opening on each side in several places;
- Now, according to the data obtained, you need to apply markings on the panels, taking into account the fact that their inner ends, i.e. adjacent to the glass unit must correspond to the length of the guides. To simplify this task, you can use a special angle meter (small), which will allow you to measure the angles of the opening, and then use it as a template for marking;
- Now you need to cut out the blanks according to the markings. To do this, you can use a jigsaw, a mounting knife, or even a hacksaw.
There is low-quality material on the market that quickly turns yellow in the sun and even cracks. Therefore, it is advisable to make a purchase at a large hardware store. However, keep in mind that the price per panel starts from
600 rubles per m2.
When all three blanks are ready, you can begin their installation.
Foaming the space between the workpiece and the opening
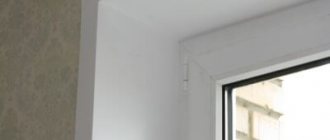
Installation of slopes
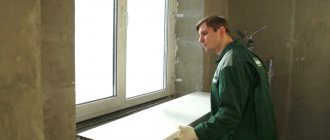
At the final stage, slopes from sandwich panels are installed on the windows. This is done as follows:
- Begin installation by installing the upper slope. To do this, insert the workpiece into the guide;
- now fill the space between the panel and the window opening with polyurethane foam, as shown in the photo above;
- Next, you need to fix the part in a horizontal position. To do this, use masking tape, which should be glued onto it in strips with a twist on the walls;
- then vertical slopes are installed according to the same scheme;
In the photo - gluing the corners
- then PVC corners should be installed around the perimeter of the window opening, which will give the slopes a finished look and hide the cracks.
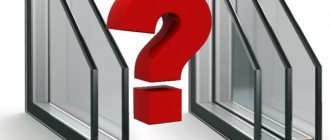
The thickness of the material varies from 6 to 32 mm. The thicker they are, the correspondingly higher their thermal insulation qualities.
It should be noted that there is another way to install slopes. It consists of using an F-shaped profile, which is attached to the walls along the perimeter of the opening . In this case, the slope is inserted between the two tails of the profile; otherwise, the work is carried out according to the scheme described above.
Joining a wall sandwich panel to an existing wall
- Wall sandwich panel;
- Wall transom (shown conditionally);
- Sealing tape;
- Shaped element FES-05;
- Insulation (mineral wool or polyurethane foam);
- Sealant for external use;
- Self-drilling screw (or rivet);
- Self-drilling screw;
- Dowel + screw (600 mm pitch);
- Shaped element FEU-04;
- Sealing mass (mastic);
- Existing wall.
Catalog of fastening units for sandwich panels
Catalog of fastening units for sandwich panels
Connection elements: 1. Sandwich wall panel 2. Column made of square pipe 3. Self-drilling screw for mounting sandwich panels 4. Self-drilling screw (or rivet) 5. Additional (shaped) element D-1 6. Sealing tape 7. Insulation ( mineral wool or polyurethane foam)
. External corner junction of panels.
Dimensions (A) and (B) are determined by the project. The dimensions shown in the drawing are recommended for sandwich panels with a thickness of 120 mm. The arrow indicates the painted surface.
D-1. External corner junction of panels.
Corner connection of sandwich panels. Internal corner (top view).
Connection elements: 1. Sandwich wall panel 2. Column made of square pipe 3. Self-drilling screw for mounting sandwich panels 4. Self-drilling screw (or rivet) 5. Additional (shaped) element D-2 6. Sealing tape 7. Insulation ( mineral wool or polyurethane foam)
D 2. Internal corner junction of panels.
Dimensions are determined by the project. The arrow indicates the painted surface.
Connecting the sandwich panel to the base. Joint connection to the base.
Connection elements: 1. Sandwich wall panel 2. Steel plinth crossbar 3. Self-drilling screw for mounting sandwich panels 4. Self-drilling screw 5. Shaped element D-3 6. Sealing tape 7. Sealant 8. Insulation (mineral wool or polyurethane foam ) 9.Foundation waterproofing 10.Foundation
Dimensions are determined by the project. The arrow indicates the painted surface.
Connection elements: 1. Sandwich wall panel 2. Steel plinth crossbar 3. Self-drilling screw for mounting sandwich panels 4. Self-drilling screw 5. Shaped element D-4 6. Sealing tape 7. Sealant 8. Insulation (mineral wool or polyurethane foam ) 9.Foundation waterproofing 10.Foundation
The meaning of flashings and their installation
When installing sandwich panels, one should not underestimate the importance of flashings, which are installed last. They reliably protect the joints of individual elements and the insulation laid between them from moisture, frost, wind and mechanical damage.
- at the junction of two elements;
- along the perimeter of window and door openings;
- on the internal and external corners of the house;
- at the ends of the parapets;
- on a skate.
When installing vertical flashings, an overlap of 10-12 cm is made. Galvanized self-tapping screws are used as fasteners. They are screwed in in increments of 30 cm. For more reliable protection of the insulation and a tight fit to the panels, a layer of silicone sealant is laid along the edges of the flashings.