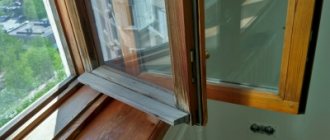
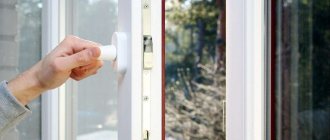
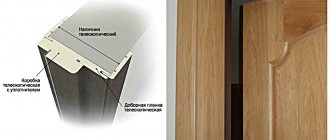
Flashings are a component of a window profile that is used to protect against blowing, create an airtight seal, and also to ensure that the structure itself acquires a finished and complete appearance. Such elements must be installed indoors and outdoors. It is also recommended that these structural components be serviced once a year, replaced and repaired as necessary to ensure they continue to perform as intended.
What are flashings for plastic windows?
Slot seals are used by installers for sealing and a beautiful visual effect. They are made from elastic or rigid plastic, wood, and steel. They are also called false strips. Simple designs are presented in different sizes, differ in installation methods and materials.
Sold in renovation supply stores and window fittings departments, shutters are decorative strips. They can be used to seal the joint between the window and the slope between the frames and the opening itself. Finishing fittings are used for interior and exterior finishing of window and balcony blocks.
Benefits of use
Despite all the obvious advantages of using flashings, it is worth mentioning them again:
- Easy to transport and store. They are made in special rolls or reels and fit into any vehicle.
- Has high resistance to external factors. Not afraid of radiation and do not deteriorate from exposure to moisture. Accessories can be installed both internally and externally.
- The material from which the strips are made does not scratch and is quite difficult to spoil. In this regard, the window opening will not lose its appearance.
- Installation does not require complex tools and requires little installation time.
- High durability and reliability.
Main functions of skirting boards
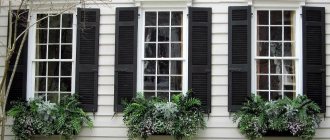
After installation work, the door strips perform two main functions. The first is decorative. The internal and external joint is visually leveled by the ebb and the window sill. The slopes are being finished. But the joining seam from the outside still remains unsightly. A significant recess is hidden behind special porches, which significantly improves the appearance of the facade of a multi-story building, commercial building, country house, etc.
The second function is protection. Of course, you can use old-fashioned finishing methods, armed with putty and plaster. The materials are used to seal gaps between the frame and the opening. But such work is quite labor-intensive and sometimes dangerous if the installation is carried out on high floors of the building. It is easier to buy and install flashings on the joining areas that protect the seams from moisture and insects.
Fixed shutter strips prevent drafts. And they often occur if during installation only polyurethane foam was used, which decomposes under the influence of direct sunlight and precipitation. Cracks and holes appear, violating the tightness of the window structure.
Useful tips
When purchasing a new window with installation from a company, ask the manager if the installation of window strips is included in this price. Companies selling plastic windows often offer this service.
If you decide to simply update an old structure, then it is advisable to measure the windows and purchase as many meters of material as you actually need.
The price for the material is quite affordable and everyone can afford to buy this useful item. The price per meter of flashing is from 30 to 60 rubles, of course, there is much cheaper material in this segment, but this will no longer be a high-quality flashing, but most likely Chinese.
Occupying an important position in sealing and thermal insulation, flashings are an excellent option for window decoration. All joints, cracks and irregularities can be removed in one fell swoop once and for all, your window will always have a beautiful finished look and high-quality sound insulation. We hope that after reading this article, you not only understand what window trim is, but also understand other more important nuances this matter.
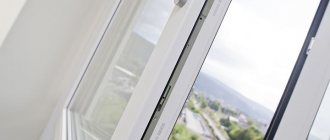
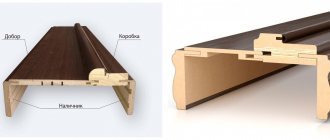
External strips for plastic windows
They can be mounted externally or internally. The location depends on the material used in production. Construction stores have products with different decorative options for additional elements, which allows you to emphasize the beauty of the installed system indoors.
The vestibules are made from the following materials:
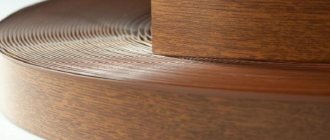
- Wood . Flat strips, corners, triangles reach a thickness of 3 mm. The false strips are painted in the desired shades, varnished, laminated, and coated with polymers. They are most often used for external cladding of Euro-windows. The raw materials used are pine, wenge, mahogany, beech, oak and other materials. Among the advantages of wooden slots, it is worth highlighting environmental friendliness, safety, and aesthetics. The downside is poor resistance to high humidity and temperature changes.
- Plastic. Universal strips are suitable for sealing joints from the outside and inside. They also have the most luxurious shade palette. The advantages include low cost, compatibility with different styles, wall finishing materials, resistance to humidity and frost. Among the disadvantages, users note the delamination of models and the appearance of yellowness in the sun.
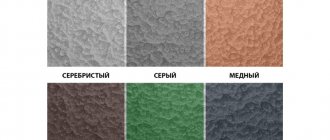
- Metal. The raw materials are aluminum alloys, galvanized steel, and polymer-coated tin sheets. Modifications of various thicknesses (from 0.5 to 2 mm) are known for long periods of use, resistance to bad weather, sudden temperature changes, and UV rays. The products are presented in a wide shade palette, which allows you to find matching color models for facades and interior walls.
Metal flashing
Plastic skirting boards are divided into rigid and flexible. The first are represented by slats with a width of 2 to 10 cm. The length of the slits reaches 6 meters. Flexible tapes visually resemble rolls of double-sided tape. The width of the rebates is 2-7 cm. The length of one roll can reach 50 meters.
Cost of the part in the Russian Federation
Flashings are supplied complete with PVC windows when placing a combined order. In such situations, as a rule, these decorative elements are included in the price of the overall set.
If it is necessary to place a separate order, the cost of flashings is the following amounts, based on 1 m. p. of the finished element, with an average part width of 100 - 150 mm :
"Centuries". Galvanized - from 350 rubles, wooden - from 250 rubles, plastic - from 180 rubles.- "Rehau". Galvanized - from 420 rubles, wooden - from 280 rubles, plastic - from 200 rubles.
- "KVE". Galvanized - from 300 rubles, wooden - from 200 rubles, plastic - from 150 rubles.
- "Mont Blanc". Galvanized - from 400 rubles, wooden - from 300 rubles, plastic - from 250 rubles.
- "Proplex". Galvanized - from 500 rubles, wooden - from 320 rubles, plastic - from 220 rubles.
- Flexible strips - from 1800 to 2500 rubles. for 50 lm, with a width of 50 mm, from 1500 to 1700 rubles. for 50 lm with a width of 30 mm.
Prices are presented by manufacturers, based on the production of a standard product according to standard drawings.
How to choose sash strips for plastic windows
Despite the model range, it is difficult to achieve an ideal combination of the design of the connecting and finishing material with the entire window system. In order not to make a mistake with your choice, you should adhere to a number of rules. Only then will it be possible to achieve a harmonious combination of tightness, decorativeness, and security.
When buying vestibules, it is recommended to build on the following criteria:
- Match the tone of the slit to the color of the frame, façade, and wall decoration. Then there will be no “traffic light” effect or general visual dissonance with the exterior. Facades and interior decoration should be in harmony with additional fittings.
- Correct texture of the material. If classic, white, plastic windows are installed, then wooden frames will look out of place. It is better to install them on blocks made of wood or plastic with the texture of natural wood.
- The width of the joining seam between the frame and the opening. It is necessary to correctly calculate this parameter so that the plank completely covers the gap and slightly overlaps the facade wall.
When buying false panels, give preference to well-known brands. Platbands are a priori inexpensive. Therefore, even branded products will not cut the homeowner’s budget. The somewhat inflated price will be compensated by the durability of the components. The most wear-resistant accessories for sealing seams are made by manufacturers of window profiles - Veka, KBE, Mont Blanc, etc.
Possible difficulties and errors
When installing strips on plastic windows, beginners often make a number of mistakes :
Selecting flashings with dimensions that are too small and do not completely cover the installation seams.- Cutting an element using a low-quality tool, which creates local deformations, burrs and an uneven edge that requires rework.
- Incorrect joining of two elements after cutting at 45 degrees.
- Incorrect choice of material fastening element.
- Tightening the screw too tightly causes local damage to the surface of plastic, wood, or crushing of metal.
- Large amounts of glue or sealant cause the plastic to swell.
To avoid mistakes, beginners should familiarize themselves with detailed master classes from professionals who often publish their video tutorials on online forms.
Self-installation or professional installation: what to choose
Many companies engaged in the manufacture and installation of turnkey windows perform turnkey installation work. This takes into account a full range of installation and finishing services, including specialists who offer to install slopes, window sills, flashings, and flashings.
Homeowners can carry out high-quality finishing themselves. This will help save your budget. The process does not take weeks or a lot of effort. The shutter strips are available in two mounting options.
The first is the presence of a self-adhesive composition. In this case, you need to tear off the protective film hiding the adhesive base. Afterwards, the gap is installed at the joint. The second is without a sticky layer. In this case, the rebates need to be secured using assembly glue, liquid nails or self-tapping screws (which cannot be done if small-width wooden rebates are used).
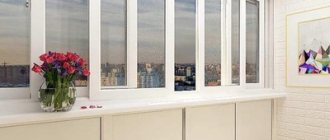
Where else are they installed?
Despite the fact that flashings are created for windows, they are sometimes used for other purposes. Elements, especially self-adhesive ones, are used to seal seams both indoors and outdoors. Many designers use it to create a single design solution.
Sources
- https://stroypomochnik.ru/nashhelnik-dlya-plastikovyh-okon-01/
- https://www.oknatrade.ru/help/nashchelniki-dlya-okon-aktualnost-ispolzovaniya/
- https://7lestnic.com/okna/nashchelniki-na-okna-pvh.html
- https://otkroyokno.ru/%D0%BD%D0%B0%D1%89%D0%B5%D0%BB%D1%8C%D0%BD%D0%B8%D0%BA%D0%B8-% D0%BD%D0%B0-%D0%BF%D0%BB%D0%B0%D1%81%D1%82%D0%B8%D0%BA%D0%BE%D0%B2%D1%8B%D0 %B5-%D0%BE%D0%BA%D0%BD%D0%B0.html
- https://oknologiya.ru/naschelniki-na-okna-pvh/
- https://balkon4life.ru/osteklenie/furnitura/nashhelniki-dlya-okon/.html
- https://1prookna.ru/ustanovka/vidy-nashhelnikov-dlya-okon
- https://oknanagoda.com/okna/plastik/uteplenie/nashhelniki-dlya-plastikovykh-okon-prei.html
- https://dommdom.ru/nashhelniki-na-plastikovye-okna.html
Preparation of surfaces and tools
Before installing the strips with your own hands, you need to prepare all the necessary tools. For installation work you will need:
- construction tape;
- a simple pencil;
- miter box, cutting off the joints;
- tools for cutting.
The latter is an electric jigsaw, grinder, metal file, construction knife. The choice depends on the material used to manufacture the slotted saw. You also need to take care of the availability of fasteners and other consumables. At home, you will need a tube of liquid nails, special glue, a gun for mounting building materials, a screwdriver, and self-tapping screws.
Once the set of equipment and materials are collected, you can begin to clean the surfaces from dirt. It is necessary to wash the frame and slopes from dust, dirt, and foam residues.
Video
The video shows the installation of end strips:
Using these rules, you can get the expected result from the strips and the entire facade as a whole. Installing flashings does not have any particular installation difficulties, but it is important to follow all the steps to prevent water or wind from getting inside the joints of the panels.
The service life of such panels depends on the quality of the work performed, because the flashing is protection not only for the walls of the house, but also for the structure of the sandwich panel.
Maybe
Installation procedure for polymer products
If the shutter strips for plastic windows are made of polymers, assembly adhesive is used for installation. On the Internet you can find several finishing options with photos, videos, and step-by-step instructions. The fastening is represented by self-adhesive strips. They are applied to the additional element by the manufacturer.
The process begins with measuring the required length of the vestibule. All connecting points are cut with a miter box at an angle of 45 degrees. When using flat planks, they can be positioned at right angles. But the first option looks more aesthetically pleasing. After trimming, the protective film is removed, which covers the adhesive base.
If elastic, flexible, polymer strips are purchased, the protective layer is removed gradually. It is recommended to glue the strips slowly, gluing the freed surface. The joints are smoothed by hand and pressed tightly against the window block.
If hard PVC analogues are used, the protective coating is completely removed. The cover is carefully installed on the frame. The unsightly junction of the window with the slopes is covered with a panel that fits tightly to the installation site. In the case of purchasing rebates without a self-adhesive layer, installation is carried out using liquid nails. Special glue is applied in a thin strip along the perimeter of the inside of the decorative element. The remaining adhesive that has come out is removed with a piece of dry cloth or a sponge.
It is important to observe the temperature regime during installation of plastic panels. The temperature indoors and outdoors should not be lower than +5°C.
How to remove marks
Cover strips sometimes need to be replaced. If the structure is screwed on with screws, then there will be no difficulties. It is enough to dismantle the fastenings and remove the rail. Problems arise when working with plastic models with an adhesive base. A sticky layer remains on all surfaces with which the part comes into contact. The substance not only looks messy, but will also make it difficult to glue a new piece.
If there is not enough fixing composition, then a stationery eraser is used to remove it. The elastic band is pressed tightly against the PVC, then zigzag movements are made sharply. The method is very slow and labor-intensive, suitable for compact areas.
Stationery eraser Source bumopt.com.ua
If after removing the strips from the plastic window there are many defects left, then use vegetable oil. The tarnishing compound is made from acrylic. Upon contact with fat, the substance changes characteristics, losing its adhesiveness. The surfaces are generously treated, left for 2 hours, then the residue is removed with a paper napkin and washed thoroughly.
For plastic windows made of high-quality PVC, traces from the flashings are removed with white spirit. A cloth is soaked in the liquid, then the problem area is carefully treated. After a couple of minutes, the fixing mass will soften.
Technology of installation of metal accessories
Metal vestibules are made without pre-applied adhesive. Metal products are quite heavy, so installation is carried out using self-tapping screws. In this case, you need to take care of the reliability of fixation of the slit. The optimal distance between fasteners is no more than 30 centimeters.
Sometimes exposed steel panels are glued to the frame using mounting adhesive. It is recommended to work with such materials only at positive air temperatures. Reliable sealing is ensured by overlapping planks. The joints are treated with sealants with increased moisture resistance.
Wood plank installation process
If you purchased platbands made of solid wood, you will have to work hard during installation work. A preview of the photo with step-by-step installation instructions will help speed up the process. Additional finishing elements are fixed using self-tapping screws or mounting adhesive.
Conventionally, all installation work is divided into four stages:
- Applying markings on the miter box in the area of the edges.
- Cutting at a 45 degree angle.
- Cleaning surfaces from dirt and excess foam.
- Applying adhesive to the inner surface of the panel.
It is imperative to maintain the cutting angle, otherwise the decorative effect of the corner areas may suffer. It is better to use self-tapping screws when installing wide slats. Otherwise, the fasteners may lead to cracking of the wood. Using an electric drill, which is equipped with small-diameter drills, will help avoid this.